// File: about/README # Introducing Gnosis Chain Gnosis Chain is a community-owned EVM-based network operated by a diverse set of validators around the world. It is one of Ethereum’s first sidechains focused on resilience and credible neutrality as its core values. Currently, there are over 200,000 validators who secure the network. Gnosis Chain uses DAO governance mechanism to ensure anyone can participate in the decision-making processes regarding the development and future of the network. Creating dApps and integrating with Gnosis Chain products is similar to any other EVM-based blockchain. You can find more details in the [protocol specification](/about/specs). # Fees Each transaction on the Gnosis Chain (sending tokens, interacting with smart contracts, etc.) is associated with the fee in xDai stablecoin. - It is one of the main differences from other EVM chains where users pay in a native token of that network. - This approach reduces the volatility risks and simplifies the development experience. Also, transaction fees are not split among pool participants of the validation process. They are received only by the validator who sealed the block. Note, this is subject to change. As the network grows, the fees may be redirected to support additional aspects of the protocol. --- // File: about/third-parties ### On-ramps - [Monerium](https://monerium.com/) - [Mt Pelerin](https://www.mtpelerin.com/) - [Ramp](https://ramp.network/) - [AscendEX](https://ascendex.com/en) --- // File: about/uRamp import ReactPlayer from 'react-player' ## What is uRamp ? uRamp offers seamless on and off ramp to users by allowing them to on ramp to ERC20 tokens across EVM chains by sending EUR to their Monerium IBAN. Similarly, it allows users to off ramp from ERC20 tokens from EVM chains to EUR in their bank account. The existing user experience in Web3 for on and off ramping between fiat and on chain assets is very clunky and requires users to go through many steps and incur heavy fees with no certainty of when they will receive their fiat in bank account and vice versa. uRamp is been built to provide an easy to use product allowing people to on and offramp between their IBANs and wallets seamlessly by integrating both Monerium and Li.Fi and leveraging their powers of collateralised stablecoin offering, native IBANs, low fees model and cross chain bridging and swapping. uRamp is supposed to be a simple representation of possibilities of Gnosis Chain when combined with Monerium and Li.Fi . ## How to use uRamp ? To use uRamp a user needs to have a wallet and a Monerium account (IBAN linked to Gnosis Chain). uRamp takes the user through a Monerium onboarding flow in case the user does not have an existing Monerium account. Once connected with both the services the user can choose between Bank to Crypto (On Ramp) or Crypto to Bank (Off Ramp). Go to https://uramp.gnosis.io/login and follow the steps mentioned or you can follow the video tutorial. ## Crypto to Bank: 1. Selects a token from the drop down box listing the available tokens in the wallet 2. Specify the amount of token to be off ramped into EUR 3. Specify the bank details including Name, IBAN, BIC and Note (optional) 4. Verify the quote and sign a transaction to execute the transfer 5. Example: ETH on mainnet to EUR 1. ETH is swapped for USDC on mainnet by Li.Fi 2. USDC on mainnet is bridged to USDC on Gnosis Chain by Li.Fi 3. USDC on Gnosis Chain is swapped to EURe on Gnosis Chain by Li.Fi 4. EURe on Gnosis Chain is burnt by Monerium 5. EUR is deposited in specified IBAN by Monerium ## Bank to Crypto: 1. Select the ERC20 token the user wishes to on ramp to 2. Specify the amount of EUR to be exchanged or ERC20 token required 3. Verify the quote and EUR required for the whole process to function 4. Start the process 5. Send EUR to Monerium IBAN 6. Execute the on chain transaction 7. Example: EUR to ETH on mainnet 1. Send EUR to Monerium IBAN 2. Monerium mints EURe to the user wallet on Gnosis Chain 3. uRamp prompts user to sign Li.Fi transaction (if quote is still valid and balance has increased) 4. EURe on Gnosis Chain is swapped to USDC on Gnosis Chain by Li.Fi 5. USDC on Gnosis Chain is bridged to USDC on mainnet by Li.Fi 6. USDC is swapped for ETH on mainnet by Li.Fi --- // File: about/communication ## News - [Twitter](https://twitter.com/gnosischain) - [YouTube](https://www.youtube.com/GnosisChain) - [Email newsletter](https://gnosis.ghost.io/) - [Validator Newsletter](https://gnosisvalidator.substack.com/) ## Community - [Discord](https://discord.gg/gnosischain) - [Farcaster](https://warpcast.com/gnosischain) - [Telegram - Unofficial](https://t.me/gnosischain) - [GitHub](https://github.com/gnosischain) - [Governance Forum](https://forum.gnosis.io/) - [Governance Summary Docs](https://gnosisdao.ghost.io/) ## Support - [Discord](https://discord.gg/gnosis) - [Validator Resources & Feedback Form](https://tally.so/r/3y4V1W) - General Inquiries: [community@gnosis.io](mailto:community@gnosis.io) ## Events and Press - [Gnosis Chain Media Kit](https://github.com/gnosischain/media-kit) ## Careers - [Gnosis Chain Careers](https://www.gnosis.io/careers) --- // File: about/networks/README # Networks ## Networks summary | Network Name | [Gnosis (mainnet)](./mainnet.md) | [Chiado (testnet)](./chiado.md) | | ------------------ | -------------------------------- | ------------------------------------ | | Native (fee) token | xDAI | Chiado xDAI | | Chain ID | 100 | 10200 | | EL RPC | https://rpc.gnosischain.com | https://rpc.chiadochain.net | | EL Explorer | https://gnosisscan.io | https://blockscout.com/gnosis/chiado | | CL Explorer | https://gnosischa.in/ | https://beacon.chiadochain.net | | Fork monitor | https://forkmon.gnosischain.com | https://forkmon.chiadochain.net | | EthStats | https://ethstats.gnosischain.com | https://ethstats.chiadochain.net | | Faucet | https://faucet.gnosischain.com/ | https://faucet.chiadochain.net/ | --- // File: about/networks/chiado # Chiado (Testnet) [Add to MetaMask](https://shanejonas.github.io/metamask-link/deep?method=wallet_addEthereumChain¶ms[0][chainId]=0x27D8¶ms[0][chainName]=Chiado¶ms[0][rpcUrls][0]=https://rpc.chiadochain.net¶ms[0][nativeCurrency][name]=Chiado%20xDAI¶ms[0][nativeCurrency][symbol]=XDAI¶ms[0][nativeCurrency][decimals]=18¶ms[0][blockExplorerUrls][0]=https://blockscout.com/gnosis/chiado) ![Chiado Train Station](../../../static/img/about/chiado.jpg) Image: Trams in Lisbon (credit: [Lisa Fotios](https://www.pexels.com/photo/people-at-city-1534560/)) ## Overview ### Purpose - Chiado is a Gnosis testnet that was launched in October 2022 - Chiado's primary purpose is to be a long-lived testnet with tooling for developers - Chiado's secondary purpose was to test "The Merge", Gnosis' transition from [Proof-of-Authority](../../about/specs/consensus/aura.md) to the [Beacon Chain](../../about/specs/gbc/README.md). - Chiado is named after the [Chiado metro station]() in Lisbon, Portugal. ### Validators - Chiado is optimized for testnet stability for developers, and has a semi-permissioned validator set similar to Ethereum's [Sepolia testnet](https://blog.ethereum.org/2022/06/30/sepolia-merge-announcement) - Chiado is not intended for broad public validator participation, as frequent cycling of validators affect Testnet stability and make it unreliable for developers (e.g. Ethereum's Prater testnet) - Chiado validators are run by core contributor teams at [Nethermind](https://nethermind.io/), [Gateway](https://gateway.fm/) and [Gnosis](https://gnosis.io/) (and possibly more in the future) - 6,000 validator keys were defined in the genesis of Chiado Beacon Chain for Gateway, Nethermind and Gnosis to run as validators ### Public Participation - Community members can still run a full node and go through the Chiado merge as it happens - 1,000 Testnet GNO on Chiado may be available in the future for community public validator participation - Community participation will be limited to 14% of the Chiado Network to ensure network stability - 1 Testnet GNO is required to run a validator, similar to Gnosis mainnet - Requests for Chiado participation keys can be made in the #chiado-testnet channel in Discord ### How to Participate - [Running a Chiado node](https://docs.sedge.nethermind.io/docs/networks/chiado) with [Nethermind Sedge](https://docs.sedge.nethermind.io/) - (Here by Dragons): If you can get your hands on Testnet GNO on Chiado, you will need to interact with the [deposit contract](https://blockscout.com/gnosis/chiado/address/0xc5be8bf53755a41c2385e7aa86f6a9e28746f466) programmatically, or deploy your own [Deposit UI](/node/manual/validator/deposit#depositing-for-chiado-testnet) with the updated config files ## Summary ### Key Infra | Network Name | Chiado | | ----------------------------- | ------------------------------------- | | Native (fee) token | Testnet xDai on Chiado | | Staking token | Testnet GNO on Chiado | | Chain ID | 10200 | | Execution Layer RPC (archive) | https://rpc.chiado.gnosis.gateway.fm | | Execution Layer RPC | https://rpc.chiadochain.net | | Execution Layer RPC (WS) | wss://rpc.chiadochain.net/wss | | Execution Layer Explorer | https://gnosis-chiado.blockscout.com/ | | Consensus Layer Explorer | https://beacon.chiadochain.net | | Beacon Checkpoint Sync | https://checkpoint.chiadochain.net | | Fork monitor | https://forkmon.chiadochain.net | | EthStats | https://ethstats.chiadochain.net | | Faucet | https://faucet.chiadochain.net/ | ### Key Parameters | Param | Value | | ----------------- | ----------------------- | | Slot Time | 5s | | Epoch | 16 slots | | Finalization Time | 2.7 min | | Staking Deposit | 1 Testnet GNO on Chiado | ## Native Tokens ### Fee Token - Name: Testnet xDai on Chiado - Type: Native Asset You can find a list of contract addresses for Chiado tokens in the [Useful Addresses](/developers/UsefulContracts) page. ## Network Config ### Config Repo Gnosis maintains a [Configs Repo](https://github.com/gnosischain/configs/) that is the canonical source for Gnosis Chain networks. ### Consensus Layer - [config.yaml](https://github.com/gnosischain/configs/blob/main/chiado/config.yaml) - [genesis.ssz](https://github.com/gnosischain/configs/blob/main/chiado/genesis.ssz) - [GnosisDAO's Recommended Bootnodes](https://github.com/gnosischain/configs/blob/main/chiado/bootnodes.yaml) ### Execution Layer - [genesis.json](https://github.com/gnosischain/configs/blob/main/chiado/genesis.json) - [nethermind.cfg](https://github.com/gnosischain/configs/blob/main/chiado/nethermind.cfg) - [GnosisDAO's Recommended Bootnodes](https://github.com/gnosischain/configs/blob/main/chiado/bootnodes_execution.yaml) - [Nethermind's Recommended Bootnodes](https://github.com/NethermindEth/nethermind/blob/master/src/Nethermind/Chains/chiado.json#L85) ### DApps | DApp | | | --------- | --- | | Uniswap | TBD | | Chainlink | TBD | ## Previous Iterations ### Chiado 0.2 Chiado was previously launched with network ID 100100. Soon after launch, the network entered a forked state. The root causes were identified and fixed as part of the Chiado relaunch. ### Appendix [1]: See [Github Issue on Testnet GNO on Chiado Staking Contracts](https://github.com/gnosischain/pm/issues/100) [2]: See [Github Issue on Goerli-Chiado Bridge Deployment](https://github.com/gnosischain/pm/issues/40) --- // File: about/networks/mainnet # Gnosis (Mainnet) [Add to MetaMask](https://shanejonas.github.io/metamask-link/deep?method=wallet_addEthereumChain¶ms[0][chainId]=0x64¶ms[0][chainName]=Gnosis¶ms[0][rpcUrls][0]=https://rpc.gnosischain.com¶ms[0][nativeCurrency][name]=xDAI¶ms[0][nativeCurrency][symbol]=XDAI¶ms[0][nativeCurrency][decimals]=18¶ms[0][blockExplorerUrls][0]=https://gnosisscan.io) ## Summary | Network Name | Gnosis | | ------------------ | ------------------------- | | Native (fee) token | [xDai](/about/tokens/xdai.md) | | Staking token | [GNO](/about/tokens/gno.md) | | Chain ID | 100 | ## Key Infra ### Execution Layer | Execution Layer | | | ------------------------ | ------------------------------------------- | | Execution Layer RPC | https://rpc.gnosis.gateway.fm | | Execution Layer RPC | https://rpc.gnosischain.com | | More RPC endpoints | [RPC Providers](../../tools/RPC%20Providers/README.md) | | Execution Layer Explorer | https://gnosisscan.io | | Execution Layer Explorer | https://blockscout.com/xdai/mainnet | | Fork monitor | https://forkmon.gnosischain.com | | EthStats | https://ethstats.gnosischain.com | | Forked Blocks | https://blockscout.com/xdai/mainnet/reorgs | | Faucet | https://gnosisfaucet.com | ### Consensus Layer | Consensus Layer | | | ------------------------ | ------------------------------------------- | | Consensus Layer RPC | https://rpc-gbc.gnosischain.com | | Beacon Explorer | https://gnosischa.in/ | | Beacon Explorer Backup 1 | https://beacon-v1.gnosischain.com | | Beacon Explorer Backup 2 | https://beacon-v2.gnosischain.com | | Beacon Checkpoint Sync | https://checkpoint.gnosis.gateway.fm | | Beacon Checkpoint Sync | https://checkpoint.gnosischain.com | | Beacon Checkpoint Sync | https://checkpoint-sync-gnosis.dappnode.io/ | ### Other Tools | Other Tools | | | ---------------- | ------------------------------ | | GnosisPools.info | https://gnosispools.info | | D14N Info | https://d14n.info/ | | Bordel | https://bordel.wtf/ | | More tools | [Tools](../../tools/README.md) | ## Key Parameters | Param | Value | | ----------------- | -------- | | Slot Time | 5s | | Epoch | 16 slots | | Finalization Time | 2.7 min | | Staking Deposit | 1 GNO | ## Native Tokens - Fee Token: [xDai](/about/tokens/xdai) - Staking Token: [GNO](/about/tokens/gno) You can find a list of contract addresses for Gnosis Mainnet tokens in the [Useful Addresses](/developers/Usefulcontracts) page. ## Network Config ### Config Repo Gnosis maintains a [Configs Repo](https://github.com/gnosischain/configs/) that is the canonical source for Gnosis Chain networks. - [config.yaml](https://github.com/gnosischain/configs/blob/main/mainnet/config.yaml) - [genesis.json](https://github.com/gnosischain/configs/blob/main/mainnet/genesis.json) - [GnosisDAO's Recommended CL Bootnodes](https://github.com/gnosischain/configs/blob/main/mainnet/bootnodes.yaml) - [GnosisDAO's Recommended EL Bootnodes](https://github.com/gnosischain/configs/blob/main/mainnet/bootnodes_execution.yaml) - [Nethermind's Recommended CL Bootnodes](https://github.com/NethermindEth/ansible-deployments/blob/main/poa_networks/gnosis/inventory/data/bootnodes-beacon.json) - [Nethermind's Recommended EL Bootnodes](https://github.com/NethermindEth/ansible-deployments/blob/main/poa_networks/gnosis/inventory/data/bootnodes-execution.json) ## Key Contracts - [xDai Bridge](../../bridges/About%20Token%20Bridges/xdai-bridge#key-contracts) - [AMB Bridge](../../bridges/About%20Token%20Bridges/amb-bridge#key-contracts) - [OmniBridge](../../bridges/About%20Token%20Bridges/omnibridge#key-contracts) - [Beacon Chain](/about/specs/gbc/README.md) --- // File: about/networks/optimism # Optimism on Gnosis :::danger DEPRECATED Optimism on Gnosis was deprecated on March 2023. We keep this page for reference. Do NOT deposit funds, they will not be withdrawable. ::: An Optimism implementation is deployed on Gnosis. Gnosis functions as the L1 (akin to Ethereum) and Optimism on Gnosis as the L2. Deployment processes are similar to using [Optimism with Ethereum](https://community.optimism.io/) with updated configs to match the Gnosis chain setup. | Parameter | Value | | ------------ | ------------------ | | Network Name | Optimism on Gnosis | | Chain ID | 300 | ## Make a Deposit :::danger DEPRECATED NETWORK! Do NOT deposit funds, they will not be withdrawable. ::: Deposits are initiated through the [Proxy\_\_OVM_L1StandardBridge contract](https://gnosis.blockscout.com/address/0x184a119d4C1D08A459FCfBFe7ECc051c163B4c80/transactions) on the Gnosis Chain with the **`depositETH`** method and the following inputs: - \_l2Gas: **`200000`** - data: **`0x`** - value: **`Deposit value in xDai (ie. 0.1 = 0.1 xDai)`** :::info Some smart contract wallets are blocked from calling the `depositETH (and depositERC20) methods`. If you want to deposit using a smart contract wallet you can use the `depositETHTo function instead.` :::
Example using BlockScout 1. Go to [https://gnosis.blockscout.com/address/0x184a119d4C1D08A459FCfBFe7ECc051c163B4c80/write-proxy](https://gnosis.blockscout.com/address/0x184a119d4C1D08A459FCfBFe7ECc051c163B4c80/write-proxy) 2. Connect a web3 wallet like MetaMask that contains some xDai for funding and gas fees. ![](/img/about/optimism/connect-wallet.png) 3. Scroll down to the **`depositETH`** method and enter the following: - \_l2Gas: **`200000`** - \_data: **`0x`** - value: **`Deposit value in xDai`** - Click **Write** and complete the transaction with your wallet. ![](/img/about/optimism/method.png)
:::info It may take several minutes for the deposit to be processed and the balance to update on the Optimism on GC Chain. ::: ## L1 Contract Addresses Additional Info related to specific contracts is [available here](https://github.com/ethereum-optimism/optimism/tree/56961f9208af8a43a25a138cce21ef488c418141/packages/contracts/docs). | Contract | Address | | ----------------------------------- | ------------------------------------------------------------------------------------------------------------------------------------------- | | BondManager | [0x730fE4431a00286Ff8dc7E9B03c661E63Ef05121](https://gnosis.blockscout.com/address/0x730fE4431a00286Ff8dc7E9B03c661E63Ef05121/transactions) | | CanonicalTransactionChain | [0x636434F59e52D50423bD8272FEB3B2bff5dF586b](https://gnosis.blockscout.com/address/0x636434F59e52D50423bD8272FEB3B2bff5dF586b/transactions) | | ChainStorageContainer-CTC-batches | [0xEc64fee4f95E48A3BAd799A5912F183d222086A8](https://gnosis.blockscout.com/address/0xEc64fee4f95E48A3BAd799A5912F183d222086A8/transactions) | | ChainStorageContainer-SCC-batches | [0x26EbaD990cC56ef36166d1C4114CEF25F024b75D](https://gnosis.blockscout.com/address/0x26EbaD990cC56ef36166d1C4114CEF25F024b75D/transactions) | | ChugSplashDictator | [0x77fAf5Aa4EB7874a676F773fc308e0FD8e9400f7](https://gnosis.blockscout.com/address/0x77fAf5Aa4EB7874a676F773fc308e0FD8e9400f7/transactions) | | ERC1820Registry | [x1820a4B7618BdE71Dce8cdc73aAB6C95905faD24](https://gnosis.blockscout.com/address/0x1820a4B7618BdE71Dce8cdc73aAB6C95905faD24/transactions) | | L1StandardBridge | [0x3804bA4ecC886AAe91A6D57dE880616E17C8269C](https://gnosis.blockscout.com/address/0x3804bA4ecC886AAe91A6D57dE880616E17C8269C/transactions) | | OVM_L1CrossDomainMessenger | [0x6A52b1dbE0293F1ba1bc136b0f8C8f0395F940b9](https://gnosis.blockscout.com/address/0x6A52b1dbE0293F1ba1bc136b0f8C8f0395F940b9/transactions) | | OVM_Proposer | [0xE57cfefE4B7EddE88af28d4ffB3BD63b272f578A](https://gnosis.blockscout.com/address/0xE57cfefE4B7EddE88af28d4ffB3BD63b272f578A/transactions) | | OVM_Sequencer | [0xFDCa025dB7368A84deeCc0d82598eB90638D52DF](https://gnosis.blockscout.com/address/0xFDCa025dB7368A84deeCc0d82598eB90638D52DF/transactions) | | Proxy\_\_OVM_L1CrossDomainMessenger | [0x4324fdD26161457f4BCc1ABDA87709d3Be8Fd10E](https://gnosis.blockscout.com/address/0x4324fdD26161457f4BCc1ABDA87709d3Be8Fd10E/transactions) | | Proxy\_\_OVM_L1StandardBridge | [0x184a119d4C1D08A459FCfBFe7ECc051c163B4c80](https://gnosis.blockscout.com/address/0x184a119d4C1D08A459FCfBFe7ECc051c163B4c80/transactions) | | StateCommitmentChain | [0xbAE5EA90F4A1dFBC1b0D145453f371E06287a6D8](https://gnosis.blockscout.com/address/0xbAE5EA90F4A1dFBC1b0D145453f371E06287a6D8/transactions) | ## L2 Contract Addresses - Optimism L2 contracts can be explored at [https://blockscout.com/xdai/optimism](https://blockscout.com/xdai/optimism) - Additional Info related to specific contracts is [available here](https://github.com/ethereum-optimism/optimism/tree/56961f9208af8a43a25a138cce21ef488c418141/packages/contracts/docs). - Summaries for [relevant predeploys here](https://github.com/ethereum-optimism/optimism/blob/8d67991aba584c1703692ea46273ea8a1ef45f56/specs/protocol/components/predeploys.md). | Contract | Address | | --------------------------- | ------------------------------------------ | | OVM_L2ToL1MessagePasser | 0x4200000000000000000000000000000000000000 | | OVM_L1MessageSender | 0x4200000000000000000000000000000000000001 | | OVM_DeployerWhitelist | 0x4200000000000000000000000000000000000002 | | OVM_ECDSAContractAccount | 0x4200000000000000000000000000000000000003 | | OVM_SequencerEntrypoint | 0x4200000000000000000000000000000000000005 | | OVM_ETH | 0x4200000000000000000000000000000000000006 | | OVM_L2CrossDomainMessenger | 0x4200000000000000000000000000000000000007 | | Lib_AddressManager | 0x4200000000000000000000000000000000000008 | | OVM_ProxyEOA | 0x4200000000000000000000000000000000000009 | | OVM_L2StandardBridge | 0x4200000000000000000000000000000000000010 | | OVM_SequencerFeeVault | 0x4200000000000000000000000000000000000011 | | OVM_ExecutionManagerWrapper | 0x420000000000000000000000000000000000000B | | OVM_GasPriceOracle | 0x420000000000000000000000000000000000000F | ## Graph Protocol When starting the graph-node the network key is: **`optimism`** - Graph [https://graph-optimism.gnosischain.com/](https://graph-optimism.gnosischain.com/) - Admin [https://admin-graph-optimism.gnosischain.com/](https://admin-graph-optimism.gnosischain.com/) --- // File: about/specs/README # Gnosis Specifications ## General Information | Property | | | - | - | | Block Size | 30M gas units | | Block Speed | 5 seconds | | Gas price | check [gas price oracle](/tools/oracles/gas-price) | | Patchset | Cancun | | Fee Token | [xDai](/concepts/tokens/xdai) | | Consensus Token | [GNO](/concepts/tokens/gno) | | Chain ID (Gnosis) | 100 (hexa 0x64) | | Chain ID (Chiado Testnet) | 10200 (hexa 0x27D8) | - Chain spec files: [https://github.com/gnosischain/configs/blob/main/mainnet/config.yaml](https://github.com/gnosischain/configs/blob/main/mainnet/config.yaml) - Bootnodes: [https://github.com/gnosischain/configs/blob/main/mainnet/bootnodes.yaml](https://github.com/gnosischain/configs/blob/main/mainnet/bootnodes.yaml) --- // File: about/specs/bug-bounty # Bug Bounty ## Immunefi Bug Bounty Bounties are an important tool for testing and enhancing application and contract security. We appreciate the skilled hackers and programmers within the community and believe in rewarding those working to protect and strengthen the ecosystem. Working in partnership with [Immunefi](https://immunefi.com/), we will be releasing additional bounties in the near future, and invite the community to help identify any possible exploits we may have missed. Security is the #1 priority of the Gnosis team. This bounty program is not being enacted in response to any known exploits, we are proactively implementing to ensure safety and soundness of our applications and protect users and their funds. There is one ongoing bug bounty program: [Bridges bug bounty](https://immunefi.com/bounty/gnosischain/). Each bug bounty program requires different assets in scope and both offer rewards determined by thread level. ## Bridge(Omnibridge, xDAI Bridge) Bounty ### Asset in scope All smart contract bug from Gnosis Chain Bridges includes ETH-xDAI Omnibridge, xDAI bridge, BSC-xDAI Omnibridge. | Type | Target | | ------------------------------------------------------------------------ | -------------------------------------------------------------------------------- | | Smart Contract - DAI-xDAI TokenBridge contract on the Ethereum Mainnet | https://etherscan.io/address/0x4aa42145Aa6Ebf72e164C9bBC74fbD3788045016 | | Smart Contract - DAI-xDAI OmniBridge contract on the Gnosis chain | https://gnosis.blockscout.com/address/0x7301CFA0e1756B71869E93d4e4Dca5c7d0eb0AA6 | | Smart Contract - ETH-xDAI OmniBridge contract on the Ethereum Mainnet | https://etherscan.io/address/0x88ad09518695c6c3712AC10a214bE5109a655671 | | Smart Contract - ETH-xDAI OmniBridge contract on the Gnosis chain | https://gnosis.blockscout.com/address/0xf6A78083ca3e2a662D6dd1703c939c8aCE2e268d | | Smart Contract - BSC-xDAI OmniBridge contract on the Binance Smart Chain | https://bscscan.com/address/0xf0b456250dc9990662a6f25808cc74a6d1131ea9 | | Smart Contract - BSC-xDAI OmniBridge contract on the Gnosis chain | https://gnosis.blockscout.com/address/0x59447362798334d3485c64D1e4870Fde2DDC0d75 | | | | ### Reward by Thread level The quantity of rewards awarded are based on the [Immunefi Vulnerability Severity Classification System V2.2](https://immunefi.com/immunefi-vulnerability-severity-classification-system-v2-2). All smart contract bug reports must come with a PoC with an end-effect impacting an asset-in-scope in order to be considered for a reward. Only the following smart contract impacts are accepted within this bug bounty program: | Smart Contract Impact | Reward | | --------------------- | ------------------- | | Critical\* | Up to USD 2,000,000 | | High | USD $10,000 | | Medium | USD $1,000 | \*All Critical smart contract vulnerabilities are further capped at 10% of economic damage, primarily taking into consideration the funds at risk. However, there is a minimum reward of **USD 50 000**. Payouts are handled by the Gnosis Chain team directly and are denominated in USD. However, payouts are done in USDT for payments up to USD 100 000. All remaining rewards are paid in STAKE. ### Out of scope & Rules **The following vulnerabilities are excluded from the rewards for this bug bounty program:** - Attacks that the reporter has already exploited themselves, leading to damage - Attacks requiring access to leaked keys/credentials - Attacks requiring access to privileged addresses (governance, strategist) - Incorrect data supplied by third party oracles - Not to exclude oracle manipulation/flash loan attacks - Basic economic governance attacks (e.g. 51% attack) - Lack of liquidity - Best practice critiques - Sybil attacks **The following activities are prohibited by bug bounty program:** - Any testing with mainnet or public testnet contracts; all testing should be done on private testnets - Any testing with pricing oracles or third party smart contracts - Attempting phishing or other social engineering attacks against our employees and/or customers - Any testing with third party systems and applications (e.g. browser extensions) as well as websites (e.g. SSO providers, advertising networks) - Any denial of service attacks - Automated testing of services that generates significant amounts of traffic - Public disclosure of an unpatched vulnerability in an embargoed bounty Please visit [Immunefi bounty page](https://immunefi.com/bounty/gnosischain/) for more details. More info -> [https://medium.com/immunefi/xdai-stake-hosts-2-000-000-bug-bounty-on-immunefi-3760e0687616](https://medium.com/immunefi/xdai-stake-hosts-2-000-000-bug-bounty-on-immunefi-3760e0687616) ## What’s next? - [Submit a bug](https://bugs.immunefi.com/) - Any questions about the program? Reach out to us in our [Discord](https://discord.gg/gnosis) channel! ## FAQ 1. Is the bug bounty program time limited? No. 2. How to submit a bug on Immunefi? https://medium.com/immunefi/a-hackers-guide-to-submitting-bugs-on-immunefi-1e6b7ada71a9 --- // File: about/specs/consensus/README # The Merge Gnosis, as a closely-related fork of Ethereum, underwent a “Merge” hardfork similar to that of Ethereum. The hardfork replaced Gnosis’ former “proof-of-authority” consensus with the “proof-of-stake” system as it merged with the Gnosis Beacon Chain. This hardfork is a critical one for Gnosis in its move towards parity with Ethereum, crucial for Gnosis’ future roadmap as an experimental playground for Ethereum features. This change is also significant as Gnosis now is similar to Ethereum in being fully permissionless now, with the deprecation of previous “proof-of-authority” features. You can read more on the Ethereum merge here: [https://ethereum.org/en/upgrades/merge/](https://ethereum.org/en/upgrades/merge/). ## **How will this affect me? ** ### Users You do not need to do anything. Your funds remain as-is during the transition. There were NOT any new token issued before, during or after the Merge. The [$GNO token](/concepts/tokens/gno) continues to be used for staking, while the [$xDai token](/concepts/tokens/xdai) is used as the native gas token. :::danger scammer alert Please be vigilant of scammers who may use this occasion to launch scam tokens, or phish for seed phrases. ::: ### Developers Gnosis' “Merge” is near 1:1 to the Ethereum Merge in its impact on developers. For a full understanding of the changes, please read “[How The Merge Impacts Ethereum’s Application Layer](https://blog.ethereum.org/2021/11/29/how-the-merge-impacts-app-layer/)”. At a high level, the Merge resulted in the following changes: * `BLOCKHASH` opcode is mostly deprecated * `DIFFICULTY` opcode returns output of randomness beacon * Block structure contains more proof-of-stake fields, zeros out proof-of-work fields * Block time is reduced to ~5s from ~6s * Block finalization is tracked via `safe head` and `finalized` blocks. #### Deprecation of AuRa RANDAO The Merge result in the deprecation of the legacy AuRa RANDAO random number generator, as part of the larger deprecation of AuRa consensus. In its place, developers are advised to move to the Beacon Chain’s Randomness, which implements EIP-4399. Please note that this randomness is still biasable, and take precautions. [EIP-4399](https://eips.ethereum.org/EIPS/eip-4399) explains the process for developers to switch over to the new Beacon Chain Randomness, which can be accessed via the `DIFFICULTY` opcode. Additionally, changes proposed by this EIP allow for smart contracts to determine whether the upgrade to the PoS has already happened. This can be done by analyzing the return value of the DIFFICULTY opcode. A value greater than 2**64 indicates that the transaction is being executed in the PoS block. ### Node runners You must **run a consensus client** alongside your existing execution client. Not doing so will cause your node to fork and not follow the right chain. Node operators can also check out the [Merge Readiness Checklist](https://launchpad.ethereum.org/en/merge-readiness/) on the Staking Launchpad for more information, as many of the details apply to all node operators. ### Stakers You must **run an execution client** alongside your existing consensus client. Not doing so will cause your node to fork and not follow the right chain. You must set a fee recipient address to receive your earned transaction fee tips/MEV. Stakers are encouraged to follow the [Merge Readiness Checklist](https://launchpad.ethereum.org/en/merge-readiness/) from the Staking Launchpad to ensure readiness for The Merge. ## More info - [Testnet Deployments](https://github.com/gnosischain/consensus-deployment-ansible#readme) - [Chiado Testnet](/concepts/networks/chiado) ## Pre-merge consensus articles - [POSDAO](/concepts/specs/consensus/posdao) - [AURA](/concepts/specs/consensus/aura) --- // File: about/specs/consensus/aura # AuRa with POSDAO Consensus :::caution The merge Gnosis transitioned to PoS using the [GNO Token](/concepts/tokens/gno), this page defines the pre-merge consensus model. Learn more [about The Merge](https://ethereum.org/en/upgrades/merge/). ::: Consensus refers to the agreement process between nodes in a network. The nodes must agree on which transactions to include in the next block on the chain before these transactions are committed. There are 2 aspects to the process - the actual consensus mechanism to add transactions to blocks, and sybil protection, which prevents malicious actors. Gnosis currently uses Parity's AuRa (Authority Round) proof-of-authority consensus model to append blocks to Gnosis. In this model, selected validators ([selected through the POSDAO dPOS process](/concepts/specs/consensus/posdao)) take turns signing blocks. A signed block is broadcast to all validators, and if the majority agree it is valid, it is added to the chain. A new block is added every 5 seconds, regardless of whether any transactions occurred during that time. _Note: POSDAO offers a pluggable consensus feature, so different or additional consensus processes may be added in the future._ Gnosis uses delegated Proof of Stake to provide sybil protection. Validators and delegators must add GNO to the protocol. If the nodes participate as expected, they receive additional GNO rewards. If they engage in malicious behavior (like not revealing random numbers) the validator is banned and their GNO (and delegators GNO) is frozen. These behavioral rewards act as incentives to promote an honest group of validators participating in consensus. [Learn more in the Whitepaper](/concepts/specs/consensus/posdao#whitepaper) View current Gnosis validator pools in the [BlockScout Staking Application](https://blockscout.com/xdai/mainnet/validators). :::info Finality delay A minimum of `n_v/2 + 1` validations being required, with `n_v` the number of validators. At least `2(n_v/2 + 1) = n_v + 2` message round trips are therefore necessary before a block is finalized by all validators. In the worst case, after exactly `n_v` validations, the delay will instead be of `2n_v + 2`. For Gnosis running with 19 validators, this is the equivalent of 40 blocks. ::: :::success [Additional Information on AuRa](https://openethereum.github.io/Aura) ::: --- // File: about/specs/consensus/posdao # POSDAO :::caution The merge Gnosis transitioned to PoS using the [GNO Token](/concepts/tokens/gno), this page defines the pre-merge consensus model. Learn more [about The Merge](/). ::: ## Proof of Stake Decentralized Autonomous Organization POSDAO describes the pre-merge validator selection method for the Gnosis Chain. Validators provide consensus for Gnosis Chain transactions. This method was deprecated immediately following the merge when the Gnosis Beacon Chain became the consensus layer engine. Validators are selected based on the amount of GNO they place into the protocol along with an on-chain RNG. The validator set is capped at 19, and validator candidates need to place minimums of 2K GNO (current minimum) and setup a valid node to be eligible for participation. In addition, public delegators can place GNO on candidates, increasing their chances of becoming validators in the next set. The validator set can change weekly based on the number of eligible validators and their staking amounts. :::success [POSDAO Contract Implementation Addresses](https://github.com/poanetwork/poa-chain-spec/blob/dai/contracts.json#L9) ::: :::info Prior to Public POSDAO, Permissioned POSDAO was used nominated validators to sign blocks. Gnosis transitioned to public POSDAO in December, 2020. ::: ## Whitepaper > Barinov, I., Arasev, V., Fackler, A., Komendantskiy, V., Gross, A., Kolotov, A. and Isakova, D. POSDAO: Proof of Stake Decentralized Autonomous Organization (April 29, 2019). Available at SSRN: [https://ssrn.com/abstract=3368483](https://ssrn.com/abstract=3368483) or [http://dx.doi.org/10.2139/ssrn.3368483](https://dx.doi.org/10.2139/ssrn.3368483) :::success [Summary and PDF version of the latest whitepaper version](https://forum.poa.network/t/posdao-white-paper/2208) ::: --- // File: about/specs/consensus/proof-of-stake # Proof of Stake (PoS) [Proof of Stake](https://ethereum.org/en/developers/docs/consensus-mechanisms/pos/) (PoS) is a consensus mechanism utilized in blockchain networks to establish network consensus and authenticate transactions. In PoS, participants are chosen to create new blocks and validate transactions based on the number of coins they hold or "stake." The more coins one possesses, the greater their likelihood of selection. PoS depends on participants having a financial stake in the network, rather than energy-intensive computations. Proof of Stake is necessary due to its numerous advantages over other consensus mechanisms. Firstly, it is more energy-efficient than methods like Proof of Work, which demand substantial computational power, thus reducing the environmental impact of blockchain networks. Secondly, PoS fosters decentralization by allowing anyone with a stake in the network to partake in block validation, preventing power concentration among a few participants. The benefits of Proof of Stake encompass enhanced energy efficiency, scalability, and security. PoS consumes less energy than PoW, rendering it more sustainable. It also provides improved scalability, as it is not constrained by increasing computational power. PoS bolsters security by offering economic incentives for participants to act honestly. Validators face the risk of losing their staked coins if they engage in malicious activities, deterring fraud and ensuring the network's integrity. # Gasper: [Gasper](https://ethereum.org/en/developers/docs/consensus-mechanisms/pos/gasper/) is a hybrid consensus mechanism that merges the best features of Proof of Stake (PoS) and Proof of Work (PoW) to establish a secure and efficient consensus protocol for blockchain networks. In Gasper, participants not only stake their coins but also solve cryptographic puzzles to authenticate transactions and generate new blocks. By addressing the limitations of individual consensus mechanisms, Gasper achieves a balance between security and efficiency. It mitigates the risk of attacks by necessitating the solving of cryptographic puzzles, making it harder for malicious actors to exploit the network. Furthermore, Gasper employs staking to ensure that even participants with smaller stakes have an opportunity to validate transactions, fostering decentralization. Gasper provides several advantages over traditional consensus mechanisms. First, it heightens security by obligating participants to solve puzzles in addition to staking their coins, making it more difficult for attackers to breach the network. Second, Gasper is more energy-efficient than PoW, as it doesn't rely solely on computational power, thus reducing the environmental impact associated with mining. Lastly, Gasper ensures fair and democratic participation by enabling participants with various stake sizes to contribute to the consensus process. # Weak Subjectivity: [Weak subjectivity](https://ethereum.org/en/developers/docs/consensus-mechanisms/pos/weak-subjectivity/) is a concept in blockchain networks that enables participants with a minimal stake to partake in block validation and consensus processes. This ensures that consensus decisions are not exclusively controlled by participants with substantial stakes. Maintaining decentralization in blockchain networks is vital, and weak subjectivity plays a crucial role in achieving this. If only participants with large stakes were involved in consensus, it would result in a more centralized system and potential power imbalances. Weak subjectivity promotes inclusivity, allowing a diverse range of participants to contribute to the network's decision-making process. By fostering decentralization, weak subjectivity allows participants with smaller stakes to validate transactions and engage in consensus processes. This democratic approach ensures that decisions are not dictated by a select few with significant stakes. Encouraging broader participation, weak subjectivity enhances the network's resilience and cultivates a more diverse and robust ecosystem. --- // File: about/specs/deposit-contracts # Deposit Contracts The Deposit contracts allow to deposit ERC20 tokens to Gnosis Chain and withdraw them back to Ethereum mainnet. The Deposit contracts on mainnet and Gnosis Chain are almost identical. However, Gnosis Chain users need to manually call the `claimWithdrawal(address)` or `claimWithdrawals(addresses)` method to withdraw the tokens/rewards back, whereas on Ethereum mainnet that's done automatically. The main issue is that GNO is an ERC20 token and it must emit `Transfer` events as per [EIP-20](https://eips.ethereum.org/EIPS/eip-20#transfer), which Gnosis Chain cannot do with system transactions at the moment. That's why it's required to call a normal transaction to claim GNO tokens. The alternative would be very complex and diverge from Ethereum on the EL side. The main withdrawal methods look as follows: ```solidity /** * @dev Claim withdrawal amount for an address * @param _address Address to transfer withdrawable tokens */ function claimWithdrawal(address _address) public { uint256 amount = withdrawableAmount[_address]; if (amount > 0) { withdrawableAmount[_address] = 0; stake_token.safeTransfer(_address, amount); } } /** * @dev Claim withdrawal amounts for an array of addresses * @param _addresses Addresses to transfer withdrawable tokens */ function claimWithdrawals(address[] calldata _addresses) external { for (uint256 i = 0; i < _addresses.length; ++i) { claimWithdrawal(_addresses[i]); } } ``` You can find a full list of contract differences on Github: - [Gnosis Chain](https://github.com/gnosischain/deposit-contract/blob/master/contracts/SBCDepositContract.sol#L237-L257) - [Shapella](https://github.com/gnosischain/deposit-contract/compare/c7217fccac3049901f78547f4024127fa1dcdcd4..master) --- // File: about/specs/gbc/README # Contracts, Addresses, Parameters ### **Contracts & Token Addresses** :::caution DO NOT send funds directly to the GBC Deposit Contract. To stake on GBC, follow the Validator instructions starting with [Validator Requirements and Responsibilities](/node/manual). ::: | Contract | Address | | -------------------- | -------------------------------------------------------------------------------------------------------------------------------------------------- | | GBC Deposit Contract | [0x0B98057eA310F4d31F2a452B414647007d1645d9](https://gnosis.blockscout.com/address/0x0B98057eA310F4d31F2a452B414647007d1645d9) | | GNO-> mGNO contract | [0x647507A70Ff598F386CB96ae5046486389368C66](https://gnosis.blockscout.com/address/0x647507A70Ff598F386CB96ae5046486389368C66) | | GNO token on Gnosis | [0x9C58BAcC331c9aa871AFD802DB6379a98e80CEdb](https://blockscout.com/xdai/mainnet/token/0x9C58BAcC331c9aa871AFD802DB6379a98e80CEdb/token-transfers) | ### **Initial Parameters (subject to change)** | Variable | Value | | ---------------------------- | ------------------------------------------------------------------------------------------------------------------------------------------------------------------------------------- | | Staking amount | 32 mGNO (equivalent to 1 GNO) | | Block time | 5 seconds | | Validator slots per epoch | 16 (with further reduction possible, [N > 1 honest proposer/epoch as per V. Buterin](https://notes.ethereum.org/@vbuterin/rkhCgQteN?type=view#Why-32-ETH-validator-sizes)) | | Validators per slot | 128 ([see more on minimum committee size](https://medium.com/@chihchengliang/minimum-committee-size-explained-67047111fa20)) | | Epoch time | 80 seconds | | Slashing | Reductions to 16 mGNO, then removal | | Clients | Prysm, Lighthouse | | Custom Deposit Contract |

| | Explorer |

Modified beaconchain explorer
🔍 beacon.gnosischain.com

| | RPC | [https://rpc-gbc.gnosischain.com](https://rpc-gbc.gnosischain.com) | | Launch MVP |

4096 validators
131,072 mGNO

83% APY

| | Security Goal Prior to Merge |

50K+ validators

1.6M+ mGNO

23% APY

| --- // File: about/specs/gbc/upgradeability # Upgradeability One differentiator for the Gnosis Beacon Chain relative to the Ethereum Beacon chain is the ability to upgrade contracts. A proxy pattern allows for this functionality, which can be extremely useful if an update is required (a bug is found, new functionality added etc). However, this also introduces issues of administrative responsibility. No one entity should solely control contract updates. A multi-sig Gnosis Safe is used to expand admin responsibilities to a larger entity. The controlling assembly is a Governance Board consisting of known and active projects who have contributed to the Gnosis and Ethereum community for some time. A proposed upgrade is presented to this board and a minimum of 7 signatures are required to enact any proposal. c [Governance Board Members](../../../bridges/management#current-bridge-governors) ### Contracts managed by the Governance Board - Deposit Contract: [0x0B98057eA310F4d31F2a452B414647007d1645d9](https://gnosis.blockscout.com/address/0x0B98057eA310F4d31F2a452B414647007d1645d9/read-contract) --- // File: about/specs/hard-forks/1604400 # #1604400 - 2019-01-11 :::caution Archived page Check the latest hard fork and update your node ::: ### Info * **Network**: xDai (now Gnosis) * **Date**: 2019-01-11 * **Block number**: 1604400 ### Description This update introduces Constantinople fork at block `1604400` in `xDai` network. ### Solution 1. Update Parity node to `2.2.5-beta` using [the guide](https://www.poa.network/for-validators/hard-forks/parity-upgrade-guide). 2. Update `poa-chain-spec/spec.json` - add Constantinople's [transitions](https://github.com/poanetwork/poa-chain-spec/pull/99/files#diff-42eb5109ad96d4ac46cdcbf18f2938de) to `engine.params` section. See [spec.json update](/concepts/specs/hard-forks/spec.json-update). 3. Organize the HF on block `1604400`. ### Verify ```bash grep -n -A2 1604400 spec.json ``` You should see: ```json 34: "eip145Transition": 1604400, 35: "eip1014Transition": 1604400, 36: "eip1052Transition": 1604400, 37: "eip1283Transition": 1604400, 38- "registrar": "0x1ec97dc137f5168af053c24460a1200502e1a9d2" 39- }, ``` --- // File: about/specs/hard-forks/16101500 # #16101500 - 2021-05-17 :::caution Archived page Check the latest hard fork and update your node ::: * **Network**: xDai (now Gnosis) * **Date**: 2021-05-17 * **Block number**: `16101500` ## Client Updates ### OpenEthereum Please update to `v3.2.5` which contains Berlin hard fork transition and the new enodes: [https://github.com/openethereum/openethereum/releases/tag/v3.2.5](https://github.com/openethereum/openethereum/releases/tag/v3.2.5) Perform a DB migration if your run OE version < v3.2.0 If your node works on an old version of Parity, you need to convert node's DB to the format compatible with OpenEthereum v3.2.x. You can use this tool [https://github.com/openethereum/3.1-db-upgrade-tool](https://github.com/openethereum/3.1-db-upgrade-tool) ### Nethermind Please update to `v1.10.67` which contains Berlin hard fork transition. [More on Nethermind](/node/manual). ## Description: Berlin HF * EIP-2565 (ModExp Gas Cost) Allows RSA signature verification. * EIP-2929 (Gas cost increases for state access opcodes) Algorithm for calculating gas costs. Costs increase for SLOAD, _CALL, BALANCE, EXT_ and SELFDESTRUCT for the first time. Adds resilience for DoS attacks. * EIP-2718 (Typed Transaction Envelope) Implements a new transaction type that supports multiple transactions. * EIP-2930 (Optional access lists) Lst of addresses and storage keys a transaction will access, resulting in easier processing and reduced gas usage. --- // File: about/specs/hard-forks/19040000 # #19040000 - 2021-11-12 :::caution Archived page Check the latest hard fork and update your node ::: * **Network**: Gnosis * **\~Date**: 2021-11-12 * **Block number**: `19,040,000` ## Client Updates ### OpenEthereum Please update to `v3.3.0` **RC 15** which contains the London hard fork transition. :::info Most node operators use the --chain=xdai flag when running a node. In this case, you will only need to update the client. If you use a local spec.json file, you will need to [upgrade to this version](https://raw.githubusercontent.com/poanetwork/poa-chain-spec/dai/spec.json) before restarting your node with the updated OE version. ::: 1. Set docker image in `docker-compose.yml` to image: openethereum/openethereum:v3.3.0-rc.15 2. Restart your node `docker-compose down` `docker-compose up -d` 3. There may be an additional instruction related to a variable update following the HF. ### Nethermind Upgrade to version [v1.11.7](https://github.com/NethermindEth/nethermind/releases/tag/1.11.7). This is the latest Nethermind release. 1. Set docker image as image: nethermind/nethermind:latest 2. `docker pull nethermind/nethermind:latest` `docker-compose down` `docker-compose up -d` ## Description: London HF Applicable updates * [EIP-1559](https://eips.ethereum.org/EIPS/eip-1559) – reconfigures fees to include BASEFEE. Block size increase to 34M. [See 1559 on Gnosis for more info](/concepts/specs/hard-forks/eip-1559) * [EIP-3198](https://eips.ethereum.org/EIPS/eip-3198) – returns the `BASEFEE` from a block * [EIP-3529](https://eips.ethereum.org/EIPS/eip-3529) - reduces gas refunds for EVM operations * [EIP-3541](https://eips.ethereum.org/EIPS/eip-3541) - prevents deploying contracts starting with `0xEF` --- // File: about/specs/hard-forks/21735000 # #21735000 - 2022-04-20 In response to the community sentiment [overwhelming favoring GIP-31](https://forum.gnosis.io/t/gip-31-should-gnosis-chain-perform-a-hardfork-to-upgrade-the-token-contract-vulnerable-to-the-reentrancy-attack/4134) a hardfork has been proposed for Gnosis. Node operators can now update their OpenEthereum or Nethermind nodes in preparation. * **Network**: Gnosis * **Block number**: `21,735,000` * **Completed:** 20 April 2022 ## Client Update Instructions :::info Instructions below are for standard node updates. **For archive nodes running Nethermind**, please see note below. ::: ### OpenEthereum Please update to `v3.3.5` which contains the hard fork transition. 1. Set docker image in `docker-compose.yml` to image: openethereum/openethereum:v3.3.5 2. Restart your node `docker-compose down` `docker-compose up -d` ### Nethermind Upgrade to version [v1.12.7](https://github.com/NethermindEth/nethermind/releases/tag/1.12.7). 1. Set docker image as image: nethermind/nethermind:1.12.7 2. `docker pull nethermind/nethermind:1.12.7` `docker-compose down` `docker-compose up -d` ### Archive nodes running Nethermind :::danger Nethermind v1.12.5`+` turns on memory pruning by default. **You will need to disable pruning** in the config file when running an archive node. Set the following variable `NETHERMIND_PRUNINGCONFIG_MODE: "None"` ::: ## Code Updates: Token Contract Bytecode * OpenEthereum: Support new hardfork ([#619](https://github.com/openethereum/openethereum/pull/619), [#633](https://github.com/openethereum/openethereum/pull/633)) * Nethermind: \[Gnosis/POSDAO] Support new hardfork ([#3889](https://github.com/NethermindEth/nethermind/pull/3889), [#3930](https://github.com/NethermindEth/nethermind/pull/3930)) This HF replaces the bytecode in the permitable token contract. Tokens bridged using the previous implementation were susceptible to re-entrancy when combined with protocols that did not guard against these types of attacks. The HF will increase bridged token security for protocols on Gnosis. More information is available in the [Gnosis Forum GIP-31 post](https://forum.gnosis.io/t/gip-31-should-gnosis-chain-perform-a-hardfork-to-upgrade-the-token-contract-vulnerable-to-the-reentrancy-attack/4134). **Previous permitable token contract bytecode** ``` 0x6080604052600436106101b65763ffffffff7c010000000000000000000000000000000000000000000000000000000060003504166305d2035b81146101bb57806306fdde03146101e4578063095ea7b31461026e5780630b26cf661461029257806318160ddd146102b557806323b872dd146102dc57806330adf81f14610306578063313ce5671461031b5780633644e51514610346578063395093511461035b5780634000aea01461037f57806340c10f19146103b057806342966c68146103d457806354fd4d50146103ec578063661884631461040157806369ffa08a1461042557806370a082311461044c578063715018a61461046d578063726600ce146104825780637d64bcb4146104a35780637ecebe00146104b8578063859ba28c146104d95780638da5cb5b1461051a5780638fcbaf0c1461054b57806395d89b4114610589578063a457c2d71461059e578063a9059cbb146105c2578063b753a98c146105e6578063bb35783b1461060a578063cd59658314610634578063d73dd62314610649578063dd62ed3e1461066d578063f2d5d56b14610694578063f2fde38b146106b8578063ff9e884d146106d9575b600080fd5b3480156101c757600080fd5b506101d0610700565b604080519115158252519081900360200190f35b3480156101f057600080fd5b506101f9610721565b6040805160208082528351818301528351919283929083019185019080838360005b8381101561023357818101518382015260200161021b565b50505050905090810190601f1680156102605780820380516001836020036101000a031916815260200191505b509250505060405180910390f35b34801561027a57600080fd5b506101d0600160a060020a03600435166024356107af565b34801561029e57600080fd5b506102b3600160a060020a0360043516610803565b005b3480156102c157600080fd5b506102ca61085d565b60408051918252519081900360200190f35b3480156102e857600080fd5b506101d0600160a060020a0360043581169060243516604435610863565b34801561031257600080fd5b506102ca610a32565b34801561032757600080fd5b50610330610a56565b6040805160ff9092168252519081900360200190f35b34801561035257600080fd5b506102ca610a5f565b34801561036757600080fd5b506101d0600160a060020a0360043516602435610a65565b34801561038b57600080fd5b506101d060048035600160a060020a0316906024803591604435918201910135610a78565b3480156103bc57600080fd5b506101d0600160a060020a0360043516602435610b89565b3480156103e057600080fd5b506102b3600435610c94565b3480156103f857600080fd5b506101f9610ca1565b34801561040d57600080fd5b506101d0600160a060020a0360043516602435610cd8565b34801561043157600080fd5b506102b3600160a060020a0360043581169060243516610db5565b34801561045857600080fd5b506102ca600160a060020a0360043516610df1565b34801561047957600080fd5b506102b3610e0c565b34801561048e57600080fd5b506101d0600160a060020a0360043516610e23565b3480156104af57600080fd5b506101d0610e37565b3480156104c457600080fd5b506102ca600160a060020a0360043516610e3e565b3480156104e557600080fd5b506104ee610e50565b6040805167ffffffffffffffff9485168152928416602084015292168183015290519081900360600190f35b34801561052657600080fd5b5061052f610e5b565b60408051600160a060020a039092168252519081900360200190f35b34801561055757600080fd5b506102b3600160a060020a0360043581169060243516604435606435608435151560ff60a4351660c43560e435610e6a565b34801561059557600080fd5b506101f9611171565b3480156105aa57600080fd5b506101d0600160a060020a03600435166024356111cb565b3480156105ce57600080fd5b506101d0600160a060020a03600435166024356111d7565b3480156105f257600080fd5b506102b3600160a060020a0360043516602435611202565b34801561061657600080fd5b506102b3600160a060020a036004358116906024351660443561120d565b34801561064057600080fd5b5061052f61121e565b34801561065557600080fd5b506101d0600160a060020a036004351660243561122d565b34801561067957600080fd5b506102ca600160a060020a03600435811690602435166112b4565b3480156106a057600080fd5b506102b3600160a060020a03600435166024356112df565b3480156106c457600080fd5b506102b3600160a060020a03600435166112ea565b3480156106e557600080fd5b506102ca600160a060020a036004358116906024351661130a565b60065474010000000000000000000000000000000000000000900460ff1681565b6000805460408051602060026001851615610100026000190190941693909304601f810184900484028201840190925281815292918301828280156107a75780601f1061077c576101008083540402835291602001916107a7565b820191906000526020600020905b81548152906001019060200180831161078a57829003601f168201915b505050505081565b336000818152600560209081526040808320600160a060020a03871680855290835281842086905581518681529151939490939092600080516020611a13833981519152928290030190a350600192915050565b600654600160a060020a0316331461081a57600080fd5b61082381611327565b151561082e57600080fd5b6007805473ffffffffffffffffffffffffffffffffffffffff1916600160a060020a0392909216919091179055565b60045490565b600080600160a060020a038516151561087b57600080fd5b600160a060020a038416151561089057600080fd5b600160a060020a0385166000908152600360205260409020546108b9908463ffffffff61132f16565b600160a060020a0380871660009081526003602052604080822093909355908616815220546108ee908463ffffffff61134116565b600160a060020a0380861660008181526003602090815260409182902094909455805187815290519193928916926000805160206119f383398151915292918290030190a3600160a060020a0385163314610a1c5761094d85336112b4565b905060001981146109b757610968818463ffffffff61132f16565b600160a060020a038616600081815260056020908152604080832033808552908352928190208590558051948552519193600080516020611a13833981519152929081900390910190a3610a1c565b600160a060020a0385166000908152600a602090815260408083203384529091529020541580610a1157506109ea611354565b600160a060020a0386166000908152600a6020908152604080832033845290915290205410155b1515610a1c57600080fd5b610a27858585611358565b506001949350505050565b7fea2aa0a1be11a07ed86d755c93467f4f82362b452371d1ba94d1715123511acb81565b60025460ff1681565b60085481565b6000610a71838361122d565b9392505050565b600084600160a060020a03811615801590610a9c5750600160a060020a0381163014155b1515610aa757600080fd5b610ab186866113ef565b1515610abc57600080fd5b85600160a060020a031633600160a060020a03167fe19260aff97b920c7df27010903aeb9c8d2be5d310a2c67824cf3f15396e4c16878787604051808481526020018060200182810382528484828181526020019250808284376040519201829003965090945050505050a3610b3186611327565b15610b7d57610b7233878787878080601f016020809104026020016040519081016040528093929190818152602001838380828437506113fb945050505050565b1515610b7d57600080fd5b50600195945050505050565b600654600090600160a060020a03163314610ba357600080fd5b60065474010000000000000000000000000000000000000000900460ff1615610bcb57600080fd5b600454610bde908363ffffffff61134116565b600455600160a060020a038316600090815260036020526040902054610c0a908363ffffffff61134116565b600160a060020a038416600081815260036020908152604091829020939093558051858152905191927f0f6798a560793a54c3bcfe86a93cde1e73087d944c0ea20544137d412139688592918290030190a2604080518381529051600160a060020a038516916000916000805160206119f38339815191529181900360200190a350600192915050565b610c9e3382611591565b50565b60408051808201909152600181527f3100000000000000000000000000000000000000000000000000000000000000602082015281565b336000908152600560209081526040808320600160a060020a0386168452909152812054808310610d2c57336000908152600560209081526040808320600160a060020a0388168452909152812055610d61565b610d3c818463ffffffff61132f16565b336000908152600560209081526040808320600160a060020a03891684529091529020555b336000818152600560209081526040808320600160a060020a038916808552908352928190205481519081529051929392600080516020611a13833981519152929181900390910190a35060019392505050565b600654600160a060020a03163314610dcc57600080fd5b80600160a060020a0381161515610de257600080fd5b610dec8383611680565b505050565b600160a060020a031660009081526003602052604090205490565b600654600160a060020a031633146101b657600080fd5b600754600160a060020a0390811691161490565b6000806000fd5b60096020526000908152604090205481565b600260036000909192565b600654600160a060020a031681565b600080600160a060020a038a161515610e8257600080fd5b600160a060020a0389161515610e9757600080fd5b861580610eab575086610ea8611354565b11155b1515610eb657600080fd5b600854604080517fea2aa0a1be11a07ed86d755c93467f4f82362b452371d1ba94d1715123511acb602080830191909152600160a060020a03808f16838501528d166060830152608082018c905260a082018b905289151560c0808401919091528351808403909101815260e090920192839052815191929182918401908083835b60208310610f575780518252601f199092019160209182019101610f38565b51815160209384036101000a6000190180199092169116179052604080519290940182900382207f190100000000000000000000000000000000000000000000000000000000000083830152602283019790975260428083019790975283518083039097018752606290910192839052855192945084935085019190508083835b60208310610ff75780518252601f199092019160209182019101610fd8565b51815160209384036101000a600019018019909216911617905260408051929094018290038220600080845283830180875282905260ff8d1684870152606084018c9052608084018b905294519098506001965060a080840196509194601f19820194509281900390910191865af1158015611077573d6000803e3d6000fd5b50505060206040510351600160a060020a03168a600160a060020a03161415156110a057600080fd5b600160a060020a038a16600090815260096020526040902080546001810190915588146110cc57600080fd5b856110d85760006110dc565b6000195b600160a060020a03808c166000908152600560209081526040808320938e16835292905220819055905085611112576000611114565b865b600160a060020a03808c166000818152600a60209081526040808320948f1680845294825291829020949094558051858152905192939192600080516020611a13833981519152929181900390910190a350505050505050505050565b60018054604080516020600284861615610100026000190190941693909304601f810184900484028201840190925281815292918301828280156107a75780601f1061077c576101008083540402835291602001916107a7565b6000610a718383610cd8565b60006111e383836113ef565b15156111ee57600080fd5b6111f9338484611358565b50600192915050565b610dec338383610863565b611218838383610863565b50505050565b600754600160a060020a031690565b336000908152600560209081526040808320600160a060020a0386168452909152812054611261908363ffffffff61134116565b336000818152600560209081526040808320600160a060020a038916808552908352928190208590558051948552519193600080516020611a13833981519152929081900390910190a350600192915050565b600160a060020a03918216600090815260056020908152604080832093909416825291909152205490565b610dec823383610863565b600654600160a060020a0316331461130157600080fd5b610c9e816116ac565b600a60209081526000928352604080842090915290825290205481565b6000903b1190565b60008282111561133b57fe5b50900390565b8181018281101561134e57fe5b92915050565b4290565b61136182611327565b80156113885750604080516000815260208101909152611386908490849084906113fb565b155b15610dec5761139682610e23565b156113a057600080fd5b60408051600160a060020a0380861682528416602082015280820183905290517f11249f0fc79fc134a15a10d1da8291b79515bf987e036ced05b9ec119614070b9181900360600190a1505050565b6000610a71838361172a565b600083600160a060020a031663a4c0ed367c0100000000000000000000000000000000000000000000000000000000028685856040516024018084600160a060020a0316600160a060020a0316815260200183815260200180602001828103825283818151815260200191508051906020019080838360005b8381101561148c578181015183820152602001611474565b50505050905090810190601f1680156114b95780820380516001836020036101000a031916815260200191505b5060408051601f198184030181529181526020820180517bffffffffffffffffffffffffffffffffffffffffffffffffffffffff167fffffffff00000000000000000000000000000000000000000000000000000000909916989098178852518151919790965086955093509150819050838360005b8381101561154757818101518382015260200161152f565b50505050905090810190601f1680156115745780820380516001836020036101000a031916815260200191505b509150506000604051808303816000865af1979650505050505050565b600160a060020a0382166000908152600360205260409020548111156115b657600080fd5b600160a060020a0382166000908152600360205260409020546115df908263ffffffff61132f16565b600160a060020a03831660009081526003602052604090205560045461160b908263ffffffff61132f16565b600455604080518281529051600160a060020a038416917fcc16f5dbb4873280815c1ee09dbd06736cffcc184412cf7a71a0fdb75d397ca5919081900360200190a2604080518281529051600091600160a060020a038516916000805160206119f38339815191529181900360200190a35050565b600160a060020a038216151561169e57611699816117f9565b6116a8565b6116a88282611805565b5050565b600160a060020a03811615156116c157600080fd5b600654604051600160a060020a038084169216907f8be0079c531659141344cd1fd0a4f28419497f9722a3daafe3b4186f6b6457e090600090a36006805473ffffffffffffffffffffffffffffffffffffffff1916600160a060020a0392909216919091179055565b3360009081526003602052604081205482111561174657600080fd5b600160a060020a038316151561175b57600080fd5b3360009081526003602052604090205461177b908363ffffffff61132f16565b3360009081526003602052604080822092909255600160a060020a038516815220546117ad908363ffffffff61134116565b600160a060020a0384166000818152600360209081526040918290209390935580518581529051919233926000805160206119f38339815191529281900390910190a350600192915050565b30316116a882826118a3565b604080517f70a0823100000000000000000000000000000000000000000000000000000000815230600482015290518391600091600160a060020a038416916370a0823191602480830192602092919082900301818787803b15801561186a57600080fd5b505af115801561187e573d6000803e3d6000fd5b505050506040513d602081101561189457600080fd5b5051905061121884848361190b565b604051600160a060020a0383169082156108fc029083906000818181858888f1935050505015156116a85780826118d86119c2565b600160a060020a039091168152604051908190036020019082f080158015611904573d6000803e3d6000fd5b5050505050565b60408051600160a060020a03841660248201526044808201849052825180830390910181526064909101909152602081810180517bffffffffffffffffffffffffffffffffffffffffffffffffffffffff167fa9059cbb000000000000000000000000000000000000000000000000000000001781528251606093600093909290918491828a5af160005193508392508080156101b65750506000835111156119ba578115156119ba57600080fd5b505050505050565b6040516021806119d2833901905600608060405260405160208060218339810160405251600160a060020a038116ff00ddf252ad1be2c89b69c2b068fc378daa952ba7f163c4a11628f55a4df523b3ef8c5be1e5ebec7d5bd14f71427d1e84f3dd0314c0f7b2291e5b200ac8c7c3b925a165627a7a72305820da715ff88e0288dbae664bb8af2f148726bdc8c499fecf88153280d022031e780029 ``` **New permitable token contract bytecode** ``` 0x6080604052600436106101b35763ffffffff60e060020a60003504166305d2035b81146101b857806306fdde03146101e1578063095ea7b31461026b5780630b26cf661461028f57806318160ddd146102b257806323b872dd146102d957806330adf81f14610303578063313ce567146103185780633644e5151461034357806339509351146103585780634000aea01461037c57806340c10f19146103ad57806342966c68146103d157806354fd4d50146103e957806366188463146103fe57806369ffa08a1461042257806370a0823114610449578063715018a61461046a578063726600ce1461047f5780637d64bcb4146104a05780637ecebe00146104b5578063859ba28c146104d65780638da5cb5b146105175780638fcbaf0c1461054857806395d89b4114610586578063a457c2d71461059b578063a9059cbb146105bf578063b753a98c146105e3578063bb35783b14610607578063c6a1dedf14610631578063cd59658314610646578063d505accf1461065b578063d73dd62314610694578063dd62ed3e146106b8578063f2d5d56b146106df578063f2fde38b14610703578063ff9e884d14610724575b600080fd5b3480156101c457600080fd5b506101cd61074b565b604080519115158252519081900360200190f35b3480156101ed57600080fd5b506101f661076c565b6040805160208082528351818301528351919283929083019185019080838360005b83811015610230578181015183820152602001610218565b50505050905090810190601f16801561025d5780820380516001836020036101000a031916815260200191505b509250505060405180910390f35b34801561027757600080fd5b506101cd600160a060020a03600435166024356107fa565b34801561029b57600080fd5b506102b0600160a060020a0360043516610810565b005b3480156102be57600080fd5b506102c761086a565b60408051918252519081900360200190f35b3480156102e557600080fd5b506101cd600160a060020a0360043581169060243516604435610870565b34801561030f57600080fd5b506102c7610a38565b34801561032457600080fd5b5061032d610a5c565b6040805160ff9092168252519081900360200190f35b34801561034f57600080fd5b506102c7610a65565b34801561036457600080fd5b506101cd600160a060020a0360043516602435610a6b565b34801561038857600080fd5b506101cd60048035600160a060020a0316906024803591604435918201910135610aac565b3480156103b957600080fd5b506101cd600160a060020a0360043516602435610bbd565b3480156103dd57600080fd5b506102b0600435610cc8565b3480156103f557600080fd5b506101f6610cd5565b34801561040a57600080fd5b506101cd600160a060020a0360043516602435610d0c565b34801561042e57600080fd5b506102b0600160a060020a0360043581169060243516610de9565b34801561045557600080fd5b506102c7600160a060020a0360043516610e0e565b34801561047657600080fd5b506102b0610e29565b34801561048b57600080fd5b506101cd600160a060020a0360043516610e40565b3480156104ac57600080fd5b506101cd610e54565b3480156104c157600080fd5b506102c7600160a060020a0360043516610e5b565b3480156104e257600080fd5b506104eb610e6d565b6040805167ffffffffffffffff9485168152928416602084015292168183015290519081900360600190f35b34801561052357600080fd5b5061052c610e78565b60408051600160a060020a039092168252519081900360200190f35b34801561055457600080fd5b506102b0600160a060020a0360043581169060243516604435606435608435151560ff60a4351660c43560e435610e87565b34801561059257600080fd5b506101f6610fc5565b3480156105a757600080fd5b506101cd600160a060020a036004351660243561101f565b3480156105cb57600080fd5b506101cd600160a060020a0360043516602435611032565b3480156105ef57600080fd5b506102b0600160a060020a0360043516602435611054565b34801561061357600080fd5b506102b0600160a060020a0360043581169060243516604435611064565b34801561063d57600080fd5b506102c7611075565b34801561065257600080fd5b5061052c611099565b34801561066757600080fd5b506102b0600160a060020a036004358116906024351660443560643560ff6084351660a43560c4356110a8565b3480156106a057600080fd5b506101cd600160a060020a0360043516602435611184565b3480156106c457600080fd5b506102c7600160a060020a036004358116906024351661120b565b3480156106eb57600080fd5b506102b0600160a060020a0360043516602435611236565b34801561070f57600080fd5b506102b0600160a060020a0360043516611241565b34801561073057600080fd5b506102c7600160a060020a0360043581169060243516611261565b60065474010000000000000000000000000000000000000000900460ff1681565b6000805460408051602060026001851615610100026000190190941693909304601f810184900484028201840190925281815292918301828280156107f25780601f106107c7576101008083540402835291602001916107f2565b820191906000526020600020905b8154815290600101906020018083116107d557829003601f168201915b505050505081565b600061080733848461127e565b50600192915050565b600654600160a060020a0316331461082757600080fd5b610830816112c0565b151561083b57600080fd5b6007805473ffffffffffffffffffffffffffffffffffffffff1916600160a060020a0392909216919091179055565b60045490565b600080600160a060020a038516151561088857600080fd5b600160a060020a038416151561089d57600080fd5b600160a060020a0385166000908152600360205260409020546108c6908463ffffffff6112c816565b600160a060020a0380871660009081526003602052604080822093909355908616815220546108fb908463ffffffff6112da16565b600160a060020a038086166000818152600360209081526040918290209490945580518781529051919392891692600080516020611d7283398151915292918290030190a3600160a060020a0385163314610a225761095a853361120b565b905060001981146109c457610975818463ffffffff6112c816565b600160a060020a038616600081815260056020908152604080832033808552908352928190208590558051948552519193600080516020611d92833981519152929081900390910190a3610a22565b600160a060020a0385166000908152600a602090815260408083203384529091529020541580610a175750600160a060020a0385166000908152600a602090815260408083203384529091529020544211155b1515610a2257600080fd5b610a2d8585856112ed565b506001949350505050565b7f6e71edae12b1b97f4d1f60370fef10105fa2faae0126114a169c64845d6126c981565b60025460ff1681565b60085481565b336000818152600560209081526040808320600160a060020a03871684529091528120549091610807918590610aa7908663ffffffff6112da16565b61127e565b600084600160a060020a03811615801590610ad05750600160a060020a0381163014155b1515610adb57600080fd5b610ae58686611324565b1515610af057600080fd5b85600160a060020a031633600160a060020a03167fe19260aff97b920c7df27010903aeb9c8d2be5d310a2c67824cf3f15396e4c16878787604051808481526020018060200182810382528484828181526020019250808284376040519201829003965090945050505050a3610b65866112c0565b15610bb157610ba633878787878080601f01602080910402602001604051908101604052809392919081815260200183838082843750611330945050505050565b1515610bb157600080fd5b50600195945050505050565b600654600090600160a060020a03163314610bd757600080fd5b60065474010000000000000000000000000000000000000000900460ff1615610bff57600080fd5b600454610c12908363ffffffff6112da16565b600455600160a060020a038316600090815260036020526040902054610c3e908363ffffffff6112da16565b600160a060020a038416600081815260036020908152604091829020939093558051858152905191927f0f6798a560793a54c3bcfe86a93cde1e73087d944c0ea20544137d412139688592918290030190a2604080518381529051600160a060020a03851691600091600080516020611d728339815191529181900360200190a350600192915050565b610cd233826114ad565b50565b60408051808201909152600181527f3100000000000000000000000000000000000000000000000000000000000000602082015281565b336000908152600560209081526040808320600160a060020a0386168452909152812054808310610d6057336000908152600560209081526040808320600160a060020a0388168452909152812055610d95565b610d70818463ffffffff6112c816565b336000908152600560209081526040808320600160a060020a03891684529091529020555b336000818152600560209081526040808320600160a060020a038916808552908352928190205481519081529051929392600080516020611d92833981519152929181900390910190a35060019392505050565b600654600160a060020a03163314610e0057600080fd5b610e0a828261159c565b5050565b600160a060020a031660009081526003602052604090205490565b600654600160a060020a031633146101b357600080fd5b600754600160a060020a0390811691161490565b6000806000fd5b60096020526000908152604090205481565b600260056000909192565b600654600160a060020a031681565b600080861580610e975750864211155b1515610ea257600080fd5b604080517fea2aa0a1be11a07ed86d755c93467f4f82362b452371d1ba94d1715123511acb6020820152600160a060020a03808d16828401528b166060820152608081018a905260a0810189905287151560c0808301919091528251808303909101815260e0909101909152610f17906115da565b9150610f25828686866116e1565b600160a060020a038b8116911614610f3c57600080fd5b600160a060020a038a1660009081526009602052604090208054600181019091558814610f6857600080fd5b85610f74576000610f78565b6000195b905085610f86576000610f88565b865b600160a060020a03808c166000908152600a60209081526040808320938e1683529290522055610fb98a8a836118e3565b50505050505050505050565b60018054604080516020600284861615610100026000190190941693909304601f810184900484028201840190925281815292918301828280156107f25780601f106107c7576101008083540402835291602001916107f2565b600061102b8383610d0c565b9392505050565b600061103e8383611324565b151561104957600080fd5b6108073384846112ed565b61105f338383610870565b505050565b61106f838383610870565b50505050565b7fea2aa0a1be11a07ed86d755c93467f4f82362b452371d1ba94d1715123511acb81565b600754600160a060020a031690565b600080428610156110b857600080fd5b600160a060020a03808a1660008181526009602090815260409182902080546001810190915582517f6e71edae12b1b97f4d1f60370fef10105fa2faae0126114a169c64845d6126c99281019290925281830193909352928b166060840152608083018a905260a0830182905260c08084018a90528151808503909101815260e090930190529250611149906115da565b9050611157818686866116e1565b600160a060020a038a811691161461116e57600080fd5b61117989898961127e565b505050505050505050565b336000908152600560209081526040808320600160a060020a03861684529091528120546111b8908363ffffffff6112da16565b336000818152600560209081526040808320600160a060020a038916808552908352928190208590558051948552519193600080516020611d92833981519152929081900390910190a350600192915050565b600160a060020a03918216600090815260056020908152604080832093909416825291909152205490565b61105f823383610870565b600654600160a060020a0316331461125857600080fd5b610cd281611a3e565b600a60209081526000928352604080842090915290825290205481565b6112898383836118e3565b60001981141561105f57600160a060020a038084166000908152600a60209081526040808320938616835292905290812055505050565b6000903b1190565b6000828211156112d457fe5b50900390565b818101828110156112e757fe5b92915050565b6112f682610e40565b1561105f5760408051600081526020810190915261131990849084908490611330565b151561105f57600080fd5b600061102b8383611abc565b600083600160a060020a031663a4c0ed3660e060020a028685856040516024018084600160a060020a0316600160a060020a0316815260200183815260200180602001828103825283818151815260200191508051906020019080838360005b838110156113a8578181015183820152602001611390565b50505050905090810190601f1680156113d55780820380516001836020036101000a031916815260200191505b5060408051601f198184030181529181526020820180517bffffffffffffffffffffffffffffffffffffffffffffffffffffffff167fffffffff00000000000000000000000000000000000000000000000000000000909916989098178852518151919790965086955093509150819050838360005b8381101561146357818101518382015260200161144b565b50505050905090810190601f1680156114905780820380516001836020036101000a031916815260200191505b509150506000604051808303816000865af1979650505050505050565b600160a060020a0382166000908152600360205260409020548111156114d257600080fd5b600160a060020a0382166000908152600360205260409020546114fb908263ffffffff6112c816565b600160a060020a038316600090815260036020526040902055600454611527908263ffffffff6112c816565b600455604080518281529051600160a060020a038416917fcc16f5dbb4873280815c1ee09dbd06736cffcc184412cf7a71a0fdb75d397ca5919081900360200190a2604080518281529051600091600160a060020a03851691600080516020611d728339815191529181900360200190a35050565b80600160a060020a03811615156115b257600080fd5b600160a060020a03831615156115d0576115cb82611b8b565b61105f565b61105f8383611b97565b6000600854826040518082805190602001908083835b6020831061160f5780518252601f1990920191602091820191016115f0565b51815160209384036101000a6000190180199092169116179052604080519290940182900382207f190100000000000000000000000000000000000000000000000000000000000083830152602283019790975260428083019790975283518083039097018752606290910192839052855192945084935085019190508083835b602083106116af5780518252601f199092019160209182019101611690565b5181516020939093036101000a6000190180199091169216919091179052604051920182900390912095945050505050565b6000808460ff16601b14806116f957508460ff16601c145b1515611775576040805160e560020a62461bcd02815260206004820152602260248201527f45434453413a20696e76616c6964207369676e6174757265202776272076616c60448201527f7565000000000000000000000000000000000000000000000000000000000000606482015290519081900360840190fd5b7f7fffffffffffffffffffffffffffffff5d576e7357a4501ddfe92f46681b20a0831115611813576040805160e560020a62461bcd02815260206004820152602260248201527f45434453413a20696e76616c6964207369676e6174757265202773272076616c60448201527f7565000000000000000000000000000000000000000000000000000000000000606482015290519081900360840190fd5b60408051600080825260208083018085528a905260ff8916838501526060830188905260808301879052925160019360a0808501949193601f19840193928390039091019190865af115801561186d573d6000803e3d6000fd5b5050604051601f190151915050600160a060020a03811615156118da576040805160e560020a62461bcd02815260206004820152601860248201527f45434453413a20696e76616c6964207369676e61747572650000000000000000604482015290519081900360640190fd5b95945050505050565b600160a060020a0383161515611968576040805160e560020a62461bcd028152602060048201526024808201527f45524332303a20617070726f76652066726f6d20746865207a65726f2061646460448201527f7265737300000000000000000000000000000000000000000000000000000000606482015290519081900360840190fd5b600160a060020a03821615156119ee576040805160e560020a62461bcd02815260206004820152602260248201527f45524332303a20617070726f766520746f20746865207a65726f20616464726560448201527f7373000000000000000000000000000000000000000000000000000000000000606482015290519081900360840190fd5b600160a060020a0380841660008181526005602090815260408083209487168084529482529182902085905581518581529151600080516020611d928339815191529281900390910190a3505050565b600160a060020a0381161515611a5357600080fd5b600654604051600160a060020a038084169216907f8be0079c531659141344cd1fd0a4f28419497f9722a3daafe3b4186f6b6457e090600090a36006805473ffffffffffffffffffffffffffffffffffffffff1916600160a060020a0392909216919091179055565b33600090815260036020526040812054821115611ad857600080fd5b600160a060020a0383161515611aed57600080fd5b33600090815260036020526040902054611b0d908363ffffffff6112c816565b3360009081526003602052604080822092909255600160a060020a03851681522054611b3f908363ffffffff6112da16565b600160a060020a038416600081815260036020908152604091829020939093558051858152905191923392600080516020611d728339815191529281900390910190a350600192915050565b3031610e0a8282611c44565b604080517f70a0823100000000000000000000000000000000000000000000000000000000815230600482015290518391600091600160a060020a038416916370a0823191602480830192602092919082900301818787803b158015611bfc57600080fd5b505af1158015611c10573d6000803e3d6000fd5b505050506040513d6020811015611c2657600080fd5b5051905061106f600160a060020a038516848363ffffffff611cac16565b604051600160a060020a0383169082156108fc029083906000818181858888f193505050501515610e0a578082611c79611d41565b600160a060020a039091168152604051908190036020019082f080158015611ca5573d6000803e3d6000fd5b5050505050565b82600160a060020a031663a9059cbb83836040518363ffffffff1660e060020a0281526004018083600160a060020a0316600160a060020a0316815260200182815260200192505050600060405180830381600087803b158015611d0f57600080fd5b505af1158015611d23573d6000803e3d6000fd5b505050503d1561105f5760206000803e600051151561105f57600080fd5b604051602180611d51833901905600608060405260405160208060218339810160405251600160a060020a038116ff00ddf252ad1be2c89b69c2b068fc378daa952ba7f163c4a11628f55a4df523b3ef8c5be1e5ebec7d5bd14f71427d1e84f3dd0314c0f7b2291e5b200ac8c7c3b925a165627a7a72305820b96bb0733a3e45fdddafa592f51114d0cf16cad047ad60b9b91ae91eb772c6940029 ``` --- // File: about/specs/hard-forks/2508800 # #2508800 - 2019-03-06 :::caution Archived page Check the latest hard fork and update your node ::: ### Info * **Network**: xDai (now Gnosis) * **Date**: 2019-03-06 * **Block number**: 2508800 ### Description This update disables Constantinople EIP-1283 at block `2508800` in `xDai` network. ### Solution 1. Update Parity node to `2.3.2-beta` using [this guide.](https://www.poa.network/for-validators/hard-forks/parity-upgrade-guide) 2. Update `poa-chain-spec/spec.json` - add [eip1283DisableTransition](https://github.com/poanetwork/poa-chain-spec/pull/107/files#diff-42eb5109ad96d4ac46cdcbf18f2938deR38) to `engine.params` section. See [Update spec.json](/concepts/specs/hard-forks/spec.json-update) 3. Organize the HF on block `2508800`. ### Verify ```bash grep -n -A2 2508800 spec.json ``` You should see: ```json 38: "eip1283DisableTransition": 2508800, 39- "registrar": "0x1ec97dc137f5168af053c24460a1200502e1a9d2" 40- }, ``` --- // File: about/specs/hard-forks/7298030 # #7298030 - 2019-12-12 :::caution Archived page Check the latest hard fork and update your node ::: * **Network**: xDai (now Gnosis) * **Date**: 2019-12-12 * **Block number**: `7298030` ## Description: Istanbul Upgrade * eip1283ReenableTransition * eip1344Transition * eip1706Transition * eip1884Transition * eip2028Transition ## Perform Updates 1. **You must update spec.json and Parity node to version 2.6.5** as the spec format was changed. [Use this guide to upgrade](/concepts/specs/hard-forks/spec.json-update). 2. Organize the HF on block `7298030` ## Verify Once your update is complete, verify the HF block number: ```bash grep -n -A2 7298030 spec.json ``` You should see: ```json 39: "eip1283ReenableTransition": 7298030, 40: "eip1344Transition": 7298030, 41: "eip1706Transition": 7298030, 42: "eip1884Transition": 7298030, 43: "eip2028Transition": 7298030, 44- "registrar": "0x1ec97dc137f5168af053c24460a1200502e1a9d2" 45- }, -- 82: "7298030": { 83- "info": "Istanbul HF", 84- "price": { -- 104: "7298030": { 105- "info": "Istanbul HF", 106- "price": { -- 127: "7298030": { 128- "info": "Istanbul HF", 129- "price": { -- 143: "7298030": { 144- "info": "Istanbul HF", 145- "price": { ``` --- // File: about/specs/hard-forks/9186425 # #9186425 - 2020-04-01 :::caution Archived page Check the latest hard fork and update your node ::: * **Network**: xDai (now Gnosis) * **Date**: 2020-04-01 * **Block number**: `9186425` ## Description: POSDAO Activation * new ValidatorSet contract * blockRewardContractTransitions * randomnessContractAddress * posdaoTransition * new Registry contract * transactionPermissionContract ## Perform Updates 1. **You must update spec.json and Parity node to version 2.7.2-posdao-stable**. [Use this guide to upgrade](https://forum.poa.network/t/posdao-activation/3310). 2. Organize the HF on block `9186425` ## Verify Once your update is complete, verify the HF block number: ```bash grep -n -A2 9186425 spec.json ``` You should see: ```json 20: "9186425": { 21- "contract": "0xB87BE9f7196F2AE084Ca1DE6af5264292976e013" 22- } -- 28: "9186425": "0x481c034c6d9441db23Ea48De68BCAe812C5d39bA" 29- }, 30- "randomnessContractAddress": { -- 31: "9186425": "0x5870b0527DeDB1cFBD9534343Feda1a41Ce47766" 32- }, 33: "posdaoTransition": 9186425 34- } 35- } -- 58: "transactionPermissionContractTransition": 9186425 59- }, 60- "genesis": { ``` --- // File: about/specs/hard-forks/README # Hard Forks :::danger Hard forks are backward-incompatible upgrades used to introduce new functionality or fix security related issues. They are backward-incompatible upgrades, requiring all nodes to upgrade to the latest version to avoid syncing to a pre-fork blockchain. Validators will receive instructions to update their nodes in the event of a hard fork. ::: Information related to a hard fork will be posted. If any assistance is needed, feel free to reach out or ask questions through [Discord](https://discord.gg/gnosischain), the [forum](https://forum.gnosis.io) or other channels. --- // File: about/specs/hard-forks/dencun # What is Dencun hardfork? Dencun hardfork activates all EIPs also activated on [Ethereum mainnet](https://eips.ethereum.org/EIPS/eip-7569). The table below lists differences if any. | EIP | Scope | | | --------------------------------------------------------------------------------------------- | ------ | -------------------------------------------- | | [EIP-1153](https://eips.ethereum.org/EIPS/eip-1153): Transient storage opcodes | EL | Not modified | | [EIP-4788](https://eips.ethereum.org/EIPS/eip-4788): Beacon block root in the EVM | CL, EL | Not modified, same addresses as Ethereum | | [EIP-4844](https://eips.ethereum.org/EIPS/eip-4844): Shard Blob Transactions | CL, EL | Constants maybe modified from Ethereum (\* ) | | [EIP-5656](https://eips.ethereum.org/EIPS/eip-5656): MCOPY - Memory copying instruction | EL | Not modified | | [EIP-6780](https://eips.ethereum.org/EIPS/eip-6780): SELFDESTRUCT only in same transaction | EL | Not modified | | [EIP-7044](https://eips.ethereum.org/EIPS/eip-7044): Perpetually Valid Signed Voluntary Exits | CL | Not modified | | [EIP-7045](https://eips.ethereum.org/EIPS/eip-7045): Increase max attestation inclusion slot | CL | Not modified | | [EIP-7514](https://eips.ethereum.org/EIPS/eip-7514): Add Max Epoch Churn Limit | CL | Constants maybe modified from Ethereum (\* ) | | [EIP-7516](https://eips.ethereum.org/EIPS/eip-7516): BLOBBASEFEE opcode | EL | Not modified | \* See [Differences with Ethereum mainnet](#differences-with-ethereum-mainnet) Note: The trusted setup required for [deneb's cryptography](https://github.com/ethereum/consensus-specs/blob/dev/specs/deneb/polynomial-commitments.md#trusted-setup) is the same as defined in Ethereum's consensus spec release v1.4.0, which can be found [here](https://github.com/gnosischain/specs/blob/master/consensus/preset/gnosis/trusted_setups/trusted_setup_4096.json). ## Differences with Ethereum mainnet ### [EIP-4844](https://eips.ethereum.org/EIPS/eip-4844) Gnosis chain has slots significantly faster than Ethereum. Bigger blocks _could_ have a higher cost to the network than Ethereum so we may price blobs differently. Ethereum mainnet has chosen a target of 3 blobs from real live experiments on mainnet with big blocks. Consequently this parameters may not be adequate. Gnosis chain has significantly cheaper fees than mainnet, so blob spam is a concern. Ethereum's `MIN_BLOB_GASPRICE` makes blob space free (1e-18 USD / blob) if usage is under the target for a sustained period of time. The same concern applies to Ethereum, but consensus is that choosing a specific value that may apply to only some market conditions and not others. Given that Gnosis native token is a stable coin, this concerns are mitigated. Given usage under target for regular txs and blob data, setting min blob gas price to 1 GWei reduces the cost per byte by a factor of 16. | Constant | Value | | ----------------------------- | ---------- | | MIN_BLOB_GASPRICE | 1000000000 | | TARGET_BLOB_GAS_PER_BLOCK | 131072 | | MAX_BLOB_GAS_PER_BLOCK | 262144 | | BLOB_GASPRICE_UPDATE_FRACTION | 1112826 | ### [EIP-7514](https://eips.ethereum.org/EIPS/eip-7514) Gnosis chain has both a lower `CHURN_LIMIT_QUOTIENT` and faster epoch times. A `MAX_PER_EPOCH_ACTIVATION_CHURN_LIMIT` value of 2 provides a good trade-off to: - Limit max state growth in the next year to 1M validators - Increase the minimum time for a 2/3 malicious take-over to 150 days at current validator set sizes - Allow validator set growth to prevent long queues unless there's exceptional demand | Constant | Value | | ------------------------------------ | ----- | | MAX_PER_EPOCH_ACTIVATION_CHURN_LIMIT | 2 | ## Upgrade Schedule | Network | Timestamp | Date & Time (UTC) | Fork Hash | Beacon Chain Epoch | | ------- | ---------- | --------------------------------- | --------- | ------------------ | | Chiado | 1706724940 | Wed Jan 31 2024 18:15:40 GMT+0000 | 0x5fbc16bc | 516608 | | Mainnet | 1710181820 | Monday March 11 202418:30:20 +UTC | 0x1384dfc1 | 889856 | ## How to Prepare ### For Validators Update your clients: Execution Layer - ✅ NethermindEth [v1.25.4+](https://github.com/NethermindEth/nethermind/releases/) - ✅ ErigonEth [v2.58.0+](https://github.com/ledgerwatch/erigon/releases/) Consensus Layer - ✅ Lighthouse [v5.0.0+](https://github.com/sigp/lighthouse/releases/) - ✅ Teku [v24.2.0+](https://github.com/Consensys/teku/releases/) - ✅ Nimbus [v24.2.1+](https://github.com/status-im/nimbus-eth2/releases/) - ✅ Lodestar [v1.16.0+](https://github.com/ChainSafe/lodestar/releases/) --- // File: about/specs/hard-forks/eip-1559 # EIP-1559 ## When EIP-1559 :::success EIP-1559 is live on Gnosis. * **Network**: Gnosis * **Date Implemented**: November 12, 2021 * **Block number**: `19,040,000` ::: ## What is EIP-1559 EIP 1559 introduces a `BASEFEE` for all blockchain transactions. This is a minimum fee charged for each transaction, and it is adjusted depending on network congestion (gas usage per block). When gas usage is high, the fee increases, and when it is low, the fee decreases. Once collected, base fees are burned by the protocol rather than paid directly to the miners (or validators in the case of xDai). In addition to the base fee, a `PRIORITYFEE` can be added to a transaction as a tip to incentivize miners (validators) to include it in a block. ## How 1559 impacts the Gnosis When EIP-1559 is implemented, xDai base fees will be burned within the protocol. This will result in a discrepancy between the xDai balance on the network and the DAI balance from Ethereum locked in the xDai bridge. To fix this imbalance, the corresponding amount of DAI on the mainnet will need to be used as well. The imbalance has not resulted in large discrepancies, and the DAI balance has not been used as of yet. Information on the burn is available here: [https://dune.com/gnosischain_team/EIP-1559-on-xDai](https://dune.com/gnosischain_team/EIP-1559-on-xDai) **Block size is also increased to 34M with this upgrade.** :::info For more info about EIP-1559 on Ethereum and how it works, see the list of [EIP-1559 resources](https://hackmd.io/@timbeiko/1559-resources) compiled by Tim Beiko. ::: --- // File: about/specs/hard-forks/merge :::danger Hard forks are backward-incompatible upgrades used to introduce new functionality or fix security related issues. They are backward-incompatible upgrades, requiring all nodes to upgrade to the latest version to avoid syncing to a pre-fork blockchain. ::: - **Network**: Gnosis - **Beacon block number**: `6,306,357` - **Completed:** 8 December 2022 - [Merged successful announcement](/updates/2022/12/10/merge) # The Merge In early December 2022, Gnosis underwent the Merge. The Gnosis execution layer (formerly xDai) has been merged with the [Gnosis Beacon Chain](../gbc/README.md), in a process similar to the [Ethereum merge](https://ethereum.org/en/upgrades/merge/). The Merge represents an important shift for Gnosis, replacing the legacy [Proof-of-Authority consensus](../consensus/aura.md) with the open and unpermissioned [Beacon Chain Consensus](../gbc/README.md). This allows Gnosis to transition to a fully decentralized and permissionless proof-of-stake network. The Merge is also another step in Gnosis' journey together with Ethereum. From the early days of xDai at ETHDenver, Gnosis has had a role in Ethereum's journey. With the adoption of Ethereum's consensus mechanism, Gnosis will continue to contribute to Ethereum's growth as an experimental chain, where newcomers, experiments and ideas are welcome. ## When did the Merge happen? :::tip The week of 5th Dec 2022 ::: On the 9 Nov 2022 Gnosis Core Devs call, it was agreed to target **the week of 5th Dec 2022** for the Merge. Due to variances in block time, the Merge will likely happen sometime from **5th to 11th Dec 2022.** ### TTD With the 5th Dec 2022 target in mind, the Core Devs have proposed the following TTD value: ``` 8626000000000000000000058750000000000000000000 ``` This number was not chosen randomly: to pay tribute to the Ethereum Merge, Core Devs have proposed to include [Ethereum's TTD](https://notes.ethereum.org/@MarioHavel/merge-ttd), `58750000000000000000000`, in the Gnosis Merge TTD. ### Bellatrix Similar to Ethereum, the Gnosis Beacon Chain have had a [Bellatrix epoch](https://blog.ethereum.org/2022/08/24/mainnet-merge-announcement) that occurred prior to the Merge. :::danger The Bellatrix upgrade is a hard fork. Nodes that aren't upgraded when the upgrade is released risk syncing to a pre-fork blockchain. ::: ## Timeline | Date | Event | | ------------------- | ----------------------------------------------- | | 15 Nov 2022 (Wed) | Merge Date announced publicly | | 23 Nov 2022 (Wed) | Release of merge-ready Client Images | | 23 Nov 2022 (Wed) | Release of revamped Validator Docs | | 30 Nov 2022 (Wed) | Bellatrix epoch hit for Consensus Layer clients | | 5-11 Dec 2022 (Mon) | Estimated TTD window for Gnosis Merge | ## How to Prepare ### For Validators :::caution Merge-ready clients releases can be downloaded from the link below. Please check and download the latest version of release for your clients. Latest announcements will be made in the #validators channel in Gnosis Discord and on Twitter. ::: **EL client** | Client | Merge ready release | Status | | ---------- | ------------------- | ------------------------------------------------------------------ | | Nethermind | v1.14.6 | ✅ https://github.com/NethermindEth/nethermind/releases/tag/1.14.6 | | Erigon | TBA | ⌛ Coming soon | **CL client** | Client | Merge ready release | Status | | ---------- | ------------------- | ---------------------------------------------------------------------- | | Teku | v22.11.0 | ✅ Available https://github.com/ConsenSys/teku/releases/tag/22.11.0 | | Lodestar | v1.2.2 | ✅ Available https://github.com/ChainSafe/lodestar/releases/tag/v1.2.2 | | Lighthouse | v3.3.0 | ✅ Available (https://github.com/sigp/lighthouse/releases/tag/v3.3.0) | | Nimbus | TBA | ⌛ Coming soon | | Prysm | N/A | ❌ Advised to switch to other clients. | **DAppNode Packages** | Package | Merge ready release | Status | | ----------------------------------------- | ------------------- | ---------------------------------------------------------------------------------------------- | | DAppNodePackage-nethermind-xdai | v1.0.17 | ✅ Available https://github.com/dappnode/DAppNodePackage-nethermind-xdai/releases/tag/v1.0.17 | | DAppNodePackage-teku-gnosis | v0.1.4 | ✅ Available https://github.com/dappnode/DAppNodePackage-teku-gnosis/releases/tag/v0.1.4 | | DAppNodePackage-web3signer-gnosis | v0.1.9 | ✅ Available https://github.com/dappnode/DAppNodePackage-web3signer-gnosis/releases/tag/v0.1.9 | | DAppNodePackage-lighthouse-gnosis | 0.1.4 | ✅ Available https://github.com/dappnode/DAppNodePackage-lighthouse-gnosis/releases/tag/v0.1.4 | | DAppNodePackage-gnosis-beacon-chain-prysm | 🚫 TBA | ⏳ TBA | | DAppNodePackage-Lodestar-Gnosis | 🟡 TBA | ⏳ After Merge | | DAppNodePackage-nimbus-gnosis | 🟡 TBA | ⏳ After Merge | ### For DApps - The Merge deprecated Gnosis' RandomAuRa on-chain randomness, and developers should find alternatives - Gnosis' Merge will be similar to the Ethereum Merge, and DApps should prepare accordingly for changes to `block.difficulty`, blockhash randomness, and block times and finalization. - We recommend the Ethereum.org article on [How the Merge affects the Application Layer](https://blog.ethereum.org/2021/11/29/how-the-merge-impacts-app-layer) - We recommend 0xMacro's post on [What Solidity Devs should know about Ethereum's Merge](https://0xmacro.com/blog/what-solidity-devs-should-know-about-ethereums-merge/) --- // File: about/specs/hard-forks/shanghai-capella # What is Shanghai/Capella hardfork? Shanghai/Capella hardfork enables validator withdrawal and several execution layer update on Gnosis Chain. EIPs that are included in this hardfork: EIP-3651, EIP-3855, EIP-3860, EIP-6049. Validator withdrawal allows a validator's account balance get withdrawn from Beacon Chain to Execution Layer, in the form of GNO. The GNO will be accrued on validator's withdrawal address on the Execution Layer, which is set using `eth1_withdrawal_address` option during validator key generation. Check out [validator withdrawal](/node/management/withdrawals) for more details. ## Upgrade Schedule | Network | Timestamp | Date & Time (UTC) | Fork Hash | Beacon Chain Epoch | | ------- | ------------ | ----------------------------- | --------- | ------------------ | | Chiado | 1684934220 | May-24-2023 13:17:00 +UTC | 0xa15a4252 | 244224 | | Mainnet | 1690889660 | Aug-01-2023 11:34:20 +UTC | 0x2efe91ba | 648704 | ## How to Prepare ### For Validators 1. Check Withdrawal Credentials For any type of withdrawals, a validator need to have `0x01` withdrawal credential. You’re fine if you used `--eth1_withdrawal_address` to create your validator keys. If not, tooling will be made available. Refer to [validator withdrawal](/node/management/withdrawals#check-withdrawal-credential) for more details. 2. Update your clients Execution Layer: ✅ NethermindEth [v1.19.3](https://github.com/NethermindEth/nethermind/releases/tag/1.19.3) ✅ ErigonEth [v2.48.0](https://github.com/ledgerwatch/erigon/releases/tag/v2.48.0) Consensus Layer: ✅ Lighthouse [v4.3.0](https://github.com/sigp/lighthouse/releases/tag/v4.3.0) ✅ Teku [v23.6.1](https://github.com/Consensys/teku/releases/tag/23.6.1) ✅ Nimbus v23.6.0 (only with the following Docker image: http://ghcr.io/gnosischain/gnosis-nimbus-eth2:v23.6.0) ✅ Lodestar [v1.9.1](https://github.com/ChainSafe/lodestar/releases/tag/v1.9.1) DAppNode Packages ✅ Teku Gnosis v0.1.9 ✅ Lighthouse Gnosis v0.1.10 ✅ Lodestar Gnosis v0.1.2 ✅ Nethermind xDAI v1.0.34 ⌛️ Erigon and Nimbus - Forthcoming ## How to claim your withdrawal? ### Partial Withdrawal As we have modified some specs regarding the withdrawals to enable withdrawing GNO instead of the native gas token xDai, unlike Ethereum, partial withdrawals currently do not happen automatically. So, for now, you will need to call [`claimWithdrawal`](https://gnosisscan.io/address/0x0b98057ea310f4d31f2a452b414647007d1645d9#writeProxyContract#F3) function on the [contract](https://gnosisscan.io/address/0x0b98057ea310f4d31f2a452b414647007d1645d9#writeProxyContract). However, it is in our plans to automate and subsidize partial withdrawals in the future. ### Full Withdrawal Please check guide on [voluntary exit](/node/management/voluntary-exit). --- // File: about/specs/hard-forks/spec.json-update # Spec.json update :::caution Archived page Check the latest hard fork and update your node ::: :::info This guide assumes that you're running this playbook from the same machine you used to make initial deployment of your node. You should already have `python` and `ansible` installed, and you have the correct ssh keypair to root-access the node. ::: 1\) If you already have a cloned version of the poa-devops repository ([https://github.com/poanetwork/poa-devops.git](https://github.com/poanetwork/poa-devops.git)), pull the latest changes: ```bash cd poa-devops git pull origin master ``` otherwise, clone this repository: ```bash git clone https://github.com/poanetwork/poa-devops.git cd poa-devops ``` 1\) create `group_vars/all` file: ```bash cp group_vars/hf-spec-change.example group_vars/all ``` and set the following variables: 1. `poa_role` - node's role (one of `bootnode`, `validator`, `moc`, `explorer`, `netstat`) 2. `MAIN_REPO_FETCH: "poanetwork"`) 3. `GENESIS_BRANCH: "dai"` ) 2\) Create/edit `hosts` file: ```bash echo "" > hosts ``` and put your node's ip address (assuming it's 192.0.2.1) as follows: ```bash [hf-spec-change] 192.0.2.1 ``` make sure you don't have other tags (`[...]`) in hosts file, **and double check you are using your DAI node's IP address**. For those who host multiple nodes: * if all your nodes are of the same role (e.g. all bootnodes), you can run this playbook on all of them by listing their ips, e.g. ``` [hf-spec-change] 192.0.2.1 192.0.2.2 192.0.2.3 192.0.2.4 ``` * if you host nodes of different types you can set `poa_role` individually against the corresponding ip address like so: ``` [hf-spec-change] 192.0.2.1 poa_role=explorer 192.0.2.2 192.0.2.3 poa_role=moc 192.0.2.4 ``` on lines where you omitted explicit `poa_role`, the value from `group_vars/all` is used. 3\) Run the playbook: ```bash ansible-playbook -i hosts site.yml ``` :::warning **I**f you get a ssh connection error, try to add `-e 'ansible_ssh_user=ubuntu'` to the command line above, substituting `ubuntu` with correct ssh username, which is usually either `ubuntu` or `root` or `poa` or `centos` depending on your setup ::: 4\) Verify that your node is active in netstat ([https://dai-netstat.poa.network/](https://dai-netstat.poa.network/)) 5\) connect to the node ```bash ssh root@192.0.2.1 ``` switch to the home folder of corresponding role: ```bash # substitute validator with your node's role (bootnode, moc, ...) cd /home/validator ``` and check the update time of `spec.json` (should be about the time you started the playbook) ```bash ls -lh # a long list should appear here, look for spec.json in the rightmost column and check the date and time on the same row ``` also check that backup was created: ```bash ls -lh spec-hfs/ # look for a file named similar to spec-hf-20180108-174649.json Numbers represent date and time in UTC when the playbook was started ``` --- // File: about/specs/security-audit # Security Audits :::info Most Audits were completed prior to the rebrand from xDai Chain to Gnosis, and will refer to the xDai chain as well as the STAKE token, the previous governance token of the chain (the chain is in the process of transferring to GNO-only security). ::: ## Stake Beacon Chain by ChainSecurity **Completed:** October 1, 2021 **Conclusion:** During the assessment one critical issue was found and fixed following the intermediate report. The remaining issues were of low severity and were fixed accordingly. The communication with the team was very responsive. **Audit Report**: [https://chainsecurity.com/security-audit/poa-network-stake-beacon-chain-sbc-deposit/](https://chainsecurity.com/security-audit/poa-network-stake-beacon-chain-sbc-deposit/) ## OmniBridge v6.0 Smart Contracts Audit by ChainSecurity **Completed:** September 7, 2021 **Conclusion**: The assessment uncovered a number of potential issues which were resolved by the team. Two additional issues were acknowledged and largely mitigated by the team, and the original severities are no longer applicable. These upgrades to the Omnibridge provide additional functionality which will be implemented in the future. * **Contracts:** [https://github.com/poanetwork/omnibridge](https://github.com/poanetwork/omnibridge) * **Audit Report** [ChainSecurity_POA_Network_Omnibridge_Version_6_0_audit.pdf](/files/ChainSecurity_POA_Network_Omnibridge_Version_6_0_audit.pdf) ## POSDAO Audit by ChainSecurity **Completed:** June 25, 2021 **Conclusion**: The assessment uncovered several issues which were addressed or acknowledged by the team. No "critical" severity security flaws preventing continued usage or launch of contracts in future contexts were found. 0 Critical Issues, 1 High Risk Issue Accepted, 4 Medium Issues Accepted/Acknowledged, 4 Low Risk Issues Accepted/Acknowledged. * **Contracts:** [https://github.com/poanetwork/posdao-contracts](https://github.com/poanetwork/posdao-contracts) * **Audit Report in repo**: [https://github.com/poanetwork/posdao-contracts/blob/master/audit/ChainSecurity/report.pdf](https://github.com/poanetwork/posdao-contracts/blob/master/audit/ChainSecurity/report.pdf) :::success more info [https://chainsecurity.com/security-audit/poa-network-posdao/](https://chainsecurity.com/security-audit/poa-network-posdao/) ::: ## OmniBridge Audit by ChainSecurity **Completed:** April 27, 2021 **Conclusion**: 0 Critical or High Risk Issues, 2 Medium Issues Accepted, 3 Low Risk Issues Accepted/Acknowledged **Contracts:** [https://github.com/poanetwork/omnibridge](https://github.com/poanetwork/omnibridge)​ :::success more info [https://chainsecurity.com/security-audit/poa-network-omnibridge/](https://chainsecurity.com/security-audit/poa-network-omnibridge/) ::: ## TokenBridge Audit by Quantstamp (covers OmniBridge) **Completed:** November 6, 2020 **Conclusion**: No high and medium risk issues found, all low risk issues addressed. **Contracts:** Revised in version 5.5.0-rc0 to address audit. [https://github.com/poanetwork/tokenbridge-contracts/releases/tag/5.5.0-rc0](https://github.com/poanetwork/tokenbridge-contracts/releases/tag/5.5.0-rc0) :::success [Quantstamp Security Audit PDF](https://github.com/poanetwork/tokenbridge/blob/master/audit/quantstamp/POA-Network-TokenBridge-contracts-5.4.1-security-assessment-report.pdf) ::: ## EasyStaking Audit by Quantstamp **Completed:** August 3, 2020 **Conclusion:** All high/medium/low risk issues resolved. [XDai-Easy-Staking-Final-Report.pdf](/files/XDai-Easy-Staking-Final-Report.pdf) ## TokenBridge Audit by Quantstamp (covers xDai bridge functionality) **Completed:** January 8, 2020 **Conclusion**: All high risk issues resolved and low risk issues addressed. [More information available in this post](https://forum.poa.network/t/quantstamp-security-audit-for-tokenbridge-contracts-completed/3233). **Contracts:** Revised in version 3.3.0 to address audit. [https://github.com/poanetwork/tokenbridge-contracts/releases/tag/3.3.0](https://github.com/poanetwork/tokenbridge-contracts/releases/tag/3.3.0) :::success [Quantstamp TokenBridge Security Audit PDF](https://github.com/poanetwork/tokenbridge/blob/73d500210546e2959536dc569f1aec5752077225/audit/quantstamp/POA-Network-Token-bridge-security-assessment-report.pdf) ::: ## STAKE Token Distribution by Quantstamp #### **STAKE Token Distribution Audit** **Completed:** June 24, 2020\ \ **Conclusion**: No High or Medium risks, all low and informational risks addressed :::success [Quantstamp STAKE Security Audit PDF](https://github.com/xdaichain/stake-token/blob/master/audit/Quantstamp/xDAI%20STAKE%20Token%20Distribution%20-%20Additional%20Report.pdf) ::: #### **DPOS Audit** In the original audit, the working name for the staking token was DPOS. This changed to STAKE. **DPOS Audit Completed:** September 5, 2019\ \ **Conclusion**: All risks resolved. \ \ **Contracts:** Version 1.0.1 addressed items in audit.\ [https://github.com/xdaichain/stake-token/releases/tag/v1.0.1](https://github.com/xdaichain/stake-token/releases/tag/v1.0.1) :::success [Quantstamp DPOS Security Audit PDF](https://github.com/xdaichain/stake-token/blob/master/audit/Quantstamp/DPOS%20token-Audit%20Final%20Report.pdf) ::: #### **STAKE Legal Opinion** The token constitutes a VFA in terms of Maltese law. Please contact [team@xdaichain.com ](mailto:team@xdaichain.com)to request access to the document. ## POSDAO Initial Security Audit by PepperSec **Completed**: August 2019 **Conclusion**: All issues fixed or addressed. Due to scalability concerns, teams created a new methodology to accumulate and later “pull” their stakes and rewards instead of the “push” strategy as implemented in the audited version of the contracts. **Contracts:** Version 0.1.0 addresses issues present in audit. [https://github.com/poanetwork/posdao-contracts/releases/tag/v0.1.0](https://github.com/poanetwork/posdao-contracts/releases/tag/v0.1.0) :::success [POSDAO v1 Consensus Contracts audit](https://forum.poa.network/t/security-audits-of-posdao-consensus-contracts/2921) ::: --- // File: about/tokens/README # Tokens Gnosis is a stable payments EVM (Ethereum Virtual Machine) blockchain designed for fast and inexpensive transactions. The chain uses a unique dual-token model; [xDai](/concepts/tokens/xdai/) is a stable token used for transactions, payments, and fees, and Proof of Stake protection will be provided by [GNO](/concepts/tokens/gno/) with the consensus-layer Gnosis Beacon Chain. | | xDai ⚔ | GNO 🦸 | | -- | ------- | ------ | | **Purpose** | - Stable Payments
- Transaction (gas) Fees | - Staking & Protocol Protection
- Community Governance | | **Stability** | Stable to USD | Market Driven | --- // File: about/tokens/gno GNO is the key token of the Gnosis ecosystem. It's used for staking on the Gnosis Beacon Chain and acts as the governance token for the GnosisDAO. ## Specifications ```jsx title="Contract Address" 0x6810e776880c02933d47db1b9fc05908e5386b96 ``` ```jsx title="Etherscan" https://etherscan.io/token/0x6810e776880c02933d47db1b9fc05908e5386b96 ``` ```jsx title="Name" Gnosis ``` ```jsx title="Ticker" GNO ``` ```jsx title="Decimals" 18 ``` ```jsx title="Icon" https://docs.gnosischain.com/img/tokens/gno.png ``` ```jsx title="Contract Address" 0x9C58BAcC331c9aa871AFD802DB6379a98e80CEdb ``` ```jsx title="Gnosisscan" https://gnosisscan.io/token/0x9C58BAcC331c9aa871AFD802DB6379a98e80CEdb ``` ```jsx title="Name" Gnosis Token on xDai ``` ```jsx title="Ticker" GNO ``` ```jsx title="Decimals" 18 ``` ```jsx title="Icon" https://docs.gnosischain.com/img/tokens/gno.png ``` Check out [Chiado Testnet specs](/concepts/networks/chiado#gno-token) for more info. ## Get GNO Tokens ### Markets - [CoinMarketCap](https://coinmarketcap.com/currencies/gnosis-gno/) - [CoinGecko](https://www.coingecko.com/en/coins/gnosis) ### Bridge - Ethereum to Gnosis token bridge: [OmniBridge](https://omni.gnosischain.com/) ## Use GNO Tokens ### Staking By staking your GNO tokens, you play a vital role in securing the Gnosis chain through the validation of blocks within the PoS consensus. As a reward for your participation, you will receive staking [rewards](../../node/rewards-penalties). For a more comprehensive understanding of the validator deposit process, check the [validator deposit process](/node/manual/validator/deposit) page. :::note Historical use of `mGNO` Historically, deposits on the Beacon Chain were made with a token called `mGNO` ([0x722fc4DAABFEaff81b97894fC623f91814a1BF68](https://gnosisscan.io/address/0x722fc4DAABFEaff81b97894fC623f91814a1BF68)), with a conversion rate of `1 GNO = 32 mGNO`. This was done to mimic Ethereum's `32 ETH` staking requirement, but is now deprecated and no longer serves any purpose. ::: For those who prefer not to manage the infrastructure themselves, liquid staking providers offer the opportunity to stake without the need for personal infrastructure management. For more in-depth information about sGNO and rGNO tokens, please consult the [Stakewise](/tools/beacon-chain/liquid-staking#tokens-sgno--rgno) page. ### GnosisDAO Governance - [GnosisDAO Governance Forum](https://forum.gnosis.io/) - [GNO Utility and Value Proposition](https://forum.gnosis.io/t/gno-utility-and-value-proposition/2344) - [Community](/developers/communication) ## GNO Token Audit - [GNO Token v2.0.0 Audit](https://hackmd.io/@verilog/gno-token-v2-audit) by Verilog Solutions --- // File: about/tokens/xdai # xDai Token xDai tokens are native tokens on Gnosis and also used to pay for execution of smart contracts and gas fees. ## Get xDai Token ### Bridge Convert DAI from Ethereum to xDai using the [Unified Gnosis Bridge App](/bridges/usebridges). ### Buy xDAI Gateways and Exchanges allow users to get xDai using FIAT or swap other crypto into xDai. - [AscendEX](https://ascendex.com/en/basic/cashtrade-spottrading/usdt/xdai) - [Mt Pelerin](https://www.mtpelerin.com/buy-xdai) - [Ramp](https://ramp.network/buy/?swapAsset=XDAI) - [Honeyswap](https://honeyswap.1hive.eth.limo/) ### Faucets Gnosis offers [free mainnet faucets](/tools/faucets/). ## Specifications xDai is the native currency built on the Gnosis blockchain, it is generated when a Dai is sent to the xDai bridge, the bridge validators mint the xDai as part of the Gnosis reward native contract. ### Properties ```jsx title="Name" xDai ``` ```jsx title="Ticker" xDAI ``` ```jsx title="Decimals" 18 ``` ```jsx title="Icon" https://docs.gnosischain.com/img/tokens/xdai.png ``` ```jsx title="Name" Chiado xDai ``` ```jsx title="Ticker" Chiado xDai ``` ```jsx title="Decimals" 18 ``` ```jsx title="Icon" https://docs.gnosischain.com/img/tokens/chiado-xdai.png ``` ## Wrapped xDai (wxDai) xDai being a native token of the network does not comply with ERC-20 standard. Wrapped xDai or wxDai is the ERC-20 compatible xDai. It allows easy integration with other DeFi primitives. ```jsx title="Gnosis Mainnet Address" 0xe91D153E0b41518A2Ce8Dd3D7944Fa863463a97d ``` ### Get wxDai - Wrap your xDai in [Wrap Eth](https://wrapeth.com/) connected with [MetaMask to Gnosis](/tools/wallets/metamask/) - [Swapr](https://swapr.eth.limo/#/swap?chainId=100) - [Honeyswap](https://honeyswap.1hive.eth.limo/) ## More Links - [CoinMarketCap](https://coinmarketcap.com/currencies/xdaistable/) - [CoinGecko](https://www.coingecko.com/en/coins/xdai) --- // File: bridges/README Welcome to Gnosis Bridge! 🎉 You can check out Gnosis Bridge here : https://bridge.gnosischain.com/ --- // File: bridges/usebridges :::info To begin using Gnosis Bridge, you need to go on this following link : https://bridge.gnosischain.com/ ::: :::note You will need xDAI to perform any transactions on Gnosis Chain as it’s the chain’s gas token. You can get xDAI by transferring DAI from Ethereum using the Bridge Explorer ::: ![xDAI bridge from ethereum](../../static/img/bridges/bridge-xdai-new.png) ### Follow the below steps to get xDAI into your Ethereum address: 1. Go to the Gnosis Chain Bridge UI and connect your wallet to the Ethereum Mainnet. 2. Once connected, you will see your address populated in the header, and your DAI balance will be displayed on the page. 3. Enter the amount of DAI you would like to transfer to Gnosis, and click the Transfer button. 4. The web3 wallet window will open with transaction details. The default gas price is fine, if you would like a faster transaction you can increase. Click Submit or Confirm (depending on wallet) to initiate the transaction. 5. Wait for the transaction confirmation (this can take some time if the network is super congested). The transaction is considered finalized after 8 blocks. To check on a pending transaction, click on the tx in the UI. ### Follow the below steps to get ERC20 token from Ethereum address to Gnosis Chain: 1. Go to the Gnosis Bridge UI 2. Connect your wallet to the Ethereum Mainnet 3. Select the token you want to transfer and enter the amount of token you want. 4. Click Bridge and sign the transaction ![Bridge erc 20 token to gnosis chain](../../static/img/bridges/bridge-erc20-new.png) Transactions from Ethereum to Gnosis Chain are expected to take ~26 mins (130 blocks) because of the verification through the ZK light client You can view and monitor your transactions by visiting this URL: https://bridge.gnosischain.com/bridge-explorer/latest-transactions - To see status of one specific transaction by pasting the transaction hash in the explorer : https://bridge.gnosischain.com/bridge-explorer You can also check out all the transactions you have done by checking out the history from "My Transactions" of your connected wallet. ![My transactions](../../static/img/bridges/bridge-explorer/transaction-history.png) :::note If you are bridging from Gnosis to Ethereum, you have to claim your funds on Ethereum after the bridge transaction has been validated. You can do this by finding your transaction on the Bridge Explorer and clicking “claim” ::: ![Search Transaction](../../static/img/bridges/bridge-explorer/claim-new.png) :::note Please note that Gnosis bridges have certain limits. You can check these limits by visiting this URL: https://bridge-explorer.gnosischain.com/bridge-explorer/bridges/ If you are bridging funds that exceed the daily limit, your transaction will be delayed till after the bridge limits reset (every 24h). ::: :::info If you are not coming from other chains, you can choose from a list of third-party bridges here: [Third-party bridges](/docs/bridges/thirdpartybridges.md) ::: ### Need more help? Join the Gnosis Chain Discord and if you need to troubleshoot a specific bridge issue, feel free to open a support ticket and tell us more about it. --- // File: bridges/Bridge Explorer # Bridge Explorer Bridge explorer allows user to check bridge transactions of Gnosis Bridge, bridges configurations, and validators status. Users may also claim their bridge transactions in bridge explorer. :::info https://bridge-explorer.gnosischain.com/bridge-explorer/latest-transactions ::: ## Transactions ### How to search for your transaction? 1. Search the transaction by inserting the transaction hash or initiator/receiver address. 2. You can use different filter options to filter out the irrelevant transactions. 3. Click on the transaction item to check the details of the transaction. ![Search Transaction](../../static/img/bridges/bridge-explorer/search-new-tx.png) ### What does different filters mean? **Status** 1. Initiated: Transaction is initiated from the source chain. 2. Collecting: Signatures from validators are being collecting for the transaction. 3. Unclaimed: Transaction has collected enough signatures, but has not yet been claimed on Ethereum. 4. Completed: Transaction has been bridged successfully. 5. Error: Transaction is not bridged successfully. **Direction** 1. Gnosis > Mainnet: The transaction is initiated from Gnosis Chain, and bridged to Ethereum mainnet, user need to claim the transaction on Ethereum mainnet. 2. Mainnet > Gnosis: The transaction is initiated from Ethereum mainnet, and bridged to Gnosis Chain. **Signed by** - The transaction is signed by which validator (validator calls `submitSignatures` to sign the transaction). **Executed by** - The transaction is executed by which validator (validator calls `executeAffirmation` to execute the transaction). ### How to claim your transaction 1. Click **Connect** button on top right corner and connect your wallet. 2. Search for your transaction 3. Click **Claim** button to claim your transaction. ![Claim Transaction](../../static/img/bridges/bridge-explorer/claim-new.png) You can also claim your transaction from Transaction page. ![Claim Transaction page](../../static/img/bridges/bridge-explorer/claim-tx-page.png) ### Daily bridge limits This section shows insight of bridge limit and is reset every `Daily limit reset` hours. 1. **Daily Limit** - Ethereum -> Gnosis Chain: Maximum amount of DAI/token that users can bridge from Ethereum to Gnosis in a day - Gnosis Chain -> Ethereum: Maximum amount of XDAI/token that users can bridge from Gnosis to Ethereum in a day. 2. **Execution Daily Limit** - Ethereum -> Gnosis Chain: Maximum amount of DAI/token that bridge validators can execute and bridge from Gnosis to Ethereum in a day. - Gnosis Chain -> Ethereum: Maximum amount of XDAI/token that bridge validators can execute and bridge from Ethereum to Gnosis in a day. 3. **Min. per transaction**: Minimum amount of token that users can bridge in a single transaction. 4. **Max. per transaction**: Maximum amount of token that users can bridge in a single transaction. 5. **Execution max. per transaction**: Maximum amount of token that validators can execute in a single transaction. 6. **Daily limit reset**: In how many hours will the daily limit get reset to zero. 7. **Token address**: Token address of corresponding token, native token(xDAI) don't have an address. ![](../../static/img/bridges/bridge-explorer/bridge-info-new.png) ### Configuration This section shows the address of key contracts. ![](../../static/img/bridges/bridge-explorer/bridge-configuration-new.png) ## Validators This section shows the insight of current bridges validators, including last seen ago, total signed and executed transactions in 24 hours, balance of validators and their addresses. ![](../../static/img//bridges/bridge-explorer/validator-status-new.png) If you are not coming from Ethereum, you can use one of the following bridges: - [Jumper](https://jumper.exchange/) (by Li.Fi) - [Bungee](https://www.bungee.exchange) - [Hop](https://app.hop.exchange/) - [Connext Bridge](https://bridge.connext.network/) Gnosis' native bridges allow for sending tokens and data, and are run by a group of [trusted bridge validators](../bridges/About%20Token%20Bridges/amb-bridgeamb-bridge#bridge-validators). There is a [roadmap](../bridges/roadmap.md) as well that you can follow. Gnosis' native bridges are first-class citizens in the chain's architecture due to the [native Omni and xDai bridge's](../bridges/About%20Token%20Bridges/README.md) integral role in minting and burning the native [xDai token](../about/tokens/xdai.md) used for gas. --- // File: bridges/thirdpartybridges import Tabs from '@theme/Tabs'; import TabItem from '@theme/TabItem'; import Admonition from '@theme/Admonition'; The following third-party bridges allow seamless asset transfers to and from Gnosis Chain. Ensure you verify the bridge’s security, trust and fees before using them. | Bridge Name | Supported Networks | Link | |-----------------|-------------------|------| | Stargate | Multiple EVM Chains | [Visit](https://stargate.finance/bridge?srcChain=gnosis) | | Symbiosis | Multiple EVM Chains | [Visit](https://app.symbiosis.finance/swap) | | Debridge | Multiple EVM Chains, Solana | [Visit](https://app.debridge.finance/?address=&inputChain=100) | | Jumper | Multiple EVM Chains, Solana | [Visit](https://jumper.exchange/?fromChain=100) | | Bungee | Multiple EVM Chains | [Visit](https://www.bungee.exchange/) | | Hop | Multiple EVM Chains | [Visit](https://app.hop.exchange/#/send?sourceNetwork=ethereum&destNetwork=gnosis) | | Hyperbridge | Multiple EVM Chains | [Visit](https://app.hyperbridge.network/) | | Crosscurve | Multiple EVM Chains | [Visit](https://app.crosscurve.fi/swap?inputChainId=27&inputToken=0x0000000000000000000000000000000000000000&outputChainId=1) | --- // File: bridges/using-amb ## Submitting AMB Confirmations Manually ### Between Ethereum and Gnosis Chain The Arbitrary Message Bridge between the Ethereum Mainnet and Gnosis Chain requires a request-and-claim scheme to transfer data from Gnosis Chain, and some users and applications may want to use a manual process to gather the oracles confirmations and send them to the AMB contracts on the Ethereum side. :::info This approach is the equivalent of the set of actions performed by the [OmniBridge UI](https://omni.gnosischain.com/bridge) after pressing the "Claim" button, or by the [AMB Live Monitoring app](https://alm-bridge-monitor.gnosischain.com/) after pressing the "Execute" button. ::: Below is the list of actions that can be executed in BlockScout and Etherscan, or, if you are familiar with the contract interaction through Web3 provider, it can be done by importing the contract's ABI to your application. 1. Find the first transaction which initiated message passing through the AMB bridge and go to the logs generated during the transaction execution. The `encodedData` argument emitted with the `UserRequestForSignature` event will be used in the next steps. ![](/img/bridges/amb_manualconfirmation_userRequestForSignature_encodedData.png) 2. Go to the [AMB helper contract](https://gnosisscan.io/address/0x7d94ece17e81355326e3359115D4B02411825EdD#readContract) and call `getSignatures()` there with the encoded data from the `UserRequestForSignature` event. It will produce a blob with signatures. ![](/img/bridges/amb_helper_getsignatures.png) 3. Pass the encoded data and the signatures to the [Arbitrary Message Bridge contract](https://etherscan.io/address/0x4C36d2919e407f0Cc2Ee3c993ccF8ac26d9CE64e#writeProxyContract)'s `executeSignatures()` function on the Ethereum Mainnet and press the "Write" button to send the transaction. ![](/img/bridges/amb_eth_executeSignatures.png) :::info MetaMask will show a high gas estimate for this transaction. In most cases the final gas consumption will be significantly lower. ::: ## Deploying custom ERC-20 Bridge - [Tokenbridge Docs: Deploying custom token bridge on top of AMB](https://github.com/tokenbridge/docs/blob/master/eth-xdai-amb-bridge/erc20-to-erc20-extension-linked-with-a-particular-token/deploy-erc20-erc677-erc827-to-erc677-amb-bridge-extension.md) - [Tokenbridge Docs: Deploying a custom UI token bridge on top of AMB](https://github.com/tokenbridge/docs/blob/master/eth-xdai-amb-bridge/erc20-to-erc20-extension-linked-with-a-particular-token/ui-to-transfer-tokens-through-amb.md) --- // File: bridges/roadmap Gnosis is investing significant resources into trust-minimization of its Bridges, to ensure trust and safety of users. ### Hashi - A cross chain protocol based on distributed trust of the underlying security mechanisms 🚧 Hashi, a cross chain protocol based on distributed trust of the underlying security mechanisms Hashi is an EVM Hash Oracle Aggregator designed to enhance cross-chain bridge security by aggregating block headers from various sources. By requiring validation from multiple independent mechanisms, Hashi ensures greater resilience against security incidents. It supports 15+ General Message Passing bridges and ZK light clients, promoting redundancy and reducing reliance on single mechanisms. Integrating Hashi into Gnosis Chain's bridges strengthens security, decentralization, and interoperability. This initiative aims to set a new standard for cross-chain transactions, enhancing user confidence and bolstering the Gnosis ecosystem's security posture. [Check out the proposal](https://forum.gnosis.io/t/gip-93-should-gnosisdao-support-the-integration-of-hashi-within-gnosis-chains-canonical-bridges/8245) . ### Telepathy, zkSNARK-enabled Light Client bridge validator ✅ Succinct Lab's zkSNARK-enabled Light Client, Telepathy, launched in July 2023, has emerged as a key component of the AMB bridge ecosystem. Utilizing zkSNARKs, Telepathy provides validity proofs, ensuring trustless verification of transaction events across chains. This solution has become one of the most active bridge validators in the AMB network, enhancing security and reliability for cross-chain transactions. After successful audits and release, we aim to gradually migrate our canonical bridges to Hashi’s distributed trust model. --- // File: bridges/audits The OmniBridge and xDai Bridge have undergone multiple independent security audits and assessments. We have engaged in the auditing process after introducing major functionality, and have acknowledged and/or fixed all issues found during these audits. Audit results are presented starting with the most recent. ## Hashi integration by Omega, g0, Least Authority The scope for auditing includes the following repos: 1. https://github.com/gnosis/hashi except for GiriGiriBashi.sol 2. AMB: https://github.com/crosschain-alliance/tokenbridge-contracts/tree/feat/hashi-integration-amb 3. XDAI: https://github.com/crosschain-alliance/tokenbridge-contracts/tree/feat/hashi-integration-xdai-bridge ### Omega **Completed**: June 27, 2024 **Conclusion**: 1 high severity issues, 4 low severity issues, 10 info issues. All issues has been resolved or acknowledged. **Audit Report**:[Omega-Gnosis-Hashi Final Audit Report](../../static/files/Omega-Gnosis-Hashi%20Final%20Report.pdf) ### g0 **Completed**: June 28, 2024 **Conclusion**: 1 critical issue, 3 medium issues, 4 minor issues, 4 note issues. All issues has been resolved or acknowledged. **Audit Report**:[g0-Gnosis-Hashi Audit Report](../../static/files/g0-Hashi-Gnosis-FinalAuditReport.pdf) ### Least Authority **Completed**: June 12, 2024 **Conclusion**: 4 issues, 13 suggestions. All issues has been resolved or acknowledged. **Audit Report**:[Least Authority-Gnosis-Hashi Audit Report](../../static/files/Least%20Authority-Gnosis%20Hashi%20Final%20Audit%20Report.pdf) ## xDAI bridge upgrade Audit by Omega and ChainSafe ### Omega **Completed**: August 31, 2023 **Conclusion**: 2 medium issues, 5 low risk issues, 3 info issues. All issues has been resolved. **Contracts**: https://github.com/gnosischain/tokenbridge-contracts/tree/xdaibridge-upgrade-sdai **Audit Report**: [Omega Gnosis Bridge Final Audit Report](../../static/files/Omega%20-%20Gnosis%20Bridge%20-%20final%20report.pdf) ### ChainSafe **Completed**: August 31, 2023 **Conclusion**: 2 minor issues, 2 optimizational issues. **Contracts**: https://github.com/gnosischain/tokenbridge-contracts/tree/xdaibridge-upgrade-sdai **Audit Report**: [ChainSafe Audit Report](../../static/files/dai-xdai-08-23.pdf) **Reference**: [Savings xDAI](../bridges/Token%20Bridge/xdai-bridge.md#savings-xdai) ## OmniBridge v6.0 Smart Contracts Audit by ChainSecurity **Completed**: September 7, 2021 **Conclusion**: 0 Critical Risk Issues, 1 High Risk Issue Mitigated, 1 Medium Issue Mitigated, 2 Corrected, 13 Low Risk Issues all Acknowledged and/or Corrected. **Contracts**: https://github.com/poanetwork/omnibridge **Audit Report**: [ChainSecurity v6.0 Audit](/files/ChainSecurity_POA_Network_Omnibridge_Version_6_0_audit.pdf) ## OmniBridge Audit by ChainSecurity **Completed**: April 27, 2021 **Conclusion**: 0 Critical or High Risk Issues, 2 Medium Issues Accepted, 3 Low Risk Issues Accepted/Acknowledged **Contracts**: https://github.com/poanetwork/omnibridge **Audit Report**: [Chainsecurity OmniBridge Audit](https://chainsecurity.com/security-audit/poa-network-omnibridge/) ## TokenBridge Audit by Quantstamp (covers OmniBridge) **Completed**: November 6, 2020 **Conclusion**: No high and medium risk issues found, all low risk issues addressed. **Contracts**: Revised in version 5.5.0-rc0 to address audit. https://github.com/poanetwork/tokenbridge-contracts/releases/tag/5.5.0-rc0 **Audit Report**: [TokenBridge Audit by Quantstamp - OmniBridge](https://github.com/omni/tokenbridge/blob/master/audit/quantstamp/POA-Network-TokenBridge-contracts-5.4.1-security-assessment-report.pdf) ## TokenBridge Audit by Quantstamp (covers AMB bridge) **Completed**: January 8, 2020 **Conclusion**: : All high risk issues resolved and low risk issues addressed. [More information available in this post](https://forum.poa.network/t/quantstamp-security-audit-for-tokenbridge-contracts-completed/3233). **Contracts**: Revised in version 3.3.0 to address audit. https://github.com/poanetwork/tokenbridge-contracts/releases/tag/3.3.0 **Audit Report**: [TokenBridge Audit by Quantstamp - AMB Bridge](https://github.com/omni/tokenbridge/blob/73d500210546e2959536dc569f1aec5752077225/audit/quantstamp/POA-Network-Token-bridge-security-assessment-report.pdf) ## Smart Contracts Security Analysis by SmartDec **Completed**: July 2019 **Conclusion**: All of the issues were addressed, some of them fixed in the latest version of the code. **Contracts**: Revised in version 2.3.3 to address audit. https://github.com/poanetwork/tokenbridge-contracts/releases/tag/2.3.3 **Audit Report**: [SmartDec Security Audit](https://github.com/omni/tokenbridge/blob/73d500210546e2959536dc569f1aec5752077225/audit/smartdec/POA-Network-TokenBridge-Contracts-v2-3-2-Security-Assessment.pdf) ## Initial TokenBridge Audit by [Peppersec](https://peppersec.com/): **Completed**: October 2018 **Conclusion**: Rated the overall security level of the system as “High”. **Contracts**: Updated to version 2.0.0 to address audit. https://github.com/poanetwork/tokenbridge-contracts/releases/tag/2.0.0 **Audit Report**: [Peppersec Initial TokenBridge Audit](https://github.com/omni/tokenbridge/blob/73d500210546e2959536dc569f1aec5752077225/audit/peppersec/POA-Network-Token-bridge-security-assessment-report.pdf) --- // File: bridges/About Token Bridges/omnibridge # Omnibridge :::info The Omnibride can be used in https://bridge.gnosischain.com/. Please avoid using the legacy Omnibridge: https://omni.legacy.gnosischain.com/bridge ::: ## Key Information [Omnibridge](https://bridge.gnosischain.com/) is a native token bridge that mints the canonical representations of bridged assets on Gnosis. The Omnibridge is built on top of the [Arbitrary Message Bridge (AMB)](../About%20Token%20Bridges/amb-bridge.md) and thus relies on the same group of [bridge validators](../About%20Token%20Bridges/amb-bridge#bridge-validators) and trust model as the AMB. The Omnibridge currently connects Gnosis to Ethereum. The Omnibridge mints bridged tokens using a variant of the [ERC-677](https://github.com/ethereum/EIPs/issues/677) token standard, with all bridged tokens tracked in the [canonical Bridged Token Registries](#canonical-token-registries). ### Overview | | Detail | | --------------------- | ----------------------------------------------------- | | Frontend URL | https://bridge.gnosischain.com/ | | Trust Model | [4-of-8 Validator Multisig](#bridge-validators) | | Governance | [8-of-16 Multisig](#bridge-governance) | | Governance Parameters | Validator Set, Daily Limits, Fees | | Bug Bounty | [up to $2m](https://immunefi.com/bounty/gnosischain/) | | Bug Reporting | [Immunefi](https://immunefi.com/bounty/gnosischain/) | ### Key Contracts ### Ethereum | Contract | Ethereum Address | | ------------------------------------- | ---------------------------------------------------------------------------------------------------------------------------------------- | | AMB Proxy Contract (Foreign) | [0x4C36d2919e407f0Cc2Ee3c993ccF8ac26d9CE64e](https://etherscan.io/address/0x4C36d2919e407f0Cc2Ee3c993ccF8ac26d9CE64e#writeProxyContract) | | Omnibridge Multi-Token Mediator Proxy | [0x88ad09518695c6c3712AC10a214bE5109a655671](https://etherscan.io/address/0x88ad09518695c6c3712AC10a214bE5109a655671#writeProxyContract) | | Validator Management Contract | [0xed84a648b3c51432ad0fD1C2cD2C45677E9d4064](https://etherscan.io/address/0xed84a648b3c51432ad0fD1C2cD2C45677E9d4064#writeProxyContract) | ### Gnosis | Contract | Gnosis Address | | ------------------------------------- | ----------------------------------------------------------------------------------------------------------------------------------------- | | AMB Proxy Contract (Home) | [0x75Df5AF045d91108662D8080fD1FEFAd6aA0bb59](https://gnosisscan.io/address/0x75Df5AF045d91108662D8080fD1FEFAd6aA0bb59#writeProxyContract) | | Omnibridge Multi-Token Mediator Proxy | [0xf6A78083ca3e2a662D6dd1703c939c8aCE2e268d](https://gnosisscan.io/address/0xf6A78083ca3e2a662D6dd1703c939c8aCE2e268d#writeProxyContract) | | Validator Management Contract | [0xA280feD8D7CaD9a76C8b50cA5c33c2534fFa5008](https://gnosisscan.io/address/0xA280feD8D7CaD9a76C8b50cA5c33c2534fFa5008#writeContract) | ### Sepolia - Chiaado | Contract | Address | |------------------------------|---------------------------------------------------------------------------------------------------------------------------------------| | Omnibrdge (Sepolia) | [0x63e47c5e3303dddcaf3b404b1ccf9eb633652e9e](https://sepolia.etherscan.io/address/0x63e47c5e3303dddcaf3b404b1ccf9eb633652e9e) | | AMB (Sepolia) | [0xf2546d6648bd2af6a008a7e7c1542bb240329e11](https://sepolia.etherscan.io/address/0xf2546d6648bd2af6a008a7e7c1542bb240329e11) | | Validator Contract (Sepolia) | [0xa0bd95dd2570632c8640ab5bc213f3a0ea33e26a](https://sepolia.etherscan.io/address/0xa0bd95dd2570632c8640ab5bc213f3a0ea33e26a) | | Omnibridge (Chiado) | [0x82f63B9730f419CbfEEF10d58a522203838d74c8](https://gnosis-chiado.blockscout.com/address/0x82f63B9730f419CbfEEF10d58a522203838d74c8) | | AMB (Chiado) | [0x8448E15d0e706C0298dECA99F0b4744030e59d7d](https://gnosis-chiado.blockscout.com/address/0x8448E15d0e706C0298dECA99F0b4744030e59d7d) | | Validator Contract (Chiado) | [0x9e8a89ebcb83065eaaf4b7ff720caa5e6b25c976](https://gnosis-chiado.blockscout.com/address/0x9e8a89ebcb83065eaaf4b7ff720caa5e6b25c976) | ### Goerli - Chiado :::note The bridge between Goerli and Chiado is deprecating soon. ::: | Contract | Address | | ----------------------------- | ---------------------------------------------------------------------------------------------------------------------------- | | OmniBridge Mediator (Foreign) | [0x00147c84f13764dCDAbAF1cbAe622fa6f6839085](https://goerli.etherscan.io/address/0x00147c84f13764dCDAbAF1cbAe622fa6f6839085) | | AMB Contract Proxy (Foreign) | [0x87A19d769D875964E9Cd41dDBfc397B2543764E6](https://goerli.etherscan.io/address/0x87A19d769D875964E9Cd41dDBfc397B2543764E6) | | GNO on Goerli | [0x7f477c3f03213970d939104cc436dc995cf615b5](https://goerli.etherscan.io/address/0x7f477c3f03213970d939104cc436dc995cf615b5) | | Contract | Address | | --------------------------- | ------------------------------------------------------------------------------------------------------------------------------------- | | OmniBridge Mediator (Home) | [0x09D549a48AC52F3f9945E7de6402c609c92aa2E1](https://gnosis-chiado.blockscout.com/address/0x09D549a48AC52F3f9945E7de6402c609c92aa2E1) | | AMB Contract Proxy (Home) | [0x99Ca51a3534785ED619f46A79C7Ad65Fa8d85e7a](https://gnosis-chiado.blockscout.com/address/0x99Ca51a3534785ED619f46A79C7Ad65Fa8d85e7a) | | GnosisBridge(GNO) on Chiado | [0x19C653Da7c37c66208fbfbE8908A5051B57b4C70](https://gnosis-chiado.blockscout.com/address/0x19C653Da7c37c66208fbfbE8908A5051B57b4C70) | ### Fees & Daily Limits | Token | Ethereum -> Gnosis | Gnosis -> Ethereum | | ---------------- | ------------------ | ------------------ | | Default Bridge Fees | 0% | 0.1% | ```mdx-code-block
Fees and transaction limits of specific token
``` #### Single Transaction Limits :::warning Bridging DAI token to Gnosis Chain DOES NOT mint native xDai token. If you want native xDai, use the [xDai Bridge](xdai-bridge) ::: | Token | Ethereum -> Gnosis | Gnosis -> Ethereum | | --------- | ------------------ | ------------------- | | Dai\*\*\* | 1,000,000,000 | 1,000,000,000 WXDAI | | USDC | 1,000,000,000 | 10,000,000 | | USDT | 1,000,000,000 | 5,000,000 | | WETH | 690 | 690 | | WBTC | 12 | 12 | | GNO | 18350 | 18350 | | GIV | 60000000 | 60000000 | | CLNY | 14000000 | 14000000 | | DXD | 1000 | 1000 | | HOPR | 7000000 | 7000000 | | HAUS | 120000 | 120000 | #### Daily Limits | Token | Ethereum -> Gnosis | Gnosis -> Ethereum | | --------- | ------------------------- | ------------------------------ | | Dai\*\*\* | 1,000,000,000,000,000,000 | 1,000,000,000,000,000,000 xDai | | USDC | 1,000,000,000,000,000,000 | 10,000,000 | | USDT | 1,000,000,000,000,000,000 | 5,000,000 | | WETH | 690 | 690 | | WBTC | 12.00000001 | 12.00000001 | | GNO | 18350 | 18350 | | GIV | 60000000 | 60000000 | | CLNY | 14000000 | 14000000 | | DXD | 1000 | 1000 | | HOPR | 7000000 | 7000000 | | HAUS | 120000 | 120000 | \*\*\* Bridging Dai Using Omnibridge :::note Daily Limit is reset according to the following logic: the smart contract stores total amount of processed tokens per current day and reverts on a new transfer if it exceeds the daily limit. Id of the day is calculated using the formula `timestamp / (number of seconds in 1 day)`, where `timestamp` is the Unix timestamp. ::: ```mdx-code-block
``` ### Bridge Validators - See [Bridge Validator](../management/validators#amb--omnibridge) ### Bridge Governance - See [Bridge Governance](../management/README.md) ## How it works ### Ethereum -> Gnosis ![](/img/bridges/diagrams/token-bridge-01.png) 1. User `approve` Omnibridge as token spender. 2. User call `relayTokens()` on Mediator contract. 3. Mediator calls `requireToPassMessage()` on the Bridge. 4. `UserRequestForAffirmation` event is emitted for validators to validate the message. 5. Message is relayed to the mediator contract when consensus is met by calling `executeAffirmation()`. 6. ABM calls mediator on Gnosis chain: - token does not exist: the mediator deploys a new token registry and mints the relayed amount. - token exists: the relayed amount is minted in the token address. --- ### Gnosis -> Ethereum. ![](/img/bridges/diagrams/token-bridge-02.png) 1. User calls `transferAndCall` on ERC-677 token contract to send tokens to Omnibridge contract 2. `OnTokenTransfer` is called 3. Mediator contract burns tokens and calls bridge contract's `requireToPassMessage()` function. 4. `UseRequestForSignature` event is emitted for validators to validate the message. 5. Validators listen to the event: call `submitSignature` on Gnosis chain. 6. `CollectedSignatures` event is emitted when consensus is met. 7. User calls AMB (Ethereum side) `executeSignatures()` 8. ABM calls `handleBridgedTokens()` on Mediator. 9. Mediator contract unlocks the tokens The Omnibridge is built on top of the [Arbitrary Message Bridge](./amb-bridge.md). ### Mediator Contracts To handle the approval of token transfers, the Omnibridge makes use of what is called a mediator contract. No matter which side of the chain is originated, the following flows are valid. ![](/img/bridges/diagrams/amb-bridge-contract-flow-mediator.svg) 1. User calls token contract's `approve()` function to approve the balance to be transferred. 2. `relayTokens()` is called on the Mediator contract 3. Mediator calls `transferFrom()` on the token contract, transferring the approved balance 4. If this is the first time that token is being bridged to the destination network, it will also query the token's name, symbol and decimals so a new contract can be deployed on the destination network 5. Mediator contract then calls `requireToPassMessage()` on the bridge contract ## Exceptions and Special Cases While most tokens can be freely transferred between chains, there are several exceptions where token properties create bridge-related issues. - Bridge operations are disabled for Rebasing tokens. - Inflationary tokens can still be bridged, but any accrued inflation IS NOT returned to the user upon bridge exit. ### Rebasing Tokens Rebasing tokens include an elastic function where supply can be increased or decreased at regular intervals. If these tokens are bridged, supply impacts could result in inequities on either side of the bridge. In some cases this could result in a bridge balance reduction and the inability for users to exit. To prevent this, we have disabled bridging capability for rebasing type tokens. A partial token list is included below:
Click to View List | Name | Symbol | Address | | --------------- | ------ | ------------------------------------------ | | Base Protocol | BASE | 0x07150e919b4de5fd6a63de1f9384828396f25fdc | | USDf | USDf | 0x05462671c05adc39a6521fa60d5e9443e9e9d2b9 | | xBTC | XBTC | 0xecbf566944250dde88322581024e611419715f7a | | Debase | DEBASE | 0x9248c485b0b80f76da451f167a8db30f33c70907 | | Coil | COIL | 0x3936ad01cf109a36489d93cabda11cf062fd3d48 | | Dollars | USDX | 0x2f6081e3552b1c86ce4479b80062a1dda8ef23e3 | | RMPL | RMPL | 0xe17f017475a709de58e976081eb916081ff4c9d5 | | Rebased | REB2 | 0x87f5f9ebe40786d49d35e1b5997b07ccaa8adbff | | VELO Token | VLO | 0x98ad9b32dd10f8d8486927d846d4df8baf39abe2 | | Tokens of Babel | TOB | 0x7777770f8a6632ff043c8833310e245eba9209e6 | | Rise Protocol | RISE | 0x3fa807b6f8d4c407e6e605368f4372d14658b38c | | Soft Link | SLINK | 0x10bae51262490b4f4af41e12ed52a0e744c1137a | | Ramifi Protocol | RAM | 0xac6fe9aa6b996d15f23e2e9a384fe64607bba7d5 | | GRPL Finance | GRPL | 0x15e4132dcd932e8990e794d1300011a472819cbd | | Xdef Finance | XDEF2 | 0x5166d4ce79b9bf7df477da110c560ce3045aa889 | | Antiample | XAMP | 0xf911a7ec46a2c6fa49193212fe4a2a9b95851c27 |
### Inflationary (Staking) Tokens Inflationary tokens accrue additional value over time. While they are locked in the bridge contract this value will accrue, but will remain on the balance of the bridge upon exit. Inflation will not be returned to a user's balance. This maintains the 1 to 1 ratio of bridged tokens necessary for OmniBridge functionality. Users are free to bridge these tokens but need to be aware that any accrued inflation will not be added to their balances. Usage of the accumulated inflation will be determined at a later time by bridge governors. A partial token list of inflationary tokens is included below:
Click to View List | Name | Symbol | Address | | ----------------------- | ------ | ------------------------------------------ | | Lido Staked Ether | stETH | 0xae7ab96520de3a18e5e111b5eaab095312d7fe84 | | StakeHound Staked Ether | STETH | 0xdfe66b14d37c77f4e9b180ceb433d1b164f0281d | | ankrETH | AETH | 0xe95a203b1a91a908f9b9ce46459d101078c2c3cb | | Cream ETH 2 | CRETH2 | 0xcbc1065255cbc3ab41a6868c22d1f1c573ab89fd | | Binance ETH staking | BETH | 0x250632378e573c6be1ac2f97fcdf00515d0aa91b |
Additional References: - [GIP-31: Hardfork that removed `transferAfterCall` from Bridged Token methods](https://forum.gnosis.io/t/gip-31-should-gnosis-chain-perform-a-hardfork-to-upgrade-the-token-contract-vulnerable-to-the-reentrancy-attack/413) (also see [writeup](https://hackmd.io/@koal/SJiDiO0bc)) ### Canonical Token Registries - [Canonical Bridged Tokens](https://gnosis.blockscout.com/tokens?tab=bridged) - Select the origin chain by using **Filter** option. ### Multiple Representations In a multi-chain world, some assets (e.g. USDC) can be bridged over from different chains. This is because the two bridges create different representation of the token on Gnosis, even if the underlying asset is the same. For example, there are two different representations of USDC on Gnosis(created by Omnibridge, it follows ERC677 standard): | Asset | Token Contract | | ------------------ | ------------------------------------------------------------------------------------------------------------------------------ | | USDC from Ethereum | [0xDDAfbb505ad214D7b80b1f830fcCc89B60fb7A83](https://gnosis.blockscout.com/address/0xDDAfbb505ad214D7b80b1f830fcCc89B60fb7A83) | | USDC from BSC | [0xD10Cc63531a514BBa7789682E487Add1f15A51E2](https://gnosis.blockscout.com/address/0xD10Cc63531a514BBa7789682E487Add1f15A51E2) | Gnosis adopts a naming convention where the "chain of origin" is added as a suffix to the token name (e.g. USDC from Ethereum, USDC from BSC) ### USDC.e: A USDC token on Gnosis Chain that complies with Circle standard :::info When using [Bridge UI](https://bridge.gnosischain.com/): Bridging from Ethereum, users bridge [USDC](https://etherscan.io/address/0xA0b86991c6218b36c1d19D4a2e9Eb0cE3606eB48) and get [USDC.e](https://gnosisscan.io/address/0x2a22f9c3b484c3629090feed35f17ff8f88f76f0). Bridging from Gnosis Chain, users bridge [USDC on xDAI](https://gnosisscan.io/address/0xDDAfbb505ad214D7b80b1f830fcCc89B60fb7A83) and get [USDC](https://etherscan.io/address/0xA0b86991c6218b36c1d19D4a2e9Eb0cE3606eB48). Use [USDC swap](https://bridge.gnosischain.com/usdc) to swap between USDC.e and USDC on xDAI ::: USDC.e is a token compliant with the [Circle's Bridged USDC Standard](https://github.com/circlefin/stablecoin-evm/blob/master/doc/bridged_USDC_standard.md). To ensure smooth bridging operations, when using [Bridge UI](https://bridge.gnosischain.com/) to bridge [USDC](https://etherscan.io/address/0xA0b86991c6218b36c1d19D4a2e9Eb0cE3606eB48) from Ethereum, user will get [USDC.e](https://gnosisscan.io/address/0x2a22f9c3b484c3629090feed35f17ff8f88f76f0) by default. 1. Bridging from ETH: a. Select **Ethereum** as source chain and **USDC** as token to bridge, you will get the equivalent amount of USDC.e on Gnosis Chain. (If you wish to get the [USDC on xDAI (old USDC)](https://gnosis.blockscout.com/address/0xDDAfbb505ad214D7b80b1f830fcCc89B60fb7A83), you may use the [USDC swap](https://bridge.gnosischain.com/usdc) in the Bridge UI to swap your USDC.e to USDC(old), and vice versa) 2. Bridging from GC: a. Select **Gnosis Chain** as source chain and **USDC.e** as token, is not allowed, user need to swap their **USDC.e** to **USDC on xDAI(old USDC)** on the [USDC swap](https://bridge.gnosischain.com/usdc). b. Select **Gnosis Chain** as source chain and **USDC on xDAI (old USDC)** as token, and claim their USDC on Ethereum. For more detail, check out [this twitter post](https://x.com/gnosischain/status/1800565095065641409). --- // File: bridges/About Token Bridges/xdai-bridge # xDai Bridge :::info The xDAI bridge can be used in https://bridge.gnosischain.com by selecting DAI/xDAI. Please avoid using the legacy xDai bridge: https://bridge.legacy.gnosischain.com/. ::: :::warning Calling `transfer` will no longer mint xDAI, and users must use `relayTokens` instead. For more detail, please check [here](https://forum.gnosis.io/t/decommissioning-of-the-transfer-function-on-xdai-bridge/8575). ::: The [xDai bridge](https://bridge.gnosischain.com) is a native DAI bridge from Ethereum that is used to mint and burn [xDai](/about/tokens/xdai), the native asset used for gas and transaction fees on Gnosis. Once Dai is bridged into the xDai bridge, the xDai bridge contract on Gnosis notifies the [block rewards contract](https://gnosis.blockscout.com/address/0x481c034c6d9441db23Ea48De68BCAe812C5d39bA). The consensus algorithm then mints xDai to the user's corresponding address on Gnosis in the next block. ## Key Information ### Overview | | Detail | | --------------------- | ----------------------------------------------------- | | Frontend URL | https://bridge.gnosischain.com | | Trust Model | [4-of-7 Validator Multisig](#bridge-validators) | | Governance | [8-of-16 Multisig](#bridge-governance) | | Governance Parameters | Validator Set, Daily Limits, Fees | | Bug Bounty | [Up to $2m](https://immunefi.com/bounty/gnosischain/) | | Bug Reporting | [Immunefi](https://immunefi.com/bounty/gnosischain/) | ### Key Contracts ### Ethereum | Contract | Ethereum Address | | ----------------------------- | ------------------------------------------------------------------------------------------------------------------------------------------- | | xDAI Bridge Contract | [eth:0x4aa42145Aa6Ebf72e164C9bBC74fbD3788045016](https://etherscan.io/address/0x4aa42145Aa6Ebf72e164C9bBC74fbD3788045016#readProxyContract) | | Validator Management Contract | [eth:0xe1579dEbdD2DF16Ebdb9db8694391fa74EeA201E](https://etherscan.io/address/0xe1579dEbdD2DF16Ebdb9db8694391fa74EeA201E#code) | ### Gnosis | Contract | Gnosis Address | | ----------------------------- | ----------------------------------------------------------------------------------------------------------------------------------------------- | | xDAI Bridge Contract | [gno:0x7301CFA0e1756B71869E93d4e4Dca5c7d0eb0AA6](https://gnosis.blockscout.com/address/0x7301CFA0e1756B71869E93d4e4Dca5c7d0eb0AA6#address-tabs) | | Block Reward Contract | [gno:0x481c034c6d9441db23Ea48De68BCAe812C5d39bA](https://gnosis.blockscout.com/address/0x481c034c6d9441db23Ea48De68BCAe812C5d39bA) | | Validator Management Contract | [gno:0xB289f0e6fBDFf8EEE340498a56e1787B303F1B6D](https://gnosis.blockscout.com/address/0xB289f0e6fBDFf8EEE340498a56e1787B303F1B6D/read-proxy) | | ERC20ToNative Helper Contract | [gno:0x2D51EAa266eafcb59bB36dD3c7E99C515e58113A](https://gnosis.blockscout.com/address/0x2d51eaa266eafcb59bb36dd3c7e99c515e58113a#readContract) | ### Sepolia - Chiado | Contract | Address | | ------------------------------ | ------------------------------------------------------------------------------------------------------------------------------------- | | xDAI Bridge Contract (Sepolia) | [0x180ff98e734415ecd35fac3d32940e1b45fad0a2](https://sepolia.etherscan.io/address/0x180ff98e734415ecd35fac3d32940e1b45fad0a2) | | Validator Contract (Sepolia) | [0x3Ea1A9f92A99bC8e820541E7bed5d1F2419fFe59](https://goerli.etherscan.io/address/0x3Ea1A9f92A99bC8e820541E7bed5d1F2419fFe59) | | xDAI Bridge Contract (Chiado) | [0xccA0Dc2A058884e62082312F09541cC7566406f0](https://gnosis-chiado.blockscout.com/address/0xccA0Dc2A058884e62082312F09541cC7566406f0) | | Validator Contract (Chiado) | [0x138190e157d7604B8f89637AA10508Abd4c673B2](https://gnosis-chiado.blockscout.com/address/0x138190e157d7604B8f89637AA10508Abd4c673B2) | ### Goerli - Chiado | Contract | Address | | ----------------------------- | ------------------------------------------------------------------------------------------------------------------------------------- | | xDAI Bridge Contract (Goerli) | [0x8659Cf2273438f9b5C1Eb367Def45007a7A16a24](https://goerli.etherscan.io/address/0x8659Cf2273438f9b5C1Eb367Def45007a7A16a24) | | Validator Contract (Goerli) | [0x1F35121d14ABC91689a7903bf911dce83B0c6EF6](https://goerli.etherscan.io/address/0x1F35121d14ABC91689a7903bf911dce83B0c6EF6) | | xDAI Bridge Contract (Chiado) | [0xbb3c86f9918C3C1d83668fA84e79E876d147fFf2](https://gnosis-chiado.blockscout.com/address/0xbb3c86f9918C3C1d83668fA84e79E876d147fFf2) | | Validator Contract (Chiado) | [0x0ee7EBC72b26e8CeAbbdF275A19dA8e4361685Ce](https://gnosis-chiado.blockscout.com/address/0x0ee7EBC72b26e8CeAbbdF275A19dA8e4361685Ce) | :::info The current deployment of xDAI bridge contract is from https://github.com/gnosischain/tokenbridge-contracts/tree/xdaibridge, with the commit hash `fb6bae7589a102613b48c12addb425b72836574e` ::: References: \*\* Some of the information from TokenBridge Docs are outdated, please verify the information before you bridge. - https://github.com/tokenbridge/docs ### Fees & Daily Limits | Type | Ethereum -> Gnosis | Gnosis -> Ethereum | | ------------------ | ------------------ | ------------------ | | Bridge Fees | 0% | 0% | | Min Transfer | 0.005 Dai | 10 xDai | | Daily Limit | 10,000,000 Dai | 10,000,000 xDai | | Max Single Deposit | 9,999,999 Dai | 10,000,000 xDai | :::note Daily Limit is reset according to the following logic: the smart contract stores total amount of processed tokens per current day and reverts on a new transfer if it exceeds the daily limit. Id of the day is calculated using the formula `timestamp / (number of seconds in 1 day)`, where `timestamp` is the Unix timestamp. ::: ### Bridge Validators - See [Bridge Validator](../management/validators#xdai-bridge) ### Bridge Governance - See [Bridge Governance](../management/README.md) ## How it Works ### Ethereum -> Gnosis Chain. ![](/img/bridges/diagrams/dai-bridge-01.png) The [xDai token](/concepts/tokens/xdai) is minted when Dai is transferred from Ethereum to Gnosis using the xDai Bridge. During the transfer process, a block reward contract is invoked to mint xDai to a user's account. Because contract calls are made from the consensus engine to create xDai tokens, balance updates are more difficult to trace than simple value transfers. 1. Users lock DAI on the [bridge contract](https://etherscan.io/address/0x4aa42145Aa6Ebf72e164C9bBC74fbD3788045016#code) on Ethereum by approving the bridge contract and calling `relayTokens`. 2. `UserRequestForAffirmation` event is triggered 3. Validators observe the deposit and invoke `executeAffirmation` function on Gnosis bridge contract 4. When enough confirmations are collected (4/7 majority), the bridge contract on Gnosis Chain calls the block reward contract to record the receiver(s) and amount(s) of xDAI to mint. 5. The [block reward contract](https://gnosis.blockscout.com/address/0x481c034c6d9441db23Ea48De68BCAe812C5d39bA) is called by the consensus engine to update user's xDAI balance. User may check the balance change visually using Blockscout's [coin balance history](https://gnosis.blockscout.com/address/0xE05FB316eB8C4ba7288D43c1bd87BE8a8d16761C?tab=coin_balance_history) or programmatically using [eth_getBalance](https://docs.infura.io/api/networks/ethereum/json-rpc-methods/eth_getbalance) API. You can also view a receiver's address and amount of xDai received in the [block reward contract's](https://gnosis.blockscout.com/address/0x481c034c6d9441db23Ea48De68BCAe812C5d39bA) logs. Whenever the `executeAffirmation` method is called, it emits the `AddedReceiver` event: ``` AddedReceiver( uint256 amount, address indexed receiver, address indexed bridge ) ``` Example: https://gnosis.blockscout.com/tx/0x5892a695860f6087a2d93140f05e6365142ff77fd7128e39dbc03128d5797ac4?tab=logs --- ### Gnosis Chain -> Ethereum. ![](/img/bridges/diagrams/dai-bridge-02.png) 1. User transfer xDAI to Gnosis Chain's xDAI bridge, xDAI is burned. 2. `UserRequestForSignature` event emitted (see [example transaction](https://blockscout.com/xdai/mainnet/tx/0x8e23cf0ab01476c2df5b71a72603f2c229d3d9a63ad6ca71ce164798f3733826/internal-transactions)). 3. Validators listen to the event and call `submitSignature` on Gnosis chain. 4. After enough signatures are collected, `CollectedSignatures` event is emitted 5. Anyone can execute the withdrawal on Ethereum (user via UI or validator). DAI is unlocked to the receiver on Ethereum. 6. `RelayedMessage` emitted on mainnet :::note This final step may be delayed if Ethereum mainnet is congested. ::: References: - [TokenBridge Docs: Withdrawing xDai to Dai](https://github.com/tokenbridge/docs/blob/master/xdai-bridge/using-the-xdai-bridge/withdrawal-authorization-flow.md) ### Savings xDAI Application: https://agave.finance/sdai/ #### Rationale MakerDAO’s DSR current rate is 5%. Since the increase of the DSR to ~3.5%, ~7M DAI have fled out of the xDAI bridge, as can be seen on this [dashboard](https://dune.com/queries/2650075/4403805?d=11). Bridging the DSR yield into Gnosis Chain will help regain these deposits. In order to provide the needed catalyst for Gnosis Chain Defi to boom, interest rates on Gnosis Chain have to pick up or reach parity with Ethereum or other chains with higher borrowing demand. Introducing Savings DAI (sDAI), a DSR(Dai Savings Rate) module in xDAI Bridge between Ethereum and Gnosis Chain. By depositing most of the DAI in xDAI bridge into sDAI vault from Spark Protocol on Ethereum, which is a ERC4626 vault depositing all DAI into the Maker DSR, interest is accrued from Maker DSR and relayed to Gnosis Chain. xDAI holders on Gnosis Chain can mint sDAI with their xDAI, and enjoy the interest accumulating from Ethereum. Check out the proposal from Karpatkey to **[Deposit DAI of the xDAI bridge in sDAI vault from Spark](https://forum.gnosis.io/t/deposit-dai-of-the-xdai-bridge-in-sdai-vault-from-spark/7236)** #### Interest rate Assuming the amount of “Savings DAI on GC” minted is lower than the one held by the bridge, then the yield will be higher than the Dai savings Rate. The bridge currently holds roughly 25M DAI and the DSR yield is 5%, assuming 25M get wrapped into sDAI and only 10M xDAI get deposited into the vault on GC, the yield will be 12.5% . The expectation is that the sDAI rate will always be higher on GC than Mainnet, as only if almost 100% of all DAI bridged is staked will we achieve rate parity. Considering the current 25M DAI sitting in the bridge, that represents ~1.25M yearly to incentivise GC. DSR yield is risk-free if you are already holding DAI. All the risks derived from the collateral are borne by all DAI holders, regardless of them depositing in the DSR. Karpatkey team have written a research piece [here.](https://www.karpatkey.com/contents/makerdaos-game-changing-move) The only newly introduced risk is smart contract risk in how the integration is made with the sDAI vault on Ethereum and the implementation of the sDAI vault on GC. #### Architecture ![](../../../static/img/bridges/xdaibridge/DSRonGnosis.png) #### Ethereum A new implementation upgrade in xDAIForeignBridge contract: [SavingsDAI Connector](https://github.com/gnosischain/tokenbridge-contracts/blob/xdaibridge-upgrade-sdai/contracts/upgradeable_contracts/erc20_to_native/SavingsDaiConnector.sol) is added as a dependency in the contract. Compare to the old implementation of the [Compound Connector](https://github.com/gnosischain/tokenbridge-contracts/blob/master/contracts/upgradeable_contracts/erc20_to_native/CompoundConnector.sol), the [payInterest](https://github.com/gnosischain/tokenbridge-contracts/blob/xdaibridge-upgrade-sdai/contracts/upgradeable_contracts/erc20_to_native/InterestConnector.sol#L138-L148) function in SavingsDai Connector is used to transfer interest received from vault to receiver address on Gnosis Chain rather than to receiver address on Ethereum. [sDAI](https://github.com/gnosischain/tokenbridge-contracts/blob/xdaibridge-upgrade-sdai/contracts/interfaces/ISavingsDai.sol) is deployed on Ethereum. Any future DAI deposited to the Bridge will be wrapped into sDAI, with caveat that it will always keep the buffer of the minimumCashThreshold when investing. **minimumCashThreshold:** This value determines what is the recommended amount of DAI that should be held in the bridge at all times, in order to create a buffer for withdrawals without added operations and thus lower gas costs. #### Gnosis Chain There are two contracts being deployed on Gnosis. The first one is the sDAI vault, also an ERC 4626 which is the most popular standard for vaults which makes it extremely useful for Defi integrations from Lending Protocols like Agave and Spark,  to DEXes like Curve and Balancer with their boosted pools. The only modification to the standard vault (OZ implementation) is that it will allow for direct deposits and withdrawals in xDAI, rather than exclusively the ERC20 WXDAI. The second contract is the Interest Receiver. This will be the address provided on Mainnet bridge as the interest receiver. What this contract does is quite simple, it distributes the balance it holds in xDAI and WXDAI into sDAI at a fixed block rate that gets updated every 1-2 days to adjust for interest rate changes coming from mainnet. The goal of this contract is to not make it possible to front run the bridging process of the interest, and to make sure there is a fairly frequent update of the sDAI shares value and exchange rate. This contract has the perk of being very easy to switch for a different one by simply setting a new receiver on the bridge, without impacting any of the operations. This means if we want to make modifications such as add a fee or normalize rates in the future, that will be very easy to plug-in. #### Role and responsibilities **xDAI/wxDAI holder** 1. Deposit xDAI/wxDAI and get sDAI shares: 1. xDAI/wxDAI holders can deposit xDAI/wxDAI in https://agave.finance/sdai/, in return for sDAI, and their corresponding shares in the vault are recorded. 2. Bridge Interest Receiver receives interest from mainnet and distribute to sDAI vault. 3. sDAI holders withdraw/redeem xDAI/wxDAI (interest+original amount) according to their shares, that has gone up because of the interest received in step 2 **Keeper** 1. Call `investDAI()` `refillBridge()` `payInterest()`. On Ethereum, anyone is allowed to `investDAI()` into the sDAI vault, anyone is allowed to `refillBridge()` right back up to the threshold, and also anyone is allowed to `payInterest()`. These processes are permissionless, and it’s also costly which is why we will have a bot to automate these 3 maintenance procedures in the most efficient way possible. 2. [Keeper](https://etherscan.io/address/0xC5cD1e53839eeD4d0A38f80C610e77bD07120c90) is maintained by [Karpatkey team](https://www.karpatkey.com/). [Source Code](https://github.com/Luigy-Lemon/XDaiBridge-Keeper/tree/main) #### Contracts | Contract | Address | | -------- | --------------------------------------------------------------------------------------------------------------------- | | sDAI | [0x83F20F44975D03b1b09e64809B757c47f942BEeA](https://etherscan.io/token/0x83f20f44975d03b1b09e64809b757c47f942beea) | | DAI | [0x6B175474E89094C44Da98b954EedeAC495271d0F](https://etherscan.io/token/0x6b175474e89094c44da98b954eedeac495271d0f) | | Keeper | [0xC5cD1e53839eeD4d0A38f80C610e77bD07120c90](https://etherscan.io/address/0xC5cD1e53839eeD4d0A38f80C610e77bD07120c90) | | Contract | Address | | ------------------------ | ---------------------------------------------------------------------------------------------------------------------- | | sDAI | [0xaf204776c7245bF4147c2612BF6e5972Ee483701](https://gnosisscan.io/address/0xaf204776c7245bF4147c2612BF6e5972Ee483701) | | wxDAI | [0xe91D153E0b41518A2Ce8Dd3D7944Fa863463a97d](https://gnosisscan.io/address/0xe91d153e0b41518a2ce8dd3d7944fa863463a97d) | | SavingsXDAI Adapter | [0xD499b51fcFc66bd31248ef4b28d656d67E591A94](https://gnosisscan.io/address/0xD499b51fcFc66bd31248ef4b28d656d67E591A94) | | Bridge Interest Receiver | [0x670daeaF0F1a5e336090504C68179670B5059088](https://gnosisscan.io/address/0x670daeaF0F1a5e336090504C68179670B5059088) | | Contract | Address | | -------- | ------------------------------------------ | | sDAI | 0xD8134205b0328F5676aaeFb3B2a0DC15f4029d8C | | DAI | 0x11fE4B6AE13d2a6055C8D9cF65c55bac32B5d844 | | Contract | Address | | ------------------------ | ------------------------------------------------------------------------------------------------------------------------------------- | | sDAI | [0x20e5eB701E8d711D419D444814308f8c2243461F](https://gnosis-chiado.blockscout.com/address/0x20e5eB701E8d711D419D444814308f8c2243461F) | | wxDAI | [0x18c8a7ec7897177E4529065a7E7B0878358B3BfF](https://gnosis-chiado.blockscout.com/address/0x18c8a7ec7897177E4529065a7E7B0878358B3BfF) | | SavingsXDAI Adapter | [0xc1529e13A5842D790da01F778Bf23a3677830986](https://gnosis-chiado.blockscout.com/address/0xc1529e13A5842D790da01F778Bf23a3677830986) | | Bridge Interest Receiver | [0x65e75819E4e8250a03958Ba303E8f95F8f578168](https://gnosis-chiado.blockscout.com/address/0x65e75819E4e8250a03958Ba303E8f95F8f578168) | ## Tutorials ### Claim DAI on Ethereum using smart contract 1. Fetch the value of `recipient`, `value` and `nonce` from `UserRequestForSignature(address recipient, uint256 value, bytes32 nonce)` from the Gnosis Chain. ![](../../../static/img/bridges/xdaibridge/gc-xdai-tx.png) 2. Go to the [xDAI bridge helper contract on Gnosis Chain](https://gnosis.blockscout.com/address/0x2d51eaa266eafcb59bb36dd3c7e99c515e58113a#readContract). 3. Call [`getMessageHash(address _recipient, uint256 _value, _origTxHash)`](https://gnosis.blockscout.com/address/0x2d51eaa266eafcb59bb36dd3c7e99c515e58113a?tab=read_write_contract#0x30322ce7) : with `recipient` and `value` from the `UserRequestForSignature` and `_origTxHash` as `nonce` from `UserRequestForSignature` (not the transaction hash!). Fetch the returned message hash. 4. Call [`getMessage(bytes32 _msgHash)`](https://gnosis.blockscout.com/address/0x2d51eaa266eafcb59bb36dd3c7e99c515e58113a?tab=read_write_contract#0x0139a221) & [`getSignatures(bytes32 _msgHash)`](https://gnosis.blockscout.com/address/0x2d51eaa266eafcb59bb36dd3c7e99c515e58113a?tab=read_write_contract#0x9bc51068) with the message hash from the previous step. ![](../../../static/img/bridges/xdaibridge/xdai-helper.png) 3. Use the value returned from the previous step to call `executeSignatures(bytes message, bytes signatures)`[Ethereum xDAI Bridge](https://etherscan.io/address/0x4aa42145Aa6Ebf72e164C9bBC74fbD3788045016#writeProxyContract#F7). ![](../../../static/img/bridges/xdaibridge/xdai-execute-signatures.png) ## Resources - [Tokenbridge Docs on xDai Bridge](https://github.com/tokenbridge/docs/blob/master/xdai-bridge/about.md) --- // File: bridges/About Token Bridges/amb-bridge ![](/img/bridges/diagrams/amb-bridge.svg) The native Arbitrary Message Bridge (AMB) allows user to send arbitrary data between Gnosis Chain and Ethereum. This allows Gnosis contracts to send data and trigger contract functions on Ethereum and other chains, and vice versa. The AMB is a key bridge primitive that is used inside higher-order bridges like the [Omnibridge native token bridge](../About%20Token%20Bridges/omnibridge.md), and is part of the [Tokenbridge Architecture](https://github.com/tokenbridge/docs). With [Telepathy added as the 8th validator](../managementdecisions.md#add-telepathy-validator-in-the-amb), AMB bridge is now more secure with trustless zero-knowledge light client technology. Due to the light client finality requirements (at least 23mins on Ethereum), the transactions will take approx. 30mins to be signed by the bridge. However, users can still use 3rd party bridges (Jumper.exchange, Connext, Hop) without any impact. For more details, check out [how AMB & Omnibridge works with Telepathy validator](#how-it-works-with-telepathy-validator). ## Key Information ### Overview | | Detail | | --------------------- | ----------------------------------------------------- | | Frontend URL | N/A | | Trust Model | [4-of-8 Validator Multisig](#bridge-validators) | | Governance | [8-of-16 Multisig](#bridge-governance) | | Governance Parameters | [Validators](#bridge-validators) | | Bug Bounty | [up to $2m](https://immunefi.com/bounty/gnosischain/) | | Bug Reporting | [Immunefi](https://immunefi.com/bounty/gnosischain/) | ## Key Contracts ### Ethereum | Contract | Address | | --------------------------------- | ---------------------------------------------------------------------------------------------------------------------------------------- | | Omnibridge Multi-Token Mediator | [0x88ad09518695c6c3712AC10a214bE5109a655671](https://etherscan.io/address/0x88ad09518695c6c3712AC10a214bE5109a655671#writeProxyContract) | | AMB (Foreign) | [0x4C36d2919e407f0Cc2Ee3c993ccF8ac26d9CE64e](https://etherscan.io/address/0x4C36d2919e407f0Cc2Ee3c993ccF8ac26d9CE64e#writeProxyContract) | | AMB/OmniBridge wETH Router Helper | [0xa6439Ca0FCbA1d0F80df0bE6A17220feD9c9038a](https://etherscan.io/address/0xa6439ca0fcba1d0f80df0be6a17220fed9c9038a) | ### Gnosis | Contract | Address | | ----------------------------------- | ----------------------------------------------------------------------------------------------------------------------------------------- | | AMB/Omnibridge Multi-Token Mediator | [0xf6A78083ca3e2a662D6dd1703c939c8aCE2e268d](https://gnosisscan.io/address/0xf6A78083ca3e2a662D6dd1703c939c8aCE2e268d#writeProxyContract) | | AMB (Home) | [0x75Df5AF045d91108662D8080fD1FEFAd6aA0bb59](https://gnosisscan.io/address/0x75Df5AF045d91108662D8080fD1FEFAd6aA0bb59#writeProxyContract) | | AMB Helper Contract | [0x7d94ece17e81355326e3359115D4B02411825EdD](https://gnosisscan.io/address/0x7d94ece17e81355326e3359115D4B02411825EdD#readContract) | ### Sepolia - Chiaado | Contract | Address | | ---------------------------- | ------------------------------------------------------------------------------------------------------------------------------------------------------- | | AMB (Sepolia) | [0xf2546D6648BD2af6a008A7e7C1542BB240329E11](https://sepolia.etherscan.io/address/0xf2546D6648BD2af6a008A7e7C1542BB240329E11) | | Validator Contract (Sepolia) | [0xa0bd95dd2570632c8640ab5bc213f3a0ea33e26a](https://sepolia.etherscan.io/address/0xa0bd95dd2570632c8640ab5bc213f3a0ea33e26a) | | AMB (Chiado) | [0x8448E15d0e706C0298dECA99F0b4744030e59d7d](https://gnosis-chiado.blockscout.com/address/0x8448E15d0e706C0298dECA99F0b4744030e59d7d) | | Validator Contract (Chiado) | [0x9e8a89ebcb83065eaaf4b7ff720caa5e6b25c976](https://gnosis-chiado.blockscout.com/address/0x9e8a89ebcb83065eaaf4b7ff720caa5e6b25c976) | | AMB Helper Contract (Chiado) | [0x3cc500B3c01D04C265c9293cB35BA2Fd8eA6dc1b](https://gnosis-chiado.blockscout.com/address/0x3cc500B3c01D04C265c9293cB35BA2Fd8eA6dc1b?tab=read_contract) | ### Goerli - Chiado :::note The bridge between Goerli and Chiado is deprecating soon. ::: | Contract | Address | | ----------------------------- | ---------------------------------------------------------------------------------------------------------------------------- | | OmniBridge Mediator (Foreign) | [0x00147c84f13764dCDAbAF1cbAe622fa6f6839085](https://goerli.etherscan.io/address/0x00147c84f13764dCDAbAF1cbAe622fa6f6839085) | | AMB Contract Proxy (Foreign) | [0x87A19d769D875964E9Cd41dDBfc397B2543764E6](https://goerli.etherscan.io/address/0x87A19d769D875964E9Cd41dDBfc397B2543764E6) | | GNO on Goerli | [0x7f477c3f03213970d939104cc436dc995cf615b5](https://goerli.etherscan.io/address/0x7f477c3f03213970d939104cc436dc995cf615b5) | | Contract | Address | | --------------------------- | ------------------------------------------------------------------------------------------------------------------------------------- | | OmniBridge Mediator (Home) | [0x09D549a48AC52F3f9945E7de6402c609c92aa2E1](https://gnosis-chiado.blockscout.com/address/0x09D549a48AC52F3f9945E7de6402c609c92aa2E1) | | AMB Contract Proxy (Home) | [0x99Ca51a3534785ED619f46A79C7Ad65Fa8d85e7a](https://gnosis-chiado.blockscout.com/address/0x99Ca51a3534785ED619f46A79C7Ad65Fa8d85e7a) | | GnosisBridge(GNO) on Chiado | [0x19C653Da7c37c66208fbfbE8908A5051B57b4C70](https://gnosis-chiado.blockscout.com/address/0x19C653Da7c37c66208fbfbE8908A5051B57b4C70) | ### Fees & Daily Limits As the Arbitrary Message Bridge is a message passing bridge, there are no fees or daily limits associated with it. ### Bridge Validators - See [Bridge Validator](../management/validators#amb--omnibridge) ### Bridge Governance - See [Bridge Governance](../management/README.md) ## How it works ### Terminology - **Home (Native) Network**: Of the two networks being bridged between, the home or native network is the one with fast and inexpensive operations. All bridge operations to collect validator confirmations are performed on this side of the bridge. It is the Gnosis Chain in this case. - **Foreign Network**: Can be any EVM chain, generally it refers to Ethereum. - **Originating Contract**: An arbitrary contract where the message originates, typically this is where the user interacts and requests for a function to be invoked on another network. ### Call a cross-chain method via AMB: ```solidity function requireToPassMessage (address _contract, bytes _data, uint256 _gas) external; ``` | param | details | | ---------- | --------------------------------------------------------------------------------------------------------- | | \_contract | address of contract on other network | | \_data | encoded bytes of the method selector and the params that will be called in the contract on the other side | | \_gas | gas to be provided in execution of the method call on the other side | ![](/img/bridges/diagrams/amb-bridge-contract-flow.png) #### Foreign Network to Home Network 1. User calls `foo()` on the originating contract 2. Originating contract calls [`requireToPassMessage()`](https://etherscan.io/address/0x4C36d2919e407f0Cc2Ee3c993ccF8ac26d9CE64e#writeProxyContract#F10) on Foreign Bridge contract, and encodes `foo()`, target address, and gas limit used on the other chain for executing a message. 3. `UserRequestForAffirmation` event is emitted, and listening validators relay the message to the Home side where signatures are collected 4. [`executeAffirmation()`](https://gnosisscan.io/address/0x75Df5AF045d91108662D8080fD1FEFAd6aA0bb59#writeProxyContract#F15) is called on the Home Bridge contract by a validator once enough signatures are collected. 5. Home bridge contract decodes the message and calls `foo()` on the target contract. #### Home Network to Foreign Network 1. User calls `foo()` on an originating contract 2. Originating contract calls [`requireToPassMessage()`](https://gnosisscan.io/address/0x75Df5AF045d91108662D8080fD1FEFAd6aA0bb59#writeProxyContract#F14) on Home Bridge contract, and encodes `foo()`, target address, and gas limit used on the other chain for executing a message. 3. Signatures are collected from validators by calling [`submitSignatures()`](https://gnosisscan.io/address/0x75Df5AF045d91108662D8080fD1FEFAd6aA0bb59#writeProxyContract#F5), and once enough are collected `CollectedSignatures()` event is emitted. 4. Message is relayed to the Foreign Bridge contract, and [`executeSignatures()`](https://etherscan.io/address/0x4C36d2919e407f0Cc2Ee3c993ccF8ac26d9CE64e#writeProxyContract#F3) is called 5. Foreign bridge contract decodes the message and calls `foo()` on target contract ### How it works with Telepathy validator ![AMB&Omnibridge with Telepathy Validator](../../../static/img/bridges/AMBValidators.png) \*\* In the graph above, light green components work as the same as [Call a cross-chain method via AMB](#call-a-cross-chain-method-via-amb) on the previous section. There are 5 key components for Telepathy validator in AMB & Omnibridge: **Off chain** 1. Telepathy Relayer: Provide merkle proof for **Telepathy PubSub**, that the `userRequestForAffirmation` event was emitted on Ethereum. 2. Telepathy Operator: For every ~12 mins (2 epoch in Ethereum), call **Telepathy Light Client** to update header. **On Gnosis Chain** 3. Telepathy PubSub: Verify the Merkle proof against the block header and publish the event. 4. Telepathy Light Client: Generate a proof of consensus for block header and verify on-chain. 5. Telepathy Validator: Subscribe to `UserRequestForAffirmation` event, and handle the published event by calling `executeAffirmation()` on AMB. Once the user initiate cross-chain method via AMB on Ethereum, it will take ~12 mins for the transaction to get finalized in block and for Telepathy light client to obtain the block header information. Thus, user has to wait for approx. 30 mins for the message to get bridged to Gnosis Chain. | Role | Address | | ---------------------- | ---------------------------------------------------------------------------------------------------------------------- | | Telepathy PubSub | [0x30Ec3049F571cf61099535bd73EcbC8968e6311a](https://gnosisscan.io/address/0x30Ec3049F571cf61099535bd73EcbC8968e6311a) | | Telepathy Validator | [0x456c255a8bc1f33778603a2a48eb6b0c69f4d48](https://gnosisscan.io/address/0x456c255A8BC1F33778603A2a48Eb6B0C69F4d48E) | | Telepathy Light Client | [0x251cee0641afed44f625fafa1cd2b410f7868591](https://gnosisscan.io/address/0x251cee0641afed44f625fafa1cd2b410f7868591) | For more details, check out [Telepathy Validator for Omnibridge](https://hackmd.io/@wdyZgTm3RrOsm-rhXDXEHA/BJ_7ExKgn) and https://docs.telepathy.xyz/. ### How to check if AMB is down (not relaying message) In certain circumstances, i.e. hardfork, AMB will be planned for downtime (not relaying message) to ensure security of the bridge. Planned downtime will be announced in public channel like Discord and Twitter, prior to the event. There is also another way to check whether the AMB is down or not by reading `maxGasPerTx` value on AMB contract. In the current configuration, `maxGasPerTx` is set to 4000000 on [Ethereum](https://etherscan.io/address/0x4C36d2919e407f0Cc2Ee3c993ccF8ac26d9CE64e#readProxyContract) and 2000000 on [Gnosis Chain](https://gnosisscan.io/address/0x75Df5AF045d91108662D8080fD1FEFAd6aA0bb59#readProxyContract). The AMB is down when `maxGasPerTx` is set to 0, only by owner of the contract. By setting `maxGasPerTx` to 0, the [condition in `_sendMessage()`](https://github.com/gnosischain/tokenbridge-contracts/blob/master/contracts/upgradeable_contracts/arbitrary_message/MessageDelivery.sol#L40) will not pass, meaning, the bridge is down/stopped. ### Security Considerations for Receiving a Call | Concern | Remediation | | ------------- | ------------------------------------------------------------------------------------------------------------------------------------------------------------------------------------------------------------------------------------------------------------------------------------------------------------------------------ | | Authorization | Check the address of invoking contract using `messageSender()` | | Authorization | Check that `msg.sender` is the address of the bridge contract | | Replay Attack | `transactionHash()` allows for checking of a hash of the transaction that invoked the `requireToPassMessage()` call. The invoking contract (in some cases, the mediator contract) is responsible for providing a _unique sequence_ (can be a nonce) as part of the `_data` param in the `requireToPassMessage()` function call | ### Mediator Contracts A mediator contract is needed if there is an approval flow, such as when transferring an NFT or ERC-20 token. For a more in-depth explanation, see the [Omnibridge page](omnibridge#mediator-contracts). ### AMB Components | Component | Description | | ---------------- | --------------------------------------------------------------------------------------------------------------------------------------------------------------------------------------------------------------------------- | | System Contracts | AMB Implementation Contracts (Home Bridge and Foreign Bridge), Governance Multisigs, gas limit helpers, failed call management helpers (for when gas estimate was insufficient), and fee management helpers to collect fees | | Oracles | Containerized microservices that listen for on-chain events and send confirmations to relay messages. [More on them here](https://github.com/omni/tokenbridge/blob/master/oracle/README.md). | | DevOps | [Bridge monitoring](https://github.com/omni/tokenbridge/blob/master/monitor/README.md), [ALM](https://github.com/omni/tokenbridge/tree/master/alm), docker compose, ansible playbooks | | dApp Contracts | extensions (pair mediator contracts on both sides of the AMB), such as the Omnibridge | ### Use Cases of AMB - ERC-to-ERC Bridges: `AMB-ERC-TO-ERC` mode enables the transfer of ERC tokens to the Foreign Mediator, which will interact with Foreign AMB Bridge to mint wrapped ERC-667 tokens on the Home Network. Complimentarily, the mode enables the transfer ERC20 or ERC-667 tokens to the Home Mediator, which will interact with Home AMB Bridge to unlock ERC20 tokens on the Foreign network. This is used by the [Omnibridge](omnibridge). - ERC-to-Native Bridges: `ERC-TO-NATIVE` mode enables the user to send ERC20 tokens to the Foreign Bridge and receive native coins from the Home Bridge Complimentarily, then can send native coins to the Home Bridge to unlock ERC20 tokens from the Foreign Bridge. The home network nodes must support a consensus engine that allows using a smart contract for block reward calculation. This mode is used by the [xDai Bridge](xdai-bridge) - Message Passing: `ARBITRARY-MESSAGE` mode enables the capability to invoke a Home/Foreign Bridge contract to send a message that will be executed on the other Network. This can be an arbitrary contract method invocation. ## Resources - [Token bridge Documentation](https://github.com/tokenbridge/docs) --- // File: bridges/About Token Bridges/README ## Bridges Conceptual Architecture Gnosis has three main types of bridges: - **Native Bridge**: built into the chain itself, and mint the xDAI and ERC20 token from Ethereum to Gnosis Chain - **3rd-party Bridges**: these are maintained by 3rd parties and allow users to swap for canonical tokens created by native bridges - **Application-Specific Bridges**: some applications may provide custom bridges that maintain their own canonical token on Gnosis ![Diagrams overview of Bridges](../../../static/img/bridges/diagrams/bridge-overview.svg) ## Gnosis Chain Bridge Gnosis Chain bridge : - allows to mint the native stablecoin xDAI on gnosis chain by bridging DAI from Ethereum - allows to bridge ERC2O token from Ethereum to Gnosis Chain ### Bridging Data See the [Arbitrary Message Passing Bridge](../About%20Token%20Bridges/amb-bridge.md) or AMB Bridge for short. ## Roadmap Gnosis has a [long-term roadmap](../roadmap.md) to move towards trustless bridges, and is actively funding research and development in this area. ## Feedback & Suggestion We would love to hear from you on suggestions and ideas on bridges in Gnosis Chain. - [Gnosis Bridges Improvement Proposals](https://docs.google.com/forms/d/1V5RH7rIcHw-7JSePErUNutWO_p59HwbbsNedoWidTKA/viewform?edit_requested=true) - [AMB developers form](https://docs.google.com/forms/d/1wj31wGZ2sxMd_n35ZTavqegQo8XEp2C9brBPLFwCMn0/viewform?edit_requested=true#responses) --- // File: bridges/About Token Bridges/hashi-integration # Hashi integration The proposal of Hashi integration on Gnosis Chain's bridges (AMB & Omnibridge, xDAI bridge) is [approved by Gnosis DAO members](https://forum.gnosis.io/t/gip-93-should-gnosisdao-support-the-integration-of-hashi-within-gnosis-chains-canonical-bridges/8245/5) on April 2nd, 2024. The integration introduces advanced security measures, mitigates systemic risks, and ensures the Gnosis Chain ecosystem remains resilient against the evolving landscape of security threats. With the efforts from Cross-Chain Alliance and Gnosis team, the integration is going toward production. Both the AMB and xDAI bridge have been upgraded to Hashi integration. 1. AMB: [Governance Decision](../management/decisions.md#upgrade-amb-implementation-contract-for-hashi-integraion-remove-telepathy-validator-refund-trac-token-due-to-accidental-transfer) 2. xDAI: [Governance Decision](../management/decisions.md#upgrade-xdai-implementation-contract-for-hashi-integraion-replacing-metacartel-with-monerium) ## What’s new? 1. Hashi Manager contract: New contract. Set reporters, adapters, and threshold parameters used by the bridge contract. 2. New variables/function: 1. HASHI_ENABLED: New variable. When set to true, every message can be approved by Hashi, but the message need not to be approved by Hashi for it to get executed. 2. HASHI_MANDATORY: New variable. When set to true, every message has to be approved by Hashi before execution. 3. isApprovedByHashi(bytes32 msgId): New public function. Return whether a message w.r.t a message Id is approved by Hashi. 4. setHashiManager(address HashiManager): New function, onlyOwner. Set Hashi Manager contract on the bridge contract. 3. Modified events: 1. xDAI Bridge: in xDAI bridge, a `bytes32 nonce` is added into `UserRequestForAffirmation` and `UserRequestForSignature` events. 1. `event UserRequestForAffirmation(address recipient, uint256 value)` is changed to `event UserRequestForAffirmation(address recipient, uint256 value, bytes32 nonce)` 2. `event UserRequestForSignature(address recipient, uint256 value)` is changed to `UserRequestForSignature(address recipient, uint256 value bytes32 nonce)` ## AMB & Omnibridge ![](../../../static/img/bridges/hashi/Hashi-Gnosis-AMB.png) For Omnibridge / AMB: **Ethereum → Gnosis Chain** 1. User approves token for Foreign Omnibridge 2. User calls ForeignOmnibridge.relayTokens(address token, address receiver, uint256 amount) 1. ForeignOmnibridge calls ForeignAMB.requireToPassMessage() 2. ForeignAMB check if HASHI_IS_ENABLED is true, and call Yaho.dispatchMessage 3. Off chain relayer detects MessageDispatched event from Yaho and call Yaho.relayMessagesToAdapters to relay message to each reporters. 4. Reporters relay the messageId and message hash to adapter contract on Gnosis Chain. 5. Light Client based oracle only stores hashes on Gnosis Chain. 3. If Hashi is enabled & mandatory, off chain executor calls Gnosis Chain’s Yaru.executeMessages(), which check if the hash is agreed upon a threshold amount of adapters (set in Hashi Manager contract) adapters and set isApprovedByHashi(messageId) to true eventually. 4. Bridge validators detects UserRequestForAffirmation event and call HomeAMB.executeAffirmation. If Hashi is enabled & mandatory, this step has to wait after step 3. **Gnosis Chain → Ethereum** 1. User approves token for Home Omnibridge 2. User calls HomeOmnibridge.relayTokens(address token, address receiver, uint256 amount) 1. HomeOmnibridge calls HomeAMB.requireToPassMessage() 2. HomeAMB check if HASHI_IS_ENABLED is true, and call Yaho.dispatchMessage 3. Off chain relayer detects MessageDispatched event from Yaho and call Yaho.relayMessagesToAdapters to relay message to each reporters. 4. Reporters relay the messageId and message hash to adapter contract on Ethereum. 3. Bridge validators detects UserRequestForSignature event and call HomeAMB.submitSignatures. 4. If Hashi is enabled & mandatory, off chain executor calls Ethereum’s Yaru.executeMessages(), which check if the hash is agreed upon adapters and set isApprovedByHashi(messageId) to true eventually. 5. User claims token by calling Ethereum’s ForeignAMB.executeSignatures(). ## xDAI briddge ![](../../../static/img/bridges/hashi/Hashi-Gnosis-xDAI.png) **Ethereum → Gnosis Chain** 1. User approves token for Foreign xDAI bridge. 2. User calls ForeignXDAIBridge.relayTokens(address receiver, uint256 amount) 1. ForeignXDAIBridge check if HASHI_IS_ENABLED is true, and call Yaho.dispatchMessage 2. Off chain relayer detects MessageDispatched event from Yaho and call Yaho.relayMessagesToAdapters to relay message to each reporters. 3. Reporters relay the messageId and message hash to adapter contract on Gnosis Chain. 4. Light Client based oracle only stores hashes on Gnosis Chain. 3. If Hashi is enabled & mandatory, off chain executor calls Gnosis Chain’s Yaru.executeMessages(), which check if the hash is agreed upon a threshold amount of adapters (set in Hashi Manager contract) and set isApprovedByHashi(messageId) to true eventually. 4. Bridge validators detects UserRequestForAffirmation event and call HomexDAIBridge.executeAffirmation. If Hashi is enabled & mandatory, this step has to wait after step 3. Block Reward contract emits AddedReceiver event, which will mint equivalent amount of xDAI to receiver in the next block. **Gnosis Chain → Ethereum** 1. User calls HomexDAIBridge.relayTokens(address receiver, uint256 amount) or transfer xDAI to HomexDAIBridge without msg.data. 1. HomexDAIBridge check if HASHI_IS_ENABLED is true, and call Yaho.dispatchMessage 2. Off chain relayer detects MessageDispatched event from Yaho and call Yaho.relayMessagesToAdapters to relay message to each reporters. 3. Reporters relay the messageId and message hash to adapter contract on Ethereum. 2. Bridge validators detects UserRequestForSignature event and call HomexDAIBridge.submitSignatures. 3. If Hashi is enabled & mandatory, off chain executor calls Ethereum’s Yaru.executeMessages(), which check if the hash is agreed upon adapters and set isApprovedByHashi(messageId) to true eventually. 4. User claims token by calling Ethereum’s ForeignxDAIBridge.executeSignatures(). DAI is transfer to the receiver eventually. ## Reference 1. AMB contracts: https://github.com/crosschain-alliance/tokenbridge-contracts/tree/feat/hashi-integration-amb 2. xDAI bridge contracts: https://github.com/crosschain-alliance/tokenbridge-contracts/tree/feat/hashi-integration-xdai-bridge 3. Test: https://github.com/crosschain-alliance/tokenbridge-contracts-migration-tests 4. Audits: https://crosschain-alliance.gitbook.io/hashi/v0.2/audit-report#gnosis-bridge-hashi-integration 5. Hashi: https://crosschain-alliance.gitbook.io/hashi/v0.2/introduction --- // File: bridges/Legacy Bridges UI/nft-bridge # NFT Bridge Gnosis does not support the native bridging of NFTs, which is usually done through [3rd-party NFT Bridges](../../about/third-parties.md) (e.g. [XP NFT Bridge](https://bridge.xp.network/)) There is a [legacy native NFT bridge](https://github.com/tokenbridge/docs/blob/master/eth-xdai-amb-bridge/nft-omnibridge-extension/README.md) that is no longer actively maintained. --- // File: bridges/Legacy Bridges UI/using-omnibridge/README # OmniBridge :::info The Legacy OmniBridge UI is now deprecated but still available, use it at your own risk. The OmniBridge UI can be accessed here: https://omni.legacy.gnosischain.com/bridge ::: The Omnibridge can be used to bridge ERC-20 tokens between Ethereum and Gnosis. The first time a token is bridged, a new ERC677 token contract is deployed on GC with an additional suffix to differentiate the token. It will say "token name on xDai", as this was the original chain name prior to re-branding. If a token has been bridged previously, the previously deployed contract is used. The requested token amount is minted and sent to the account initiating the transfer (or an alternative receiver account specified by the sender). - [Tokenbridge Docs](https://github.com/tokenbridge/docs/tree/master/eth-xdai-amb-bridge/multi-token-extension/ui-to-transfer-tokens) ## Transfer any ERC-20 token from Ethereum to Gnosis It is possible to use the [Gnosis Bridge](https://bridge.gnosischain.com) to transfer any ERC20 from Ethereum to xDai. Any user can initiate this initial transfer. Once the token exists on Gnosis, it can be transferred back and forth using the same UI. ### Token Transfer In this example, we transfer the Basic Attention Token (BAT) from Ethereum to xDai. When this process was started, this token does not yet exist on Gnosis. It takes less than 5 minutes and some ETH for gas fees. 1. Go to the [Legacy OmniBridge UI](https://omni.legacy.gnosischain.com/bridge) - Connect your wallet to the Ethereum Mainnet - Select the token you want to transfer (here we select BAT) and enter the amount - Click Unlock and approve the account interaction. :::note These screenshots were taken back when Basic Attention Token (BAT) was first bridged. The steps are the same, but note that the url is old and is now https://omni.legacy.gnosischain.com/bridge ::: ![](/img/bridges/omni-tokentransfer1.jpg) 2. Confirm the transaction to approve ![](/img/bridges/omni-tokentransfer2.jpg) 3. Once transaction approval is complete, you can now Transfer BAT to BAT on xDai. Click Transfer. ![](/img/bridges/omni-tokentransfer3.jpg) 4. Press Confirm to approve the transfer and pay the gas fees. These may be expensive depending on network congestion. We recommend [checking current gas prices](https://ethgas.watch/). Because of high fees, it also may make sense to bridge over a larger amount of tokens in a single transaction rather than several smaller ones. ![](/img/bridges/omni-tokentransfer4.jpg) 5. The bridge transaction will begin to process. While you are waiting for block confirmations, you can click on the ALM monitor link to view progress of your transfer, or you can view the [ALM monitor here](https://alm-bridge-monitor.gnosischain.com/) and look up your transaction by the transaction hash. ![](/img/bridges/omni-tokentransfer5.jpg) Viewing the ALM app: ![](/img/bridges/omni-tokentransfer6.jpg) :::note Back when BAT was first bridged, only 2/3 confirmations were required. Now the validator set has expanded so 4/8 confirmations are required. ::: 6. After a successful transfer, you can check the token on BlockScout to see that it exists. Check Bridged tokens at https://blockscout.com/xdai/mainnet/bridged-tokens. ![](/img/bridges/omni-tokentransfer7.jpg) 7. Note the contract address and be sure to [add the token to your wallet](https://metamask.zendesk.com/hc/en-us/articles/360015489031-How-to-add-unlisted-tokens-custom-tokens-in-MetaMask#h_01FWH492CHY60HWPC28RW0872H). ### Switch Bridges and Networks in the UI #### Bridges The OmniBridge UI supports several bridges. To switch chains, click on the Bridge Selector to choose. Once selected, a popup will instruct you to change networks in MetaMask. Click the buttons directly in the popup to complete the process. 1. Choose from selector ![](/img/bridges/omni-switchnetwork1.png) 2. Click to switch to target network (Binance Smart Chain in the screenshot) ![](/img/bridges/omni-switchnetwork2.png) 3. Click approve to add the network to MetaMask. If you get a warning that the network details don't match, it's likely ok. Be sure to check [chainlist.org](https://chainlist.org/) to verify the network details just in case. ![](/img/bridges/omni-switchnetwork3.png) 4. Click "Switch Network" to allow the site to switch the network. ![](/img/bridges/omni-switchnetwork4.png) 5. UI should display that you are connected to the new chain. Your wallet address will now change from being highlighted red to blue. ![](/img/bridges/omni-switchnetwork5.png) #### Networks When switching between networks within the same bridge, press the arrows icon in the top middle, then confirm the network switch in MetaMask. ![](/img/bridges/omni-switchnetwork6.png) ## Transfer Tokens without the UI The instructions below use the Etherscan UI and the Blockscout UI to demonstrate the token transfer process. There is [Legacy OMNIBRIDGE UI](https://omni.legacy.gnosischain.com/bridge) also available which calls the methods of the multi-token mediators contracts described below. ### General Case: ERC-20 Token Transfer The general case describes a "pure" ERC20 token. For tokens compatible with ERC677 and ERC827 token standards the steps may be simplified - see the [separate section below](#simplification-for-erc677erc827-tokens). #### Ethereum -> Gnosis Chain The steps below assume: - The account performing the actions owns some amount of an ERC20 token on Ethereum. - The account is funded with some ether to cover gas fees. - The MetaMask/NiftyWallet must be unlocked and rights to access the account must be granted for Etherscan. For demonstration purposes we transfer Sai tokens. ![](/img/bridges/omni-erc20manual1.png) 1. **Approve the mediator contract to transfer tokens.** The mediator contract uses the `transferFrom` functionality of the ERC20 token contract to lock the tokens; it must be explicitly approved to perform this operation. ![](/img/bridges/omni-erc20manual2.png) First, connect to the Web3 provider (MetaMask or other). Next, click on Write Contract and go to the approve method. Enter the following: `guy (address)` field: the mediator contract address on Ethereum (`0x88ad09518695c6c3712AC10a214bE5109a655671`) `wad (uint256)`: the amount of tokens to transfer in wei ![](/img/bridges/omni-erc20manual3.png) Press the "Write" button to send the transaction. ![](/img/bridges/omni-erc20manual4.png) The wallet window will appear. Gas price can be adjusted to speed up transaction verification. After the transaction is confirmed in the wallet, it is necessary to wait for verification. Depending on the gas price specified and traffic congestion it can take several seconds to several minutes. 2. **Initiate the transfer request.** Copy the contract address before proceeding: ![](/img/bridges/omni-erc20manual5.png) Next, open the mediator contract ([`0x88ad09518695c6c3712AC10a214bE5109a655671`](https://etherscan.io/address/0x88ad09518695c6c3712AC10a214bE5109a655671)) in Etherscan. ![](/img/bridges/omni-erc20manual6.png) The mediator contract is a proxy contract; Click contract then click the "Write as Proxy" tab. ![](/img/bridges/omni-erc20manual7.png) Since you are opening a new contract in Etherscan, you will connect to the Web3 provider (your wallet of choice) again. Then, in the `relayTokens` method enter the token contract address and the amount of tokens to transfer. ![](/img/bridges/omni-erc20manual8.png) Press the "Write" button to send the transaction. ![](/img/bridges/omni-erc20manual9.png) The MetaMask/NiftyWallet will appear and the gas price can be adjusted to speed up the transaction verification. Once the transaction is confirmed in MetaMask, wait for confirmation. Depending on the gas price specified and traffic congestion it could take from several seconds to several minutes. Once the transaction is included in a block, the Arbitrary Message Bridge validators will wait for 8 additional blocks. Then, they will send confirmations to Gnosis chain to invoke the multi-token mediator contract and complete the tokens transfer. You can monitor the confirmation and AMB request execution with the [AMB Live Monitoring tool](https://alm-bridge-monitor.gnosischain.com/). Specify the hash (tx id) of the transaction used to call `relayTokens` in the ALM entry page to check the status of the AMB request initiated by this transaction in real time. If the AMB request is executed successfully: - **If token has not been transferred with AMB before:** If this is the first transaction for this particular token using the AMB, a new ERC677 token contract will be deployed to Gnosis. The token contract will be initialized with the same symbol and decimals as for the original token on Ethereum. The name of the new token will be extended with the letters "on xDai" (e.g. "Dai Stablecoin v1.0 on xDai"). At the end, the requested amount of tokens will be minted and sent to the account that called `relayTokens`. - **If token has been previously transferred with AMB:** If If the ERC677 token has already been registered by the mediator for the original ERC20 token, deployment of the contract will be skipped but the requested amount of tokens will be minted and sent to the account that called `relayTokens`. Once the process is complete and indexed by BlockScout, it is possible to find the token contract on Gnosis Chain. Check out the [Bridged token registry](https://blockscout.com/xdai/mainnet/bridged-tokens) to view it. #### Gnosis -> Ethereum The steps below assume that the account performing the actions is funded with some xDai to cover gas fees. Also, the MetaMask/NiftyWallet must be unlocked and rights to access the account must be granted for BlockScout. :::info Make sure that the token contract is verified in BlockScout. Token contracts deployed as part of the multi-token mediator operations are not verified automatically, so if the token does not allow read and write in the block explorer, [follow the steps](https://docs.blockscout.com/for-users/verifying-a-smart-contract) to verify the contract before starting. ::: 1. **Call the transferAndCall method to transfer tokens** The token contract deployed by the multi-token mediator supports the ERC677 standard, so instead of calling `approve` and `relayTokens`, a single method `transferAndCall` can be used to transfer tokens to the mediator contract and notify it regarding this action at the same time. Go to the "Write Proxy" tab of the token contract in BlockScout ![](/img/bridges/omni-gno-eth-manual1.png) In the transferAndCall method enter the multi-token mediator contract address on Gnosis chain (`0xf6A78083ca3e2a662D6dd1703c939c8aCE2e268d`), amount of tokens to transfer, and "0x" in the \_data field. Press Write to send the transaction. ![](/img/bridges/omni-gno-eth-manual2.png) The MetaMask window will appear. Gas price should be 1 GWei, adjust if needed. Once the transaction is confirmed in MetaMask, wait for verification by the Gnosis chain validators. This is typically completed in a few seconds. Once the transaction is included in a block, the Arbitrary Message Bridge validators will wait for one more block. After that, they will collect confirmations on Gnosis chain and transfer them to Ethereum. The transaction sent by a validator to Ethereum will execute the request to unlock the tokens. You can monitor this process using the [AMB Live Monitoring tool](https://alm-bridge-monitor.gnosischain.com/). Specify the hash (tx id) of the transaction used to call transferAndCall in the ALM entry page and it will check the status of the AMB request initiated by this transaction in real time. The requested amount of tokens minus any fees will be unlocked on Ethereum. #### Simplification for ERC677/ERC827 tokens If the token on Ethereum is ERC677 or ERC827 compatible it is possible to omit the approve method call and only call the `transferAndCall` method in the token contract. :::note This example uses the STAKE token, [whose utility will be depreciated after the merge of xDAI/Gnosis](https://forum.gnosis.io/t/gip-16-gnosis-chain-xdai-gnosis-merge/1904). However, the token will still exist and these steps are still relevant. ::: Below is example with the STAKE token contract: ![](/img/bridges/omni-erc677-simplification1.png) Click Write Contract and specify the multi-token mediator contract address on Ethereum (0x88ad09518695c6c3712AC10a214bE5109a655671) as the recipient of the tokens, the amount of tokens in wei the "value" field, and `0x` in the "data" field. Click Write to execute. ![](/img/bridges/omni-erc677-simplification2.png) #### Simplification for token transfers from the Gnosis Chain side :::danger Do Not Use the `transfer` method to send tokens to the multi-token mediator on Ethereum. It will lead to loss of tokens. ::: The token contact deployed on Gnosis Chain is a customized version of ERC677 standard. It contains the changes that allow calling the transfer method to withdraw tokens from Gnosis instead of `transferAndCall`. So, it is enough to specify the multi-token mediator contract address on Gnosis chain (`0xf6A78083ca3e2a662D6dd1703c939c8aCE2e268d`) as the recipient and amount of tokens to initiate request to transfer tokens back to Ethereum. :::warning The method described above works only for tokens deployed by the multi-token mediator on Gnosis chain. ::: ## Bridging Tokens Minted on Gnosis Tokens minted natively on Gnosis Chain are now available to bridge to Ethereum. Note that you will need to pay gas costs for the destination chain (which can be quite high for Ethereum) with the destination currency (such as ether) when bridging. Bridging requires 2 steps: 1. Unlock the Token (allow the application to transfer) 2. Request the Transfer (requires 2 transactions, 1 from sending chain and the 2nd on destination chain to claim) Please see the [previous section on bridging from Gnosis to Ethereum](#gnosis---ethereum) for specific instructions, as the steps are the same. --- // File: bridges/Legacy Bridges UI/using-omnibridge/advanced :::info The following tutorial is referring to the legacy Omnibridge. The new Bridge UI for Omnibridge can be used in https://bridge.gnosischain.com/, and relevant tutorials can be found in [here](../../Bridge%20Explorer.md). Please avoid using the legacy Omnibridge: https://omni.legacy.gnosischain.com/bridge ::: ## Alternate Receiver The default bridge mode sends funds to the same address across chains, as the same algorithm is used to derive an address from a private key across the chains where the OmniBridge is deployed. However, it is easy to specify another address to receive funds on the chain you are bridging to. This may be desirable when sending funds from a multi-sig wallet (like Gnosis Safe), or as a transfer method to another address on a secondary chain. ### Set and Alternate Receiver 1. Click on the "Advanced" link on the Omnibridge UI. A text field will appear. 2. Paste the `0x...` address you are transferring funds to on the receiving chain. 3. Proceed with the Request ![](/img/bridges/omni-alternate-receiver.gif) :::info Claims on the receiving chain can be completed using any address with enough funds. Copy the tx hash from the first transaction (it will be linked during tx processing or when complete in the history tab of the bridge. You can also find in your MetaMask wallet) and paste into https://alm-bridge-monitor.gnosischain.com/ to search and execute. ::: ## Set Custom RPC Endpoints If you are experiencing an issue with an Ethereum or Gnosis Chain RPC endpoint when trying to bridge you can easily set your own endpoint in the interface. Note that these are Read Only, if you need to use the RPCs to process transactions, you can [set custom RPCs in your web3 wallet like MetaMask](https://metamask.zendesk.com/hc/en-us/articles/360043227612-How-to-add-a-custom-Network-RPC-and-or-Block-Explorer) as well. ### RPC Endpoints: - [Gnosis RPC's](/tools/rpc/) - [Ethereum RPC's](https://www.alchemy.com/list-of/rpc-node-providers-on-ethereum) 1. Go to [the bridge UI](https://omni.gnosischain.com/bridge) and click settings at the top. 2. Add your RPC of choice and click **Save**. Note that the URL options change based off which networks you have selected to bridge between. ![](/img/bridges/omni-custom-rpc1.png) ## Infinite Unlock You must give approval to the bridge contracts to access and send ERC-20 tokens. This is similar to Uniswap or another DEX that asks for approval to spend your tokens. You can give this permission on a per transaction basis, or you can unlock an unlimited amount to transfer with the infinite unlock option. Infinite unlock saves on transaction fees, but does introduce security risk if the contract is compromised. If compromised, a malicious 3rd party may have the ability to access all funds rather than a finite approved amount. ### Set Infinite Unlock 1. Go to Settings on the top of the page 2. Toggle "Infinite Unlock" and click **Save**. When you process your next unlock, the transaction will allow all transfers of that token without needing to unlock again. ![](/img/bridges/omni-infinite-unlock1.png) 3. If you don't wish to use infinite unlock but would like te instead set a custom limit, when the MetaMask window pops up to ask for approval you have the option to set a spend limit. Click "Edit Permission" and it will take you to the following screen: ![](/img/bridges/omni-custom-limit.png) --- // File: bridges/Legacy Bridges UI/using-omnibridge/bnb-chain # BNB Chain :::danger BSC to GC has been deprecated on Omnibridge UI. This page provides a way for user to bridge token back to "original" chain, where the canonical token contract is deployed. ::: | Contract| Address| |---|---| |AMB (BSC)| [0x05185872898b6f94aa600177ef41b9334b1fa48b](https://bscscan.com/address/0x05185872898b6f94aa600177ef41b9334b1fa48b#readProxyContract) | |AMB (GC)| [0x162e898bd0aacb578c8d5f8d6ca588c13d2a383f](https://gnosisscan.io/address/0x162e898bd0aacb578c8d5f8d6ca588c13d2a383f#readProxyContract)| |Omnibridge (BSC) |[0xF0b456250DC9990662a6F25808cC74A6d1131Ea9](https://bscscan.com/address/0xf0b456250dc9990662a6f25808cc74a6d1131ea9)| | Omnibridge(GC)|[0x59447362798334d3485c64d1e4870fde2ddc0d75](https://gnosisscan.io/address/0x59447362798334d3485c64d1e4870fde2ddc0d75)| | Validator Contract (BSC)|[0xFCE050274760d7C1AB809271Fb753dCEdac811b8](https://bscscan.com/address/0xFCE050274760d7C1AB809271Fb753dCEdac811b8)| |Validator Contract(GC)|[0x6f00218e7D985FE1211f5d47B350708fF915A842](https://gnosisscan.io/address/0x6f00218e7d985fe1211f5d47b350708ff915a842#writeProxyContract)| ## Gnosis -> BSC The steps below assume that the account performing the actions is funded with some xDai to cover gas fees. Also, the MetaMask/NiftyWallet must be unlocked and rights to access the account must be granted for BlockScout. :::info Make sure that the token contract is verified in BlockScout. Token contracts deployed as part of the multi-token mediator operations are not verified automatically, so if the token does not allow read and write in the block explorer, [follow the steps](https://docs.blockscout.com/for-users/verifying-a-smart-contract) to verify the contract before starting. ::: 1. **Call the transferAndCall method to transfer tokens** The token contract deployed by the mutli-token mediator supports the ERC677 standard, so instead of calling `approve` and `relayTokens`, a single method `transferAndCall` can be used to transfer tokens to the mediator contract and notify it regarding this action at the same time. Go to the "Write Proxy" tab of the token contract in BlockScout ![](/img/bridges/omni-gno-eth-manual1.png) In the transferAndCall method enter the multi-token mediator contract address on Gnosis chain (`0x59447362798334d3485c64d1e4870fde2ddc0d75`), amount of tokens to transfer, and "0x" in the \_data field. Press Write to send the transaction. ![](/img/bridges/omni-gno-eth-manual2.png) The MetaMask window will appear. Gas price should be 1 GWei, adjust if needed. Once the transaction is confirmed in MetaMask, wait for verification by the Gnosis chain validators. This is typically completed in a few seconds. Once the transaction is included in a block, the Arbitrary Message Bridge validators will wait for one more block. After that, they will collect confirmations on Gnosis chain and transfer them to BSC. The transaction sent by a validator to BSC will execute the request to unlock the tokens. ## BSC -> Gnosis Chain The steps below assume: - The account performing the actions owns some amount of an ERC20 token on BSC. - The account is funded with some ether to cover gas fees. - The MetaMask/NiftyWallet must be unlocked and rights to access the account must be granted for BinanceScan. For demonstration purposes we transfer Sai tokens. ![](/img/bridges/omni-erc20manual1.png) 1. **Approve the mediator contract to transfer tokens.** The mediator contract uses the `transferFrom` functionality of the ERC20 token contract to lock the tokens; it must be explicitly approved to perform this operation. ![](/img/bridges/omni-erc20manual2.png) First, connect to the Web3 provider (MetaMask or other). Next, click on Write Contract and go to the approve method. Enter the following: `guy (address)` field: the mediator contract address on BSC (`0xF0b456250DC9990662a6F25808cC74A6d1131Ea9`) `wad (uint256)`: the amount of tokens to transfer in wei ![](/img/bridges/omni-erc20manual3.png) Press the "Write" button to send the transaction. ![](/img/bridges/omni-erc20manual4.png) The wallet window will appear. Gas price can be adjusted to speed up transaction verification. After the transaction is confirmed in the wallet, it is necessary to wait for verification. Depending on the gas price specified and traffic congestion it can take several seconds to several minutes. 2. **Initiate the transfer request.** Copy the contract address before proceeding: ![](/img/bridges/omni-erc20manual5.png) Next, open the mediator contract ([`0xF0b456250DC9990662a6F25808cC74A6d1131Ea9`](https://bscscan.com/address/0xF0b456250DC9990662a6F25808cC74A6d1131Ea9#readProxyContract)) in Etherscan. ![](/img/bridges/omni-erc20manual6.png) The mediator contract is a proxy contract; Click contract then click the "Write as Proxy" tab. ![](/img/bridges/omni-erc20manual7.png) Since you are opening a new contract in Etherscan, you will connect to the Web3 provider (your wallet of choice) again. Then, in the `relayTokens` method enter the token contract address and the amount of tokens to transfer. ![](/img/bridges/omni-erc20manual8.png) Press the "Write" button to send the transaction. ![](/img/bridges/omni-erc20manual9.png) The MetaMask/NiftyWallet will appear and the gas price can be adjusted to speed up the transaction verification. Once the transaction is confirmed in MetaMask, wait for confirmation. Depending on the gas price specified and traffic congestion it could take from several seconds to several minutes. Once the transaction is included in a block, the Arbitrary Message Bridge validators will wait for 8 additional blocks. Then, they will send confirmations to Gnosis chain to invoke the multi-token mediator contract and complete the tokens transfer. For more details, check out [here](README.md#transfer-tokens-without-the-ui) --- // File: bridges/Legacy Bridges UI/using-omnibridge/debugging-omnibridge-txns # Debugging OmniBridge Transactions :::info This page is mostly for application developers, if you sent tokens through the OmniBridge and would like to get the status whether the tokens were sent successfully or not, please use [Bridge Explorer](https://bridge.gnosischain.com/bridge-explorer) instead. ::: Firstly, the [Foreign Arbitrary Message Bridge contract](https://etherscan.io/address/0x4C36d2919e407f0Cc2Ee3c993ccF8ac26d9CE64e) which is used by the OmniBridge, emits the `UserRequestForAffirmation` event as part of the a deposit request made by user (on the Ethereum side). ``` event UserRequestForAffirmation(bytes32 indexed messageId, bytes encodedData); ``` For example, [this is the event in the OmniBridge transaction](https://etherscan.io/tx/0x804a4b28520faad8b68d122cafdffedd2e185a9aa734b69f264a652d5c53afa4#eventlog), and the topic `0x482515ce3d9494a37ce83f18b72b363449458435fafdd7a53ddea7460fe01b58` ![](/img/bridges/omni-debugging1.png) In the event definition and from the example, the Id of the AMB message is trackable as part of the event. The event from the example shows the message Id: `0x000500004ac82b41bd819dd871590b510316f2385cb196fb0000000000000402`. On the other side of the bridge, if the message was executed successfully the [AMB contract](https://gnosis.blockscout.com/address/0x75Df5AF045d91108662D8080fD1FEFAd6aA0bb59) emits the `AffirmationCompleted` event. ``` event AffirmationCompleted( address indexed sender, address indexed executor, bytes32 indexed messageId, bool status ); ``` Here is [the event corresponding to the example](https://blockscout.com/xdai/mainnet/tx/0x092f1c8a02f305e5bfb671b923710cdd150c5b0e41df048c75b790538a25025b/logs) ![](/img/bridges/omni-debugging2.png) The topic of the event is `0xe194ef610f9150a2db4110b3db5116fd623175dca3528d7ae7046a1042f84fe7`. And the message Id is represented as a separate topic in the event. That's why it is possible to use different ways to filter out the corresponding transaction if the message Id of the OmniBridge deposit is known (it always can be received from the deposit transaction). For example, you can use the BlockScout API for this: https://docs.blockscout.com/for-users/api/rpc-endpoints. Example of the request to the BlockScout: ``` https://gnosis.blockscout.com/api?module=logs&action=getLogs&fromBlock=1&toBlock=latest&address=0x75Df5AF045d91108662D8080fD1FEFAd6aA0bb59&topic0=0xe194ef610f9150a2db4110b3db5116fd623175dca3528d7ae7046a1042f84fe7&topic3=0x000500004ac82b41bd819dd871590b510316f2385cb196fb0000000000000402&topic0_3_opr=and ``` It will return the JSON with the transaction hash correlated to the emission of the event `AffirmationCompleted` with the message Id: ``` { "message": "OK", "result": [ { "address": "0x75df5af045d91108662d8080fd1fefad6aa0bb59", "blockNumber": "0xbc8133", "data": "0x0000000000000000000000000000000000000000000000000000000000000001", "gasPrice": "0x3b9aca00", "gasUsed": "0x2d572", "logIndex": "0x8", "timeStamp": "0x5f7ab6dd", "topics": [ "0xe194ef610f9150a2db4110b3db5116fd623175dca3528d7ae7046a1042f84fe7", "0x00000000000000000000000088ad09518695c6c3712ac10a214be5109a655671", "0x000000000000000000000000f6a78083ca3e2a662d6dd1703c939c8ace2e268d", "0x000500004ac82b41bd819dd871590b510316f2385cb196fb0000000000000402" ], "transactionHash": "0x092f1c8a02f305e5bfb671b923710cdd150c5b0e41df048c75b790538a25025b", "transactionIndex": "0x5" } ], "status": "1" } ``` --- // File: bridges/Legacy Bridges UI/using-omnibridge/safe # OmniBridge with Safe App OmniBridge is compatible with the Gnosis Safe apps interface, allowing for bridge interaction and ERC20 transfers between Gnosis Chain and Ethereum using a Multisig Wallet. The following instructions are for bridging **ERC20s between Ethereum and Gnosis**. To transfer xDai to Dai and vice versa, see the [xDai Bridge + Gnosis Safe](../using-xdai-bridge/safe.md) instructions. :::warning Each Gnosis Safe is deployed independently on Gnosis and/or Ethereum. Cross-chain safes do not share the same contract addresses (even when they have the same owners etc), so it is **important to use the Alternate Recipient Address feature** when bridging with a safe. ::: ## Add the App 1. Go to your Gnosis Safe and login and connect as you normally would. - Gnosis Safe on Ethereum/Gnosis: [https://gnosis-safe.io/app/](https://gnosis-safe.io/app/) Select corresponding network on top right corner. 2. Go to Apps -> Add Custom App ![](/img/bridges/omnibridge/gn-1.png) 3. Add the App Url: [https://omni.gnosischain.com/](https://omni.gnosischain.com/) The App name should populate as OmniBridge. Agree to the terms and click Add. ![](/img/bridges/omnibridge/gn2.png) 4. App will be added to the interface, click to access. ![](/img/bridges/omnibridge/gnosis-3.png) ## Bridge App on Origin Chain: Initiating a Transaction 5. Open the application and interact with the bridge as you normally would to begin the transfer process. \*\*\*\* In this example we bridge from xDai to Ethereum. :::warning Note that when bridging with a safe you will set an alternate receiver. This may be a 2nd safe contract on the receiving chain or an individual address to receive the funds. **If you bridge without setting a Recipient Address, your funds may be lost.** ::: To set an Alternate Recipient, click on **Advanced**, then enter in the **0x address** into the Recipient Address box that will receive funds on the receiving chain. You can set a Gnosis safe address on the receiving chain as the recipient or another accessible address. Complete the rest of the information (token type and amount to transfer) and click **Request**. If you need more details related to OmniBridge transfers, see the [OmniBridge Instructions Page](./). ![](/img/bridges/omnibridge/gnosis-4.png) 6. Once you have requested the transfer, the required number of safe owners need to submit, sign and confirm to process the request. ![](/img/bridges/omnibridge/gnosis-submit-sign.png) ![](/img/bridges/omnibridge/gnosis-6.png) Once the first transaction is processed, close the safe application and switch chains to complete the claim. ## Bridge App on Receiving Chain: Claiming a Bridge Transaction In this example, we sent STAKE from xDai to a Gnosis Safe address on Ethereum. To claim this transaction, login to Gnosis Safe on Ethereum and open the OmniBridge Application (you may need to [add it using the steps above](#add-the-app) if you have not added previously) 7. You should see the claim screen, click the **Claim** button to begin the process. If you do not see this screen, click on **History** at the top of the OmniBridge app. ![](/img/bridges/omnibridge/omni-1.png) 8. Click the **Claim** button. ![](/img/bridges/omnibridge/omni-2.png) 9. All required owners must confirm the transaction before it is processed. Once completed, the funds are added to the Safe. ![](/img/bridges/omnibridge/omni-3.png) --- // File: bridges/Legacy Bridges UI/using-omnibridge/specific-tokens # Specific Tokens In some cases it is convenient to use ETH, the native token for the Ethereum Mainnet, in the form of a wrapped ERC20 token. This allows to unify interfaces for operations with assets. The recent Wrapped ETH token contract is [WETH9](https://etherscan.io/address/0xc02aaa39b223fe8d0a0e5c4f27ead9083c756cc2). When the ETH-Gnosis OmniBridge first started, wrapped ETH was bridged to the Gnosis chain in form of ERC677 token: Wrapped ETH on xDai. Although the bridged token can be transferred back to ETH, it is still be in form of the ERC20 token, and it cannot be used in transactions to pay for gas fees. In this case, if a user has no ETH, it is impossible for them to unwrap these ETH tokens. This set of instructions demonstrates how the Wrapped ETH can be bridged from Gnosis chain directly to ETH tokens using a new `relay-and-call` feature implemented in the OmniBridge contracts. In the last part of this guide there is also an instruction on how to transfer ETH to WETH on Gnosis chain using a single operation. This may not be used often but some users may find it handy. This instruction assumes that you have access to BlockScout and Etherscan. You also must have a bit of xDai to pay for gas fees for a bridge transaction on Gnosis chain. In the second part of the tutorial, you will learn how to bridge GNO between Goerli and Chiado testnet. You are required to have some xDAI on Chiado and ETH on Goerli to complete the transaction. ## Bridge wEth on Gnosis to Native Eth on Ethereum 1. Change the chain to Gnosis in MetaMask 2. Find the wEth token in BlockScout, and go to the [Write Proxy](https://gnosis.blockscout.com/address/0x6A023CCd1ff6F2045C3309768eAd9E68F978f6e1?tab=write_proxy) tab. ![](/img/bridges/omni-bridge-to-native-eth1.png) 3. Scroll to the `transferAndCall` method: ![](/img/bridges/omni-bridge-to-native-eth2.png) 4. Enter the following information as parameters to call the method: - `_to`(address): `0xf6A78083ca3e2a662D6dd1703c939c8aCE2e268d` . This is sthe address of the OmniBridge contract on Gnosis. - `_value`(uint256): amount of wETH to be bridged (bridge fees wikll be subtracted from this value). - `_data`(bytes): the concatenation of the following: - the address of the wETH OmniBridge helper contract on the Ethereum Mainnet (`0xa6439Ca0FCbA1d0F80df0bE6A17220feD9c9038a`) - the address of the ETH recipient without the leading `0x` For example, for the recipient `0xbf3d6f830ce263cae987193982192cd990442b53`, the value in `_data` field is `0xa6439ca0fcba1d0f80df0be6a17220fed9c9038abf3d6f830ce263cae987193982192cd990442b53` Click **Write** to send the transaction. 5. When the transaction is included in the block, click on the transaction link to get the transaction details ![](/img/bridges/omni-bridge-to-native-eth3.png) 6. Use the "View in ALM App" link on the page with transaction details, or use the transaction hash and go to the [ALM site](https://alm-bridge-monitor.gnosischain.com/) and enter it manually to track status of the transfer and finalize bridge operations if required. ![](/img/bridges/omni-bridge-to-native-eth4.png) 7. Eventually, when an executing transaction on the Mainnet is processed, the WETH will be unlocked and unwrapped to ETH native tokens: ![](/img/bridges/omni-bridge-to-native-eth5.png) --- ## Bridge Eth to Gnosis Chain 1. Visit the WETH OmniBridge helper contract on [Etherscan](https://etherscan.io/address/0xa6439ca0fcba1d0f80df0be6a17220fed9c9038a#writeContract) and connect your wallet. 2. Scroll to the `wrapAndRelayTokens` method and enter the amount of ETH to bridge to Gnosis chain: ![](/img/bridges/omni-bridge-from-native-eth1.png) Click **Write** to send the transaction 3. When the transaction is included in the block, press the "View you transaction" button to get the transaction hash which can be used in the [AMB Live Monitoring app](https://alm-bridge-monitor.gnosischain.com/) to track the status of the transaction. --- ## GNO: Goerli -> Chiado Bridging GNO from Goerli to Chiado requires 2 txs. #### Transaction 1 Allow Foreign OmniBridge Mediator to transfer GNOs, by calling approve() on GNO contract. **[Called Function](https://goerli.etherscan.io/address/0x7f477c3F03213970d939104CC436Dc995CF615b5)**: `GNO.approve(address Foreign OmniBridge Mediator, uint256 amount)` **[Transaction Parameter Example](https://docs.metamask.io/guide/sending-transactions.html)**: ``` to: 0x7f477c3F03213970d939104CC436Dc995CF615b5 (GNO on Goerli) value: 0 data: 0x095ea7b300000000000000000000000000147c84f13764dcdabaf1cbae622fa6f683908500000000000000000000000000000000000000000000d3c21bcecceda1000000 ``` #### Transaction 2 Relay GNO tokens from Foreign Omnibridge Mediator. **[Called Function](https://goerli.etherscan.io/address/0x00147c84f13764dcdabaf1cbae622fa6f6839085)**: `Foreign_OmniBridge_Mediator.relayTokens(address _receiver, uint256 _value)` **[Transaction Parameter Example](https://docs.metamask.io/guide/sending-transactions.html)**: ``` to: 0x00147c84f13764dcdabaf1cbae622fa6f6839085 (Foreign OmniBridge Mediator) value: 0 data: 0x01e4f53a0000000000000000000000007f477c3f03213970d939104cc436dc995cf615b50000000000000000000000000000000000000000000000000de0b6b3a7640000 ``` After a few minutes the exact amount of relayed tokens will be available on Chiado side. --- ## GNO: Chiado -> Goerli Bridging GNO from Chiado to Goerli also requires 2 txs. #### Transaction 1 Allow Home OmniBridge Mediator to transfer GNOs. **[Called Function](https://blockscout.com/gnosis/chiado/address/0x19C653Da7c37c66208fbfbE8908A5051B57b4C70)**: `GNO.approve(address Home OmniBridge Mediator, uint256 amount)` **[Transaction Parameter Example](https://docs.metamask.io/guide/sending-transactions.html)**: ``` to: 0x19C653Da7c37c66208fbfbE8908A5051B57b4C70 (GNO on Chiado) value: 0 data: 0x095ea7b300000000000000000000000009d549a48ac52f3f9945e7de6402c609c92aa2e100000000000000000000000000000000000000000000d3c21bcecceda1000000 ``` #### Transaction 2 Relay GNO tokens from Home Omnibridge Mediator. **[Called Function](https://blockscout.com/gnosis/chiado/address/0x09D549a48AC52F3f9945E7de6402c609c92aa2E1)**: `Home_OmniBridge_Mediator.relayTokens(address _receiver, uint256 _value)` **[Transaction Parameter Example](https://docs.metamask.io/guide/sending-transactions.html)**: ``` to: 0x09D549a48AC52F3f9945E7de6402c609c92aa2E1 (Home OmniBridge Mediator) value: 0 data: 0x01e4f53a00000000000000000000000019C653Da7c37c66208fbfbE8908A5051B57b4C700000000000000000000000000000000000000000000000000de0b6b3a7640000 ``` After a few minutes the exact amount of relayed tokens will be available on Goerli side. --- // File: bridges/Legacy Bridges UI/using-omnibridge/token-registry # Token Registry ## Getting corresponding Token Address There are several approaches to discover the token contract on the Ethereum Mainnet that corresponds to the token contract on Gnosis chain. ### **Approach 1: BlockScout** BlockScout allows you to see if a token was bridged using the multi-token extension. First, search the token and go it's contract page: ![](/img/bridges/omni-bridged-tokens1.png) This view contains information that this token was bridged and a link to the original token. ![](/img/bridges/omni-bridged-tokens2.png) If you go to the top bar, you will notice that the token dropdown allows you to filter between tokens based off where they were bridged from: ![](/img/bridges/omni-bridged-tokens3.png) ### **Approach 2: Mediator Storage** The [multi-token mediator on Gnosis chain](https://gnosisscan.io/address/0xf6A78083ca3e2a662D6dd1703c939c8aCE2e268d#writeProxyContract) provides methods for viewing correspondence of bridgeable tokens: - `foreignTokenAddress` - returns the address of the token contract on the Ethereum Mainnet by specifying the address the token contract on Gnosis Chain. - `homeTokenAddress`- returns the address of the token contract on Gnosis chain by specifying the address of the token contract on Ethereum. Pass in the token address to get the corresponding address on the other chain: ![](/img/bridges/omni-mediatorstorage1.png) ## Verifying a Canonical Bridged Token on BlockScout New tokens deployed by the multi-token mediator are not verified automatically in BlockScout. Sometimes it is necessary to read data from the token contract directly in the block explorer or even call a method of the token contract (e.g. to transfer tokens back to the Ethereum Mainnet). Follow the instructions below to verify the contract in BlockScout. Once verified, you can read and write to the contract using the BlockScout interface. 1. Find the token contract by the token symbol using the search bar. The following example follows the verification of the STAKE token, which [recently had its staking utility deprecated](https://forum.gnosis.io/t/gip-16-gnosis-chain-xdai-gnosis-merge/1904). However, these steps are still relevant. The bridgeable token name is extended by "on xDai": ![](/img/bridges/omni-verify-token1.png) 2. Verify the contract: ![](/img/bridges/omni-verify-token2.png) ![](/img/bridges/omni-verify-token3.png) Click on the Code tab, click Verify and Publish, then fill the form following the recommendations below (see solidity contract code below this image). Press the "Verify & publish" button at the bottom of the form to finish. ![](/img/bridges/omni-verify-token4.png)
Click to View Solidity Contract Code used in the Example **Code**: ```solidity showLineNumbers pragma solidity 0.4.24; /** * @title Proxy * @dev Gives the possibility to delegate any call to a foreign implementation. */ contract Proxy { /** * @dev Tells the address of the implementation where every call will be delegated. * @return address of the implementation to which it will be delegated */ /* solcov ignore next */ function implementation() public view returns (address); /** * @dev Fallback function allowing to perform a delegatecall to the given implementation. * This function will return whatever the implementation call returns */ function() public payable { // solhint-disable-previous-line no-complex-fallback address _impl = implementation(); require(_impl != address(0)); assembly { /* 0x40 is the "free memory slot", meaning a pointer to next slot of empty memory. mload(0x40) loads the data in the free memory slot, so `ptr` is a pointer to the next slot of empty memory. It's needed because we're going to write the return data of delegatecall to the free memory slot. */ let ptr := mload(0x40) /* `calldatacopy` is copy calldatasize bytes from calldata First argument is the destination to which data is copied(ptr) Second argument specifies the start position of the copied data. Since calldata is sort of its own unique location in memory, 0 doesn't refer to 0 in memory or 0 in storage - it just refers to the zeroth byte of calldata. That's always going to be the zeroth byte of the function selector. Third argument, calldatasize, specifies how much data will be copied. calldata is naturally calldatasize bytes long (same thing as msg.data.length) */ calldatacopy(ptr, 0, calldatasize) /* delegatecall params explained: gas: the amount of gas to provide for the call. `gas` is an Opcode that gives us the amount of gas still available to execution _impl: address of the contract to delegate to ptr: to pass copied data calldatasize: loads the size of `bytes memory data`, same as msg.data.length 0, 0: These are for the `out` and `outsize` params. Because the output could be dynamic, these are set to 0, 0 so the output data will not be written to memory. The output data will be read using `returndatasize` and `returdatacopy` instead. result: This will be 0 if the call fails and 1 if it succeeds */ let result := delegatecall(gas, _impl, ptr, calldatasize, 0, 0) /* */ /* ptr current points to the value stored at 0x40, because we assigned it like ptr := mload(0x40). Because we use 0x40 as a free memory pointer, we want to make sure that the next time we want to allocate memory, we aren't overwriting anything important. So, by adding ptr and returndatasize, we get a memory location beyond the end of the data we will be copying to ptr. We place this in at 0x40, and any reads from 0x40 will now read from free memory */ mstore(0x40, add(ptr, returndatasize)) /* `returndatacopy` is an Opcode that copies the last return data to a slot. `ptr` is the slot it will copy to, 0 means copy from the beginning of the return data, and size is the amount of data to copy. `returndatasize` is an Opcode that gives us the size of the last return data. In this case, that is the size of the data returned from delegatecall */ returndatacopy(ptr, 0, returndatasize) /* if `result` is 0, revert. if `result` is 1, return `size` amount of data from `ptr`. This is the data that was copied to `ptr` from the delegatecall return data */ switch result case 0 { revert(ptr, returndatasize) } default { return(ptr, returndatasize) } } } } interface IPermittableTokenVersion { function version() external pure returns (string); } /** * @title TokenProxy * @dev Helps to reduces the size of the deployed bytecode for automatically created tokens, by using a proxy contract. */ contract TokenProxy is Proxy { // storage layout is copied from PermittableToken.sol string internal name; string internal symbol; uint8 internal decimals; mapping(address => uint256) internal balances; uint256 internal totalSupply; mapping(address => mapping(address => uint256)) internal allowed; address internal owner; bool internal mintingFinished; address internal bridgeContractAddr; // string public constant version = "1"; bytes32 internal DOMAIN_SEPARATOR; // bytes32 public constant PERMIT_TYPEHASH = 0xea2aa0a1be11a07ed86d755c93467f4f82362b452371d1ba94d1715123511acb; mapping(address => uint256) internal nonces; mapping(address => mapping(address => uint256)) internal expirations; /** * @dev Creates a non-upgradeable token proxy for PermitableToken.sol, initializes its eternalStorage. * @param _tokenImage address of the token image used for mirrowing all functions. * @param _name token name. * @param _symbol token symbol. * @param _decimals token decimals. * @param _chainId chain id for current network. */ constructor(address _tokenImage, string memory _name, string memory _symbol, uint8 _decimals, uint256 _chainId) public { string memory version = IPermittableTokenVersion(_tokenImage).version(); assembly { // EIP 1967 // bytes32(uint256(keccak256('eip1967.proxy.implementation')) - 1) sstore(0x360894a13ba1a3210667c828492db98dca3e2076cc3735a920a3ca505d382bbc, _tokenImage) } name = _name; symbol = _symbol; decimals = _decimals; owner = msg.sender; // msg.sender == HomeMultiAMBErc20ToErc677 mediator bridgeContractAddr = msg.sender; DOMAIN_SEPARATOR = keccak256( abi.encode( keccak256("EIP712Domain(string name,string version,uint256 chainId,address verifyingContract)"), keccak256(bytes(_name)), keccak256(bytes(version)), _chainId, address(this) ) ); } /** * @dev Retrieves the implementation contract address, mirrowed token image. * @return token image address. */ function implementation() public view returns (address impl) { assembly { impl := sload(0x360894a13ba1a3210667c828492db98dca3e2076cc3735a920a3ca505d382bbc) } } } ```
After verification is successful, the number tabs in the contract window will be extended to allow users to "Read Contract", "Write Contract", "Read Proxy" and "Write Proxy". ![](/img/bridges/omni-verify-token5.png) ## Bridged Tokens List A dynamic list of bridged tokens is now available. - [Tokens Bridged from Ethereum](https://blockscout.com/xdai/mainnet/bridged-tokens/eth) - [Tokens Bridged from Binance Smart Chain](https://blockscout.com/xdai/mainnet/bridged-tokens/bsc) The OmniBridge multi-token bridge extension is now being used to bridge many tokens from Ethereum to Gnosis. A second instance bridges tokens to and from the Binance Smart Chain. When a token is bridged, the name is appended with "on xDai" or "from Ethereum/BSC". On a token page, you can also find the link to the original token on Ethereum. ## Getting bridged tokens from Omnibridge Smart Contracts The Token list is queried dynamically with BlockScout. The list is compiled by following these steps: 1. Find all transactions to the [AMB Contract on Gnosis](https://gnosis.blockscout.com/address/0x75Df5AF045d91108662D8080fD1FEFAd6aA0bb59/transactions#address-tabs) 2. Check all internal transactions for each transaction. 3. If an internal transaction creates a contract from the AMB mediator address (0xf6A78083ca3e2a662D6dd1703c939c8aCE2e268d), and this contract exposes the `getTokenInterfacesVersion()` getter, it is safe to assume that this contract’s address is a bridged token address. --- // File: bridges/Legacy Bridges UI/using-xdai-bridge/README ## xDai Bridge ### Moving Dai from Ethereum to xDai on Gnosis :::note You will need some Dai to transfer AND some ETH for gas (transaction fees). [Bridge minimum/maximum amounts](../../Token%20Bridge/xdai-bridge.md#fees--daily-limits) are set by the [bridge governors](../../management/README.md). Bridge may take some time to update chain stats, try refreshing or waiting a minute if you receive any errors. You can also select a [different RPC](#custom-rpc) in the Settings dropdown. ::: 1. Go to the [Legacy xDai Bridge UI](https://bridge.legacy.gnosischain.com/) and connect your wallet to the Ethereum Mainnet. Once connected, you will see your address populated in the header, and your DAI and xDai balance displayed on the page. If you change the dropdown on the page (ETH Mainnet) but not in MetaMask, the interface will update but your wallet will not auto-connect to the chain. _Switching chains in MetaMask_ however will automatically update the interface. 2. Enter the amount of Dai you would like to transfer to Gnosis, and click the Transfer button. 3. The web3 wallet window will open with transaction details. The default gas price is fine, if you would like a faster transaction you can increase. Click Submit or Confirm (depending on wallet) to initiate the transaction. 4. Wait for the transaction confirmation (this can take some time if the network is super congested). The transaction is considered finalized after 8 blocks. To check on a pending transaction, click on the tx in the UI. 5. Once the initial transfer confirmation is successful, you will see consecutive 'Transfer Pending' notifications with: 1. 20 of 20 block confirmations 2. Countdown with continue until 1 block confirmation is left. 3. Waiting for execution on Gnosis Chain side. 4. Transfer Complete. 6. Click on View on BlockScout to see details about the transaction. If you scroll down you will see the `address` (your address where the xdai was sent), `value` (amount sent in wei), and `transactionHash`, which will match the hash from the initial transaction. ### Moving xDai from Gnosis back to Dai on Ethereum :::note It is recommended to use Google Chrome and MetaMask without Ad Blockers to complete this process. You will need a **small additional amount of xDai** to process the first transaction, and an **additional amount of Eth** to process the claim transaction on Ethereum. ::: 1. Go to the [Legacy xDai Bridge UI](https://bridge.legacy.gnosischain.com/) and connect your wallet to Gnosis Chain. Once connected, you will see your address populated in the header, and your DAI and xDai balance displayed on the page. If you change the dropdown on the page but not in MetaMask, the interface will update but your wallet will not auto-connect to the chain. _Switching chains in MetaMask_ however will automatically update the interface. 2. Enter the amount of xDai you would like to transfer to Dai, and click the Request button. Note that there exists a [minimum amount](../../Token%20Bridge/xdai-bridge.md#fees--daily-limits). 3. Confirm that you will need to perform 2 transactions, and will need xDai and Eth to complete the transfer. Click **Confirm** to process the transaction on Gnosis Chain. 4. Your web3 wallet window will open with transaction details. 5. Wait for 8 block confirmations. You will see several popups with block confirmation info. 6. You will see a modal instructing you switch networks in your MetaMask (or other web3 wallet) to the Ethereum Mainnet. 7. After you switch networks the **Claim** button will appear. Press to proceed. 8. **Confirm** the second claim transaction in MetaMask (you will need some Eth for gas fees). Once processed, the Dai should be available in your wallet. :::info If you are interested in converting Dai to xDai without the UI see [how to use xDai Bridge without UI](#using-xdai-bridge-without-the-ui) ::: ### How To Use the xDai Bridge with Safe (formerly Gnosis Safe) The xDai Bridge is included as a native Safe application, and Multisig Wallets on both Ethereum and Gnosis can interact with the bridge directly from the safe. The following instructions are for bridging **xDai to Dai** and vice versa. To bridge any other ERC20s, see the [Legacy Omnibridge + Gnosis Safe](../using-omnibridge/README.md) instructions. #### Initiating a Transaction 1. Go to your [Safe](https://gnosis-safe.io/app), login and connect. You will want to access the safe you are bridging from first (if moving xDai to Dai, start with the Gnosis one). **Safe addresses are distinct for each chain**. You can toggle which network you are using in the top right corner dropdown. 2. Go to **Apps** and find the [**xDai Bridge** App](https://gnosis-safe.io/app/share/safe-app?appUrl=https://bridge.xdaichain.com&chainId=1). Apps are typically displayed in alphabetical order. Click to access. 3. Open the application and interact with the bridge as you normally would to begin the transfer process. \*\*\*\* In the following example we bridge xDai on Gnosis chain to Dai on Ethereum. Note that there exists a [minimum amount](../../Token%20Bridge/xdai-bridge.md#fees--daily-limits). Enter: 1. xDai Amount 2. Recipient Address 3. Click Request. The Mainnet amount will show 0 DAI, as your Safe address on the Ethereum Mainnet is different and will not correspond with any Dai amount in a mainnet safe. :::danger When bridging with a safe you will set a **Recipient Address**. This may be a 2nd safe contract on the receiving chain or an individual address to receive the funds. The app will not let you proceed until you set the Recipient Address. ::: Once you request to bridge xDai, you will see this warning reminding you about the claims process. Some xDai is required on one of the owner's wallets to initiate the transfer process, and Eth on Ethereum is required to claim bridged Dai. 4. On submission, the required number of safe owners each need to **submit** and **sign** to process the request. This does not require any xDai. The final signature owner (required number of signatures are set through the gnosis safe settings) then needs to confirm. Any owner can then execute the tx and pay for the initial transfer transaction with xDai once this quorum has been met. In this example, a second owner goes to the **transactions** menu in their safe to find **transaction needs your confirmation**. 5. Execute the transaction on Gnosis. A warning message may appear related to the gas limit which is set too low by the application. To fix, go to **Advanced options** and raise the gas limit. You can set it to be higher if desired - the transaction will only use the amount required within the set limit. 6. Once confirmed, you can close the safe application on xDai. Find the transaction details on BlockScout by clicking on the transaction in the **MetaMask Activity** tab or by following the transaction history in the safe. _Next, switch to a Safe on Ethereum to complete the claim process._ #### Claiming a Bridge Transaction on Ethereum In this example, we sent xDai to a Safe address on Ethereum. To claim the transaction and receive Dai, login to [Safe on Ethereum](https://gnosis-safe.io/app/) and open the xDai Bridge Application (located in the Apps menu). 1. You should see the claim screen, click the **History** button to begin the process. If you do not see this screen, click on **History** at the top of the bridge app. 2. Click the **Claim** button. 3. All required owners must confirm the transaction before it is processed. Once the required signatures are collected, an owner can claim the transaction. The claim will require Eth, and can be completed anytime if the current prices are too high. Once completed, you can find the Etherscan link in your MetaMask Activity tab or the pending transaction pop-up. ## More guides - [Alternate Receiver](./alternate-receiver.md) - [Custom RPC endpoint in Bridge](./custom-rpc.md) - [Using Safe App](./safe.md) - [Without UI](./no-ui.md) - [Troubleshooting](./troubleshooting) --- // File: bridges/Legacy Bridges UI/using-xdai-bridge/alternate-receiver # Alternate Receiver :::info The following tutorial is referring to the legacy xDAI bridge. The new Bridge UI for xDAI bridge can be used in https://bridge.gnosischain.com/, and relevant tutorials can be found in [here](../../Bridge%20Explorer.md). Please avoid using the legacy xDAI bridge: https://bridge.legacy.gnosischain.com/ ::: The feature _Alternative Receiver_ has integrated in the contracts of the xDai bridge as part of [an upgrade](https://forum.poa.network/t/migration-of-the-xdai-tokenbridge-completed/3212). With this feature it becomes possible to transfer tokens through the bridge to any account by very simple actions. It means that Alice can send Dai to Bob’s account on Gnosis chain in one transaction, and Bob can send xDai to Clare’s account on the Ethereum Mainnet in one transaction too. Due to different nature of tokens on two sides of the xDai bridge the operations to transfer assets to an alternative receiver from one chain to another differ as well. The xDai Bridge Alternative Receiver functionality. The transfer requires 2 transactions, one to unlock the contract and a second to process the transaction. _Manual methods are described below this section._ ## Dai to xDai 1. Go to [the bridge UI](https://bridge.gnosischain.com/) and connect your MetaMask Wallet. ![](/img/bridges/xdai-alt-rec-dai-xdai1.png) 2. Determine **Single Tx Unlock** or **Infinite Tx Unlock**. You may want to approve the transfer for a single transaction, or approve the contract to make unlimited transfers from this address to many other addresses. For a Single TX Unlock, proceed directly to step 3 below. For infinite TX unlock, complete the following. 1. Go to Settings ![](/img/bridges/xdai-alt-rec-dai-xdai2.png) 2. Toggle Infinite Unlock and save. Close the modal and proceed to step 3. ![](/img/bridges/xdai-alt-rec-dai-xdai3.png) 3. Click on **Advanced** and add the Recipients Address and the amount to Dai to transfer to Gnosis. Press **Unlock.** ![](/img/bridges/xdai-alt-rec-dai-xdai4.gif) 4. Confirm the Unlock transaction in MetaMask. 5. Click to Transfer and Confirm the transaction. 6. Once the initial transaction is successful, you will see consecutive Transfer Pending notifications with: 1. 20 of 20 block confirmations..... 2. Countdown with continue until 1 block confirmation is left. 3. Waiting for execution on Gnosis side. 4. Transfer Complete. 7. The transfer is complete. Check the balance of the new account by clicking on the BlockScout link or accessing the address on Gnosis Chain. ## xDai to Dai 1. With xDai to Dai transfers you do not need to use the Unlock feature. Connect to Gnosis Chain in MetaMask. 1. Click on Advanced. 2. Enter the Address that will receive Dai. 3. Enter Amount. 4. Click Request. ![](/img/bridges/xdai-alt-rec-xdai-dai1.png) 2. Click Confirm to acknowledge you will need to perform 2 transactions. 3. Confirm the first tx in MetaMask. 4. Wait for 20 Block Confirmations on xDai. 5. Switch to **Ethereum Mainnet** in MetaMask. The Claim button will appear. Click **Claim**. 6. **Confirm** the second claim transaction in MetaMask. Once processed, the Dai should be available for the alternative receiver on Ethereum. ## Dai to xDai (Manual, Non-UI Method) 1. Open MetaMask and choose the Ethereum Mainnet. 2. Go to the Dai Token Contract -> Write Contract functionality in Etherscan. [https://etherscan.io/address/0x6b175474e89094c44da98b954eedeac495271d0f#writeContract](https://etherscan.io/address/0x6b175474e89094c44da98b954eedeac495271d0f#writeContract) 3. Connect to your Web3 Wallet (MetaMask). 4. Approve the bridge contract to perform operations with tokens: - `usr(address)` -- the address of the xDai bridge contract in the Ethereum Mainnet: `0x4aa42145Aa6Ebf72e164C9bBC74fbD3788045016` - `wad(uint256)` -- the amount of tokens (in Wei) approved to send through the bridge (in this case 2 Dai): `2000000000000000000` - Click **Write** 4. Confirm the transaction in the MetaMask and wait until it is included in the chain. 5. Initialize the xDai bridge contract interface in Etherscan. Here you will write to the proxy contract. [https://etherscan.io/address/0x4aa42145aa6ebf72e164c9bbc74fbd3788045016#writeProxyContract](https://etherscan.io/address/0x4aa42145aa6ebf72e164c9bbc74fbd3788045016#writeProxyContract) 6. You will see several `relayTokens` methods. Use Method (1) to send to an alternate address. You can also use a second method (14) if the Dai deposit is performed by another contract of behalf of the user account (like a DEX). There are also 2 other `relayToken` methods (4), (22) that specify a `_token(address)`. These are not in use. **relayTokens Method (1)** - `_receiver (address)` - address of the alternate receiver, the account that will be sent native tokens on Gnosis chain - `_amount (uint256)` - the amount of tokens (in Wei) to transfer; must be less or equal amount of tokens approved for the bridge operations - Click **Write** **relayTokens Method(14)** - `_sender (address)` - optional. Use when the Dai deposit is performed by another contract on behalf of a user account (e.g. by a DEX) - `_receiver (address)` - address of the alternate receiver, the account that will be sent native tokens on Gnosis chain - `_amount (uint256)` - the amount of tokens (in Wei) to transfer; must be less or equal amount of tokens approved for the bridge operations - Click **Write** 7. Submit the transaction in the MetaMask and wait until it is included in the chain. 8. The xDai bridge will take some time to relay the deposit request to Gnosis chain. Once complete, the balance of the `_receiver`account will increase with the corresponding amount of xDai. ## xDai to Dai (Non-UI Method) 1. Go to the [xDai bridge proxy contract on Gnosis Chain](https://gnosis.blockscout.com/address/0x7301CFA0e1756B71869E93d4e4Dca5c7d0eb0AA6?tab=write_proxy) 2. Using the `relayTokens` method under the "Write Proxy" tab, enter the receiver address in the `_receiver` box, and the amount of xDai to transfer (in xDai - no need to convert to WEI). Connect your wallet and confirm the transaction. Copy the transaction hash. ![](/img/bridges/xDai-manual-xDai-Dai1.png) 3. Go to the [helper contract](https://gnosis.blockscout.com/address/0x2D51EAa266eafcb59bB36dD3c7E99C515e58113A?tab=write_proxy). In the `getMethodHash()` method, enter the transaction hash from the previous step, the recipient address, and the amount being transferred. When entering the amount, you can use that little "+" icon to add the zeroes, as the amount needs to be entered in wei. Use the 10^18 option to save yourself some typing. Do not include any fees, only the amount to send. Copy the message hash after clicking query. ![](/img/bridges/xDai-manual-xDai-Dai-getMsgHash.png) 4. Paste the message hash from the previous step into the `getMessage()` method. If you receive 0x0 it means either the bridge oracles did not send a confirmation for the withdrawal yet or the data entered in the step 3 is incorrect. Double check the info and if it is correct you will eventually receive the message. ![](/img/bridges/xDai-manual-xDai-Dai-getMsg.png) 5. Once you receive the message, use the message hash from step 3 and query the `getSignatures()` method with it. It should return a blob packed with the signatures provided by the validator. If enough signatures haven't been collected yet, then the query could fail. If this happens, waiting a few minutes should fix it. ![](/img/bridges/xDai-manual-xDai-Dai-getSignatures.png) 6. Copy and paste the signature blob and the output from step 4 into the [Ethereum proxy contract](https://etherscan.io/address/0x4aa42145aa6ebf72e164c9bbc74fbd3788045016#writeProxyContract)'s `executeSignatures` method (you will need some Eth for gas). Connect your wallet and click write. After the transaction processes, the funds should appear in the receiver wallet. ![](/img/bridges/xDai-manual-xDai-Dai-execSignatures.png) - [How to bridge Dai to a different address on Gnosis](../../Legacy%20Bridges%20UI/using-xdai-bridge/alternate-receiver.md) - [TokenBridge Docs: Alternative Receiver for the xDai Bridge](https://github.com/tokenbridge/docs/blob/master/xdai-bridge/using-the-xdai-bridge/alternative-receiver-for-the-xdai-bridge.md) --- // File: bridges/Legacy Bridges UI/using-xdai-bridge/custom-rpc # Custom JSON RPC Endpoints If you are experiencing an issue with an Ethereum or Gnosis Chain RPC endpoint when trying to bridge you can easily set your own endpoint in the interface. Note that these are **Read Only**, if you need to use the RPCs to process transactions, you can [set custom RPCs in your web3 wallet like MetaMask as well](https://metamask.zendesk.com/hc/en-us/articles/360043227612-How-to-add-a-custom-Network-RPC-and-or-Block-Explorer). **Alternative Endpoint Resources** * [Gnosis supported endpoints](/tools/rpc/) * [Ethereum nodes](https://ethereumnodes.com/) 1) Go to [bridge.gnosischain.com](https://bridge.gnosischain.com/) and select Settings. ![](/img/bridges/xdaibridge/xsetting1.png) 2) Add your RPC for either or both chains and click **Save**. ![](/img/bridges/xdaibridge/xsetting2.png) --- // File: bridges/Legacy Bridges UI/using-xdai-bridge/no-ui # Without UI It is possible to move Dai and xDai using a wallet rather than through the UI. This method is supported by all wallets that support ERC20 transfers (e.g. [MyEtherWallet.com](http://myetherwallet.com/), [TrustWallet](https://trustwallet.com/), [MetaMask](https://metamask.io/)). Here we use NiftyWallet. Token address for reference: - Dai: [0x6b175474e89094c44da98b954eedeac495271d0f](https://etherscan.io/token/0x6b175474e89094c44da98b954eedeac495271d0f) TokenBridge addresses for reference (where you send the asset to transfer) - Mainnet TokenBridge (Dai -> xDai): `0x4aa42145Aa6Ebf72e164C9bBC74fbD3788045016` - xDai TokenBridge (xDai -> Dai): `0x7301CFA0e1756B71869E93d4e4Dca5c7d0eb0AA6` ## Transfer Dai from the Ethereum Mainnet to the Gnosis Chain 1. Connect to the Ethereum Mainnet and locate DAI in your webwallet. 2. Enter in the following: 1. TokenBridge Address as the recipient: `0x4aa42145Aa6Ebf72e164C9bBC74fbD3788045016` 2. Amount to Send 3. Submit the transaction 3. Wait for the relay confirmation from the bridge validators. This may take several minutes. 4. Set your wallet to the Gnosis chain and check your balance. ## Transfer xDai to DAI from the Gnosis chain to the Ethereum Mainnet :::info The following demonstrates interaction with contract methods using BlockScout and Etherscan ::: 1. Send xDai coins to the Token Bridge address `0x7301CFA0e1756B71869E93d4e4Dca5c7d0eb0AA6` on the Gnosis Сhain using any wallet software. 2. Wait for the transaction confirmation on the Gnosis chain (5 seconds). 3. Copy the transaction hash of the confirmation and connect to the Ethereum mainnet. 4. Visit the helper contract: [https://gnosis.blockscout.com/address/0x2D51EAa266eafcb59bB36dD3c7E99C515e58113A](https://gnosis.blockscout.com/address/0x2D51EAa266eafcb59bB36dD3c7E99C515e58113A) 5. In the `getMessageHash` method field add the following information from your originating transaction and press the Query button. The method will return a hashed message. - DAI recipient (typically the transaction sender but may differ if the ‘relayTokens’ functionality is used) - Value (in **Wei** - do not include fees, only amount sent (Wei converter at [http://eth-converter.com/](http://eth-converter.com/)) - Originating transaction hash 6. Copy the message hash and paste into the `getMessage` method. If you receive 0x0 it means either the bridge oracles did not send a confirmation for the withdrawal yet or the data entered in the step 3 is incorrect. Double check the info and if it is correct you will eventually receive the message. 7. Once you receive the message, use the message hash again this time with the `getSignatures` method. It will return a blob with packed signatures provided by the validator. The method could fail if not enough signatures are collected. ![](/img/bridges/xdaibridge/blockscout1.jpg) 8. Go to Etherscan and connect a web3 wallet: [https://etherscan.io/address/0x4aa42145aa6ebf72e164c9bbc74fbd3788045016#writeProxyContract](https://etherscan.io/address/0x4aa42145aa6ebf72e164c9bbc74fbd3788045016#writeProxyContract) 9. Enter the message (from `getMessage` method above) and the signatures blob to the `executeSignatures` method, press the **Write** button and complete the transaction with a Web3 wallet. If the method reverts, the withdrawal was likely already executed. You can check all input for the recipient here: [https://etherscan.io/token/0x6b175474e89094c44da98b954eedeac495271d0f?a=0x](https://etherscan.io/token/0x6b175474e89094c44da98b954eedeac495271d0f?a=0x)..., where the recipient's address follows after “a=“. ![](/img/bridges/xdaibridge/etherscan1.jpg) Once you have written to the contract method, a View your **transaction** button will appear. Click to view the pending transaction. ![](/img/bridges/xdaibridge/etherscan3.jpg) ![A completed transaction](/img/bridges/xdaibridge/etherscan2.jpg) --- // File: bridges/Legacy Bridges UI/using-xdai-bridge/safe # xDai Bridge with Safe App The xDai Bridge is now included as a native Gnosis Safe application, and Multisig Wallets on both Ethereum and Gnosis Chain can interact with the bridge directly from the safe. The following instructions are for bridging **xDai to Dai** and vice versa. To bridge any other ERC20s, see the [Omnibridge + Gnosis Safe](/bridges/tutorials/using-omnibridge/safe) instructions. ## Initiating a Transaction 1. Go to your [Gnosis Safe](https://gnosis-safe.io/app/) and login and connect. You will want to access the safe you are bridging from first (if moving xDai to Dai, start with the xDai bridge). Safe addresses are distinct for each chain. 2. Go to **Apps** and find the **xDai Bridge** App. Apps are typically displayed in alphabetical order. Click to access. ![](/img/bridges/xdaibridge/img1.png) 3. Open the application and interact with the bridge as you normally would to begin the transfer process. **** In the following example we bridge xDai on the Gnosis chain to Dai on Ethereum. The minimum amount to initiate a bridge transfer is 10 xDai. Enter: 1. xDai Amount 2. Recipient Address 3. Click Request. The Mainnet amount will show 0 DAI, as your Gnosis safe address on the Ethereum Mainnet is different and will not correspond with any Dai amount in a mainnet safe. :::warning When bridging with a safe you will set a **Recipient Address**. This may be a 2nd safe contract on the receiving chain or an individual address to receive the funds. The app will not let you proceed until you set the Recipient Address. ::: ![](/img/bridges/xdaibridge/set-recipient-address.png) Once you request to bridge xDai, you will see this warning reminding you about the claims process. xDai funds are required on one of the owner's wallets to initiate the transfer process, and Eth on Ethereum to claim bridged Dai. ![Message following initial request](/img/bridges/xdaibridge/confirm-warning.png) 4. On submission, the required number of safe owners each need to **submit** and **sign** to process the request. This does not require any xDai. ![](/img/bridges/xdaibridge/submit-and-sign.png) The final signature owner (required number of signatures are set through the gnosis safe settings) then needs to confirm. Any owner can then execute the tx and pay for the initial transfer transaction with xDai once this quorum has been met. In this example, a second owner goes to the **transactions** menu in their safe to find **transaction needs your confirmation**. ![A second signature is required in this example ](/img/bridges/xdaibridge/2nd confirmer.png) 5. Execute the transaction on the Gnosis chain. In this case, a warning message appears related to the gas limit which is set too low by the application. ![](/img/bridges/xdaibridge/approve-tx-issue.png) To fix, go to **Advanced options** and raise the gas limit. In this example we raise by 100,000 (initially was set to 124197) which results in a very small increase in cost since the transaction is on Gnosis. You can set higher if desired - the transaction will only use the amount required within the set limit. ![](/img/bridges/xdaibridge/edit-gas-limit.png) 6. Once confirmed, you can close the safe application on xDai. Find the transaction details on BlockScout by clicking on the transaction in the **MetaMask Activity** tab or by following the transaction history in the safe. _Next, switch to a Gnosis Safe on Ethereum to complete the claims process._ ![A successful transfer](/img/bridges/xdaibridge/blockscout-success.png) ## Bridge App on Receiving Chain: Claiming a Bridge Transaction In this example, we sent xDai to a Gnosis Safe address on Ethereum. To claim the transaction and receive Dai, login to [Gnosis Safe on Ethereum](https://gnosis-safe.io/app/) and open the xDai Bridge Application (located in the Apps menu). 7. You should see the claim screen, click the **History** button to begin the process. If you do not see this screen, click on **History** at the top of the bridge app. ![](/img/bridges/xdaibridge/claim-screen-1.png) 8. Click the **Claim** button. ![](/img/bridges/xdaibridge/claim-screen-2.png) 9. All required owners must confirm the transaction before it is processed. Once the required signatures are collected, an owner can claim the transaction. The claim will require Eth, and can be completed anytime to optimize gas prices. Once completed, you can find the Etherscan link in your MetaMask Activity tab or the pending transaction pop-up. ![](/img/bridges/xdaibridge/to-view-on-etherscan.png) ![Tx pending in Etherscan](/img/bridges/xdaibridge/on-etherscan.png) ![Go to the Transactions Menu Item -> History to see prior transaction in your Gnosis safe.](/img/bridges/xdaibridge/transaction-history.png) --- // File: bridges/Legacy Bridges UI/using-xdai-bridge/troubleshooting :::info The following tutorial is referring to the legacy xDAI bridge. The new Bridge UI for xDAI bridge can be used in https://bridge.gnosischain.com/, and relevant tutorials can be found in [here](../../Bridge%20Explorer.md). Please avoid using the legacy xDAI bridge: https://bridge.legacy.gnosischain.com/ ::: # Troubleshoot Bridge Issues Bridge transactions can take some time (hours in extreme cases) to complete depending on Ethereum mainnet congestion. Try these actions first if your transaction has been **pending for 10 minutes or more** (and you don't want to wait any more time). Actions differ depending on if you are transferring from xDai to Dai or [Dai to xDai](#dai-to-xdai-transaction-is-taking-a-long-time). If you are using OmniBridge for other ERC20 tokens (not xDai to Dai) please see the [OmniBridge page](/bridges/tutorials/using-omnibridge/). **This guide only addresses issues with xDai to Dai transfers.** :::info **Things to know** - A bridge exit (moving from xDai to Dai) requires **2 transactions**, **one to initiate the transfer** on Gnosis, and a **2nd to claim DAI on Ethereum**. - To process the **2nd transaction**, you will need to **switch to Ethereum Mainnet in MetaMask** and **you will need Ether to pay gas fees.** - The **2nd transaction may take quite a long time**, it is being processed on Ethereum. You can set a higher gas price if you want to speed it up. [**Instructions**](#dai-to-xdai-transaction-is-taking-a-long-time)**.** - If you closed the UI before starting the 2nd transaction, you can come back and to complete later. [**Instructions**](#i-used-the-xdai-bridge-ui)**.** - Additional troubleshooting items below. ::: ## Bridge UI is Offline or in Maintenance Mode We are doing some periodic maintenance and optimization on the Bridge and are now putting the UI into maintenance mode during these times to avoid additional confusion and/or delayed transactions for users. If you started a transaction but it did not complete because of maintenance mode, be assured that funds are safe and will be available once maintenance is complete. If you have questions or concerns during maintenance, please contact us in [Discord channel](https://discord.gg/gnosis) for up-to-date information. ## I Only See Bridging in 1 Direction The bridge is dynamic and supports bi-directional bridging**. It will shift automatically when you update your web3wallet (MetaMask) to the correct chain**. When you are on Ethereum Mainnet, you will see the Eth-Mainnet to Gnosis side, and when you are on Gnosis, you will see the Gnosis to Eth Mainnet side. You can adjust which side through the Bridge toggle in menu, however to initiate a transfer you will need your wallet set to the correct chain. ![](/img/bridges/xdaibridge/toggle.gif) ## I Transferred xDai to Dai but it's Not Working A new bridge decentralization feature means **withdrawals now require 2 steps**. You must 1. initiate the bridge transaction on Gnosis 2. Claim your Dai on Ethereum. There are currently different bridging UIs, and depending on the UI you may need to take different steps to complete the process. - [xDai bridge](#i-used-the-xdai-bridge-ui): [https://bridge.gnosischain.com/](https://bridge.gnosischain.com/) - [Burner Wallet](#i-used-burner-wallet-at-xdai-io): [https://xdai.io](https://xdai.io) ## I Used the xDai Bridge UI When using the xDai bridge, we recommend Chrome and MetaMask. It is also useful to disable ad-blockers, as there are popups which guide you through the process. [A successful transfer process is documented here](./README.md). If you submitted a tx on Gnosis, but not complete the claim process, return to the Bridge UI and connect your MetaMask wallet with the account you used previously. 1\) Switch MetaMask to the ETH Mainnet. If you have unclaimed txs you should see the following popup. Click on **History**. ![](/img/bridges/xdaibridge/xmodal1.png) 2\) If you are in the Bridge UI, you can also click on **History to view.** ![](/img/bridges/xdaibridge/history-1.png) 1. **Filter by Unreceived Transactions** and click the **Claim** button to begin the process. MetaMask will ask you to confirm the transaction and pay the gas fees to complete the process. ![](/img/bridges/xdaibridge/history2.png) ![](/img/bridges/xdaibridge/history3.png) :::info You may want to [manually set gas prices for a cheaper exit](#gas-fees-for-an-exit-claim-are-very-high-how-can-i-reduce-them). ::: ## I Used **Burner Wallet** at xDai.io If you initiated a transfer from Burner Wallet, it likely is stuck on the Waiting for Bridge message. ![](/img/bridges/xdaibridge/b1.jpg) ### I'm connected to the Burner Wallet with MetaMask You can retrieve the pending transaction using the MetaMask interface. [Learn more here.](#find-transaction-hash-in-metamask) 1. Go to the Bridge UI at [https://bridge.gnosischain.com/](https://bridge.gnosischain.com/) 2. Switch your MetaMask wallet to the ETH Mainnet 3. Click on **History.** You will see any unclaimed transactions*. (You can also filter unclaimed transactions)* 4. Press the **Claim button** to process**.** _(will not appear until 6+ minutes after the transaction)_ 5. **Confirm** transaction in MetaMask and wait for tx validation. :::warning You may want to [manually set gas prices for a cheaper exit](#gas-fees-for-an-exit-claim-are-very-high-how-can-i-reduce-them). ::: ### I'm using a standalone Burner Wallet In this case, you'll want to export your private key into MetaMask to finish the conversion. 1\) Click the Advanced Button. ![](/img/bridges/xdaibridge/a1.jpg) 2\) Copy Private Key. ![](/img/bridges/xdaibridge/a2.jpg) 3\) Open MetaMask and import the account. ![](/img/bridges/xdaibridge/a3.jpg) 4\) Paste in the private key and click Import. ![](/img/bridges/xdaibridge/a4.jpg) 5\) Go to the Bridge UI at [https://bridge.gnosischain.com/](https://bridge.gnosischain.com/) 1. Switch your MetaMask wallet to the ETH Mainnet 2. Click on **History.** You will see any unclaimed transactions*. (You can also filter unclaimed transactions)* 3. Press the **Claim button** to process**.** _(will not appear until 6+ minutes after the transaction)_ 4. **Confirm** transaction in MetaMask and wait for tx validation. :::warning You may want to [manually set gas prices for a cheaper exit](#gas-fees-for-an-exit-claim-are-very-high-how-can-i-reduce-them). ::: :::info You will need some ETH in your wallet to pay gas fees and finalize the transaction. You can send from another account. ::: 6\) You will see a Success message when the transaction is complete. 7\) Add DAI as a custom token in MetaMask to view your DAI balance in the wallet. ![](/img/bridges/xdaibridge/a10.jpg) ![](/img/bridges/xdaibridge/a11.jpg) ![](/img/bridges/xdaibridge/a12.jpg) ## Gas fees For an Exit Claim are Very High! How Can I Reduce Them? You can check current gas prices at [https://ethgas.watch/](https://ethgas.watch/). If they are high at the moment, you may want to wait until later to process your transaction. [https://ethereumprice.org/gas/](https://ethereumprice.org/gas/) can help you plan for the best time of day to make the claim transaction. If you want to go ahead with the claim, try setting MetaMask to SLOW. This may take longer to process but can save you on tx fees. You can also click on Advanced to see additional metrics and choose an exact gas price for your transaction. [More information available here](https://metamask.zendesk.com/hc/en-us/articles/360015488771-How-to-Adjust-Gas-Price-and-Gas-Limit-). ## Dai to xDai Transaction is Taking a Long Time 8 block confirmations are required to ensure a transaction is final and xDai can be minted to your account. If Ethereum is congested, it may take many more blocks for your transaction to be queued. If your transaction is stuck in pending for a long time, you can opt try to speed it up by: 1. Selecting the pending transaction in MetaMask. 2. Clicking Speed Up. 3. Paying the additional gas to try and get it through more quickly. Otherwise, it will likely be in a pending state until the congestion breaks up. If it remains in a pending state on MetaMask for a long time, see [Resetting MetaMask](#transaction-not-showing-on-blockscout-or-etherscan---resetting-metamask) below. ![](/img/bridges/xdaibridge/speedup.jpg) ## Transaction Not Showing on BlockScout or Etherscan - Resetting MetaMask. If you initiated a transaction but don't see a pending transaction the Block Explorer (in either direction, if originating from Gnosis check [BlockScout](https://gnosis.blockscout.com/), if Ethereum check [Etherscan](https://etherscan.io/)) try resetting your MetaMask account to clear your transaction history. This can be useful to clear up: - A pending transaction which refuses to clear. - A transaction fails to show up on Etherscan but is still pending. :::warning Imported accounts will not repopulate win your wallet with this method, so be sure you have access to a private key or seed phrase to restore these in a [reset account](https://metamask.zendesk.com/hc/en-us/articles/360015488891-Resetting-an-Account). ::: This [troubleshooting guide from 1Hive](https://forum.1hive.org/t/troubleshooting-problems-on-metamask/215) is also helpful for instructions on resetting and dealing with other MetaMask issues. ## I'm using a Ledger to Claim tokens on an xDai to Dai Bridge Transfer To use a Ledger you need to allow contract data in order to interact with smart contracts. We assume that you have installed the [Ethereum app](https://support.ledger.com/hc/en-us/articles/115005200009-Set-up-and-use-MyEtherWallet). 1. [Update the firmware](https://support.ledgerwallet.com/hc/en-us/articles/360002731113) to the latest version. 2. Connect and unlock your Ledger device. 3. Open the **Ethereum** application. 4. Press the right button to navigate to **Settings**. Press both buttons to validate. 5. In the **Contract data** settings, press both buttons to allow contract data in transactions. The device displays **Allowed**. 6. Retry your transaction. For more help with Ledger, please see their [support docs](https://support.ledger.com/hc/en-us). ## Find a Transaction Hash Completing a transfer from Gnosis to Ethereum (converting xDai to Dai) requires 2 transactions. 1. Initial withdrawal on Gnosis. Signatures are collected and xDai is burned. 2. Claim Dai on Ethereum. Submit transaction hash containing validator confirmations. When transferring with the Bridge UI, the tx from step 1 is copied behind the scenes and used with the claim functionality in step 2. In some cases, however, step 2 may not process, or a different method may be used (such as a direct transfer without the UI or with another UI like a burner wallet that does not include this claim functionality) and the claim must be processed manually. ### Find Transaction Hash in BlockScout 1. Go to BlockScout at https://gnosis.blockscout.com/ and enter the address that originated the transaction (typically your wallet address). If you were using a contract to interact with the bridge (in this case use the contract that called the relayToken method) enter that address. ![](/img/bridges/xdaibridge/xdai-bs.jpg) 2. You will see the transaction in the list (tx sent from your address to the EternalStorageProxy contract (`0x7301CFA0e1756B71869E93d4e4Dca5c7d0eb0AA6`). Copy the tx hash. ![](/img/bridges/xdaibridge/xdai-bs2.jpg) ### Find Transaction Hash in MetaMask The process will be similar for other Ethereum wallets. Find your past transaction history and copy the tx hash for the Contract interaction. 1. Go to MetaMask and [connect to **Gnosis**](/tools/wallets/metamask). 2. Click on the Contract Interaction TX in the activity tab of your account. ![](/img/bridges/xdaibridge/MM1.jpg) 3. Copy the Transaction ID (hash). ![Copy the tx hash for the contract interaction](/img/bridges/xdaibridge/MM2.jpg) ## View Inbound (Dai to xDai) Transactions When Dai is transferred from Ethereum to xDai on Gnosis, the amount of Dai in your wallet will decrease and the corresponding amount of xDai will increase. However, the transaction will not appear on the xDai side of the wallet. The easiest way to track it is in BlockScout with the Coin Balance History view. 1. Copy the account address used for the transaction. ![Copy Address - you can be connected to Ethereum or Gnosis, it is the same address on both chains.](/img/bridges/xdaibridge/tut22.jpg) 2. Paste the address into BlockScout at https://gnosis.blockscout.com/. ![](/img/bridges/xdaibridge/tut2.jpg) 3. Select Coin Balance History. ![](/img/bridges/xdaibridge/tut3.jpg) 4. Scroll down to see incoming and outgoing amounts. Your transaction should appear here. Red txs signify outgoing and green are incoming. You can click on the block number to find your transaction in the block if you'd like more information. ![](/img/bridges/xdaibridge/tut5.jpg) ![Click the block for more details](/img/bridges/xdaibridge/tut6.jpg) 5. Select a tx hash to view details. ![](/img/bridges/xdaibridge/tut9.jpg) 6. Here you see the recipient address, the value, and the hash of the initiating tx on Ethereum. ![](/img/bridges/xdaibridge/tut10.jpg) 7. This tx can be copy/pasted into Etherscan to see the initiating tx information. ![](/img/bridges/xdaibridge/tut11.jpg) --- // File: bridges/hashi/README Hashi is an EVM Hash Oracle Aggregator, designed to facilitate a [principled approach to cross-chain bridge security](https://ethresear.ch/t/a-principled-approach-to-bridges/14725?u=auryn). Hashi is developed and maintained further by the Cross-chain Alliance team. The integration of Hashi within Gnosis Chain's Canonical Bridges is in progress, check out [here](https://forum.gnosis.io/t/gip-93-should-gnosisdao-support-the-integration-of-hashi-within-gnosis-chains-canonical-bridges/8245). :::info Docs Migration notice Hashi documentation is now at [crosschain-alliance/Hashi](https://crosschain-alliance.gitbook.io/hashi) ! ::: The primary insight being that the vast majority of bridge-related security incidents could have had minimal impact if the systems relying on them had built in some redundancy. In other words, it's much more secure to require messages be validated by multiple independent mechanisms, rather than by just one. We call this setup a **RAIHO** (Redundant Array of Independent Hash Oracles). --- // File: bridges/management/README Bridge Management encompasses the governance and coordination of bridge-related operations and events. It involves two distinct entities: Bridge Governors and Bridge Validators. Bridge Governors oversee bridge operations on both the Ethereum and Gnosis sides, making critical decisions on bridge parameters and validator settings. Bridge Validators ensure the accurate and timely relaying of messages by monitoring event emissions, validating the associated logic, and invoking the relevant functions on the destination chain. ## Bridge Governance ### Overview In response to increased usage and value locked in the xDai bridge and Omnibridge, a proposal was introduced to extend security and decision making powers to a wider group of participants (governors). The proposal was accepted, and governance by means of a multi-signature Gnosis Safe was put into place initially on the Ethereum side on 2 October, 2020. Once Gnosis Safe was deployed to Gnosis Chain, updated governance was enacted on the xDai chain(now Gnosis Chain) on 23 October, 2020. The governing board is responsible for managing bridge operations on both sides of the bridge (contracts are deployed on the Ethereum and Gnosis side). 8 signatures are required to approve any management proposal. Operations may include: - Bridge contract updates. - Contract parameters updates such as bridge limits, finality threshold, gas price fallback etc. - Bridge validator parameter updates like changing the validators set or signatures threshold. All actions are managed through Gnosis Safe accounts, one on the Ethereum mainnet for Ethereum contract side operations and one on Gnosis for xDai contract operations. ### Bridge Governor Multisig | Network | Safe Address | | -------- | ---------------------------------------------------------------------------------------------------------------------------------- | | Ethereum | [eth:0x42F38ec5A75acCEc50054671233dfAC9C0E7A3F6](https://app.safe.global/home?safe=eth:0x42F38ec5A75acCEc50054671233dfAC9C0E7A3F6) | | Gnosis | [gno:0x7a48Dac683DA91e4faa5aB13D91AB5fd170875bd](https://app.safe.global/home?safe=gno:0x7a48Dac683DA91e4faa5aB13D91AB5fd170875bd) | ### Current Bridge Governors There are currently 16 Bridge Governors, of which 8-of-16 are required to pass a proposal. | Governor | Address | | ------------------------- | ---------------------------------------------------------------------------------------------------- | | GnosisDAO | 0x57B11cC8F93f2cfeC4c1C5B95213f17cAD81332B | | Metacartel | 0xd945325557f1FB4374fBf10Ae86D385632Df870A | | Kleros | 0xb2a33ae0E07fD2ca8DBdE9545F6ce0b3234dc4e8 | | Protofire | 0x80BA18503a1Fa16Ea22F3ef1Af23e2994EaC1d97 | | Nethermind | 0x544cE64C3Fc6Da72CEB2456CC4cF19E7c7972eFA | | Lab10 | 0x10DD75875a2a8a284529Ae7223B1aCE410d606bd | | Gateway | 0x5b10cE4DDD27F57d4D432D409A5321219cbA7893 | | Gnosis Bridge Team | eth:0x4b5F5231e2F08Ad49d79Ce5672A8339a63Cfbd43
gno:0xEF138856d0581641A57245Ee5CFfc9ceaA059623 | | Giveth | 0x839395e20bbB182fa440d08F850E6c7A8f6F0780 | | KarpatkeyDAO | 0xb8173f558f75EE263013fd6294177bf75279a21e | | Hopr | 0xA07888742c18d7e658132AE0148fF205fFF46481 | | Aave-Chan Initiative(ACI) | 0x329c54289Ff5D6B7b7daE13592C6B1EDA1543eD4 | | Erigon | 0xcF9ebF877688Ed88a7479A6e63457Fd78D4275cE | | Cow Protocol | 0xf59e447e97bc03c2b0c5719e2e551f0b15b724e5 | | Safe | 0xDdf2d07267EAF2cE3E13ee4319bE1F34D55ed992 | | Agave | 0xc44caeb7F0724A156806664d2361fD6f32a2d2C8 | ## Governance Process ### Phase 1: Ideation Post created on the Gnosis Forum in the [GnosisDAO](https://forum.gnosis.io/). There is no set duration on how long a proposal stays in this stage. There is no formal requirement for a proposal to pass this stage. However, if a proposal discussion fails to garner momentum from the community, it is unlikely to become a successful proposal. ### Phase 2: Specification [Gnosis Improvement Proposal](https://forum.gnosis.io/t/gip-0-template/734) (GIP) post is created. This stage lasts 5 days. For the proposal to pass this stage, one outcome with a relative majority of votes on the forum poll must be achieved. If the relative majority of votes indicates `Make no changes`, the proposal does not pass to Phase 3. ### Phase 3: Multisig Voting & Execution [Gnosis Improvement Proposal](https://forum.gnosis.io/t/gip-0-template/734) (GIP) post is refined, and there is a [GnosisDAO Snapshot](https://snapshot.org/#/gnosis.eth) poll. This stage lasts for 7 days. For proposals to be accepted there must be one outcome with a relative majority of GNO used for signaling on the GnosisDAO Snapshot poll accompanied by a yes-voting quorum of a minimum of 4% of the circulating supply of GNO. If the relative majority of GNO used in signaling on the Snapshot poll indicates the result Make no changes, the proposal will not be accepted and considered closed. :::info Check out all the governance decisions in the past in [Governance Decisions](decisions.md)! ::: ### Governor: Upgrading a Contract There are two possible scenarios for how the bridge or validators contracts can be upgraded: - a security fix when only the contract implementation is changed - an improvement when the contract implementation upgrade requires initialization of storage values. 1. Deploy a new implementation of the bridge or validators contract. 2. Depending on the contract and the chain, get the current version of the contract implementation. 3. Use the `upgradeTo` method from EternalStorageProxy ABI, the address of the new implementation, and the incremented version number to encode the data for the transaction. Tools like [ABI Encoding Service](https://abi.hashex.org/) can be useful when it comes to constructing the calldata from ABI. 4. Create the transaction on using [Governor's Safe](README.md#bridge-governor-multisig) and let all the governors sign the message. 5. Once the threshold is reached, execute the transaction. ### Governor: Adding/Removing a validator 1. Call `addValidator(address validator)` or `removeValidator(address validator)` in the [Governor's Safe](README.md#bridge-governor-multisig) to add or remove a validator. 2. (Optional) Call `setRequiredSignatures(uint256 _requiredSignatures)` to update the required signatures in order to execute a message. ### Governor: Setting bridge limits Different limits are set for the [xDai Bridge](../Token%20Bridge/xdai-bridge.md#fees--daily-limits) and the [OmniBridge](../Token%20Bridge/omnibridge.md#fees--daily-limits) by the bridge governors. Please see their respective documentation pages for more information. ## Bridge Validators Bridge Validators monitor events on both sides of the chains to ensure that the user's bridging requests are validated promptly. In the Gnosis Chain, there are both trusted and trustless validators. [Telepathy](/bridges/Token%20Bridge/amb-bridge#how-it-works-with-telepathy-validator), a trustless ZK-based validator on AMB, secures transactions using zero-knowledge proofs, while the rest of the validators sign the message to validate the message. The threshold of signatures from validators has to be reached in order to execute the message on the destination chain. - [xDai Bridge Validators](/bridges/management/validators#xdai-bridge) - [AMB & OmniBridge Validators](/bridges/management/validators#amb--omnibridge) ```mdx-code-block
Setting up GNO bridge validators: Gnosis Chain <->Ethereum
``` ## GNO bridge validators GC <-> ETH Mainnet ### How to setup 1. Checkout https://github.com/dharmendrakariya/chiado-ansible-bridges (yes I know it says Chiado but we use it for mainnet) 2. replace group_vars/amb.yml in https://github.com/dharmendrakariya/chiado-ansible-bridges with following settings: ```bash --- ORACLE_LOG_LEVEL: info ORACLE_BRIDGE_MODE: "ARBITRARY_MESSAGE" COMMON_HOME_RPC_URL: "" COMMON_HOME_BRIDGE_ADDRESS: "0x75Df5AF045d91108662D8080fD1FEFAd6aA0bb59" ORACLE_HOME_RPC_POLLING_INTERVAL: 15000 COMMON_FOREIGN_RPC_URL: "ETH RPC URL NON ARCHIVAL" ORACLE_FOREIGN_ARCHIVE_RPC_URL: "ETH RPC URL ARCHIVAL" COMMON_FOREIGN_BRIDGE_ADDRESS: "0x4C36d2919e407f0Cc2Ee3c993ccF8ac26d9CE64e" ORACLE_FOREIGN_RPC_POLLING_INTERVAL: 24000 ORACLE_TX_REDUNDANCY: true ORACLE_HOME_TX_RESEND_INTERVAL: 300000 COMMON_HOME_GAS_PRICE_SUPPLIER_URL: "eip1559-gas-estimation" COMMON_HOME_GAS_PRICE_SPEED_TYPE: "fast" COMMON_HOME_GAS_PRICE_FALLBACK: 2000000000 ORACLE_HOME_GAS_PRICE_UPDATE_INTERVAL: 600000 COMMON_HOME_GAS_PRICE_FACTOR: 1 COMMON_FOREIGN_GAS_PRICE_SUPPLIER_URL: "eip1559-gas-estimation" COMMON_FOREIGN_GAS_PRICE_SPEED_TYPE: "fast" COMMON_FOREIGN_GAS_PRICE_FALLBACK: 100000000000 ORACLE_FOREIGN_GAS_PRICE_UPDATE_INTERVAL: 600000 COMMON_FOREIGN_GAS_PRICE_FACTOR: 1 ORACLE_ALLOW_HTTP_FOR_RPC: yes QUEUE_URL: "amqp://rabbit-amb" REDIS_URL: "redis://redis-amb" ORACLE_HOME_START_BLOCK: 27147951 ORACLE_FOREIGN_START_BLOCK: 16918880 ``` 3. replace group_vars/native.yml in https://github.com/dharmendrakariya/chiado-ansible-bridges with following settings: ```bash --- ORACLE_LOG_LEVEL: info ORACLE_BRIDGE_MODE: "ERC_TO_NATIVE" COMMON_HOME_RPC_URL: "" COMMON_HOME_BRIDGE_ADDRESS: "0x7301CFA0e1756B71869E93d4e4Dca5c7d0eb0AA6" ORACLE_HOME_RPC_POLLING_INTERVAL: 15000 COMMON_FOREIGN_RPC_URL: "" ORACLE_FOREIGN_ARCHIVE_RPC_URL: "" COMMON_FOREIGN_BRIDGE_ADDRESS: "0x4aa42145Aa6Ebf72e164C9bBC74fbD3788045016" ORACLE_FOREIGN_RPC_POLLING_INTERVAL: 24000 ORACLE_TX_REDUNDANCY: true ORACLE_HOME_TX_RESEND_INTERVAL: 300000 COMMON_HOME_GAS_PRICE_SUPPLIER_URL: "eip1559-gas-estimation" COMMON_HOME_GAS_PRICE_SPEED_TYPE: "fast" COMMON_HOME_GAS_PRICE_FALLBACK: 2000000000 ORACLE_HOME_GAS_PRICE_UPDATE_INTERVAL: 600000 COMMON_HOME_GAS_PRICE_FACTOR: 1 COMMON_FOREIGN_GAS_PRICE_SUPPLIER_URL: "eip1559-gas-estimation" COMMON_FOREIGN_GAS_PRICE_SPEED_TYPE: "fast" COMMON_FOREIGN_GAS_PRICE_FALLBACK: 100000000000 ORACLE_FOREIGN_GAS_PRICE_UPDATE_INTERVAL: 600000 COMMON_FOREIGN_GAS_PRICE_FACTOR: 1 ORACLE_ALLOW_HTTP_FOR_RPC: yes QUEUE_URL: "amqp://rabbit" REDIS_URL: "redis://redis" ORACLE_HOME_START_BLOCK: 27147951 ORACLE_FOREIGN_START_BLOCK: 16918880 ``` 4. replaces hosts.yml in https://github.com/dharmendrakariya/chiado-ansible-bridges with ```bash all: children: oracle: children: native: hosts: : ansible_user: ORACLE_VALIDATOR_ADDRESS_PRIVATE_KEY: "" amb: hosts: : ansible_user: ORACLE_VALIDATOR_ADDRESS_PRIVATE_KEY: "" ``` 5. Install on hosts: ```bash - name: Install python3 apt: update_cache: yes name: "{{ item }}" with_items: - python3 - python3-pip - name: Install python requirnments ansible.builtin.pip: executable: pip3 name: - docker - molecule - flake8 state: present ``` 6. Run in https://github.com/dharmendrakariya/chiado-ansible-bridges, the command should start the service ```bash ansible-playbook -i hosts.yml site.yml ``` 7. Make sure that logs for `oracle-bridge_affirmation-1` contains ```bash {"level":30,"time":1679670411723,"msg":"Processing affirmationRequest 0xd2abaafc7359452b6d78631d6ab35571127dbd05ddfcff41784a5e9d29c191e1","validator":"0x3e0A20099626F3d4d4Ea7B0cE0330e88d1Fe65D6","name":"watcher-erc-native-affirmation-request","eventTransactionHash":"0xd2abaafc7359452b6d78631d6ab35571127dbd05ddfcff41784a5e9d29c191e1","sender":"0xE899161e268C0Be32C7993BB8221480C89B00d4D","value":"500000000000000000000","v":1} {"level":30,"time":1679670411724,"msg":"Processing affirmationRequest 0xbc6d387ffc1a893eceb123d54e90358a4f83756960bd40410fd4f76c296854d9","validator":"0x3e0A20099626F3d4d4Ea7B0cE0330e88d1Fe65D6","name":"watcher-erc-native-affirmation-request","eventTransactionHash":"0xbc6d387ffc1a893eceb123d54e90358a4f83756960bd40410fd4f76c296854d9","sender":"0xE899161e268C0Be32C7993BB8221480C89B00d4D","value":"130025433237150000000000","v":1} ``` 8. After the service is started please use `service poabridge stop|start` in order to shutdown or start the service before making any changes on a host machine ```mdx-code-block
``` ## Summary of different roles in bridge - **Governor** role (representation of a multisig contract): - add/remove validators - set daily limits on either direction - set maximum per transaction limit on both bridges - set minimum per transaction limit on both bridges - upgrade contracts in case of vulnerability - set minimum required signatures from validators in order to relay a user's transaction - **Validator** role: - provide 100% uptime to relay transactions - listen for `UserRequestForSignature` events on Home Bridge and sign an approval to relay assets on Foreign network - listen for `CollectedSignatures` events on Home Bridge. As soon as enough signatures are collected, transfer all collected signatures to the Foreign Bridge contract. - listen for `UserRequestForAffirmation` or `Transfer` (depending on the bridge mode) events on the Foreign Bridge and send approval to Home Bridge to relay assets from Foreign Network to Home - **User** role: - sends assets to Bridge contracts: - In xDAI bridge: Send DAI token to the Foreign xDAI Bridge to receive xDAI token from the Home xDAI Bridge, send xDAI token to the Home xDAI Bridge to unlock DAI token from the Foreign xDAI Bridge; - In AMB: Invoke Home/Foreign Bridge to send a message that will be executed on the other chain as an arbitrary contract method invocation; - In Omnibridge: Approve & relay ERC20 tokens to the Foreign Omnibridge which will interact with Foreign AMB Bridge to mint ERC20 tokens on the Home chain, and transfer ERC20 tokens to the Home Omnibridge which will interact with Home AMB Bridge to unlock ERC20 tokens on Foreign chain. --- // File: bridges/management/decisions # Governance Decisions The [Bridge Governance Board](./#current-bridge-governors) is responsible for enacting updates related to bridge functionality, contract upgrades, and other parameters impacting bridge operations. The following items have been implemented by the board. ## Upgrade xDAI implementation contract for Hashi integraion, replacing Metacartel with Monerium 🗳 Justification: 1. Upgrade xDAI proxy contract to the new Hashi integrated bridge contract according to https://forum.gnosis.io/t/gip-93-should-gnosisdao-support-the-integration-of-hashi-within-gnosis-chains-canonical-bridges/8245: 1. Foreign xDAI implementation contract: [0xb54042F5bA4B048fEa54aaE70abbbe41AC716299](https://etherscan.io/address/0xb54042F5bA4B048fEa54aaE70abbbe41AC716299#readContract), version: 9 2. Home xDAI Implementation contract: [0xb740472c650fe949931b9df0cb253b48c80c82de](https://gnosisscan.io/address/0xb740472c650fe949931b9df0cb253b48c80c82de#readContract), version: 6 2. set Hashi Manager for xDAI Bridge 1. Hashi Manager on ETH: [0x9acCFAD714A1e670CD1f6dc666FE892d1d5547BD](https://etherscan.io/address/0x9acCFAD714A1e670CD1f6dc666FE892d1d5547BD) 2. Hashi Manager on Gnosis Chain: [0x60Aa15198a3AdfC86FF15B941549A6447B2dDB49](https://gnosisscan.io/address/0x60Aa15198a3AdfC86FF15B941549A6447B2dDB49) 3. Replace MetaCartel in Bridge governors with Monerium 1. MetaCartel: 0xd945325557f1FB4374fBf10Ae86D385632Df870A 2. Monerium: 0xB646B8b5Fe6cBc7770578B7679208337ef747ae4 ✅ Implemented: Apr 15, 2025 ## Replacing bridge governors 🗳 Justification: Add signers: - Aavechan: 0x329c54289Ff5D6B7b7daE13592C6B1EDA1543eD4 - Kleros: 0xb2a33ae0E07fD2ca8DBdE9545F6ce0b3234dc4e8 - Erigon: 0xcF9ebF877688Ed88a7479A6e63457Fd78D4275cE - Nethermind: 0x544cE64C3Fc6Da72CEB2456CC4cF19E7c7972eFA Remove Signers: - DaoHaus: 0x1685324Bf373670ad5C9c56bd88A1dc1C063b0f9 - RaidGuild: 0xd26a3F686D43f2A62BA9eaE2ff77e9f516d945B9 - Succinct: 0x72Ff26D9517324eEFA89A48B75c5df41132c4f54 - 01node: 0x0101016044726994aFd16f4A99f0d960090D35e7 ✅ Implemented: Jan 31, 2025 ## Increase required block confirmation for AMB to 175 blocks, replace CowSwap’s lost address, and replace 1Hive with Hopr 🗳 Justification: 1. Governor wallet: Replace CowSwap’s lost address `0xAC0622953d25e1a6c4e0f32Ffc1A9C1cE350B60E` with new address `0xf59e447e97bc03c2b0c5719e2e551f0b15b724e5` 2. Governor wallet: Replace 1Hive `0x86Da253817DC599059e3AD5A1F098F7b96aBf34c` with Hopr `0xA07888742c18d7e658132AE0148fF205fFF46481`. 3. Foreign AMB: Increase `requiredBlockConfirmation` from 130 to 175 to wait for Light Client based oracle to generate the event proof. ✅ Implemented: Dec 16, 2024 ## Upgrade AMB implementation contract for Hashi integraion, remove Telepathy validator, refund TRAC token due to accidental transfer 🗳 Justification: 1. Upgrade AMB proxy contract to the new Hashi integrated bridge contract according to https://forum.gnosis.io/t/gip-93-should-gnosisdao-support-the-integration-of-hashi-within-gnosis-chains-canonical-bridges/8245: 1. Foreign AMB implementation contract: [0x098f51bdfb5D6d319DD4FDf06b64773d25bD1316](https://etherscan.io/address/0x098f51bdfb5D6d319DD4FDf06b64773d25bD1316#readContract), version: 6 2. Home AMB Implementation contract: [0xA033535983d1aBcc2648af730EDCb198909903D7](https://gnosis.blockscout.com/address/0xA033535983d1aBcc2648af730EDCb198909903D7#code), version: 6 2. Remove Telepathy from AMB’s validator list 1. Succinct Labs is deprecating the Telepathy platform; thus, we are removing Telepathy [0x456c255A8BC1F33778603A2a48Eb6B0C69F4d48E](https://gnosisscan.io/address/0x456c255A8BC1F33778603A2a48Eb6B0C69F4d48E) from validator list. We will add the new SP1 based implementation when ready. 3. Unlock TRAC token to users 1. Users transferred TRAC token directly into Omnibridge instead of calling relayTokens, resulting in TRAC token locked in Omnibridge: https://etherscan.io/tx/0xf1192bff538080c848ecbf9385a63656ddc5312e51e97d09debf7b06a25316e9. We will bridge the locked TRAC token to Gnosis Chain so that users can receive the token. ✅ Implemented: Sept 23, 2024 ## Unlock 5.4k EURe due to a Bridge App bug 🗳 Justification: Due to a bug in the new Bridge App (calling `transfer` instead of `relayTokens` ), which in the meantime has been fixed, 5.4k EURe were accidentally locked in the bridge. The proposal will mint 5.4k Omnibridge EURe (not canonical EURe) on Ethereum (based on the 5.4k canonical EURe that were locked on Gnosis chain side), so that the user can send it back to Omnibridge and unlock their EURe on Gnosis Chain. ✅ Implemented: Apr 22, 2024 ## Onboarding EURC.e to Gnosis Chain, reset default dailyLimit and executionDailyLimit, remove fees for existing tokens, replace Telepathy validator address 🗳 Justification: 1. To comply with Circle’s bridged token standard, we have deployed Bridged EURC on the Gnosis Chain. Unlike the typical bridged token from Omnibridge, Bridged EURC on Gnosis Chain uses the latest version of the FiatToken standard, v2.2. Therefore, registering Bridged EURC on Gnosis Chain’s Omnibridge and setting default values for dailyLimit and executionDailyLimit are necessary to meet the token bridge limit requirements. Setting default dailyLimit and executionDailyLimit will not affect the current bridged token, but only newly bridged token, and it can be reset for individual tokens by calling setDailyLimit and setExecutionDailyLimit through governance process. - Bridged EURC on Gnosis Chain (EURC.e): 0x54E4cB2a4Fa0ee46E3d9A98D13Bea119666E09f6 - new default dailyLimit: 10000000000000000000000000000000000010 - new default executionDailyLimit: 10000000000000000000000000000000000010 2. Removing the fee of the following tokens as well as setting default fee to 0, meaning all the future newly bridged token from Omnibridge will be zero fee. BAL, PNK, CRV, CRVUSD, LINK, HOPR, COW, DXD, WSTETH 3. Increasing the daily and transactions limits for: WETH, WBTC, GNO, USDC, USDT, HOPR 4. Replacing Telepathy validator address with a new one. ✅ Implemented: Mar 13, 2024 ## Increase required block confirmation for AMB to 130 blocks, remove Autonolas LP token fee 🗳 Justification: To increase the participation of the Telepathy light client on the AMB, we [increase the required block confirmations](https://app.safe.global/transactions/tx?safe=eth:0x42F38ec5A75acCEc50054671233dfAC9C0E7A3F6&id=multisig_0x42F38ec5A75acCEc50054671233dfAC9C0E7A3F6_0xbd070bf3e3a1047b073d00c34fb73b39dd24678dd41c6f0c6855fec8411de165) from 100 blocks (~20 mins) to 130 blocks (~26 mins). This will ensure that the majority of the txs can be signed by Telepathy. End users should expect 6 more minutes delay. Besides, as requested from Autonolas team, we [remove the Autonolas LP token fee](https://app.safe.global/transactions/tx?safe=gno:0x7a48Dac683DA91e4faa5aB13D91AB5fd170875bd&id=multisig_0x7a48Dac683DA91e4faa5aB13D91AB5fd170875bd_0x27127a754307d26d7a9a4bfdcb01242103212ebec979039702e12de615125af5) on ETH↔GC Omnibridge, from previously 0.01% to 0. ✅ Implemented: Dec 18, 2023 ## Remove OLAS token fee from ETH-GC Omnibridge 🗳 Justification: As requested from Autonolas team, we [removed OLAS token fee](https://app.safe.global/transactions/tx?safe=gno:0x7a48Dac683DA91e4faa5aB13D91AB5fd170875bd&id=multisig_0x7a48Dac683DA91e4faa5aB13D91AB5fd170875bd_0x4efc19db4b29b2812b17e74cf4f8c91eef02a68a966a64617810c74589f5ab8b) on ETH↔GC Omnibridge, from previously 0.01% to 0. OLAS on Ethereum: https://etherscan.io/address/0x0001a500a6b18995b03f44bb040a5ffc28e45cb0 Bridged OLAS token on Gnosis: https://gnosisscan.io/address/0xce11e14225575945b8e6dc0d4f2dd4c570f79d9f ✅ Implemented: Nov 9, 2023 ## Savings xDAI launch - Initiate sDAI interest bridging and increase xDAI bridge limits. 🗳 Justification: This is a follow-up on the previous proposal. After the successful upgrade of the xDAI bridge to deploy reserves on the sDAI vault, we launched the Savings xDAI vault on Gnosis chain which will distribute the interest earned on mainnet to holders of the sDAI token on Gnosis chain. We [set interest receiver](https://app.safe.global/transactions/tx?safe=eth:0x42F38ec5A75acCEc50054671233dfAC9C0E7A3F6&id=multisig_0x42F38ec5A75acCEc50054671233dfAC9C0E7A3F6_0x933bd8409a8f46789ee29d50af1c10ed40378e05705681c8530aa744eb322ac5) to the interest receiver contract on Gnosis Chain. We [increased the limits](https://app.safe.global/transactions/tx?safe=gno:0x7a48Dac683DA91e4faa5aB13D91AB5fd170875bd&id=multisig_0x7a48Dac683DA91e4faa5aB13D91AB5fd170875bd_0x330f022997f6cb47b9d9643ebf032871bc0ffb82a0a3ee8e1020649de22dc6ec) for incoming xDAI transactions to Gnosis chain as we are anticipating higher volumes due this launch. Previous value: 10 million. New value: 15 million. ✅ Implemented: Oct 5, 2023 ## Upgrade xDAI bridge to support investing in sDAI vault. 🗳 Justification: We [upgrade](https://app.safe.global/transactions/tx?safe=eth:0x42F38ec5A75acCEc50054671233dfAC9C0E7A3F6&id=multisig_0x42F38ec5A75acCEc50054671233dfAC9C0E7A3F6_0xd8683bccfe39ace95a1da5f58a5c9a83dc324de39ce07f11fcffb5c2397ca96c) [xDAI bridge](https://etherscan.io/address/0x4aa42145Aa6Ebf72e164C9bBC74fbD3788045016#readProxyContract) to new implementation version in order to support investing DAI from the bridge contract into sDAI vault from Spark Protocol. This upgrade only implements changes on Ethereum, and the next phase will be on Gnosis Chain. The implementation contract is [audited by Omega and ChainSafe](../audits.md#xdai-bridge-upgrade-audit-by-omega-and-chainsafe). For more details, please refer to [docs](../tokenbridge/xdai-bridge.md#savings-xdai) We call the method `upgradeTo()` on the xDAI bridge proxy contract (0x4aa42145aa6ebf72e164c9bbc74fbd3788045016) with parameters: version 8 and impl. 0x166124b75c798cedf1b43655e9b5284ebd5203db. We call the `initializeInterest()` with the following parameters. ``` - DAI: 0x6b175474e89094c44da98b954eedeac495271d0f - minCashThreshold: 1000000000000000000000000 (1,000,000 DAI) - minInterestPaid: 1000000000000000000000 (1,000 DAI) - interestReceiver: 0x0000000000000000000000000000000000000000 ``` We also call `investDAI()` to invest the DAI into MakerDSR. 25m DAI have been [deposited into sDAI vault](https://etherscan.io/tx/0x291d48fdfd430165b2b7f62c3ae806ea28ab34b4dc8a2e4d7d01693f19b780c9) earning interest. [refillBridge()](https://etherscan.io/address/0x4aa42145Aa6Ebf72e164C9bBC74fbD3788045016#writeProxyContract#F3) will be called periodically (once per day at the moment) by the Karpatkey team to ensure that there is enough DAI for withdrawal on Ethereum. ✅ Implemented: Sept 20, 2023 ## Add Telepathy Validator in the AMB 🗳 Justification: Adding the Telepathy validator in the AMB as the 8th validator. Telepathy is a light client based validator developed by SuccinctLabs. Main goal is to increase security of the bridge by adding a validator that is not based on trusted off-chain agents but on verifying the transactions based on the Ethereum consensus layer. We are also increasing the minimum required block confirmations to 100 blocks so that the Telepathy validator has enough time to participate in the transaction affirmation process. This initiative is part of this proposal that started a year ago: https://forum.gnosis.io/t/gip-57-should-gnosis-dao-support-research-of-a-zksnark-enabled-light-client-and-bridge/5421 More details on the design: https://hackmd.io/@wdyZgTm3RrOsm-rhXDXEHA/BJ_7ExKgn ✅ Implemented: Jul 3, 2023 ## Remove two governor wallets, add three new governor wallets and remove HAUS token fee. 🗳 Justification: We removed two inactive governor wallets from ex-xDAI team and add three new governor wallets: Succinct Labs, Agave, Gnosis Bridge team. Additionally, we increased governance Safe wallet’s threshold from 7 to 8, resulting in 8-of-16 requirement to pass a proposal, strengthening the resilience of the bridge governance. Besides, as requested from DAOHAUS team, we removed HAUS token fee, making it a complete fee-less operation to bridge HAUS token between ETH and Gnosis Chain. ✅ Implemented: Jun 12, 2023 ## Upgrade BNB-GC Omnibridge mediator to stop accepting any new token locks and mints 🗳 Justification: As part of the longer term plan to decommission the BNB-GC Omnibridge (more info [https://forum.gnosis.io/t/bridge-to-binance-update/6624](https://forum.gnosis.io/t/bridge-to-binance-update/6624)), we want to stop any new token locks and mints from either BNB chain or Gnosis Chain. ✅ Implemented: April 4, 2023 ## Safe contract updates, two new governor wallets and Gateway validator addition. 🗳 Justification: We executed a regular/routine update for all Safe contracts. Additionally, we added one more validator (7 in total), strengthening even further the resilience of the bridges. Finally, we replaced two recently inactive wallets with new participants that will participate in the governance more actively. ✅ Implemented: March 20, 2023 ## Adjust limits on ETH-GC OmniBridge for WETH, WBTC, GNO, CLNY, DXD, HOPR, HAUS 🗳 Justification: For risk management purposes, the daily limits for transactions from Gnosis Chain to Ethereum where raised for major assets and were adjusted to reasonable values for some smaller assets. ✅ Implemented: February 23, 2023 ## Add Karpatkey and remove Syncnode from the set of validators of AMB & xDAI Bridges 🗳 Justification: Syncnode team requested to be removed from the validator set. In the same time addition of Karpatkey validator creates additional reliability and decentralization of validators set. ✅ Implemented: December 4, 2022 ## Remove Funds from lending protocols AAVE and Compound and disable Interest Function on Omni Bridge and xDAI Bridge 🗳 Justification: reduce risk and exposure during the uncertainty that came with the merge. After the merge, a new strategy must be developed in order to define how to approach this type of investment considering the implications related to transparency to the users and the risk involved. ✅ Implemented: September 14, 2022 ## Remove Former xDai Team Validators from AMB & xDAI Bridges 🗳 Justification: xDai validators were important at the early stages of the project to ensure operational execution and bridge functionality. Now, with increased community involvement and ecosystem maturity, the next step is to further decentralize processes and remove the former xDai team. ✅ Implemented: June 14, 2022 ## Disable Deposit Function in StakingAura POSDAO contract 🗳 Justification: Staking is deprecated in POSDAO. Current validators will continue until the Gnosis Chain {'<->'} Gnosis Beacon Chain merge but no new deposits are allowed. ✅ Implemented: June 14, 2022 ## Swap Governance Account Address 🗳 Justification: Account for the former xDai team needs to be updated in the Governance Gnosis Safe. ✅ Implemented: June 03, 2022 ## Decrease Withdrawal Fee on OmniBridge for CommonGround 🗳 Justification: The Common Ground token withdrawal fees should be set to 0 when bridging from Gnosis Chain to Ethereum to help promote adoption. ✅ Implemented: May 30, 2022 ## Remove Validator from the AMB Validator Set 🗳 Justification: This odd-numbered validator run by the xDai team is redundant and should be removed from the set. ✅ Implemented: May 24, 2022 ## Increase Limits for xDAI, USDC and USDT 🗳 Justification: Due to market conditions, stablecoin bridge limits should be temporarily raised to ensure leveraged positions are not liquidated due to inability to bridge. ✅ Implemented: May 12, 2022 ## Increase Default Daily Limits of AMB Bridge 🗳 Justification: To support projects looking to move large amount of tokens from Ethereum to Gnosis Chain, increase the limits from 10^9 to 10^18 to enable transfer in a single tx. ✅ Implemented: May 11, 2022 ## Update Bridge Fee Receiver to GnosisDAO 🗳 Justification: Bridge responsibility is migrating to GnosisDAO, and fees should be sent to a GnosisDAO owned safe. - Added new fee recipient - Removed existing recipient ✅ Implemented in batch: May 03, 2022 ## Update Bridge Fee Receiver to GnosisDAO 🗳 Justification: Bridge responsibility is migrating to GnosisDAO, and fees should be sent to a GnosisDAO owned safe. - Added new fee recipient - Removed existing recipient ✅ Implemented: May 03, 2022 ## Update Bridge Validator Set 🗳 Justification: Remove unresponsive validator and add new validators to both the AMB Omnibridge and xDai Tokenbridge. - Removed 1 inactive validator, Mariano Conti - Added 2 new validators, Cow Protocol and Gnosis Safe ✅ Implemented in batch: May 01, 2022 ## Interest Received by Bridge Compounding Redirected to KarpatkeyDAO 🗳 Justification: As part of the agreement between xDai/Gnosis Chain token merge the interest received on bridged funds should be managed by KarpatkeyDAO. ✅ Implemented: April 26, 2022 ## Decrease Daily Limit Amounts for Bridge Transactions 🗳 Justification: Increase the bridge security by decreasing the allowable daily limits for the following assets: - xDAI - 3’000’000 (4%) - USDC - 2’500’000 (3%) - USDT - 1’500’000 (4%) - WETH - 250 (3%) - WBTC - 2 (2.5%) - GNO - 5’000 (2%) ✅ Implemented (in series of txs): April 11, 2022 ## Add Bridge Validator & Increase Requires Sigs 🗳 Justification: Add an additional validator to xDai Bridge and AMB OmniBridge. A second proposal increased the number of signatures required for bridge execution. - xDai: 4/6 - AMB OmniBridge 5/8 ✅ Implemented (in series of txs) March 26, 2022 ## Update Governing Body 🗳 Justification: Add additional governors to increase decentralization and remove several inactive validators. A series of related proposals accomplished the following: - Removed 2 inactive governors, Burner Wallet and Request - Added 3 new governors, KarpatkeyDAO, Cow Protocol and Gnosis Safe ✅ Implemented (in several txs) March 26, 2022 ## Rotate AMB validator 🗳 Justification: Maintain active participation by rotating a signer address on the ETH-GC Arbitrary Message Bridge ✅ Implemented: February 21, 2022 ## Increase gas limit to 4m gas for AMB messages 🗳 Justification: Necessary for Cow token deployment. Blocks can handle this capability with EIP1559 implementation. ​✅ Implemented: January 30, 2022 ## Decrease OmniBridge withdrawal fee for WBTC 🗳 Justification: Reduce fees to 0 to attract participants to protocols on the Gnosis Chain. ✅ Implemented: January 24, 2022 ## Decrease OmniBridge withdrawal fee for GNO 🗳 Justification: Incentivize users to move operations to the Gnosis Chain ✅ Implemented: January 17, 2022 ## Adjust Perpetual Finance contract auto-execution functionality 🗳 Justification: Perpetual Finance is no longer subsidizing transaction for users - users will need to deposit/withdraw/ and pay tx fees themselves. The bridge no longer needs to auto-execute transactions for this contract. ✅ Implemented: December 22, 2021 ## Decrease OmniBridge withdrawal fee for WETH 🗳 Justification: Incentivize users to move operations to the Gnosis Chain ✅ Implemented: December 03, 2021 ## Add Tornado cash contracts to Omnibridge forwarding rules manager 🗳 Justification: Add Tornado Cash contracts for proper routing and subsidized exits. This was done in several transactions from Oct 27 to Dec 10 to account for all contract functionality. ✅ Implemented: October 27, November 9, November 15, 2021, December 10, 2021 ## Increase finalization time to 20 blocks 🗳 Justification: To increase security, finalization time on Gnosis for the xDAI TokenBridge and for the ETH-xDAI Arbitrary Message Bridge increased to 20 blocks from previous 8-12. ✅ Implemented: October 18, 2021 ## Update Contracts 🗳 Justification: Last in a series of upgrades to allow reverse bridging and deploy contracts included in the Chainsecurity audits. ✅ Implemented: October 15, 2021 ## Include Compounding for xDai Bridge 🗳 Justification: Add compounding to support bridge operations. ✅ Implemented: October 6, 2021 ## Upgrade Bridge Contracts 🗳 Justification: Add new functionality including increased AMB request ability, contracts to send requests, and fix a security vulnerability identified through the Bug Bounty program. ✅ Implemented: October 4, 2021 ## Add 1Hive Representative to the Governance Board 🗳 Justification: Increase decentralization by extending the governance and the bridge validators set. ✅ Implemented: October 4, 2021 ## Add 01Node & Peerion Representatives to the Governance Board 🗳 Justification: Increase decentralization by extending the governance and the bridge validators set. ✅ Implemented: September 22, 2021 ## Increase finalization time on Ethereum Mainnet 🗳 Justification: Increase the amount of blocks required for confirmation on the Ethereum Mainnet to 20, increaseing bridge operation reliability and security (less chances for re-orgs). This update slightly delays user transfers from 2.5 minutes to \~4 minutes. ✅ Implemented: August 20, 2021 ## Reduce USDC withdrawal fees to 0 for 3 months 🗳 Justification: Current exit fees for USDC transfers on OmniBridge are currently 0.1%. The primary purpose of this temporary 3-month reduction to 0 fees is to attract more protocols utilizing USDC and OmniBridge for their activities. ✅ Implemented: June 15, 2021 ## Return user funds 🗳 Justification: A user accidentally [sent over 2000 USDC](https://blockscout.com/xdai/mainnet/tx/0x2837cd89972f2e37a1cb631e60dbb761213010fe526a089c99f48ed483f63956) to the USDC token contract on Gnosis. After confirming the users identity, the board agreed to call the `claimTokensFromTokenContract` method and return the amount to the user. ✅ Implemented: April 15, 2021 ## Upgrade Bridge Contracts 🗳 Justification: A number of updates were made to the contracts to facilitate user engagement, support costs for xDai transfers, and provide logic for rebasing tokens. The minimum amount per token transaction was reduced to 1 wei (primarily to support LP tokens or other token fractions) and fees were set to 0.1% for xDai to Dai transfers. ✅ Implemented: March 15, 2021 ## Add Syncnode as Governor / xDai Bridge Oracle 🗳 Justification: Increase decentralization by extending the governance and the bridge validators set to include Syncnode. ✅ Governor Set Implemented: January 22, 2021 ✅ Oracle Implemented: January 7, 2021 --- // File: bridges/management/validators # Bridge Validator Unlike bridge governance, a bridge validator in Gnosis Chain is an entity responsible for monitoring event emissions from one blockchain, validating the associated logic, signing the validated events, and subsequently invoking the relevant functions on the destination chain to confirm the validation. Bridge validators are formed by different trusted entities such as Gnosis DAO, Safe, etc, and trustless entity such as Hashi for AMB. ## AMB & Omnibridge Due to the fact that Omnibridge is built on top of AMB, these two bridges share the same set of validators. ### Current Bridge Validators | GC Address | Organization Name | | -------------------------------------------------------------------------------------------------------------------------- | ----------------- | | [gno:0x459a3bd49f1ff109bc90b76125533699aaaaf9a6](https://gnosisscan.io/address/0x459a3bd49f1ff109bc90b76125533699aaaaf9a6) | Protofire | | [gno:0x105CD22eD3D089Bf5589C59b452f9dE0796Ca52d](https://gnosisscan.io/address/0x105CD22eD3D089Bf5589C59b452f9dE0796Ca52d) | Giveth | | [gno:0xfa98b60e02a61b6590f073cad56e68326652d094](https://gnosisscan.io/address/0xfa98b60e02a61b6590f073cad56e68326652d094) | Karpatkey | | [gno:0xbdc141c8d2343f33f40cb9edd601ccf460cd0dde](https://gnosisscan.io/address/0xbdc141c8d2343f33f40cb9edd601ccf460cd0dde) | GnosisDAO | | [gno:0x674c97db4ce6cac04a124d745979f3e4cba0e9f0](https://gnosisscan.io/address/0x674c97db4ce6cac04a124d745979f3e4cba0e9f0) | Cow Protocol | | [gno:0x258667E543C913264388B33328337257aF208a8f](https://gnosisscan.io/address/0x258667E543C913264388B33328337257aF208a8f) | Gnosis Safe | | [gno:0x3e0A20099626F3d4d4Ea7B0cE0330e88d1Fe65D6](https://gnosisscan.io/address/0x3e0A20099626F3d4d4Ea7B0cE0330e88d1Fe65D6) | Gateway | 0x725bC6F18F8CDd7f57A9aB9A9f2Ea17A199185e5 0xb1562173109932146a7fBBF28d7c6652bc2DaACE [0xc9ADb79B8A6e7C6e90c765A3B4d16d81213c9D49](https://gnosisscan.io/address/0xc9ADb79B8A6e7C6e90c765A3B4d16d81213c9D49) ### Omnibridge validator workflow ![](/img/bridges/diagrams/amb-bridge-validator-flow.png) ## xDAI bridge The xDAI bridge relies on trusted xDai Bridge Validators as cross-chain bridge oracle. Bridge transactions currently requires signatures from 4 of 7 validators. | Organization | Gnosis Address | | ------------ | ---------------------------------------------------------------------------------------------------------------------------------- | | GnosisDao | [gno:0x97630e2ae609d4104abda91f3066c556403182dd](https://gnosis.blockscout.com/address/0x97630e2ae609d4104abda91f3066c556403182dd) | | Protofire | [gno:0x4d1c96b9a49c4469a0b720a22b74b034eddfe051](https://gnosis.blockscout.com/address/0x4D1c96B9A49C4469A0b720a22b74b034EDdFe051) | | CowProtocol | [gno:0x587c0d02b40822f15f05301d87c16f6a08aaddde](https://gnosis.blockscout.com/address/0x587c0d02b40822f15f05301d87c16f6a08aaddde) | | Giveth | [gno:0xc073C8E5ED9Aa11CF6776C69b3e13b259Ba9F506](https://gnosis.blockscout.com/address/0xc073C8E5ED9Aa11CF6776C69b3e13b259Ba9F506) | | GnosisSafe | [gno:0x1312e98995bbcc30fc63db3cef807e20cdd33dca](https://gnosis.blockscout.com/address/0x1312e98995bbcc30fc63db3cef807e20cdd33dca) | | Karpatkey | [gno:0xfa98b60e02a61b6590f073cad56e68326652d094](https://gnosis.blockscout.com/address/0xfa98b60e02a61b6590f073cad56e68326652d094) | | Gateway | [gno:0x90776017057b84bc47D7e7383b65C463C80a6cdd](https://gnosis.blockscout.com/address/0x90776017057b84bc47D7e7383b65C463C80a6cdd) | 0x725bc6f18f8cdd7f57a9ab9a9f2ea17a199185e5 0xb1562173109932146a7fbbf28d7c6652bc2daace | Network | Address | | ------- | -------------------------------------------------------------------------------------------------------------------------------------------------------------------------------------------------------------------------------------------------------------------- | | Goerli | 0xef35547c29a7547df67ff573c158bf1b74381add(Gateway)
0xda286781cbbc9819c94852885a118c93ed25e064
0x758c277ca1b04da3ba3add5d61cd26337cfafd7e
0xdc3a6044440b75c5cefb023ae2d0e5b9069230cf (Gnosis DAO) | | Chiado | 0xef35547c29a7547df67ff573c158bf1b74381add(Gateway)
0xda286781cbbc9819c94852885a118c93ed25e064
0x758c277ca1b04da3ba3add5d61cd26337cfafd7e
0x9d84152df06880cdabeb30e10c2985f40d98b901
0xdc3a6044440b75c5cefb023ae2d0e5b9069230cf (Gnosis DAO) |
### Bridge Validator Flow ![](/img/bridges/diagrams/xdai-bridge-validator-flow.png) ### Resources - [TokenBridge Docs: Migrating Oracle to new Server](https://github.com/tokenbridge/docs/blob/master/xdai-bridge/xdai-bridge-oracle-maintenance/oracle-migration-to-a-new-server.md) ```mdx-code-block
Setting up GNO bridge validators: Gnosis Chain <->Ethereum
``` ## GNO bridge validators GC <-> ETH Mainnet ### How to setup 1. Checkout https://github.com/dharmendrakariya/chiado-ansible-bridges (yes I know it says Chiado but we use it for mainnet) 2. replace group_vars/amb.yml in https://github.com/dharmendrakariya/chiado-ansible-bridges with following settings: ```bash --- ORACLE_LOG_LEVEL: info ORACLE_BRIDGE_MODE: "ARBITRARY_MESSAGE" COMMON_HOME_RPC_URL: "" COMMON_HOME_BRIDGE_ADDRESS: "0x75Df5AF045d91108662D8080fD1FEFAd6aA0bb59" ORACLE_HOME_RPC_POLLING_INTERVAL: 15000 COMMON_FOREIGN_RPC_URL: "ETH RPC URL NON ARCHIVAL" ORACLE_FOREIGN_ARCHIVE_RPC_URL: "ETH RPC URL ARCHIVAL" COMMON_FOREIGN_BRIDGE_ADDRESS: "0x4C36d2919e407f0Cc2Ee3c993ccF8ac26d9CE64e" ORACLE_FOREIGN_RPC_POLLING_INTERVAL: 24000 ORACLE_TX_REDUNDANCY: true ORACLE_HOME_TX_RESEND_INTERVAL: 300000 COMMON_HOME_GAS_PRICE_SUPPLIER_URL: "eip1559-gas-estimation" COMMON_HOME_GAS_PRICE_SPEED_TYPE: "fast" COMMON_HOME_GAS_PRICE_FALLBACK: 2000000000 ORACLE_HOME_GAS_PRICE_UPDATE_INTERVAL: 600000 COMMON_HOME_GAS_PRICE_FACTOR: 1 COMMON_FOREIGN_GAS_PRICE_SUPPLIER_URL: "eip1559-gas-estimation" COMMON_FOREIGN_GAS_PRICE_SPEED_TYPE: "fast" COMMON_FOREIGN_GAS_PRICE_FALLBACK: 100000000000 ORACLE_FOREIGN_GAS_PRICE_UPDATE_INTERVAL: 600000 COMMON_FOREIGN_GAS_PRICE_FACTOR: 1 ORACLE_ALLOW_HTTP_FOR_RPC: yes QUEUE_URL: "amqp://rabbit-amb" REDIS_URL: "redis://redis-amb" ORACLE_HOME_START_BLOCK: 27147951 ORACLE_FOREIGN_START_BLOCK: 16918880 ``` 3. replace group_vars/native.yml in https://github.com/dharmendrakariya/chiado-ansible-bridges with following settings: ```bash --- ORACLE_LOG_LEVEL: info ORACLE_BRIDGE_MODE: "ERC_TO_NATIVE" COMMON_HOME_RPC_URL: "" COMMON_HOME_BRIDGE_ADDRESS: "0x7301CFA0e1756B71869E93d4e4Dca5c7d0eb0AA6" ORACLE_HOME_RPC_POLLING_INTERVAL: 15000 COMMON_FOREIGN_RPC_URL: "" ORACLE_FOREIGN_ARCHIVE_RPC_URL: "" COMMON_FOREIGN_BRIDGE_ADDRESS: "0x4aa42145Aa6Ebf72e164C9bBC74fbD3788045016" ORACLE_FOREIGN_RPC_POLLING_INTERVAL: 24000 ORACLE_TX_REDUNDANCY: true ORACLE_HOME_TX_RESEND_INTERVAL: 300000 COMMON_HOME_GAS_PRICE_SUPPLIER_URL: "eip1559-gas-estimation" COMMON_HOME_GAS_PRICE_SPEED_TYPE: "fast" COMMON_HOME_GAS_PRICE_FALLBACK: 2000000000 ORACLE_HOME_GAS_PRICE_UPDATE_INTERVAL: 600000 COMMON_HOME_GAS_PRICE_FACTOR: 1 COMMON_FOREIGN_GAS_PRICE_SUPPLIER_URL: "eip1559-gas-estimation" COMMON_FOREIGN_GAS_PRICE_SPEED_TYPE: "fast" COMMON_FOREIGN_GAS_PRICE_FALLBACK: 100000000000 ORACLE_FOREIGN_GAS_PRICE_UPDATE_INTERVAL: 600000 COMMON_FOREIGN_GAS_PRICE_FACTOR: 1 ORACLE_ALLOW_HTTP_FOR_RPC: yes QUEUE_URL: "amqp://rabbit" REDIS_URL: "redis://redis" ORACLE_HOME_START_BLOCK: 27147951 ORACLE_FOREIGN_START_BLOCK: 16918880 ``` 4. replaces hosts.yml in https://github.com/dharmendrakariya/chiado-ansible-bridges with ```bash all: children: oracle: children: native: hosts: : ansible_user: ORACLE_VALIDATOR_ADDRESS_PRIVATE_KEY: "" amb: hosts: : ansible_user: ORACLE_VALIDATOR_ADDRESS_PRIVATE_KEY: "" ``` 5. Install on hosts: ```bash - name: Install python3 apt: update_cache: yes name: "{{ item }}" with_items: - python3 - python3-pip - name: Install python requirnments ansible.builtin.pip: executable: pip3 name: - docker - molecule - flake8 state: present ``` 6. Run in https://github.com/dharmendrakariya/chiado-ansible-bridges, the command should start the service ```bash ansible-playbook -i hosts.yml site.yml ``` 7. Make sure that logs for `oracle-bridge_affirmation-1` contains ```bash {"level":30,"time":1679670411723,"msg":"Processing affirmationRequest 0xd2abaafc7359452b6d78631d6ab35571127dbd05ddfcff41784a5e9d29c191e1","validator":"0x3e0A20099626F3d4d4Ea7B0cE0330e88d1Fe65D6","name":"watcher-erc-native-affirmation-request","eventTransactionHash":"0xd2abaafc7359452b6d78631d6ab35571127dbd05ddfcff41784a5e9d29c191e1","sender":"0xE899161e268C0Be32C7993BB8221480C89B00d4D","value":"500000000000000000000","v":1} {"level":30,"time":1679670411724,"msg":"Processing affirmationRequest 0xbc6d387ffc1a893eceb123d54e90358a4f83756960bd40410fd4f76c296854d9","validator":"0x3e0A20099626F3d4d4Ea7B0cE0330e88d1Fe65D6","name":"watcher-erc-native-affirmation-request","eventTransactionHash":"0xbc6d387ffc1a893eceb123d54e90358a4f83756960bd40410fd4f76c296854d9","sender":"0xE899161e268C0Be32C7993BB8221480C89B00d4D","value":"130025433237150000000000","v":1} ``` 8. After the service is started please use `service poabridge stop|start` in order to shutdown or start the service before making any changes on a host machine ```mdx-code-block
``` --- // File: developers/Overview # Why Build on Gnosis Chain?

Fast transaction times (5 seconds) & low transaction fees (500 tx for $0.01)

A stable token for transactions & gas fees

Smart Contract, DApp & [toolset](/tools) compatibility with other Ethereum-based chains like Ethereum, Ethereum Classic, BSC and others.

Fully-featured explorers [Gnosisscan](https://gnosisscan.io) and [BlockScout](https://blockscout.com/xdai/mainnet).

Growing ecosystem designed to support stable person-to-person transactions, micro transactions, conference currencies, community currencies, DeFi, NFTs, DAOs, games and more.

Wide-ranging [Community Support](/developers/communication).

## Getting Started Welcome to the Developers section! This section gives an extensive overview on how to get started with the Gnosis Chain development process. Below you can see a list of resources that will help with your learning journey. ## Resources - [Wallets](/tools/wallets): A list of wallets that support Gnosis Chain. - [Faucets](/tools/faucets/): A list of faucets you can use for testing purposes. - [RPC Providers](/tools/RPC%20Providers/): A list of RPC providers that provide access to the network. ### Coming Soon: Building on Top of Gnosis Pay We're excited to announce a groundbreaking development in the Gnosis ecosystem: a self-custodial Visa card, powered by Gnosis Pay. This innovative product leverages the robust and decentralized Gnosis Chain, offering users a seamless bridge between the traditional financial system and the decentralized finance (DeFi) world. We will soon be opening our SDK for Developers in our ecosystem to build financial products on Gnosis Pay cards. ### Gnosis Pay: A Gateway to DeFi Gnosis Pay stands at the forefront of decentralized payment networks, removing barriers and creating a fluid, integrated financial experience. By utilizing Gnosis Chain's infrastructure, Gnosis Pay ensures secure, fast, and reliable transactions. ### Key Features: - **Self-Custodial Visa Card:** Take control of your finances with a Visa card that puts you in charge of your assets. - **Decentralized and Secure:** Built on Gnosis Chain, Gnosis Pay offers a decentralized solution that doesn't compromise on security. - **Accepted Everywhere:** With the backing of Visa, your Gnosis Pay card is welcome at over 80 million merchants worldwide. For more information, visit [Gnosis Pay](https://gnosispay.com/). --- // File: developers/quickstart # Gnosis Chain Quickstart This guide shows you how to deploy a smart contract to Gnosis Chain using Remix IDE. ## Prerequisites - Basic understanding of programming - Firefox or any Chromium-based browser (Chrome, Brave, Edge, etc.) ## Web3 Setup ### Create a wallet Gnosis Chain requires a Web3 wallet to interact with the network. In this tutorial, we'll cover MetaMask as an example. You can download and install MetaMask from the [official website](https://metamask.io/download/). Follow the instructions in the app and create your new wallet. Make sure to save your 12-word mnemonic phrase in a secure location. ### Add Chiado to your wallet After you create a wallet, add the Chiado network to the list of available networks: 1. Go to [Chainlist](https://chainlist.org/?search=gnosis&testnets=true) 2. Search for Gnosis 3. Connect your wallet 4. Approve a new network ![chainlist](/img/developers/quickstart/chainlist.png) ### Fund your wallet Lastly, top up the wallet with xDAI that you'll use for contract deployments on one of the environments: Chiado Testnet or Gnosis Mainnet. It's recommended to deploy contracts on the testnet first and use the mainnet only after you've done proper security audits. Testnets on any EVM-compatible chains don't require real funds to pay for transactions. Instead, they use faucets that represent free tokens. You can use the following faucets to get xDAI on the Chiado testnet: - [Chiado faucet](https://faucet.chiadochain.net/) - [Gnosis Chain Faucet](https://gnosisfaucet.com/) ![faucet](/img/developers/quickstart/faucet.png) ## Deploy a contract Your first contract is a simple `Hello World` that can set and retrieve variables. ```solidity // SPDX-License-Identifier: MIT pragma solidity 0.8.22; contract HelloWorld { string public value; constructor(string memory initialValue) { value = initialValue; } function updateName(string memory newValue) public { value = newValue; } } ``` You can deploy this contract as follows: 1. Open [Remix IDE](https://remix.ethereum.org/) 2. Create a new file `HelloWorld.sol` 3. Paste the above code or write your own contract 4. Compile your contract Go to `Solidity compiler` and select `Compile HelloWorld.sol`. You can leave the default compilation settings. ![compile-contract](/img/developers/quickstart/compile.png) 5. Select deployment environment Go to `Deploy & run transactions` and select `Injected Provider - MetaMask` as your environment. ![select-environment](/img/developers/quickstart/environment.png) 6. Deploy contract Lastly, put the initial value in the constructor and click `Deploy`. ![deploy-contract](/img/developers/quickstart/deploy.png) 7. Check result If the deployment is successful, you'll see the result in your logs that looks as follows: ![check-result](/img/developers/quickstart/result.png) Make sure to save the contract address. You'll need it in the future. 8. Interact with the contract Now that your contract is deployed, you can retrieve the current value or set a new one as follows: ![interact](/img/developers/quickstart/interact.png) --- // File: developers/Usefulcontracts # Useful Contracts Here are some contract addresses that might be useful during Gnosis Chain development. ## Ethereum Mainnet ### Mainnet contract addresses | Contract | Address | | ----------------------------------- | ---------------------------------------------------------------------------------------------------------------------------------------- | | GNO Token | [0x6810e776880c02933d47db1b9fc05908e5386b96](https://etherscan.io/address/0x6810e776880c02933d47db1b9fc05908e5386b96) | ### Mainnet bridge contract addresses | Contract | Address | | ----------------------------------- | ---------------------------------------------------------------------------------------------------------------------------------------- | | AMB/Omnibridge Multi-Token Mediator | [0x88ad09518695c6c3712AC10a214bE5109a655671](https://etherscan.io/address/0x88ad09518695c6c3712AC10a214bE5109a655671#writeProxyContract) | | AMB Contract Proxy (Foreign) | [0x4C36d2919e407f0Cc2Ee3c993ccF8ac26d9CE64e](https://etherscan.io/address/0x4C36d2919e407f0Cc2Ee3c993ccF8ac26d9CE64e#writeProxyContract) | | AMB/Omnibridge wETH Router Helper | [0xa6439Ca0FCbA1d0F80df0bE6A17220feD9c9038a](https://etherscan.io/address/0xa6439ca0fcba1d0f80df0be6a17220fed9c9038a) | | Omnibridge Validator Management Contract | [0xed84a648b3c51432ad0fD1C2cD2C45677E9d4064](https://etherscan.io/address/0xed84a648b3c51432ad0fD1C2cD2C45677E9d4064#writeProxyContract) | | xDAI Bridge Proxy Contract | [0x4aa42145Aa6Ebf72e164C9bBC74fbD3788045016](https://etherscan.io/address/0x4aa42145Aa6Ebf72e164C9bBC74fbD3788045016#readProxyContract) | | xDAI Bridge Validator Management Contract | [0xe1579dEbdD2DF16Ebdb9db8694391fa74EeA201E](https://etherscan.io/address/0xe1579dEbdD2DF16Ebdb9db8694391fa74EeA201E#code) | | xDAI Bridge Admin Multisignature Wallet | [0xff1a8EDA5eAcdB6aAf729905492bdc6376DBe2dd](https://etherscan.io/address/0xff1a8EDA5eAcdB6aAf729905492bdc6376DBe2dd) | :::info The current deployment of xDAI bridge contract is from [tokenbridge-contracts/xdaibridge-upgrade-sdai](https://github.com/gnosischain/tokenbridge-contracts/tree/xdaibridge-upgrade-sdai), with the commit hash `bf602f35e624cc6c58c827e7c56b23c8b1afa69a` ::: ## Gnosis Chain ### Gnosis Chain contract addresses | Contract | Address | | ----------------------------------- | ---------------------------------------------------------------------------------------------------------------------------------------- | | GNO | [0x9C58BAcC331c9aa871AFD802DB6379a98e80CEdb](https://gnosisscan.io/token/0x9C58BAcC331c9aa871AFD802DB6379a98e80CEdb) | | wxDAI | [0xe91D153E0b41518A2Ce8Dd3D7944Fa863463a97d](https://gnosisscan.io/token/0xe91D153E0b41518A2Ce8Dd3D7944Fa863463a97d) | | Deposit contract | [0x0B98057eA310F4d31F2a452B414647007d1645d9](https://gnosisscan.io/address/0x0B98057eA310F4d31F2a452B414647007d1645d9) | ### Gnosis Chain bridge contract addresses | Contract | Address | | ----------------------------------- | ---------------------------------------------------------------------------------------------------------------------------------------- | | AMB Proxy Contract | [0x75Df5AF045d91108662D8080fD1FEFAd6aA0bb59](https://gnosisscan.io/address/0x75Df5AF045d91108662D8080fD1FEFAd6aA0bb59#writeProxyContract) | | AMB Contract Proxy (Home) | [0x75Df5AF045d91108662D8080fD1FEFAd6aA0bb59](https://gnosisscan.io/address/0x75Df5AF045d91108662D8080fD1FEFAd6aA0bb59#writeProxyContract) | | AMB Helper Contract | [0x7d94ece17e81355326e3359115D4B02411825EdD](https://gnosisscan.io/address/0x7d94ece17e81355326e3359115D4B02411825EdD#readContract) | | Omnibridge Multi-Token Mediator Proxy | [0xf6A78083ca3e2a662D6dd1703c939c8aCE2e268d](https://gnosisscan.io/address/0xf6A78083ca3e2a662D6dd1703c939c8aCE2e268d#writeProxyContract) | | Omnibridge Validator Management Contract | [0xA280feD8D7CaD9a76C8b50cA5c33c2534fFa5008](https://gnosisscan.io/address/0xA280feD8D7CaD9a76C8b50cA5c33c2534fFa5008#writeContract) | | xDAI Bridge Proxy Contract | [0x7301CFA0e1756B71869E93d4e4Dca5c7d0eb0AA6](https://gnosis.blockscout.com/address/0x7301CFA0e1756B71869E93d4e4Dca5c7d0eb0AA6#address-tabs) | | xDAI Bridge Block Reward Contract | [0x481c034c6d9441db23Ea48De68BCAe812C5d39bA](https://gnosis.blockscout.com/address/0x481c034c6d9441db23Ea48De68BCAe812C5d39bA) | | xDAI Bridge Validator Management Contract | [0xB289f0e6fBDFf8EEE340498a56e1787B303F1B6D](https://gnosis.blockscout.com/address/0xB289f0e6fBDFf8EEE340498a56e1787B303F1B6D/read-proxy) | | xDAI Bridge Admin Multisignature Wallet | [0x0d3726e5a9f37234d6b55216fc971d30f150a60f](https://gnosis.blockscout.com/address/0x0D3726e5a9f37234D6B55216fC971D30F150a60F/transactions#address-tabs) | | xDAI Bridge ERC20ToNative Helper Contract | [0x2D51EAa266eafcb59bB36dD3c7E99C515e58113A](https://gnosis.blockscout.com/address/0x2d51eaa266eafcb59bb36dd3c7e99c515e58113a#readContract) | ### Gnosis Chain validator addresses | Name | Address | | ----------------------------------- | ---------------------------------------------------------------------------------------------------------------------------------------- | | xDAI Bridge Validator (Gnosis DAO) | [0xc9ADb79B8A6e7C6e90c765A3B4d16d81213c9D49](https://gnosisscan.io/address/0xc9ADb79B8A6e7C6e90c765A3B4d16d81213c9D49) [0x1abbf5ec09763afc398551e555967931d64e1508](https://gnosisscan.io/address/0x1abbf5ec09763afc398551e555967931d64e1508) | ## Goerli ### Goerli contract addresses | Contract | Address | | ----------------------------------- | ---------------------------------------------------------------------------------------------------------------------------------------- | | GNO | [0x7f477c3f03213970d939104cc436dc995cf615b5](https://goerli.etherscan.io/address/0x7f477c3f03213970d939104cc436dc995cf615b5) | | Governance Safe | [0xf02796C7B84F10Fa866DAa7d5701A95f3131A727](https://gnosis-safe.io/app/gor:0xf02796C7B84F10Fa866DAa7d5701A95f3131A727home) | ### Goerli bridge contract addresses | Contract | Address | | ----------------------------------- | ---------------------------------------------------------------------------------------------------------------------------------------- | | OmniBridge Mediator (Foreign) | [0x00147c84f13764dCDAbAF1cbAe622fa6f6839085](https://goerli.etherscan.io/address/0x00147c84f13764dCDAbAF1cbAe622fa6f6839085) | | AMB Contract Proxy (Foreign) | [0x87A19d769D875964E9Cd41dDBfc397B2543764E6](https://goerli.etherscan.io/address/0x87A19d769D875964E9Cd41dDBfc397B2543764E6) | | xDAI Bridge Proxy Contract | [0x8659Cf2273438f9b5C1Eb367Def45007a7A16a24](https://goerli.etherscan.io/address/0x8659Cf2273438f9b5C1Eb367Def45007a7A16a24) | | xDAI Bridge Validator Contract | [0x1F35121d14ABC91689a7903bf911dce83B0c6EF6](https://goerli.etherscan.io/address/0x1F35121d14ABC91689a7903bf911dce83B0c6EF6) | ### Goerli validator addresses | Name | Address | | ----------------------------------- | ---------------------------------------------------------------------------------------------------------------------------------------- | | xDAI Bridge Validator (Gateway) | [0xef35547c29a7547df67ff573c158bf1b74381add](https://goerli.etherscan.io/address/0xef35547c29a7547df67ff573c158bf1b74381add) | | xDAI Bridge Validator (Gnosis DAO) | [0xda286781cbbc9819c94852885a118c93ed25e064](https://goerli.etherscan.io/address/0xda286781cbbc9819c94852885a118c93ed25e064) [0x758c277ca1b04da3ba3add5d61cd26337cfafd7e](https://goerli.etherscan.io/address/0x758c277ca1b04da3ba3add5d61cd26337cfafd7e) [0x9d84152df06880cdabeb30e10c2985f40d98b901](https://goerli.etherscan.io/address/0x9d84152df06880cdabeb30e10c2985f40d98b901) [0xdc3a6044440b75c5cefb023ae2d0e5b9069230cf](https://goerli.etherscan.io/address/0xdc3a6044440b75c5cefb023ae2d0e5b9069230cf) | ## Chiado ### Chiado contract addresses | Contract | Address | | ----------------------------------- | ---------------------------------------------------------------------------------------------------------------------------------------- | | GnosisBridge(GNO) | [0x19C653Da7c37c66208fbfbE8908A5051B57b4C70](https://blockscout.com/gnosis/chiado/address/0x19C653Da7c37c66208fbfbE8908A5051B57b4C70) | | wxDAI | [0x18c8a7ec7897177E4529065a7E7B0878358B3BfF](https://gnosis-chiado.blockscout.com/address/0x18c8a7ec7897177E4529065a7E7B0878358B3BfF) | | Deposit Contract | [0xb97036A26259B7147018913bD58a774cf91acf25](https://blockscout.com/gnosis/chiado/address/0xb97036A26259B7147018913bD58a774cf91acf25) | | Governance Safe | [0x0Ad7de9064BAA98892a244e1415Ca8a2766096D2](https://blockscout.com/gnosis/chiado/address/0x0Ad7de9064BAA98892a244e1415Ca8a2766096D2) ### Chiado bridge contract addresses | Contract | Address | | ----------------------------------- | ---------------------------------------------------------------------------------------------------------------------------------------- | | OmniBridge Mediator (Home) | [0x09D549a48AC52F3f9945E7de6402c609c92aa2E1](https://gnosis-chiado.blockscout.com/address/0x09D549a48AC52F3f9945E7de6402c609c92aa2E1) | | AMB Contract Proxy (Home) | [0x99Ca51a3534785ED619f46A79C7Ad65Fa8d85e7a](https://gnosis-chiado.blockscout.com/address/0x99Ca51a3534785ED619f46A79C7Ad65Fa8d85e7a) | | xDAI Bridge Proxy Contract | [0xbb3c86f9918C3C1d83668fA84e79E876d147fFf2](https://gnosis-chiado.blockscout.com/address/0xbb3c86f9918C3C1d83668fA84e79E876d147fFf2) | | xDAI Bridge Validator Contract | [0x0ee7EBC72b26e8CeAbbdF275A19dA8e4361685Ce](https://gnosis-chiado.blockscout.com/address/0x0ee7EBC72b26e8CeAbbdF275A19dA8e4361685Ce) | --- // File: developers/Build contracts on gnosis/full-stack-dapp # Building a Full Stack Dapp In the following tutorial we will go through a step-by-step guide on how to create a full-stack Hello World App that interacts with Gnosis. This tutorial is designed for either new developers interested in Dapp development or existing devs interested in migrating to Gnosis development. Throughout the tutorial, feel free to reference other pages in our documentation for information with greater depth - however this tutorial will give you a basic understanding of how to get up and running. This Dapp will allow you to wave at Gnosis, and see how many times you have waved. ## Guideline Overview 1. Creating and connecting your wallet to Gnosis 2. Setting up your project 3. Smart-contract development 4. Using Hardhat for contract development 5. Deploying your contract on Gnosis 6. Integrating your smart contract with your project's front end ## Wallet - Select one of the [wallets](/tools/wallets/) to store Gnosis gas token (xDai). - Fund your wallet with xDai using one of the [faucets](/tools/faucets/). - To interact with dApps, we recommend to [setup and configure MetaMask](/tools/wallets/metamask/). ## Setting up your project ### Tech Stack: * [Waffle](https://ethereum-waffle.readthedocs.io/en/latest/), a library for writing and testing smart contracts. * [Hardhat](https://hardhat.org/), a development environment used for smart contract compiling, deploying, testing and debugging. * [Ethers.js](https://docs.ethers.io/v5/), a library for interacting with Ethereum Virtual Machine (EVM) chains. First let's initialize your project: ```bash mkdir gnosis-full-stack-dapp cd gnosis-full-stack-dapp npm init -y npm install --save-dev hardhat@2.9.9 ``` Now let's run Hardhat to create a project: ```bash npx hardhat ``` This is what you should see: ```bash 888 888 888 888 888 888 888 888 888 888 888 888 888 888 888 8888888888 8888b. 888d888 .d88888 88888b. 8888b. 888888 888 888 "88b 888P" d88" 888 888 "88b "88b 888 888 888 .d888888 888 888 888 888 888 .d888888 888 888 888 888 888 888 Y88b 888 888 888 888 888 Y88b. 888 888 "Y888888 888 "Y88888 888 888 "Y888888 "Y888 Welcome to Hardhat v2.9.9 ? What do you want to do? … ▸ Create a basic sample project Create an advanced sample project Create an advanced sample project that uses TypeScript Create an empty hardhat.config.js Quit ``` Select the ```▸ Create a basic sample project``` option. Make sure to select yes for this option: ```bash ? Do you want to install this sample project's dependencies with npm (@nomiclabs/hardhat-waffle ethereum-waffle chai @nomiclabs/hardhat-ethers ethers)? (Y/n) ‣ y ``` We will be using Waffle and Ethers.js later on. Run the below just in case they weren't automatically added: ```bash npm install --save-dev @nomiclabs/hardhat-waffle ethereum-waffle chai @nomiclabs/hardhat-ethers ethers ``` After the following, we can check if Hardhat is working smoothly with: ```bash npx hardhat compile npx hardhat test ``` You should see: ```bash Deploying a Greeter with greeting: Hello, world! Changing greeting from 'Hello, world!' to 'Hola, mundo!' ✔ Should return the new greeting once it's changed (1612ms) 1 passing (2s) ``` Moving forward, let's delete ```sample-test.js``` under test, ```sample-script.js``` under ```scripts```, and lastly ```Greeter.sol``` under ```contracts```. Make sure not to delete folders, we will be working with them still. ## Writing a contract First create the file ```WavePortal.sol``` under the ```contracts``` folder. Then input the code below: ```sol showLineNumbers title=contracts/WavePortal.sol // SPDX-License-Identifier: UNLICENSED pragma solidity ^0.8.0; import "hardhat/console.sol"; contract WavePortal { uint256 totalWaves; constructor() { console.log("Yo yo, I am a contract and I am smart"); } function wave() public { totalWaves += 1; console.log("%s has waved!", msg.sender); } function getTotalWaves() public view returns (uint256) { console.log("We have %d total waves!", totalWaves); return totalWaves; } } ``` ## Deploying your Contract To deploy your contract to Gnosis, let's update your config file at `hardhat.config.js`. For a complete configuration check [hardhat config guide](../dev-environment/hardhat.md#config-hardhat-for-gnosis). ```js showLineNumbers title=hardhat.config.js require("@nomiclabs/hardhat-waffle"); require('dotenv').config(); // This is a sample Hardhat task. To learn how to create your own go to // https://hardhat.org/guides/create-task.html task("accounts", "Prints the list of accounts", async (taskArgs, hre) => { const accounts = await hre.ethers.getSigners(); for (const account of accounts) { console.log(account.address); } }); // You need to export an object to set up your config // Go to https://hardhat.org/config/ to learn more /** * @type import('hardhat/config').HardhatUserConfig */ module.exports = { solidity: "0.8.4", defaultNetwork : 'gnosis', networks: { gnosis: { url: 'https://rpc.gnosischain.com/', gasPrice: 1000000000, accounts: [process.env.PRIVATE_KEY], }, }, }; ``` :::danger Proper private key management is critical. To safeguard your private key, it has been added to a .env file, or environment variable file. DO NOT PUSH THIS TO GITHUB OR COMMIT TO SOURCE CONTROL. Even if you delete it after, assume it will live on forever after being committed and is compromised. Add .env to your .gitignore if you plan on committing, or store securely it in an environment variable. ::: Let's install dotenv, to safekeep your private key: ```bash npm install --save dotenv ``` :::note Make sure to refresh your console/terminal afterwards, to make sure you have dotenv in your current environment. ::: **Create a .env file in your root directory** In this file, add your private key like: ``` showLineNumbers title=.env PRIVATE_KEY= ``` Next, create your ```deploy.js``` file under the ```scripts``` folder: ```js showLineNumbers title=scripts/deploy.js const main = async () => { const [deployer] = await hre.ethers.getSigners(); const accountBalance = await deployer.getBalance(); console.log("Deploying contracts with account: ", deployer.address); console.log("Account balance: ", accountBalance.toString()); const waveContractFactory = await hre.ethers.getContractFactory("WavePortal"); const waveContract = await waveContractFactory.deploy(); await waveContract.deployed(); console.log("WavePortal address: ", waveContract.address); }; const runMain = async () => { try { await main(); process.exit(0); } catch (error) { console.log(error); process.exit(1); } }; runMain(); ``` Now before you deploy, make sure you have funds in your wallet! Visit the [funds page](/tools/faucets/), if you don't have funds. Deploy to Gnosis with the following command: ```npx hardhat run scripts/deploy.js --network gnosis``` Your output should look like: ```bash Deploying contracts with account: 0x0F87E9E1A9981aCFe300A3f0f862ED1916326202 Account balance: 9992684695712000000 WavePortal address: 0x343610D353a0B2Ba86dDAAa348BF62B732107284 ``` The ```WavePortal address``` variable, is your **contract address**. You can verify the deployment on https://gnosisscan.io/, by putting your contract address in. ## Adding your Front End To get your front end up and running quickly, visit this [Replit link](https://replit.com/@nitric1/Gnosis-Chain-Hello-World?v=1#README.md) and fork it by clicking the **Use Template** Button on the right side of the page. ![Diagram](/img/full-stack-dapp/replit-fork.drawio.png) Navigate to the ```App.jsx``` file in Replit and follow the directions below: To connect **your contract** with your front end, replace the contract address variable shown below with the contract address you received after deploying. ```js showLineNumbers title=src/App.jsx const App = () => { const [currentAccount, setCurrentAccount] = useState(""); const contractAddress = ""; //Replace this with your contract address (the WavePortal address) // Make sure to have your address surrounded by quotation marks const contractABI = abi.abi; ``` Lastly, in the Replit ```utils``` folder, we need to replace the ```WavePortals.json``` file with the generated json from when you deployed your contract. In the repository you worked on your smart contracts, navigate to ```artifacts/contracts/WavePortal.sol/WavePortal.json```, and copy that whole file into the replit file talked about above. The file should look something like this: ```json showLineNumbers title=utils/WavePortals.json { "_format": "hh-sol-artifact-1", "contractName": "WavePortal", "sourceName": "contracts/WavePortal.sol", "abi": [ { "inputs": [], "stateMutability": "nonpayable", "type": "constructor" }, { ``` ## Interacting with Contract Congrats! You have created a full-stack DApp on Gnosis. Make sure to wave at Gnosis. ![Diagram2](/img/full-stack-dapp/full-stack-dapp-finished.JPG) --- // File: developers/Build contracts on gnosis/nft # Launching an NFT on Gnosis ## Overview As is the case with many other things on Gnosis, launching an NFT collection follows very similar steps to how you would on Ethereum. As is the case with Ethereum, you will need to implement the [ERC721 standard](https://eips.ethereum.org/EIPS/eip-721) to create a Non-Fungible Token. For those familiar with Object-Oriented Programming, it's much like implementing an interface. You need to implement each of the following events/functions: ```solidity showLineNumbers interface ERC721 /* is ERC165 */ { event Transfer(address indexed _from, address indexed _to, uint256 indexed _tokenId);= event Approval(address indexed _owner, address indexed _approved, uint256 indexed _tokenId); event ApprovalForAll(address indexed _owner, address indexed _operator, bool _approved); function balanceOf(address _owner) external view returns (uint256); function ownerOf(uint256 _tokenId) external view returns (address); function safeTransferFrom(address _from, address _to, uint256 _tokenId, bytes data) external payable; function safeTransferFrom(address _from, address _to, uint256 _tokenId) external payable; function transferFrom(address _from, address _to, uint256 _tokenId) external payable; function approve(address _approved, uint256 _tokenId) external payable; function setApprovalForAll(address _operator, bool _approved) external; function getApproved(uint256 _tokenId) external view returns (address); function isApprovedForAll(address _owner, address _operator) external view returns (bool); } interface ERC165 { function supportsInterface(bytes4 interfaceID) external view returns (bool); } ``` :::note NFTs are not necessarily ERC-721 tokens, they can also be [ERC-1155](https://eips.ethereum.org/EIPS/eip-1155), for example. ::: :::tip If you're looking for a way to create NFTs without coding, check out [Nifty.Ink](https://nifty.ink/explore) ::: For this walk through, we're going to be using [Hardhat](https://hardhat.org/) ([configure it with Gnosis](../dev-environment/hardhat.md/#config-hardhat-for-gnosis)). ## Prerequisites To follow along, it's recommended to review and be familiar with the [documentation on deploying a contract](/developers/building/first-contract). You will also need to have a working Node.js >=16.0 installation and [a small amount of xDai for gas](/tools/faucets). ## Step 1: Set up your environment ```bash mkdir gnosis-nft cd gnosis-nft && npm init && npm install --save-dev hardhat && npx hardhat ``` Select `Create an empty hardhat.config.js` and hit enter. Now, install the `hardhat-toolbox` plugin: ```bash npm install --save-dev @nomicfoundation/hardhat-toolbox ``` Configure [hardhat with Gnosis](../smart-contracts/hardhat.md). ## Step 2: Host NFT Art on IPFS IPFS ([InterPlanetary File System](https://en.wikipedia.org/wiki/InterPlanetary_File_System)) is the decentralized way to store files. Nft artwork tends to be pretty large, so storing them on-chain isn't an option. 1. Download the IPFS CLI by following the instructions [here](https://ipfs.tech/#install). 2. Create IPFS repository ```bash ipfs init ``` 3. Open another terminal window and run the following: ```bash ipfs daemon ``` Now open the first terminal window and run the following to add your art file (art.png) to ipfs: ```bash ipfs add art.png ``` This will output a hash prefixed by a "Qm". copy that and add the “https://ipfs.io/ipfs/” prefix to it. For example, this was mine: https://ipfs.io/ipfs/QmVUZDRXPLPToKVCfhWQ9hPT31ZUu3XDVuQr1XvQKqz1f1 4. Create a JSON file and add it to IPFS: ```json { "name": "Gnosis NFT", "description":"hoot hoot", "image":"https://ipfs.io/ipfs/QmVUZDRXPLPToKVCfhWQ9hPT31ZUu3XDVuQr1XvQKqz1f1", } ``` and then run: ```bash ipfs add nft.json ``` Another "Qm" prefixed hash string will be generated. Copy that down and add the same “https://ipfs.io/ipfs/” prefix to it. Mine looks like this: https://ipfs.io/ipfs/QmdtHvwsGNjVejuXHyCnM3r4UP8cJonf8DgSveejGfNhvU . ## Step 3: Implement the ERC-721 Token Contract 1. Create a new directory called contracts and create a file called GnosisNft.sol ```bash mkdir contracts cd contracts && touch GnosisNft.sol ``` 2. Open Nft.sol in your favorite text editor or IDE (VS Code has a [Hardhat extension](https://hardhat.org/hardhat-vscode/docs/overview)). To keep it simple for the sake of this tutorial, we're going to import OpenZeppelin's [ERC-721 Implementation](https://github.com/OpenZeppelin/openzeppelin-contracts/tree/master/contracts/token/ERC721). To use this, quickly run in the terminal: ```bash npm install @openzeppelin/contracts ``` If you go and take a look at the repository, you'll notice how they implement the ERC-721 standard as mentioned above. Take some time to look through the code, and then edit GnosisNft.sol to look like this: ```solidity showLineNumbers // SPDX-License-Identifier: MIT pragma solidity 0.8.9; import "@openzeppelin/contracts/token/ERC721/ERC721.sol"; import "@openzeppelin/contracts/access/Ownable.sol"; contract gnosisNft is Ownable, ERC721("GnosisNft", "GNOT") { uint tokenId; mapping(address=>tokenMetaData[]) public ownershipRecord; struct tokenMetaData{ uint tokenId; uint timeStamp; string tokenURI; //this will be the nft artwork } function mintToken(address recipient) onlyOwner public { require(owner()!=recipient, "Recipient cannot be the owner of the contract"); _safeMint(recipient, tokenId); ownershipRecord[recipient].push(tokenMetaData(tokenId, block.timestamp, "https://ipfs.io/ipfs/QmdtHvwsGNjVejuXHyCnM3r4UP8cJonf8DgSveejGfNhvU" //Make this your IPFS link you generated in step 2! )); tokenId = tokenId + 1; } } ``` 3. Now that you've got that all coded up, it's time to compile and deploy. You can also [see here](/developers/smart-contracts/hardhat) for more deployment info. Run from project root: ```bash npx hardhat compile ``` This should compile without errors. Create a directory called scripts, and within it add a file called deploy.js. Add the following: ```javascript showLineNumbers async function main() { const [deployer] = await ethers.getSigners(); console.log("Deploying contracts with the account:", deployer.address); console.log("Account balance:", (await deployer.getBalance()).toString()); const Token = await ethers.getContractFactory("gnosisNft"); //this will be whatever you named your contract const token = await Token.deploy(); console.log("Token address:", token.address); } main() .then(() => process.exit(0)) .catch((error) => { console.error(error); process.exit(1); }); ``` Now, edit your hardhat.config.js to look something like this: ```javascript showLineNumbers require("@nomicfoundation/hardhat-toolbox"); const fs = require("fs"); module.exports = { solidity: "0.8.9", defaultNetwork : 'gnosis', networks: { gnosis: { url: 'https://rpc.gnosischain.com/', gasPrice: 1000000000, accounts: { mnemonic: mnemonic(), }, }, }, }; function mnemonic() { try { return fs.readFileSync("./mnemonic.txt").toString().trim(); } catch (e) { console.log(e); console.log( "WARNING: No mnemonic file created for a deploy account." ); } return ""; }; ``` :::danger Proper private key management is critical. To safeguard the mnemonic, it has been added to a file called mnemonic.txt in this case. DO NOT PUSH THIS TO GITHUB OR COMMIT TO SOURCE CONTROL. Even if you delete it after, assume it will live on forever after being committed and is compromised. Add mnemonic.txt to your .gitignore if you plan on committing, or store securely it in an environment variable. ::: To deploy, run: ```bash npx hardhat run scripts/deploy.js --network gnosis ``` Congrats, you have deployed a basic ERC-721 contract to Gnosis! If you like, you can build out a front end to view your NFT. For now, you can view your token in [Blockscout](https://blockscout.com/xdai/mainnet/). --- // File: developers/Build contracts on gnosis/token # Launching an ERC-20 token on Gnosis ## Overview This will follow very closely with the steps to deploy an ERC-20 token to Ethereum. An ERC-20 token is a token that follows the [ERC-20 Standard](https://ethereum.org/en/developers/docs/standards/tokens/erc-20/). To follow the standard, we will be deploying a contract that implements the following events and functions: ```solidity showLineNumbers function name() public view returns (string) function symbol() public view returns (string) function decimals() public view returns (uint8) function totalSupply() public view returns (uint256) function balanceOf(address _owner) public view returns (uint256 balance) function transfer(address _to, uint256 _value) public returns (bool success) function transferFrom(address _from, address _to, uint256 _value) public returns (bool success) function approve(address _spender, uint256 _value) public returns (bool success) function allowance(address _owner, address _spender) public view returns (uint256 remaining) event Transfer(address indexed _from, address indexed _to, uint256 _value) event Approval(address indexed _owner, address indexed _spender, uint256 _value) ``` For this tutorial, we are going to be using [Hardhat](https://hardhat.org/). ## Prerequisites To follow along, it's recommended to review and be familiar with the [documentation on deploying a contract](/developers/building/first-contract). This will also follow a lot of the same steps as the [Launching an NFT on Gnosis tutorial](/developers/building/nft). You will also need to have a working Node.js >=16.0 installation and [a small amount of xDai for gas](/tools/faucets). Also, take a look at [these important points to consider](https://forum.openzeppelin.com/t/points-to-consider-when-creating-a-fungible-token-erc20-erc777/2915) before creating your token. ## Step 1: Set up your Environment For this tutorial, we're going to use npm and Solidity v0.8.9 ```bash mkdir gnosis-token-example cd gnosis-token-example && npm init && npm install --save-dev hardhat && npx hardhat ``` Select `Create an empty hardhat.config.js` and hit enter. Then run: ```bash npm install --save-dev @nomicfoundation/hardhat-toolbox ``` Configure [hardhat with Gnosis](../dev-environment/hardhat.md#config-hardhat-for-gnosis). ## Step 2: Add Contract Code We're going to import and use OpenZeppelin's ERC-20 contract implementation. ```bash npm install @openzeppelin/contracts mkdir contracts cd contracts && touch ExampleErc20.sol ``` Now add the following code to your ExampleErc20.sol file: ```solidity showLineNumbers // SPDX-License-Identifier: MIT pragma solidity ^0.8.9; import "@openzeppelin/contracts/token/ERC20/ERC20.sol"; /** * @title OwlToken * @dev Very simple ERC20 Token example, where all tokens are pre-assigned to the creator. * Note they can later distribute these tokens as they wish using `transfer` and other * `ERC20` functions. * Based on https://github.com/OpenZeppelin/openzeppelin-contracts/blob/v2.5.1/contracts/examples/SimpleToken.sol */ contract OwlToken is ERC20 { /** * @dev Constructor that gives msg.sender all of existing tokens. */ constructor() ERC20("OwlToken", "OWLT") { ///name the token whatever you like, at Gnosis we like Owls so I'm making an Owl token and giving them all to myself! _mint(msg.sender, 1000 * 10**18); } } ``` Now, you are ready to deploy your token contract. Be sure to properly store your mnemonic/private key! The deploy script will be the same [as when we deployed the NFT](/developers/building/nft#step-3-implement-the-erc-721-token-contract). Also, [see here for more info on deploying contracts with Hardhat](/developers/smart-contracts/hardhat). ## Step 3: Add the token to your wallet to view your balance To view your new tokens you have just minted, you'll have to add the ERC-20 contract address of the token to the wallet that you deployed from (the `msg.sender` address). If you are using MetaMask, scroll to the bottom of the wallet window and you will see an option to "Import Tokens" ![](/img/developers/import-tokens.png) Click that, and then enter the token address to import. ![](/img/developers/import-tokens-screen.png) You should now see your tokens in your wallet: ![](/img/developers/tokens-added.png) --- // File: developers/Interact on Gnosis/ethers-js # Using Ethers.js [Ethers.js](https://docs.ethers.io/v5/) is a compact library for interacting with Ethereum Virtual Machine (EVM) based blockchains. With Gnosis being an EVM chain, you can use Ethers.js to interact with the Gnosis ecosystem. ## Adding Ethers.js to your Project ```bash yarn add ethers ``` ```bash npm install --save ethers ``` To import the ethers library into your project using Node.js, use the following: ```js const { ethers } = require("ethers"); ``` ```js import { ethers } from "ethers"; ``` ## Connecting to Gnosis with MetaMask After installing, you need to create a web3 instance and set a provider. Most Ethereum supported wallets, such as MetaMask, have an [EIP-1193](https://eips.ethereum.org/EIPS/eip-1193) compliant provider at `window.ethereum`. This works for connecting to Gnosis as well. ```js // A Web3Provider wraps a standard Web3 provider, which is // what MetaMask injects as window.ethereum into each page const provider = new ethers.providers.Web3Provider(window.ethereum) // MetaMask requires requesting permission to connect users accounts await provider.send("eth_requestAccounts", []); // The MetaMask plugin also allows signing transactions to // send ether and pay to change state within the blockchain. // For this, you need the account signer... const signer = provider.getSigner() ``` View the official Ethers.js MetaMask docs [here](https://docs.ethers.io/v5/getting-started/#getting-started--connecting). ## Connecting to Gnosis via RPC ```js // If you don't specify a //url//, Ethers connects to the default // (i.e. ``http:/\/localhost:8545``) const provider = new ethers.providers.JsonRpcProvider(); // The provider also allows signing transactions to // send ether and pay to change state within the blockchain. // For this, we need the account signer... const signer = provider.getSigner() ``` View the official Ethers.js RPC docs [here](https://docs.ethers.io/v5/getting-started/#getting-started--connecting-rpc). ## Interacting with a Contract To connect to and interact with a deployed contract, you can do the following: ```js // The Contract object const Contract = new ethers.Contract(Address, Abi, provider); ``` View the official Ethers.js contract docs [here](https://docs.ethers.io/v5/getting-started/#getting-started--contracts). --- // File: developers/Interact on Gnosis/metamask # MetaMask API Detecting that MetaMask is installed and adding additional networks and custom tokens easily make a great dApp user experience, specially those who are not technically skilled. It is important to streamline the onboarding process as much as you can to make it easier for consumers to operate your application. This guide explains how to build a simple button for your front-end application that will automatically add Gnosis to MetaMask. ## Summary of actions 1. Detect MetaMask or propose its installation 2. Detect ChainId, and propose to add Gnosis if needed 3. Detect Account, and propose to connect if needed ## Detect MetaMask ```js showLineNumbers if (typeof window.ethereum !== 'undefined') { console.log('MetaMask is installed!'); //TODO: propose users to install MetaMask } ``` ## Detect Gnosis The following code includes all the parameters needed by MetaMask to add Gnosis to its networks programmatically ```js showLineNumbers var GNOSIS_MAINNET_PARAMS = { chainId: "0x64", chainName: "Gnosis", nativeCurrency: { name: "xDai", symbol: "XDAI", decimals: 18, }, rpcUrls: ["https://rpc.gnosischain.com/"], blockExplorerUrls: ["https://gnosisscan.io/"], } var addGnosisToMetaMask = function() { window.ethereum.request({ method: "wallet_addEthereumChain", params: [GNOSIS_MAINNET_PARAMS], }) .catch((error) => { console.log(error); }); }; ``` ## Detect account Our dApps need access to the user's account, follow this code example to get it: ```js showLineNumbers var getAccount = async function(){ const accounts = await window.ethereum.request({ method: 'eth_requestAccounts' }); // MetaMask provide a single account console.log(accounts[0]); alert(accounts[0]); } ``` ## Add Custom Token to MetaMask In addition to directing the user to [manually import tokens using the MetaMask UI](https://metamask.zendesk.com/hc/en-us/articles/360015489031-How-to-add-unlisted-tokens-custom-tokens-in-MetaMask#h_01FWH492CHY60HWPC28RW0872H), you can add code to your dApp's front end to prompt the user to add it to their MetaMask wallet automatically. This can be done using the [`wallet_watchAsset` method](https://docs.metamask.io/guide/rpc-api.html#wallet-watchasset). To do so, add the following code to your dApp's front end: ```javascript showLineNumbers const tokenAddress = 'custom-token-address-on-gnosis'; const tokenSymbol = 'your-token-symbol'; const tokenDecimals = 18; //or how ever many decimals const tokenImage = 'your-token-image-url'; try { // wasAdded is a boolean. Like any RPC method, an error may be thrown. const wasAdded = window.ethereum.request({ method: 'wallet_watchAsset', params: { type: 'ERC20', // Initially only supports ERC20, but eventually more! options: { address: tokenAddress, // The address that the token is at. symbol: tokenSymbol, // A ticker symbol or shorthand, up to 5 chars. decimals: tokenDecimals, // The number of decimals in the token image: tokenImage, // A string url of the token logo }, }, }); if (wasAdded) { console.log('Token Added'); } else { console.log('Failed to add'); } } catch (error) { console.log(error); } ``` ## Live example This documentation site is built in ReactJS, check [this sample page](/live-samples/metamask-add-button) to see the above code in action. ## More info - Read more about [Connect Users To Layer 2 Networks With The MetaMask Custom Networks API](https://consensys.net/blog/metamask/connect-users-to-layer-2-networks-with-the-metamask-custom-networks-api/) on the MetaMask Blog. - [EIP-3085](https://eips.ethereum.org/EIPS/eip-3085) is an [Ethereum Improvement Proposal](https://eips.ethereum.org/) that defines an RPC method for adding Ethereum-compatible chains to wallet applications. - [Full API for the window.ethereum object](https://docs.metamask.io/guide/ethereum-provider.html#table-of-contents) --- // File: developers/Interact on Gnosis/web3-js # Using Web3.js [web3.js](https://web3js.readthedocs.io/en/v1.7.5/web3.html) is a collection of libraries that allow you to interact with a local or remote Ethereum node using HTTP, IPC or WebSocket. Since Gnosis and Ethereum are very similar, web3.js can also be used in the same way. This page will go over some of the basics to get started. The web3.js docs have a lot more on the full features and functionality of the library and can be found [here](https://web3js.readthedocs.io/en/v1.7.5/). You can view RPCs to connect to [here](/tools/rpc/). ## Adding web3.js to your Project ```bash yarn add web3 ``` ```bash npm install web3 ``` Link the `dist/web3.min.js` After installing, you need to create a web3 instance and set a provider. Most Ethereum supported wallets, such as MetaMask, have an [EIP-1193](https://eips.ethereum.org/EIPS/eip-1193) compliant provider at `window.ethereum`. This works for connecting to Gnosis as well. ```javascript // From web3.js docs: // In Node.js use: const Web3 = require('web3'); const web3 = new Web3(Web3.givenProvider); ``` ## Interacting with a Contract [Official Docs here](https://web3js.readthedocs.io/en/v1.7.5/web3-eth-contract.html). To connect to and interact with a deployed contract, you can do the following: ```javascript var contract = new web3.eth.Contract(jsonInterface[, address][, options]) ``` More on the parameters [here](https://web3js.readthedocs.io/en/v1.7.5/web3-eth-contract.html#new-contract). ## Setting Gnosis as a Custom Chain When using web3.js, the default chain for signing transactions locally will be Ethereum mainnet. You can, however, [set a custom chain using the default common property](https://web3js.readthedocs.io/en/v1.7.5/web3-eth.html#id19): ```javascript web3.eth.defaultCommon = {customChain: {name: 'Chiado Testnet', chainId: 10200, networkId: 10200}}; ``` ```javascript web3.eth.defaultCommon = {customChain: {name: 'Gnosis', chainId: 100, networkId: 100}}; ``` --- // File: developers/Verify Smart Contracts/README # Contract Verification To increase transparency and trust, you can verify your deployed contracts. Verifying a contract requires the disclosure of your source code, and the software will verify that the source code matches the one deployed in Gnosis. Verification providers: import DocCardList from '@theme/DocCardList'; --- // File: developers/Verify Smart Contracts/blockscout # Blockscout Contract Verification Follow the [verifying a smart contract](https://docs.blockscout.com/for-users/verifying-a-smart-contract) guide on Blockscout documentation for detailed step-by-step guide. - [Blockscout Explorer](https://blockscout.com/xdai/mainnet/) ![](/img/developers/verify/blockscout.png) --- // File: developers/Verify Smart Contracts/gnosisscan # Gnosisscan Contract Verification [Gnosisscan](https://gnosisscan.io) is a Gnosis explorer built by the same team behind [Etherscan](https://etherscan.io/). Follow the [verifying contracts](https://medium.com/etherscan-blog/verifying-contracts-on-etherscan-f995ab772327) guide on EtherScan Blog for detailed step-by-step guide. It mentions and shows screenshots taken in Etherscan, but those apply for [Gnosisscan](https://gnosisscan.io) as well. ![](/img/developers/verify/gnosisscan.png) ## Useful links - [Gnosisscan verification page](https://gnosisscan.io/verifyContract) - [Types of Contract Verification](https://info.etherscan.com/types-of-contract-verification/) - [Verifying contracts on Etherscan](https://medium.com/etherscan-blog/verifying-contracts-on-etherscan-f995ab772327) - [Verifying Contracts Programmatically](https://docs.etherscan.io/tutorials/verifying-contracts-programmatically) --- // File: developers/Verify Smart Contracts/sourcify # Sourcify Smart Contract Verification Follow the [verifying a smart contract](https://docs.sourcify.dev/docs/how-to-verify/) guide on Sourcify documentation for detailed step-by-step guide. ![](/img/developers/verify/sourcify.gif) *Image from [https://docs.sourcify.dev/docs/how-to-verify/](https://docs.sourcify.dev/docs/how-to-verify/)* - [Sourcify Verifier](https://sourcify.dev/#/verifier) - [Sourcify Playground](https://playground.sourcify.dev/) - [How to Verify](https://docs.sourcify.dev/docs/how-to-verify/) - [Sourcify Blog](https://docs.sourcify.dev/blog/) --- // File: developers/Verify Smart Contracts/truffle # Truffle Verify This [truffle plugin](https://www.npmjs.com/package/truffle-plugin-verify) allows you to automatically verify your smart contracts' source code on Gnosisscan (by Etherscan), straight from the Truffle CLI. ## Installation Install the plugin with npm or yarn ```bash yarn add -D truffle-plugin-verify ``` ```bash npm install -D truffle-plugin-verify ``` Add the plugin to your truffle-config.js file ```js module.exports = { /* ... rest of truffle-config */ plugins: ['truffle-plugin-verify'] } ``` Generate an API Key on your [Gnosisscan account](https://gnosisscan.io/myaccount). Add your Gnosisscan API key to your truffle config (make sure to use something like dotenv so you don't commit the api key) ```js module.exports = { /* ... rest of truffle-config */ api_keys: { gnosisscan: 'MY_API_KEY' } } ``` ## Useful links - [Automatically verify Truffle smart contracts on Etherscan](https://kalis.me/verify-truffle-smart-contracts-etherscan/) - [Truffle Quickstart](https://trufflesuite.com/docs/truffle/quickstart/) --- // File: developers/dev-environment/hardhat # Using Hardhat Hardhat is a development environment used for smart contract compiling, deploying, testing and debugging. [Get started with Hardhat](https://hardhat.org/hardhat-runner/docs/getting-started#installation) for general installation and overview. ## Config Hardhat for Gnosis Update the config with Gnosis networks, check the highlighted lines for instructions: ```js {6-8,14,44,55} showLineNumbers title="hardhat.config.ts" import { HardhatUserConfig } from "hardhat/config"; import "@nomicfoundation/hardhat-toolbox"; //https://hardhat.org/hardhat-runner/docs/config#json-rpc-based-networks //Note: keep your mnemonic and private keys securely //Read more: https://hardhat.org/hardhat-runner/docs/config#hd-wallet-config //1) You can configure private keys or mnemonic: //let accounts = ["your private key here"] let accounts = { mnemonic: "your mnemonic here", } const config: HardhatUserConfig = { solidity: "0.8.17", //2) select the default network "gnosis" or "chiado" defaultNetwork: "gnosis", networks: { hardhat: { }, gnosis: { url: "https://rpc.gnosischain.com", accounts: accounts, }, chiado: { url: "https://rpc.chiadochain.net", gasPrice: 1000000000, accounts: accounts, }, }, etherscan: { customChains: [ { network: "chiado", chainId: 10200, urls: { //Blockscout apiURL: "https://blockscout.com/gnosis/chiado/api", browserURL: "https://blockscout.com/gnosis/chiado", }, }, { network: "gnosis", chainId: 100, urls: { // 3) Select to what explorer verify the contracts // Gnosisscan apiURL: "https://api.gnosisscan.io/api", browserURL: "https://gnosisscan.io/", // Blockscout //apiURL: "https://blockscout.com/xdai/mainnet/api", //browserURL: "https://blockscout.com/xdai/mainnet", }, }, ], apiKey: { //4) Insert your Gnosisscan API key //blockscout explorer verification does not require keys chiado: "your key", gnosis: "your key", }, } }; export default config; ``` ```js {5-7,14,44,55} showLineNumbers title="hardhat.config.js" require("@nomicfoundation/hardhat-toolbox"); //https://hardhat.org/hardhat-runner/docs/config#json-rpc-based-networks //Note: keep your mnemonic and private keys securely //Read more: https://hardhat.org/hardhat-runner/docs/config#hd-wallet-config //1) You can configure private keys or mnemonic: //let accounts = ["your private key here"] let accounts = { mnemonic: "your mnemonic here", } /** @type import('hardhat/config').HardhatUserConfig */ module.exports = { solidity: "0.8.17", //2) select the default network "gnosis" or "chiado" defaultNetwork: "gnosis", networks: { hardhat: { }, gnosis: { url: "https://rpc.gnosischain.com", accounts: accounts, }, chiado: { url: "https://rpc.chiadochain.net", gasPrice: 1000000000, accounts: accounts, }, }, etherscan: { customChains: [ { network: "chiado", chainId: 10200, urls: { //Blockscout apiURL: "https://blockscout.com/gnosis/chiado/api", browserURL: "https://blockscout.com/gnosis/chiado", }, }, { network: "gnosis", chainId: 100, urls: { // 3) Select to what explorer verify the contracts // Gnosisscan apiURL: "https://api.gnosisscan.io/api", browserURL: "https://gnosisscan.io/", // Blockscout //apiURL: "https://blockscout.com/xdai/mainnet/api", //browserURL: "https://blockscout.com/xdai/mainnet", }, }, ], apiKey: { //4) Insert your Gnosisscan API key //blockscout explorer verification does not require keys chiado: "your key", gnosis: "your key", }, } }; ``` ## Compile your contract ```bash npx hardhat compile ``` ## Deploy your contract ```bash title="Gnosis Mainnet" npx hardhat run scripts/deploy.ts --network gnosis ``` ```bash title="Chiado Testnet" npx hardhat run scripts/deploy.ts --network chiado ``` ```bash title="Gnosis Mainnet" npx hardhat run scripts/deploy.js --network gnosis ``` ```bash title="Chiado Testnet" npx hardhat run scripts/deploy.js --network chiado ``` View your deployed contract on any of the [explorers](/tools/explorers). Visit our [Tools page](/tools) for other support. ## Verify Contract ```bash npx hardhat verify --network chiado ``` ```bash npx hardhat verify --network gnosis ``` Visit our [Contract Verification Page](/developers/verify/) for more documentation on verification tools. ## Additional Hardhat Documentation - Additional Hardhat deployment documentation is located [here](https://hardhat.org/hardhat-runner/docs/guides/deploying). --- // File: developers/dev-environment/foundry # Using Foundry #### Foundry is a smart contract development toolchain. Follow the [Foundry documentation](https://book.getfoundry.sh/getting-started/installation) for general installation and overview. Foundry consists of: - [Forge](https://github.com/foundry-rs/foundry/blob/master/forge): Ethereum testing framework (like Truffle, Hardhat and DappTools). - [Cast](https://github.com/foundry-rs/foundry/blob/master/cast): Swiss army knife for interacting with EVM smart contracts, sending transactions and getting chain data. - [Anvil](https://github.com/foundry-rs/foundry/blob/master/anvil): local Ethereum node, akin to Ganache, Hardhat Network. ## Compile your Gnosis Contract Compile your contract with this command: ```bash forge build ``` Additional compilation options can be found [here](https://book.getfoundry.sh/reference/forge/forge-build). ## Deploy your Contract Forge can only deploy one contract at a time. Because Solidity files may contain multiple contracts, ```:``` (Seen below) specifies which contract to deploy. #### Deploy your contract on Gnosis with the following Forge command: ```bash forge create --rpc-url https://rpc.chiadochain.net --private-key src/.sol: ``` ```bash forge create --rpc-url https://rpc.gnosischain.com --private-key src/.sol: ``` #### Deploy with constructor arguments: Use the ```--constructor-args``` flag to pass arguments to the constructor: ```bash forge create --rpc-url https://rpc.chiadochain.net \ --constructor-args \ --private-key src/.sol: \ ``` ```bash forge create --rpc-url https://rpc.gnosischain.com \ --constructor-args \ --private-key src/.sol: \ ``` ## Verify your Contract #### Verify your Gnosis contract on deployment using Etherscan: Use the ```--verify``` flag as shown below: ```bash forge create --rpc-url https://rpc.chiadochain.net \ --private-key src/.sol: \ --etherscan-api-key \ --verify ``` ```bash forge create --rpc-url https://rpc.gnosischain.com \ --private-key src/.sol: \ --etherscan-api-key \ --verify ``` For information regarding pre-existing contract verification, visit the [official Forge documentation](https://book.getfoundry.sh/forge/deploying#verifying-a-pre-existing-contract). For further Contract Verification information, visit our [official page](/developers/verify/) --- // File: developers/dev-environment/truffle # Using Truffle with Gnosis Truffle is a development environment used for smart contract compiling, deploying, testing and debugging. Follow the [Truffle documentation](https://trufflesuite.com/docs/truffle/) for general installation and overview. ## Config Truffle for Gnosis Update the config with Gnosis credentials ```js showLineNumbers title=truffle-config.js module.exports = { // See // for more about customizing your Truffle configuration! networks: { gnosis: { provider: function() { return new HDWalletProvider( process.env.MNEMONIC, "https://rpc.gnosischain.com") }, network_id: 100, gas: 500000, gasPrice: 1000000000 }, chiado: { provider: function() { return new HDWalletProvider( process.env.MNEMONIC, "https://rpc.chiadochain.net") }, network_id: 10200, gas: 500000, gasPrice: 1000000000 }, } }; ``` ## Compile your Gnosis contract ### Default Compile ```bash truffle compile --network chiado ``` ```bash truffle compile --network gnosis ``` ### Compile with Options ```bash truffle compile [--list ] [--all] [--network chiado] [--quiet] ``` ```bash truffle compile [--list ] [--all] [--network gnosis] [--quiet] ``` ## Deploy your Contract ```bash truffle migrate --network chiado ``` ```bash truffle migrate --network gnosis ``` View your deployed contract any of the [explorers](/tools/explorers). Visit our [Tools page](/tools) for other support. ## Verify Contract Verify with Truffle by using [Truffle Plugin Verify](https://trufflesuite.com/docs/truffle/reference/truffle-commands/#deploy) Visit our [Contract Verification Page](/developers/verify/) for more documentation on verification tools. ## Additional Truffle Documentation - Additional Truffle command documentation is located [here](https://trufflesuite.com/docs/truffle/reference/truffle-commands/#deploy). --- // File: developers/dev-environment/cookbook # Using Cookbook Cookbook is an open source smart contract marketplace. You can search, upload, download, deploy, manage and integrate any Solidity smart contract into your app. It supports Gnosis Chain and Chiado. ## Search on smart contract marketplace Navigate to [Cookbook](https://www.cookbook.dev/search?q=), and search for the smart contract you would like to use or deploy: ![marketplace](../../../static/img/developers/cookbook/cookbook-marketplace.png) ## Choose the deploy option Once you've chosen your smart contract, you have different options to select: 1. Simply Deploy: Configure and Deploy the smart contract on the network you chose by few clicks. 2. Edit On Remix: Use [Remix IDE](https://remix.ethereum.org/) to edit the smart contract 3. Download smart contract: Download the smart contract and use it locally. ![deploy option](../../../static/img/developers/cookbook/contract-options.png) In this tutorial, we'll choose **Simply Deploy** option. ## Configure the smart contract ![config](../../../static/img/developers/cookbook/config-contract.png) ## Pick a chain Select the network for which the smart contract to be deployed to. Click **Deploy** and you'll be prompted to sign a smart contract creation transaction. Please check that whether you have enough xDAI balance on your wallet. ![pick chain](../../../static/img/developers/cookbook/select-network.png) ## Check your deployed smart contract on Dashboard Once the smart contract is deployed, you may check the address on Dashboard. You may also download ABI, Bytecode, Source Code and Verification Data from here. ![dashboard](../../../static/img/developers/cookbook/dashboard.png) ## Additional Resources * [Cookbook](https://www.cookbook.dev/) --- // File: faq/Node FAQs/changingwc :::info **Find this document incomplete? Visit our [Discord channel](https://discord.gg/gnosis) or contact us via [Validator Request form](https://tally.so/r/3y4V1W)!** ::: :::info **:bulb: This document is continuously being improved.** ::: # Changing Withdrawal Credentials 1. **I am trying to change my withdrawal credential from 0x00 to 0x01. I can't seem to be able to connect to my Beacon Node. Is there another way to do it?** Be sure to use the right port used by your client. For example the default port for Lighthouse might be 5052, Avado nodes seems to use 5051, etc... If you need more help you can ask on the Discord. 2. **Is there a public URL to generate the offline-preparation.json file for setting up the withdrawal credential?** If you have troubles generating the offline-preparation.json file please ask us for help on the Discord, we can share an already generated file if necessary 3. **How can I change withdrawal credentials of an already exited validator?** It's not possible as now to change the withdrawal credentials of an already exited validator. 4. **How to change the withdrawal credential on Windows?** It's recommended to do it on Linux, even if it's a virtual machine. Ask us for help on the Discord if you need more help. 5. **How can I change my withdrawal credentials from 0x00 to 0x01?** You can follow the guide in the [docs](https://docs.gnosischain.com/node/management/withdrawals) which use ethdo. If you run into troubles you can ask us, especially with the offline-preparation step. 6. **Is DappNode going to have a user-friendly UI for changing withdrawal credentials?** Currently not, even if Dappnode mentioned working on it in the past. You have to follow the regular [step by step guide](https://docs.gnosischain.com/node/management/withdrawals). 7. **How many times can I change the withdrawal credential?** It is a one time process. Once you change your withdrawal credential from 0x00 to 0x01, you cannot change it anymore. 8. **Do I have to make the withdrawal credential change after switching to another client?** You can switch to any client you want, the two are unrelated. BLS-to-Execution (withdrawal credential change) is important for you to be able to claim partial withdrawals or a full withdrawal when you exit your validator. While making any client changes, make sure you always have a backup of your keystore files. 9. **Is there any guides on how to change withdrawal credentials easily?** You can follow the step by step guide on our [documentation](https://docs.gnosischain.com/node/management/withdrawals#how-to-change-the-withdrawal-credential). 10. **Will there be an easy way in the future to convert my withdrawal credential to 0x01?** DappNode guys are working on a modified version of Wagyu tool for Gnosis Chain, but there's no precise ETA on that. For now, you can only do so by using ethdo as detailed in our documentation. 11. **Will there be an easy solution to change the withdrawal credentials from old 0x00 to new address format 0x01?** For now, the only way to change your withdrawal credential from 0x00 to 0x01 is using ethdo following the [step by step tutorial](https://docs.gnosischain.com/node/management/withdrawals#how-to-change-the-withdrawal-credential) on our docs. --- // File: faq/Node FAQs/depositWithdrawalReward :::info **Find this document incomplete? Visit our [Discord channel](https://discord.gg/gnosis) or contact us via [Validator Request form](https://tally.so/r/3y4V1W)!** ::: :::info **:bulb: This document is continuously being improved.** ::: # Deposit, Withdrawals and Rewards 1. **What are withdrawals?** Validator withdrawal allows a validator’s account balance to get withdrawn from Beacon Chain to Execution Layer, in the form of GNO. The GNO will be accrued on validator’s withdrawal address on the Execution Layer, which is set using `eth1_withdrawal_address` option during validator key generation. 2. **What are two types of withdrawals?** There are 2 types of withdrawals: Partial Withdrawal and Full Withdrawal. Partial Withdrawal: Any balance in excess of 1 GNO from the account balance gets withdrawn back to withdrawal address. Full Withdrawal: All the balance from validator’s account gets withdrawn back to withdrawal address. This has to be initiated by validator, signing `voluntary_exit` message and broadcasting it to the network. It is irreversible. 3. **What are 0x00 and 0x01 withdrawal credentials prefixes?** The beacon chain validators have a field called withdrawal credentials, where the first byte is referred to as the withdrawal prefix. Currently, this value can be either 0x00 or 0x01, depending on how it is set during the deposit process using a deposit tool. Validators with 0x00 withdrawal credentials won’t have immediate withdrawal capabilities. To enable partial and full withdrawals and unlock their funds, these validators must undergo a one-time migration to 0x01. As this is a one time process, it is essential to be careful performing it. 4. **How do I change my withdrawal credential?** You can find a full tutorial on how to change your withdrawal credential [here](https://docs.gnosischain.com/node/management/withdrawals#how-to-change-the-withdrawal-credential). 5. **I have been running multiple validators. Can I set up the same withdrawal credential for all of them?** Yes, you can set up the same withdrawal credential for all of your validators and can also set up different withdrawal credentials for individual validators. 6. **How long does it take for node status information to appear after a deposit?** It takes about 4 hours for a deposit to be processed, you can check how your validator is doing on gnosischa.in. 7. **Where can I check my withdrawal credential?** You have to claim withdrawals manually now, you can do so on the [Deposit page](https://deposit.gnosischain.com/) or on the [Deposit contract](https://gnosisscan.io/address/0x0b98057ea310f4d31f2a452b414647007d1645d9#writeProxyContract#F4). You can also visit [official docs](https://docs.gnosischain.com/node/management/withdrawals#check-withdrawal-credential) for more detail. 8. **Do partial withdrawals happen automatically?** As we have modified some specs regarding the withdrawals to enable withdrawing GNO instead of the native gas token xDai, unlike Ethereum, partial withdrawals currently do not happen automatically. So, for now, you will need to call [`claimWithdrawal`](https://gnosisscan.io/address/0x0b98057ea310f4d31f2a452b414647007d1645d9#writeProxyContract#F3) function on the [contract](https://gnosisscan.io/address/0x0b98057ea310f4d31f2a452b414647007d1645d9#writeProxyContract). However, it is in our plans to automate and subsidize partial withdrawals in the future. 9. **Do full withdrawals happen automatically?** No. If your validator is currently active and participating in the beacon chain, then the full withdrawal will not happen automatically. You will have to manually initiate an exit to cause this. Additionally, if you initiate an exit but still have a 0x00 withdrawal credential, your funds will not be withdrawn until a `BLSToExecutionChange` message is included on chain. 10. **Is there a UI that I can use for withdrawals?** No, as you will have to interact with the beacon chain, it is not feasible to provide a UI that encompasses all the clients. 11. **Where does the automatic balance withdraw to?** In case you are using a legacy withdrawal credential 0x00, it will not be withdrawn and you will have to perform a migration to 0x01 credentials to complete the withdrawal. If you have already configured your withdrawal address and have a withdrawal credential of 0x01, then rewards in excess of 1 GNO (32 mGNO) will be transferred to your withdrawal address. 12. **Once I have changed my credential to 0x01, can I change it to an alternative withdrawal address?** No, the migration from 0x00 to 0x01 is a one time process and once you set the address, it cannot be changed. Please make this migration with the utmost care. Note, the withdrawal credential can either be an externally-owned account (EOA) or a smart contract such as a SAFE. 13. **I have lost the private key to my withdrawal address, what can I do?** Unfortunately, there is nothing that can be done if the withdrawal address is lost. Please ensure this address is properly backed up and securely stored. 14. **What happens to my GNO if I make a full withdrawal but I forget to set the withdrawal credential to 0x01?** Nothing. Your validator will exit, and will no longer be assigned duties, neither able to earn nor lose any more additional GNO. You may still migrate your withdrawal credentials from 0x00 to 0x01. Once this is done, the validator’s balance will be withdrawn to the address you specify. 15. **Can I cancel a withdrawal request that is in the queue?** No you cannot, this is a one time, irreversible process. Once you submit your withdrawal request (BLSToExecutionChange and/or exit) you can’t go back. Please only exit or change credentials when you are fully aware of what the specific operation will do and with utmost caution. 16. **What is the deposit contract?** The deposit contract keeps track of validators and staking amounts. The GBC deposit contract is based on [the original Ethereum beacon chain deposit contract](https://github.com/ethereum/consensus-specs/blob/master/solidity_deposit_contract/deposit_contract.sol), with [some additional functionality](/concepts/specs/security-audit). - Contract Security Audit by Chainsecurity: [https://chainsecurity.com/security-audit/poa-network-stake-beacon-chain-sbc-deposit/](https://chainsecurity.com/security-audit/poa-network-stake-beacon-chain-sbc-deposit/) - GBC Contract Address: [0x0B98057eA310F4d31F2a452B414647007d1645d9](https://gnosis.blockscout.com/address/0x0B98057eA310F4d31F2a452B414647007d1645d9) 17. **How do I voluntarily exit all my validators (using lighthouse) with DappNode?** First of all be sure to already have a 0x01 withdrawal address or follow the step by step guide. Then go to the web3signer UI, select all keys, select the exit button, type the message ("I want to exit"), then verify on Gnosischa.in how it is going, it can take some time between the moment where you exit and the moment where it's visible on Gnosischa.in 18. **When you receive rewards from validation, where does the reward go? Does it stay in the node or go to the address you choose to receive rewards? Because on this address I don't notice any increase of GNO.** If you have set a withdrawal address, your rewards will accrue in the deposit contract. At the moment you will have to claim them on the [Deposit page](https://deposit.gnosischain.com/) or manually from the [contract](https://gnosisscan.io/address/0x0b98057ea310f4d31f2a452b414647007d1645d9#writeProxyContract#F4) by calling the claimWithdrawals function and entering your withdrawal address 19. **I use Lighthouse and I wanted to know if it was possible to separate the rewards of each validator from the address provided when creating the keystore.json files? I also wanted to know if it was possible to add validators later**. For consensus layer rewards who are paid in GNO once updated to 0x01 it's not possible to change it. For execution layer rewards who are paid in xDAI you can change them as much as you want in the client or web3signer UI. You can add validator keys later on. Just add the key, configure the fee recipient address and you are fine. 20. **I want to stake some GNO, I wonder how long does it take when I withdraw them?** For solo validators, exiting then withdrawing your GNOs should take about one or two days, depending of the exit queue. 21. **Can I withdraw my GNO which is currently used in validator?** Yes, you have to do a [voluntary exit](https://docs.gnosischain.com/node/management/voluntary-exit) (either from the client itself or if you are on Dappnode from the Web3signer UI) then wait for your validator to leave the exit queue and once the withdrawal is ready claim on the [Deposit page](https://deposit.gnosischain.com/) or manually from the [contract](https://gnosisscan.io/address/0x0b98057ea310f4d31f2a452b414647007d1645d9#writeProxyContract#F4) by calling the claimWithdrawals function and entering your withdrawal address 22. **What is the easiest way to set withdrawal address without setting up locally beacon node, cli and etc.?** Check the step by step [tutorial](https://docs.gnosischain.com/node/management/withdrawals) in the docs using ethdo ; this community made [video](https://youtu.be/By9VmNviNT0) can help too, don't hesitate to ask on Discord if you have questions/problems with the process 23. **Is it possible to change the address where I get the validator rewards?** For consensus layer rewards who are paid in GNO once updated to 0x01 it's not possible to change it. For execution layer rewards who are paid in xDAI you can change them as much as you want in the client or web3signer UI. More information in the [docs](https://docs.gnosischain.com/node/rewards-penalties). 24. **In the explorer gnosischa.in, what is the meaning of total withdrawal?** Total withdrawal means the total accrued GNO 25. **I keep missing rewards, is it because I am running my validators on a regular disk instead of an SSD?** You need to use a SSD to validate Gnosis, an HDD doesn't have the required performances, more information [in the docs](https://docs.gnosischain.com/node/#requirements) and a guide on which SSD to chose in this [Github](https://gist.github.com/yorickdowne/f3a3e79a573bf35767cd002cc977b038) 26. **Want to exit and re-enter with a different withdrawal address, but can't broadcast the exit message. Can anyone help me?** Fixes have been done in November 2023 on Dappnode for bugs related to exits so it's possible that this bug has been fixed since then. Don't hesitate to ask on the Discord if you encounter those kind of bugs. 27. **Is there any other way to exit than the signer UI?** You can also initiate an exit through your client, more information in the [docs](https://docs.gnosischain.com/node/management/voluntary-exit) 28. **Can I withdraw without being online?** It's usually very complicated to generate an exit message with an offline validator but if you want to do this, ask us for help on the Discord and we will look what can be done. 29. **How do I withdraw my earnings (xDAI) to my MM wallets for each Validator recipient address?** You don't need to claim execution layer rewards who are paid in xDAI, when you propose a block, the reward will go to your address. You can see you rewards on [Gnosisscan](https://gnosisscan.io/) on your validator address, in the Validated Blocks tab. 31. **Could anyone please explain to me how withdrawals and validator rewards work on Gnosis Chain?** Consensus layer rewards are paid in GNO to your withdrawal address and have to be claimed on the [Deposit page](https://deposit.gnosischain.com/) or manually from the [contract](https://docs.gnosischain.com/node/management/withdrawals#how-to-receive-my-withdrawal-full-or-partial) ; Execution layer rewards are paid in xDAI to your recipient address. 31. **How to withdraw the staked validator amount though?** You can do a [voluntary exit](https://docs.gnosischain.com/node/management/voluntary-exit) either from the client itself or if you are on Dappnode from the Web3signer UI then wait for your validator to leave the exit queue and once the withdrawal is ready claim on the [Deposit page](https://deposit.gnosischain.com/) or manually from the [contract](https://docs.gnosischain.com/node/management/withdrawals#how-to-receive-my-withdrawal-full-or-partial). 32. Is there a guide on how to withdraw when you only have the keystore? If you lost your seed there is pretty much no way to get it back. But not all is lost. You still have the keystore files. Make sure you back up those somewhere. Have you set a withdrawal address when you generated the keystore files? If yes, then you are pretty fine without the seed. You only need the seed to regenerate these keys and also set a withdrawal address if you have not yet. If you have set the withdrawal address already, you do not really need the seed phrase anymore. If you have not set a withdrawal address yet, then without the seed you have no access to your deposited GNO anymore. You can still run your validators, and get the execution layer rewards (xDAI), it is not much and probably not worth it. 33. **I had partial withdrawals going to an address in August. Are the future withdrawals will go to the same address?** If back then when a bot was claiming them automatically, your withdrawals were going to a specific address, it means that your withdrawal address is correctly setup and new withdrawals will go there as well. Now you have to claim withdrawals manually, you can do so on the [Deposit page](https://deposit.gnosischain.com/) or on the [Deposit contract](https://docs.gnosischain.com/node/management/withdrawals#how-to-receive-my-withdrawal-full-or-partial) 34. **My wallet got hacked. Is there any way to change my withdrawal address?** If it's already a 0x01 withdrawal address then it can't be updated anymore. If it's till a 0x00 address then follow the usual guide in the [docs](https://docs.gnosischain.com/node/management/withdrawals#how-to-change-the-withdrawal-credential). 35. **I am trying to change my withdrawal credential from 0x00 to 0x01. I can't seem to be able to connect to my Beacon Node. Is there another way to do it?** Be sure to use the right port used by your client. For example the default port for Lighthouse might be 5052, Avado nodes seems to use 5051, etc... If you need more help you can ask on the Discord. 36. **Is there any way other than web3-signer to exit my validators?** You can also initiate an exit through your client, more information in the [docs](https://docs.gnosischain.com/node/management/voluntary-exit). 37. **I want to deposit GNO on the test network. Where can I find the operation guide?** More information in the [docs](https://docs.gnosischain.com/concepts/networks/chiado/#how-to-participate). If you need Chiado GNO you can ask on the Discord. 38. **How long until the GNO from my withdrawal arrives in my wallet? Do you have to claim it manually?** You have to claim withdrawals manually, you can do so on the Deposit page or on the Deposit contract. Once claimed it should be instantaneous in the same transaction. 39. **How long does the contract to manually claim withdrawals take to complete?** It's instantaneous, as soon as the claim transaction is validated, the GNO will be sent to your withdrawal address 40. **Are there any news regarding an easy solution to change the recipient address in my DappNode to withdraw my mGNO?** Currently not, even if Dappnode mentioned working on it in the past. You have to follow the regular [step by step guide](https://docs.gnosischain.com/node/management/withdrawals). 41. **I see automatic withdrawals to my wallet on gnosischa.in, but I don't seem to be receiving them. Is there anything else that I need to do?** You have to claim withdrawals manually, you can do so on the [Deposit page](https://deposit.gnosischain.com/) or on the Deposit contract. Once claimed it should be instantaneous in the same transaction. 42. **Should the automatic withdrawals that started after Shapella go to the default fee recipient address or some other address?** After the Shapella upgrade a bot was claiming withdrawals for everyone automatically but who was since then stopped after concerns about generating a lot of unsolicited small transactions who are complex to report for tax. You have to claim withdrawals manually now, you can do so on the Deposit page or on the Deposit contract. These withdrawals will go to your withdrawal address. 43. **What happened to automatic withdrawals after Shapella? How do I claim rewards manually?** After the Shapella upgrade a bot was claiming withdrawals for everyone automatically but who was since then stopped after concerns about generating a lot of unsolicited small transactions who are complex to report for tax. You have to claim withdrawals manually now, you can do so on the [Deposit page](https://deposit.gnosischain.com/) or on the [Deposit contract](https://docs.gnosischain.com/node/management/withdrawals#how-to-receive-my-withdrawal-full-or-partial). 44. **Is there an easy way to transfer the ownership of my validators to a different address?** There's no "easy way" you would need to exit your validators, withdraw your GNO and deposit them on new validators 45. **My validator received a considerable amount of execution reward, how is it possible?** Recent gas spikes and higher execution rewards in blocks can be related to arbitrage bots, NFT minting, among others. 46. **Is there any way to see how much GNO is waiting for me to be claimed from the GBC Deposit contract?** Go on the [deposit contract](https://gnosisscan.io/address/0x0B98057eA310F4d31F2a452B414647007d1645d9#readProxyContract) and enter your withdrawal address in the field "7.withdrawableAmount" 47. **Anyone also has problems while trying to deposit?** Most problems with the deposit page on the user side seems to be related to the RPC you're using in your wallet, but it's also possible that there is a problem on our side, in that case don't hesitate to report and ask about it on the Discord 48. **"failed to fetch existing deposits. Please try again", anyone facing the same issue?** Most problems with the deposit page on the user side seems to be related to the RPC you're using in your wallet, but it's also possible that there is a problem on our side, in that case don't hesitate to report and ask about it on the Discord 49. **I've got some validators, do I need to do something to receive the rewards from these validators to my wallet?** Consensus layer rewards are paid in GNO to your withdrawal address and have to be claimed on the [Deposit page](https://deposit.gnosischain.com/) or manually from the [contract](https://deposit.gnosischain.com/) ; Execution layer rewards are paid in xDAI to your recipient address. 50. **What kind of penalties will I face if I am offline for 1 day?** Offline penalties which basically are equal to what you would have earned in a day while validating. 51. **Are rewards getting paid out in xDAI now instead of GNO?** You can earn two kinds of rewards : consensus layer rewards who are paid in GNO and execution layer rewards who are paid in xDAI. More information in the docs. 52. **After withdrawals went live, I got some GNO in my wallet, but now there are no more coming in** After the Shapella upgrade a bot was claiming withdrawals for everyone automatically but who was since then stopped after concerns about generating a lot of unsolicited small transactions who are complex to report for tax. You have to claim withdrawals manually now, you can do so on the [Deposit page](https://deposit.gnosischain.com/). 53. **My validator node is slashed, how to withdraw GNO?** You can do a voluntary exit either through the client like described in the docs or if you are using Dappnode you can exit through the Web3signer UI. 54. **How long until withdrawals arrive in wallet?** For full withdrawals you have to wait until your validator leaves the exit queue and be ready to claim. Then both for partial and full withdrawals, once claimed on the contract or on the [Deposit page](https://deposit.gnosischain.com/) it should be instantaneous. 55. **On gnosischa.in while some rewards are denominated in GNO, others are in xDai. What's the difference?** You can earn two kinds of rewards : consensus layer rewards who are paid in GNO and execution layer rewards who are paid in xDAI. More information in the [docs](https://docs.gnosischain.com/node/rewards-penalties). 56. **Any timeline from Stakewise for withdrawals?** It will happen after the Stakewise v3 update which might take longer for Gnosis Chain because of the two tokens rewards system 57. **I see a withdrawal on gnosischa.in, but I haven't initiated anything. Why?** The withdrawals you see on Gnosischa.in are basically just withdrawals ready to be claimed on the contract, the GNO in question have waiting on the deposit contract, you can claim a withdrawal on the [Deposit page](https://deposit.gnosischain.com/) or manually from the [contract](https://docs.gnosischain.com/node/management/withdrawals#how-to-receive-my-withdrawal-full-or-partial). 58. **I do not want partial withdrawals to be automatic due to tax reasons. Can I opt-out of this feature?** The bot who was automatically claiming withdrawals has been stopped now, withdrawals are manuals now 59. **I've been running my node for a week now. When/Where can I expect to start seeing my accrued rewards?** If you have set a withdrawal address, your rewards will accrue in the deposit contract. At the moment you will have to claim them manually from that contract. You can either go and call claimWithdrawals function on the GBC deposit contract or use the Withdrawal Claim tab on https://deposit.gnosischain.com/. You can check your accrued rewards on https://gnosischa.in. as well. 60. **Can I withdraw without being online?** It is usually pretty tricky to exit without an actively running node. If getting online is an option, we suggest you to do so. If not, you can try to create an exit message using [ethdo](https://github.com/wealdtech/ethdo/blob/master/docs/exitingvalidators.md) and by [broadcasting](https://gnosischa.in/tools/broadcast) the message using the Broadcast tool on [gnosischa.in](http://gnosischa.in/). 61. **My wallet got hacked. Is there any way to change my withdrawal address?** If the withdrawal address you have set is already 0x01, unfortunately, there is no way to change it as it is a one time process. 62. **How to stop validation and withdraw my coins?** First, make sure your withdrawal credential is set to 0x01 following the relevant tutorial on our [documentation](https://docs.gnosischain.com/node/management/withdrawals). If not, follow the ethdo tutorial to change it from 0x00 to 0x01. If it is set as 0x01, you can just use Web3Signer to exit. 63. **The withdrawal credentials must be set through the Web3Signer UI, correct? I launched a new validator yesterday and gnosisch.in says there is no withdrawal address. In W3 signer, it shows that it is set correctly. Any ideas on how to rectify?** If you have not specified a withdrawal address when creating your keystore files, you will need to follow the ethdo guide to set your withdrawal credential as 0x01. 64. **Has anyone successfully used the Ethereum staking/deposit CLI tool (https://launchpad.ethereum.org/en/btec/#broadcast-message) to generate a signed "BLS To Execution Change" in order to update the withdrawal address of a Gnosis validator?** You cannot use Ethereum Staking/Deposit CLI tool for BLS-to-Execution on Gnosis Chain as it is not supported. However, you can change your withdrawal credential by using ethdo following the [step by step tutorial](https://docs.gnosischain.com/node/management/withdrawals#how-to-change-the-withdrawal-credential) on our docs. 65. **How long does it take for a withdrawal to be processed? The epoch for my exit (according to https://gnosischa.in/) was 5 hours ago, but if I hit the claimwithdrawal function from the withdrawal address, I don't get any GNO.** You can check the withdrawals tab on https://gnosischa.in to see an estimate of how long you need to actually be able to claim your exited GNO. 66. **Anyone know how to withdraw GNO from stakewise validator?** Stakewise will enable withdrawals when they go live with their V3. However, if you do not want to wait, you can go to https://curve.fi/ to swap your rGNO and sGNO (subject to some slippage). 67. **I set a withdrawal address to a Safe on Gnosis Chain, I see the partial withdrawals, but the balance in GNO don’t go up. What should I do?** Unlike Ethereum, on Gnosis Chain, you will have to claim them on the [Deposit page](https://deposit.gnosischain.com/) or manually from the [contract](https://deposit.gnosischain.com/) by calling the claimWithdrawals function and entering your withdrawal address 68. **Where do Withdrawals from Validators go to? After Update I received GNO once but now it says it's sending Amounts of GNO but they never arrive in my wallet.** After the Shapella upgrade a bot was claiming withdrawals for everyone automatically but who was since then stopped after concerns about generating a lot of unsolicited small transactions who are complex to report for tax. You have to claim withdrawals manually now, you can do so on the [Deposit page](https://deposit.gnosischain.com/) or on the [Deposit contract](https://docs.gnosischain.com/node/management/withdrawals#how-to-receive-my-withdrawal-full-or-partial) 69. Is there a guide on how to unstake my Gnosis validators? Do a [voluntary exit](https://docs.gnosischain.com/node/management/voluntary-exit) either from the client itself or if you are on Dappnode from the Web3signer UI then wait for your validator to leave the exit queue and once the withdrawal is ready claim on the [Deposit page](https://deposit.gnosischain.com/) or manually from the [contract](https://docs.gnosischain.com/node/management/withdrawals#how-to-receive-my-withdrawal-full-or-partial). --- // File: faq/Node FAQs/generalQuestions Twitter Announcement@2x :::info **Find this document incomplete? Visit our [Discord channel](https://discord.gg/gnosischain) or contact us via [Validator Request form](https://tally.so/r/3y4V1W)!** ::: :::info **:bulb: This document is continuously being improved.** ::: # General Questions 1. **What is a validator?** Validators propose and vote on blocks to include in the chain. The chain is secured by a staked amount of GNO. Validators stake GNO and receive additional GNO as rewards for correct behavior (proposing and attesting blocks) and a slashed balance as penalties for incorrect behavior (offline node, attesting invalid blocks). 2. **What is PoS (Proof-of-Stake)?** Proof-of-Stake (PoS) is a consensus mechanism for processing transactions and creating new blocks in a blockchain. Staking is when you pledge your coins to be used for verifying transactions. The same PoS implementation underlies both Gnosis Chain and Ethereum's consensus mechanism, except for a few differences outlined [here](https://docs.gnosischain.com/about/). 3. **What is Gnosis Chain?** Gnosis Chain is an EVM-compatible Layer-1 blockchain that aspires to be the most secure, resilient and credibly neutral blockchain, buttressed by a deeply decentralized network secured by over 200K validators. 5. **What tax software has integrated GC?** [Cryptio](https://cryptio.co/) is available for German users. --- // File: faq/Node FAQs/monitoring :::info **Find this document incomplete? Visit our [Discord channel](https://discord.gg/gnosis) or contact us via [Validator Request form](https://tally.so/r/3y4V1W)!** ::: :::info ** :bulb: This document is continuously being improved.** ::: # Monitoring and Alerts 1. **Got a couple of validators on DappNode and I'm moving soon, how can I pause validators to avoid missing attestations?** Either leave your validator as it is and then you will end up just having "offline penalties" which are about equal to what you would have earned by validating in a day. The other option is to exit your validators (be sure to have a 0x01 withdrawal address before). Within the community some validators consider that if you will stop validating for less than 30 days then it might not be worth exiting your validator... but over 30 days it is worth it. 2. **I am getting INFO - Beacon chain is in activity leak on Teku. Why?** Could be related to the system clock being delayed. Open a terminal then enter ssh dappnode@[your Dappnode's IP] in your terminal then use `su` then try `sudo apt update && sudo apt install ntp`. As this is more complex, don't hesitate to ask on our Discord for help if needed. 3. **Anyone has an automated alert for their validators?** Open an account on gnosischa.in it will send you an email when the node goes down 4. **Is there a queue monitor similar to validatorqueue.com for beaconchain?** There is an exit queue on Gnosis Chain as well but no dedicated website. Once the your voluntary exit message broadcasted, you can monitor the progress of your validator withdrawal on Gnosischa.in 5. **Would anyone in this group be interested in a Gnosis Chain validators monitoring bot?** Some validators from the community are currently building tools to help monitor their validators better 6. **Is there a way to check my claimable balance of GNO?** Go on the [deposit contract](https://gnosisscan.io/address/0x0B98057eA310F4d31F2a452B414647007d1645d9#readProxyContract) and enter your withdrawal address in the field "`7.withdrawableAmount`" 7. **Has anyone set up multiple validators to monitor under your account on gnosischa.in? I'm wondering if there is a way to batch add validators instead of just one-by-one. (edited)** You should be able to add them in bulk by searching for the deposit/withdrawal address in the dashboard and then clicking the button that looks like a bookmark (save all to watch list).You can then select all and manage notifications for your selection in the notification center. The dashboard only shows up to 100 in the free fier, but I think you can add up to 300 to the watch list. 8. **Anyone have a detailed gas chart for Gnosis?** You can take a look at Blockscout to get detailed analytics about Gnosis Chain, including gas chart here: https://gnosis.blockscout.com/stats 9. **Noticed a quite high xDAI burn rate in several of my blocks during the last about 5 to 6 days. Does anyone can explain me what this is caused by? Just due to higher traffic or have some parameters been adjusted?** There is an ongoing NFT spam on Gnosis Chain. The spam NFT minters use legacy transaction types, meaning they only set a gas price not a base fee and tip. This results in validators getting everything above the base fee as a tip. I have no idea why they use legacy transaction, but obviously they are not price sensitive. In your block it looks like it was several MEV bots swapping tokens around also using legacy transactions. --- // File: faq/Node FAQs/offlineAndSyncIssue :::info **Find this document incomplete? Visit our [Discord channel](https://discord.gg/gnosis) or contact us via [Validator Request form](https://tally.so/r/3y4V1W)!** ::: :::info ** :bulb: This document is continuously being improved.** ::: # Offline and Sync Issues 1. **Anyone seeing errors with checkpoint sync today?** If the usual checkpoint sync https://checkpoint.gnosischain.com/ doesn't work, you can try using https://checkpoint.gnosis.gateway.fm/ if they are both down, don't hesitate to report it as the team might not be aware yet 2. **My (dapp)node have been offline for a couple of hours. After restart attestation and block proposing resumed, but duties in sync committee still shows missing even after a few hours since it's up again. Does anyone has an explanation for this?** Maybe it was related to an Intel chip bug that was fixed by Dappnode 3. **Installed Nethermind and Lighthouse on a new arm, let it sync for 24hrs and deposited validators after. Now all my validators are leaking. Do I need to wait for sync still or have something misconfigured?** Nethermind might take longer than 24h to sync. Wait and check. This error could also be related to recent sync issues. 4. **If my Gnosis validator have been offline for a long time (several months) and I restart it, do I need to withdraw and re-deposit the collateral, or can I just wait for it to become active again? How long will it take until it start earning again?** Update everything and wait until sync is finished, just remember to make sure your keystores are properly imported into your web3signer gnosis 5. **Using checkpoint sync, but all my nodes are down. Why?** If the usual checkpoint sync https://checkpoint.gnosischain.com/ doesn't work, you can try using https://checkpoint.gnosis.gateway.fm/ if they are both down, don't hesitate to report it as the team might not be aware yet 6. **Just realized my validators are off line since the beginning of the month, can someone take a peek and help?** Delete the Nethermind database and let it sync from scratch 7. **Hey, I run 50+ validators and seems like it misses heads quite frequently. Beaconchain shows I have average effectiveness of 88%. Any ideas on what is the most limiting factor? Just thinking what I can do to improve this.** In most cases the most important factor are: a synced clock (ntp), and a good internet connection 8. **Is there a new checkpoint for Gnosis?** The two common checkpoint sync are : https://checkpoint.gnosischain.com/ and https://checkpoint.gnosis.gateway.fm/ 9. **My Gnosis node is crashed a month ago, was there a breaking chain upgrade a month ago?** Gnosis Chain had the [Shapella](https://docs.gnosischain.com/concepts/specs/hard-forks/shanghai-capella) upgrade early August 2023, validators had to update their clients to continue validating. 10. **Can I use checkpoint sync with Nethermind?** There is no checkpoint-sync or fast sync yet for Nethermind, syncing Nethermind from scratch can take up to +/- 2 days --- // File: faq/Node FAQs/runningNode :::info **Find this document incomplete? Visit our [Discord channel](https://discord.gg/gnosischain) or contact us via [Validator Request form](https://tally.so/r/3y4V1W)!** ::: :::info ** :bulb: This document is continuously being improved.** ::: # Running Nodes 1. **I think my HOPR version dappnode is completely broken down. I would like to exit the Gnosis staking and withdraw the GNOs. How can I do that without accessing my dappnode node?** It's usually very complicated to generate an exit message with an offline validator but if you want to do this, ask us for help on the Discord and we will look what can be done. 2. **I just changed my internet provider. Since then my nodes are not syncing. Do you guys know if any ports need to be open for GC (beacon chain and/or validators)?** If you use UPnP try to keep an eye on it and check how it behaves and if the issues persist, maybe you'll be better with manual port forwarding instead of relying on UPnP 3. **I have deposited for two hours, why haven’t I seen my node information?** It takes about 4 hours for a deposit to be processed, you can check how your validator is doing on gnosischa.in 4. **I'm getting an alert in Lighthouse that I've got an invalid signature and/or that an endpoint has failed, how to troubleshoot?** Lighthouse specific problem, you might want to ask Lighthouse directly about it 5. **I have trouble connecting to my beacon node? Is there any other way to get the offline-preparation.json file?** Be sure to use the right port used by your client. For example the default port for Lighthouse might be 5052, Avado nodes seems to use 5051, etc... 6. **I am getting the error error: Api \{ error: ServerMessage \{ code: -32602, message: "ExecutionPayloadV1 expected" \} \} on Lighthouse? Why?** If you're using Nethermind with the old xdai presets, replace them with gnosis 7. **I am getting the error error: Api \{ error: ServerMessage \{ code: -32602, message: "ExecutionPayloadV1 expected" \} \} on Lighthouse? Why?** If you're using Nethermind with the old xdai presets, replace them with gnosis 8. **Is there mev-boost for Gnosis Chain similar to Ethereum? Are there any relays?** There is no MEV-Boost on Gnosis Chain currently. 9. **Are validators meetups happening at a specific recurring date?** We aim to set the validator meetup in the third week of the month. however, due to the small size of comms team, date changes are to be expected... 10. **There's already existing solutions with pre-made hardware to run a validator?** Dappnode is the most known of ready to use validator hardware, among others on the market. 11. **How many GNO should I have to make it worth running a node?** It really depends on you but basically the more GNO you can stake (up to a few hundreds per node, for a regular Intel NUC 11), the more the cost of buying and running the node will be split and proportionally smaller for each validator.... If you're very good with DIY and have no fear of experimenting, you can even validate using a Raspberry Pi like a few validator are doing in the community. 12. **I am running 4 validators on my DappNode, and it seems like a waste of the machine. Is there an easy way to add more validators?** It's the same process basically, with the exception of a setting for the number of current instances running, where you'll need to enter the amount of validators you're already running. The Wagyu keygen tool for Gnosis is the easiest way to create your new keys. 13. **If I get a DappNode, what's the max amount of GNO that I can stake per node?** You should be able to run a few hundreds validators on a regular Dappnode. Note that you can only deposit 128 validators at a time, if you want to deposit more you need to repeat it, which is the same process basically, with the exception of a setting for the number of current instances running, where you'll need to enter the amount of validators you're already running. The Wagyu keygen tool for Gnosis is the easiest way to create your new keys. 14. **What are the hardware requirements for running a node?** [More info in the docs](https://docs.gnosischain.com/node/#requirements) 15. **Could you tell me what code I have to put in the Dappnode terminal to recover all my GNO that I have staked?** First of all be sure to already have a 0x01 withdrawal address or follow the [step by step guide](https://docs.gnosischain.com/node/management/withdrawals). Then go in the web3signer UI, select all keys, select the exit button, type the message ("I want to exit"), then verify on Gnosischa.in how it is going, it can take some time between the moment where you exit and the moment where it's visible on Gnosischa.in 16. **How much does it cost per month to run a full node on Azure?** Clouds providers are usually much more expensive than running a node yourself. An estimation in the community for Azure found that the average price to run a node on Azure, as mid-2023 would be possibly around $300 per month. 17. **My validator is Status Slashed, how to withdraw or re-become validator?** To troubleshot your node, you can check your Dappnode dashboard or the logs of the clients. If the problem comes from the consensus client, often switching to another client like Lighthouse helps. Lighthouse with checkpoint sync takes only about 2 minutes to be up and running. If you need more help to troubleshoot this, please ask on the Discord. 18. **Is it possible to switch from Teku to Lodestar client?** It's totally possible to switch to another consensus client and it often helps to solve some client problems, switching should be fast using checkpoint sync. 19. **After making the 1 GNO deposit, how long it takes to the validator to be active?** It takes about 4 hours for a deposit to be processed, you can check how your validator is doing on gnosischa.in 20. **Is it worth to be a validator?** Regardless of your number of validators by becoming one you're helping to secure and decentralize the network and you can earn a decent APY (who was ~14% as of October 2023 but who depends of the number of validators) 21. **How many deposits per epoch are allowed on GBC? How long would it take to deposit and start validating?** You can deposit quickly on Gnosis Chain, as of mid 2023, there was 17280 new validators deposits per day if all slots are full 22. **Can I run a validator on my own PC, not with ideal hardware requirements but close to the specified ones?** It might be possible, check if your hardware is close to the requirements in the docs 23. **Now I got three validator-nodes on Zonaris only to discover I can't afford the staking GNO idk if delegated staking is a thing, but if yes I would keep those nodes up if there's interest.** Clouds node hosting can be very expensive and sometimes can also be not financially sustainable with the APY you can earn as a validator. If that's a possibility for you you might want to consider running your node at home. Otherwise you can try liquid staking like [Stakewise](https://app.stakewise.io/). 24. **Is Nethermind XDAI the only Execution clients for Gnosis?** Erigon is an alternative that you might consider. 25. **Is Erigon safe to use?** Erigon is now ready for production use! 26. **Is it possible to start again an exited node?** If you have exited, it means your validator does not have any GNO to participate in the validation. You need to deposit again to start validating. 27. **How easy is it to exit validators?** If your have changed your withdrawal credentials from 0x00 to 0x01 or if it is already set as 0x01, you can use Web3Signer to exit your validator. If not, you can follow the step by step guide on our documentation. 28. **If I have, say 100 GNO, can I put them all in a single validator to earn rewards on all 100, or must I run 100 separate validators of 1 each?** The effective balance of a single validator is 1 GNO. All other GNO rewards accrued on your validator are ready to be claimed by calling the `claimWithdrawals function` on the GBC deposit contract or using the Withdrawal Claim tab on https://deposit.gnosischain.com/. If you have more than 1 GNO, you can set up multiple validators using the same machine. 29. **Can I participate in gnosis governance with GNO staked in validators? I would not think so, but if yes, how?** Depending on how the strategies for governance participation is set for a specific vote on Snapshot, you can vote with your GNO staked for validating by using the address that you have used to fund your validators. 30. **Hey guys, is there any way how to free disk space on Gnosis node , any pruning or state sync?** If you would like to clear up some space, you can delete your CL client info (except your wallet / keys of course) and use checkpoint sync, it usually takes only 2 minutes. 31. **Is the Gnosis validator incentive program still available? Looking to start a node here from Ghana- West Africa.** Gnosis VIP was run by Gnosis Builders team, which has been retired. It will go live soon. Stayed tuned! 32. **My nodes are producing negative income for some reason. I have to admit I have neglected them for a while. Do I need to update them? The dappstore is showing the version of teku and nethermind I got running as the current version, the nodes are 100% synced. They are producing positive and negative income in irregular intervals, dashboard shows them as healthy, I'm kinda lost tbh, any help?** It might be due to unstable connection. You can check the logs to see the number of peers both for your CL and EL. Also, keeping your clients up-to-date is essential. 33. **I want to run a validator, where can I find documentation?** The docs have a complete section dedicated to running a node https://docs.gnosischain.com/node/ 34. **Any recommended walkthroughs or guides on how best to take my Gnosis validators offline?** You can do a [voluntary exit](https://docs.gnosischain.com/node/management/voluntary-exit) either from the client itself or if you are on Dappnode from the Web3signer UI then wait for your validator to leave the exit queue and once the withdrawal is ready claim on the Deposit page or manually from the contract by calling the claimWithdrawals function and entering your withdrawal address --- // File: faq/Node FAQs/staking :::info **Find this document incomplete? Visit our [Discord channel](https://discord.gg/gnosis) or contact us via [Validator Request form](https://tally.so/r/3y4V1W)!** ::: :::info ** :bulb: This document is continuously being improved.** ::: # Staking, Liquid Staking 1. **Where can I swap mGNO to GNO?** mGNO is deprecated now, you can stake GNO directly 3. **What’s the best place to stake my GNO bag?** You can stake your GNO on liquid staking platforms like Stakewise or you could get/buy your own node and stake those GNO to validate the chain (~14% APY as October 2023) more information in the docs 4. **Is there any official staking platform for GNO?** You can run your node as a solo validator or use a liquid staking protocol like [Stakewise](https://stakewise.io/). 5. **I have some Locked GNO, how to get it back?** You can unlock your GNO on the [Locking page](https://lock.gnosis.io/) 6. **Can you currently unstake sGNO or is that not ready yet?** To withdraw directly you need to wait for Stakewise v3 that isn't out yet or if you really want to withdraw immediately, you can find some liquidity on Curve for sGNO and rGNO 7. **How can I convert rGNO?** Use the [rGNO](https://curve.fi/#/xdai/pools/factory-v2-1/deposit) liquidity pool on Curve 8. **Where can I swap GNO to mGNO?** mGNO is deprecated now, you can stake GNO directly 9. **How to move LGNO tokens out of a compromised wallet?** LGNO tokens can't be transferred, you will have to unlock your GNO on the [Locking](https://lock.gnosis.io/) page but about your compromised wallet, if the hackers are using a bot to drain all tokens out of the wallet, there is a high possibility that funds won't be able to be recovered. 10. **Is there any way to stake more than 32 mGNO per validator?** mGNO is actually deprecated, but the effective balance of your validator cannot exceed 1 GNO as the exceeding balance will be ready to be claimed as partial withdrawals. 11. **Rewards for staking are given in GNO, but what happens to the xDai used to pay gas from all transactions on the network? Where does the GNO come from since it isn't used for gas in the transaction?** Every validator has two addresses to which it distributes rewards to: 1. Withdrawal address: The consensus layer rewards go to this address. These rewards are: attestation rewards, sync committee rewards, block proposal rewards. It can only be set once. If you have set it during key generation/deposit, you cannot change it again. 2. Fee recipient address: The execution layer rewards go to this address. When you propose a block, people pay you to include their transaction, this fee reward goes to this address. You set this one in your validator client or web3signer for each validator. It can be changed as often as you want. For more info you can check [Rewards & Penalties](https://docs.gnosischain.com/node/rewards-penalties) section on the docs. --- // File: faq/bridges # Bridges FAQs 1. Can I bridge tokens between Gnosis Chain and BSC using Omni Bridge The BSC - Gnosis Chain bridge has been deprecated you can instead use a third party bridge like Jumper for example. 2. What is the best way to bridge it to another chain? For larger amounts, you can use the xDAI bridge (from Gnosis Chain to Ethereum) : https://bridge.gnosischain.com/ For smaller amounts or if you want to bridge them to another chain (to a L2 or another chain), with very small gas fees using Jumper : https://jumper.exchange/ 3. On AMB/Omni Bridge once the daily limit has been reached, how can I get my tokens? Follow the manual execution tutorial https://docs.gnosischain.com/bridges/tutorials/using-amb once you have initiated the `executeSignature()` transaction, the token release transaction will be credited to your account automatically the next day. 4. I’m trying to bridge but Omni Bridge says that the maximum amount was already transferred? Some tokens have [bridge limits](https://docs.gnosischain.com/bridges/tokenbridge/omnibridge#single-transaction-limits), which can be a daily limit and or maximum or minimum per transaction, this is for example the case for GNO between Gnosis Chain and Ethereum, you can click the “Limits” button below the bridge box to check the current limits for a given token. These Daily Limits will be reset at 00:00 UTC. 5. How much time does it take to bridge using Omni Bridge ? With the new zk light client verification, bridging assets takes about 20 minutes. You can check your bridge transaction on the bridge explorer : https://bridge-explorer.gnosischain.com/ 6. Why do the tokens I just got on Gnosis Chain after bridging from Ethereum have a different contract address? Often tokens have a different contract address because when they are bridged into Gnosis Chain, the contract address alters, becoming a proxy token of the bridged one. This process is fundamental to how the tokens are locked on the bridge. 7. I bridged some agEUR tokens using the Angle Bridge, now I have lz-agEUR in my wallet, what can I do? The Angle Bridge has daily and hourly limits (they are visible on the bridge page). If the limits are reached when processing a bridge transaction, you won’t receive agEUR in your wallet on the destination chain but instead, you will receive lz-agEUR tokens in your wallet that can be used to redeem agEUR later, when the limits reset, you would then need to make a manual claim following this tutorial : https://docs.angle.money/overview/guides/bridge#how-to-get-back-ageur-from-lz-ageur 8. I’m trying to bridge agEUR from Gnosis Chain to another chain using the Angle Bridge but I’m getting an error “internal JSON-RPC error” Be sure to have enough xDAI for gas and fees, to use the Angle Bridge you should have at least 1,5 xDAI in your wallet. More information in Angle Protocol docs : https://docs.angle.money/overview/guides/bridge 9. I’m having issues using Omni bridge to bridge assets held in a SAFE between Ethereum and Gnosis Chain, I get a “failure to connect” ERROR. Rabby wallet ( https://rabby.io/ ) wallet is good workaround allowing to load SAFE into it and inject them in similarly to Metamask. 10. I bridge my WETH from Gnosis Chain to Ethereum, but I don't see my WETH balance increases on Ethereum. When bridging [WETH](https://gnosisscan.io/token/0x6a023ccd1ff6f2045c3309768ead9e68f978f6e1) from Gnosis Chain, Omnibridge will automatically unwrap your WETH on Ethereum to ETH, so you will only accept ETH on Ethereum. The transaction calls [WETHOmnibridgeHelper](https://etherscan.io/address/0xa6439Ca0FCbA1d0F80df0bE6A17220feD9c9038a) to withdraw ETH from [WETH](https://etherscan.io/address/0xC02aaA39b223FE8D0A0e5C4F27eAD9083C756Cc2) token contract, create a new contract to receive the ETH and eventually self destruct that contract and send the ETH to the user. Check out [this transaction](https://etherscan.io/tx/0xfed3bfb9a86b4c65039de6e64f4582e7fad8b1cac0b67f69c185c0332b3fab7e) for more details. 11. How do I know if xDAI get minted to my account when I'm using xDAI bridge for bridging DAI from Ethereum? Because xDAI is gas token(or native token) on Gnosis Chain, newly minted xDAI by xDAI bridge will not create a transaction. You may check your balance increment visually by looking for **coin balance history** section in blockscout: https://gnosis.blockscout.com/address/$YOUR_ADDRESS?tab=coin_balance_history or querying the balance programmatically using eth_getBalance api. 12. I want to bridge my AgEUR or EURe, what bridge should I use? To bridge AgEUR : https://app.angle.money/bridges-agEUR To bridge EURe: You will need have an account in [Monerium app](https://monerium.app/), click **Send Money**, select **Cross-Chain** and enter the amount you want to send, then click **Send**.. Double check the message is correct and sign the message. ```mdx-code-block
Step by Step
``` ![Step1](../../static/img/faq/bridge/EURe-step1.png) ![Step2](../../static/img/faq/bridge/EURe-step2.png) ![Step3](../../static/img/faq/bridge/EURe-step3.png) ![Step4](../../static/img/faq/bridge/EURe-step4.png) ```mdx-code-block
``` 13. How do I check if my message from AMB(or Omnibridge) has been executed? For Omnibridge, you can visit https://bridge.gnosischain.com/bridge-explorer and enter the transaction hash or address you want to search for. For AMB, you can check it by messageId. 1. Find the message Id from the transaction log: In the block explorer, check the `Logs` tab of your transaction receipt, and find `messageId` in event `UserRequestForAffirmation`(bridging from ETH) or `UserRequestForSignature`(bridging from Gnosis Chain). The data type of `messageId` is `bytes32`. 2. On the destination chain's AMB, query the `messageCallStatus(bytes32 messageId)` by pasting the `messageId`. If it returns true, it means the message has been executed. If false, it means the message has not been executed. Foreign AMB (Ethereum): https://etherscan.io/address/0x4C36d2919e407f0Cc2Ee3c993ccF8ac26d9CE64e#readProxyContract#F18 Home AMB (Gnosis Chain): https://gnosisscan.io/address/0x75Df5AF045d91108662D8080fD1FEFAd6aA0bb59#readProxyContract#F23 3. To find out the transaction of the message being executed, you can find the log which emit the event `AffirmationCompleted` (bridging from ETH), or `RelayedMessage` (bridging from GC). Here is an example script using viem. ```mdx-code-block
Sample script
``` ``` import { createPublicClient, http, parseAbiItem } from "viem"; import { gnosis, mainnet} from "viem/chains"; const main = async() => { const gnoClient = createPublicClient({ chain: gnosis, transport: http() }) const ethClient = createPublicClient({ chain: mainnet, transport: http() }) const homeAMB = "0x75Df5AF045d91108662D8080fD1FEFAd6aA0bb59" const foreignAMB = "0x4C36d2919e407f0Cc2Ee3c993ccF8ac26d9CE64e" // Choose either home or foreign // Foreign const foreignLogs = await ethClient.getContractEvents({ address: foreignAMB, abi: [parseAbiItem("event RelayedMessage(address indexed sender,address indexed executor,bytes32 indexed messageId,bool status)")], eventName: 'RelayedMessage', args: { messageId: // replace the messageId }, fromBlock: // replace from Block to recent block toBlock: 'latest' }) console.log(foreignLogs[0].transactionHash) // Home const homeLogs = await gnoClient.getContractEvents({ address: homeAMB, abi: [parseAbiItem("event AffirmationCompleted(address indexed sender,address indexed executor,bytes32 indexed messageId,bool status)")], eventName: 'AffirmationCompleted', args: { messageId: // replace the messageId }, fromBlock: // replace from Block to recent block toBlock: 'latest' }) console.log(homeLogs[0].transactionHash) }; main(); ``` ```mdx-code-block
``` --- // File: faq/node # Validators FAQ 1. Where can I track my validator performance? [GnosisPools](https://www.gnosis.builders/post/gnosispools-guide), [Node monitoring guide](../node/management/monitoring-node.md) 2. How to run a node on Gnosis Chain? https://docs.gnosischain.com/node/ 3. What is reward & penalties? https://docs.gnosischain.com/node/rewards-penalties 4. Where can I find hardware requirements to run a node? Hardware requirements differ by client but generally are not that high. To get a better idea, you can check each specific client’s hardware requirements here: https://docs.gnosischain.com/node/#hardware 5. How did the merge impact my GBC node? The Ethereum Mainnet merged with the beacon chain proof-of-stake system. This marked the end of proof-of-work for Ethereum, and the full transition to proof-of-stake. The Gnosis Beacon Chain (GBC) serves in a frontrunning capacity for important Ethereum consensus-layer updates. 6. My nethermind xdai is lagging, it never seems to catch up to 100%. It fluctuates between 97-99.5% synced. I’m using nethermind xdai execution client, lighthouse gnosis consensus client and the web3 gnosis signer. 1. update all packages to the latest version (core, EL, CL, web3signer, etc) 2. turn on EL + CL and check if both are on sync before turning on the validator (see that lighthouse has 2 processes, 1 beacon and 1 validator) 3. (a) if both are on sync, turn on the validator and check 10 minutes later the beacon explorer (b) if you don’t get both to the head, let me know here and we can troubleshoot together. 7. My validator is constantly missing attestations. Several of my validators are said to be inactive and getting penalized on beacon.gnosischain.com, although logs show errors that I don’t understand. And half of them are active and well (all running on the same physical machine). Solution from discord user @pyk: https://discord.com/channels/502416149343109121/920642136272166972/1055445460023783525 This happens on my end due to one beacon node cannot handle all validators request (hence some validators miss their attestations while others dont) and sometimes beacon node lose all its peers. My solution is to run a few beacon nodes (lodestar) connected to one execution node (nethermind), so I have backup when one beacon node disconnected from their peers. For example here is how to connect multiple beacon nodes in one validator (lodestar): ``` validator --network=gnosis --dataDir=/data --logFileLevel=info --beaconNodes=http://gnosis-beacon-1:4000,http://gnosis-beacon-2:4000,http://gnosis-beacon-3:4000,http://gnosis-beacon-4:4000,http://gnosis-beacon-5:4000 ``` 8. I added 3 validators and skipped the [“Step 3: Upload Keystores to Web3Signer”](https://docs.gnosischain.com/node/tools/dappnode/#step-3-upload-keystores-to-web3signer) in dappNode and got error: Status: error ❌ Message: Error importing keystore: Unable to add validator. Check that the keystore file format is valid and the password is correct.” . I went directly to “Step 4: Fund Your Validators”. Now I see they are active but missing attestations. The password is correct and the keystore files are the same I used in step 4. 1. Double-check that you’re uploading your keystores to web3signer Gnosis 2. Try restarting both Web3Signer Gnosis and your Consensus Client 3. If this is the first time you’re uploading your keystores, make sure you uncheck the import slashing data option 4. Triple-check your password is right and was inputted as you intended 9. Which clients are supported by GBC? Lighthouse, Prysm, Nimbus, and Teku clients. [Read more here](../node/architecture.md#consensus-layer). 10. How long does it take to sync the node? Along with running the GBC client you can also consider running a Gnosis Node to connect with (_optional - recommended for experienced node runners only_). Syncing [Gnosis using Nethermind](/node/manual) requires \~200GB (and growing) of data to download. You may encounter some errors during syncing. Depending on your setup, you can expect it to take anywhere from a few hours to several days. 11. Can I use a node provider to run a Gnosis node? Check the [RPC Providers](../tools/RPC%20Providers/README.md) page for the complete list. 12. Can I use DappNode? Yes! [DappNode](https://dappnode.io) is a partner and full-featured service provider for the Gnosis Beacon Chain. If you would like to use their services for validation, please see the [guide and instructions here.](https://forum.dappnode.io/t/how-to-setup-a-gnosis-beacon-chain-gbc-validator-on-dappnode/1351) 13. Help! I've lost my validator keys You are responsible for your keys (deriving and storing your keys and mnemonic securely). If you lose them or your keys are compromised, there is no recourse to recover your funds. 14. What is a validator? Validators propose and vote on blocks to include in the chain. The chain is secured by a staked amount of GNO. Validators stake GNO and receive additional GNO as rewards for correct behavior (proposing and attesting blocks) and a slashed balance as penalties for incorrect behavior (offline node, attesting invalid blocks). 15. What is the deposit contract? The deposit contract keeps track of validators and staking amounts. The GBC deposit contract is based on [the original Ethereum beacon chain deposit contract](https://github.com/ethereum/consensus-specs/blob/master/solidity_deposit_contract/deposit_contract.sol), with [some additional functionality](/concepts/specs/security-audit). - Contract Security Audit by Chainsecurity: [https://chainsecurity.com/security-audit/poa-network-stake-beacon-chain-sbc-deposit/](https://chainsecurity.com/security-audit/poa-network-stake-beacon-chain-sbc-deposit/) - GBC Contract Address: [0x0B98057eA310F4d31F2a452B414647007d1645d9](https://gnosis.blockscout.com/address/0x0B98057eA310F4d31F2a452B414647007d1645d9) 16. How much do validators earn in rewards? This varies based on how many validators are participating. As the number of validators increases, the reward for validation is reduced as security becomes increasingly decentralized. Additional info is available on the [incentives page](../node/rewards-penalties.md). You can view the current reward yield and other statistics on the [Gnosis Beacon Chain Dune Analytics dashboard](). 17. How many validator processes can run per node? It is possible to run multiple validator processes on a single node with GBC. A 4CPU/8GB node handled 256 validators during testing processes, although for higher decentralization it is recommended to run multiple nodes for this number of validators. The safe recommendation for multiple validators per node is 128. 18. How long does fast sync take with Nethermind? It depends on the mode and hardware specifications. Typically 24 hours should be allowed. - For more information on syncing with Nethermind see [https://github.com/NethermindEth/docs/blob/master/ethereum-client/sync-modes.md](https://github.com/NethermindEth/docs/blob/master/ethereum-client/sync-modes.md) - To learn more about reading logs during syncing see [https://docs.nethermind.io/nethermind/first-steps-with-nethermind/getting-started#explaining-nethermind-logs](https://docs.nethermind.io/nethermind/first-steps-with-nethermind/getting-started#explaining-nethermind-logs) ## Shapella & Validator withdrawal FAQs 1. What is Shapella? Shapella refers to the combination of both Shanghai and Capella. Shanghai enables GNO staking withdrawals for Gnosis Chain, unlike the previous model that doesn’t allow for staked GNO to be withdrawn. Shanghai is the name given to the execution layer (EL) upgrade, while Capella is the name of the coinciding consensus layer (CL) upgrade. 2. What are withdrawals? Validator withdrawal allows a validator’s account balance to get withdrawn from Beacon Chain to Execution Layer, in the form of GNO. The GNO will be accrued on validator’s withdrawal address on the Execution Layer, which is set using `eth1_withdrawal_address` option during validator key generation. 3. What are two types of withdrawals? There are 2 types of withdrawals: Partial Withdrawal and Full Withdrawal. Partial Withdrawal: Any balance in excess of 1 GNO from the account balance gets withdrawn back to withdrawal address. Full Withdrawal: All the balance from validator’s account gets withdrawn back to withdrawal address. This has to be initiated by validator, signing `voluntary_exit` message and broadcasting it to the network. It is irreversible. 4. What are 0x00 and 0x01 withdrawal credentials prefixes? The beacon chain validators have a field called withdrawal credentials, where the first byte is referred to as the withdrawal prefix. Currently, this value can be either 0x00 or 0x01, depending on how it is set during the deposit process using a deposit tool. Validators with 0x00 withdrawal credentials won’t have immediate withdrawal capabilities. To enable partial and full withdrawals and unlock their funds, these validators must undergo a one-time migration to 0x01. As this is a one time process, it is essential to be careful performing it. 5. How do I change my withdrawal credential? You can find a full tutorial on how to change your withdrawal credential [here](https://docs.gnosischain.com/node/management/withdrawals#how-to-change-the-withdrawal-credential). 6. I have been running multiple validators. Can I set up the same withdrawal credential for all of them? Yes, you can set up the same withdrawal credential for all of your validators and can also set up different withdrawal credentials for individual validators. 7. Where can I check my withdrawal credential? https://docs.gnosischain.com/node/management/withdrawals#check-withdrawal-credential 8. Do partial withdrawals happen automatically? As we have modified some specs regarding the withdrawals to enable withdrawing GNO instead of the native gas token xDai, unlike Ethereum, partial withdrawals currently do not happen automatically. So, for now, you will need to call [`claimWithdrawal`](https://gnosisscan.io/address/0x0b98057ea310f4d31f2a452b414647007d1645d9#writeProxyContract#F3) function on the [contract](https://gnosisscan.io/address/0x0b98057ea310f4d31f2a452b414647007d1645d9#writeProxyContract). However, it is in our plans to automate and subsidize partial withdrawals in the future. 9. Do full withdrawals happen automatically? No. If your validator is currently active and participating in the beacon chain, then the full withdrawal will not happen automatically. You will have to manually initiate an exit to cause this. Additionally, if you initiate an exit but still have a 0x00 withdrawal credential, your funds will not be withdrawn until a `BLSToExecutionChange` message is included on chain. 10. Is there a UI that I can use for withdrawals? No, as you will have to interact with the beacon chain, it is not feasible to provide a UI that encompasses all the clients. 11. Where does the automatic balance withdraw to? In case you are using a legacy withdrawal credential 0x00, it will not be withdrawn and you will have to perform a migration to 0x01 credentials to complete the withdrawal. If you have already configured your withdrawal address and have a withdrawal credential of 0x01, then rewards in excess of 1 GNO will be transferred to your withdrawal address. 12. Once I have changed my credential to 0x01, can I change it to an alternative withdrawal address? No, the migration from 0x00 to 0x01 is a one time process and once you set the address, it cannot be changed. Please make this migration with the utmost care. Note, the withdrawal credential can either be an externally-owned account (EOA) or a smart contract such as a SAFE. 13. I have lost the private key to my withdrawal address, what can I do? Unfortunately, there is nothing that can be done if the withdrawal address is lost. Please ensure this address is properly backed up and securely stored. 14. What happens to my GNO if I make a full withdrawal but I forget to set the withdrawal credential to 0x01? Nothing. Your validator will exit, and will no longer be assigned duties, neither able to earn nor lose any more additional GNO. You may still migrate your withdrawal credentials from 0x00 to 0x01. Once this is done, the validator’s balance will be withdrawn to the address you specify. 15. Can I cancel a withdrawal request that is in the queue? No you cannot, this is a one time, irreversible process. Once you submit your withdrawal request (BLSToExecutionChange and/or exit) you can’t go back. Please only exit or change credentials when you are fully aware of what the specific operation will do and with utmost caution. 16. Where can I find the client updates for Shapella? You can find all client updates in this [blog post](https://www.gnosis.io/blog/shapella-client-updates) or [validator withdrawal section](https://docs.gnosischain.com/node/management/withdrawals). Make sure you update your clients before the upgrade. --- // File: faq/others # Gnosis Chain FAQs 1. Where can I bridge my tokens to Gnosis Chain? Between Ethereum and Gnosis Chain : https://bridge.gnosischain.com/ More chains and options : [jumper](https://jumper.exchange/), [bungee](https://www.bungee.exchange/), [hop](https://app.hop.exchange/) For specific tokens like AgEUR and EURe, please use [the token's authorised bridge](../faq/bridges.md) instead of Omnibridge. 2. What is Gnosis Faucet? The Gnosis Chain xDAI faucet distributes xDAI to new users so that they may have enough gas to complete a few transactions and interact with applications on Gnosis Chain : https://www.gnosisfaucet.com/ 3. Where can I stake my GNO? Currently, you can stake your GNO on [Stakewise.io] (https://stakewise.io/). Please note that your wallet must be directed at the Gnosis Chain network with your GNO tokens already bridged to Gnosis. 4. What is sGNO? When you stake your GNO on Stakewise you receive sGNO. https://docs.gnosischain.com/faq/others 6. What is LGNO? This stands for locked GNO. The LGNO contact was an incentive program for the Gnosis community to lock their GNO in return for vCOW. To learn more, please visit this thread by Stefan George -https://twitter.com/StefanDGeorge/status/1488924732191907849 7. What is d14n.info? :::note The site is deprecated. ::: [d14n.info](https://www.d14n.info/) is a real-time dashboard that measures decentralization of the Gnosis Chain and Ethereum networks. We use the Nakamoto Coefficient as the primary quantitative measure across multiple dimensions of the network. You may also check out [Gnosis Metrics](https://www.gnosismetrics.com/#overview) 8. What native bridges does Gnosis have? [xDAI & OmniBridge](https://docs.gnosischain.com/bridges/) 9. What are the DAOs running on the Gnosis Chain? https://www.daosongnosis.com/ 10. Which wallets can I use on the Gnosis Chain? https://www.gnosiswallets.com/ 11. How do I connect my wallet to Gnosis Chain? Click 'Add to Metamask' in [here](https://docs.gnosischain.com/concepts/networks/mainnet) or view other options from https://docs.gnosischain.com/tools/wallets/ 12. I was staking xdai on the easystaking xdai site and it is no longer active. How can I access my xdai? This has been down for some time now due to the old team that was running xdai not maintain it anymore. You will need to use the block explorer to interact with the contracts without the UI in order for it to be withdrawn. These are the steps that need to be taken: https://etherscan.io/address/0xecbcd6d7264e3c9eac24c7130ed3cd2b38f5a7ad#readProxyContract 11. lastDepositIds Type your address which gives you a number. 3. balances Find your deposits. They are numbered from 0 up to the number you got previously. Check all of them. https://etherscan.io/address/0xecbcd6d7264e3c9eac24c7130ed3cd2b38f5a7ad#writeProxyContract 7. makeForcedWithdrawal Withdraw. Please note this instant-withdrawal has a 2% fee 13. I recently transferred an ERC-1155 into a safe. I realized after the fact that gnosis does not support 1155s. Is there a way that I’m able to transfer it back out? You have to use “contract interaction” on the safe when you click on “New Transaction” On the pop up, you will put in the contract address of the ERC-1155 token - (It may or may not automatically pull in the ABI so you may have to copy that from the contract details via gnosis scan) Once, the contract address and abi is input into the prompt… there should be a drop down of which functions are available to you. You want to drop down to “safeTransferFrom” When you select that, you will have prompts to fill in: From(address) - that address that owns the token - your safe To(address) - what wallet do you want to send it to? id(uint256) - The token number of the NFT amount(uint256) - How many of those tokens do you want to send? - usually just 1 data(bytes) - I just put in " 0x0 " empty data. Add that transaction - then sign it off and that should work if you are still having issues i would suggest to hop into the Safe discord and ask for further assistance there. 14. When SAFE airdrop? https://forum.gnosis.io/t/gip-64-should-gnosisdao-distribute-safe-tokens-to-incentivize-decentralizing-gnosis-chain/5896 https://forum.gnosis.io/t/gip-64-should-gnosisdao-distribute-safe-tokens-to-incentivize-decentralizing-gnosis-chain/5896/54 15. Where is the simplest way to stake GNO on gnosis chain? https://www.validategnosis.com/ 16. I’ve been experiencing this error withMetamask on Gnosis Chain. It doesn’t generate fees whenever I send tokens. ‘Transaction error - Internal JASON-RPC error.’ https://metamask.zendesk.com/hc/en-us/articles/360059289871-Error-Internal-JSON-RPC-error-when-trying-to-interact-with-other-network and please update your RPC on MetaMask to https://rpc.gnosis.gateway.fm/ 17. What is WXDAI for? As xDai on Gnosis Chain acts similar to ETH on Ethereum Network, you would need a wrapped version of xDai to be used as an ERC-20. Basically, WXDAI is the equivalent of WETH on Gnosis Chain. 18. What is Gnosis chain? Gnosis Chain is an EVM-based Layer 1 utilizing PoS consensus. Gnosis Chain utilizes a dual token model unlike similar EVM chains. On Gnosis Chain GNO token is used to secure the consensus layer while xDai is used as the gas token. 19. How can I add Gnosis Chain to Metamask? You can follow the instructions on this page: https://docs.gnosischain.com/tools/wallets/metamask/ Or alternatively, you can go to https://chainlist.org/ search for Gnosis Chain to get Gnosis Chain added automatically to your Metamask. 20. What DApps can we use on Gnosis? All dApps on Gnosis Ecosystem can be found here: https://ecosystem.gnosischain.com/ 21. Is it possible run a Node and qualify for future rewards? Yes, you can run a Node and qualify for rewards. For all the information you need in terms of running a node, please visit https://docs.gnosischain.com/node/. 22. I’m totally new to this project and I’m trying to feel myself around. Where should I start learning? You can jump to all relevant links on our landing page at https://www.gnosis.io/. Alternatively, you can check our documentation https://docs.gnosischain.com/. Also, feel free to take a look at the governance forum to see what is being discussed around the community regarding improvement proposals https://forum.gnosis.io/. 23. Is Gnosis Chain a Testnet or Mainnet released? Gnosis Chain is not a testnet. It is a fully operational Layer 1 utilizing Proof of Stake. But if you are wondering, Gnosis Chain has its testnet called Chiado, the details of which can be found here: https://docs.gnosischain.com/concepts/networks/chiado. 24. Is the grants program still running? ‼️UPDATE: The Gnosis Ecosystem Fund was discontinued. Projects can now directly apply for funding through the GnosisDAO. For non commercial/public goods : https://bit.ly/gnosis-grants 25. What are the NFT marketplaces on Gnosis Chain? https://niftyfair.io/ --- // File: node/Node Tools/dappnode # DAppNode [DAppNode](https://dappnode.com/) is a simple platform for deploying and hosting DApps, P2P clients, and blockchain nodes. It provides a user-friendly way to set up and configure nodes with a couple of clicks. It is a Free Open Source Software, and can be used in the following ways 1. Purchase one of their pre-installed [DAppNode Servers](https://dappnode.com/en-us/collections/frontpage). These are designed to be able to be run by those with very little technical know-how, and requires no command line at any point. 2. Install DAppNode software on any compatible hardware or even a VPS. The installation is done by following their official installation documentation [Here](https://docs.dappnode.io/user/quick-start/Core/installation) ## Using DAppNode {#install-on-dappnode} This guide was done with the inestimable help of DAppNode Team Member `@voss`, with some additions from `@Lanski`. ### Step 1. Install the required packages for validating Once you have access to the Dappnode UI, go to the Stakers-UI page , you can access by clicking on http://my.dappnode/#/stakers/gnosis or click on the Stakers section you can find in the left Nav Bar, then click on the Gnosis tab. ![Select Stakers in the left side menu](/img/node/dappnode-left-menu.png) Make sure to select the Gnosis chain tab, ![Select the tab Gnosis Chain](/img/node/dappnode-stakers-ui.png) The next step is to select the combination of client you want to use in your dappnode. For this process you need to select: - 1. Select the execution client: Nethermind-xdai. Click on the package - 2. Select the consensus client, here you can install one of the following options: Teku-gnosis, Lighthouse-gnosis and Prysm-gnosis - 3. Install the web3signer. This is required because this is the package that will contain the keystores. ![Select the execution and consensus clients](/img/node/dappnode-stakers-ui-2.png) 1. Select the Execution client. For now, or in the moment this guide was created, nethermind is the only execution client that supports gnosis chain. ![Execution client ](/img/node/dappnode-execution-client.png) 2. Select the consensus client. You will see the next fields when you click in the package chart. ![Select a consensus client](/img/node/dappnode-consensus-client.png) **Fee Recipient Address** The fee recipient is the regular Gnosis `0x` address that will receive priority fees of the proposed block. You will only receive fees at this address for blocks you propose, not for attestations. Any Gnosis EOA or Safe address **Graffiti** Choose a string that will be appended to your proposed blocks. You will be able to change later so it can be left as is for now. **Checkpoint for fast sync** To get your beacon node up and running in only a few minutes, you can start it from a recent finalized checkpoint state rather than syncing from genesis. This is substantially faster and consumes fewer resources than syncing from genesis while still providing all the same features. Be sure you are using a trusted node for the fast sync. Get your checkpoint sync(Dappnode fills this field with the checkpoint sync they provide by default) from a running Gnosis Beacon Chain node or use the official one. https://checkpoint.gnosischain.com 3. Select the web3signer. ![Select web3signer](/img/node/dappnode-web3signer-stakers.png) Then click in the below button that says "Apply changes" ![Apply the changes](/img/node/dappnode-stakers-ui-apply.png) Be patient, the installation process can take several minutes. You can check all have been installed in the [dashboard page](http://my.dappnode/#/dashboard). ### Step 2: Key Generation
Docker Command Line Instructions (only needed if you have trouble with Wagyu)
  1. Pull the docker image for the data generator
    {`docker pull ghcr.io/gnosischain/validator-data-generator:latest`}
  2. If this is your first time running the process and there is no existing mnemonic to generate keystores and deposit data, replace the variables below with your info, and then run the command.
          docker run -it --rm -v /path/to/validator_keys:/app/validator_keys ghcr.io/gnosischain/validator-data-generator:latest new-mnemonic --num_validators=NUM --mnemonic_language=english --chain=gnosis --folder=/app/validator_keys --eth1_withdrawal_address=WITHDRAWAL_ADDRESS
        
  3. Choose a secure password and confirm. You will be shown a mnemonic seed phrase. Write down and store your keystore password and mnemonic safely offline.
    DappNode Step 3 
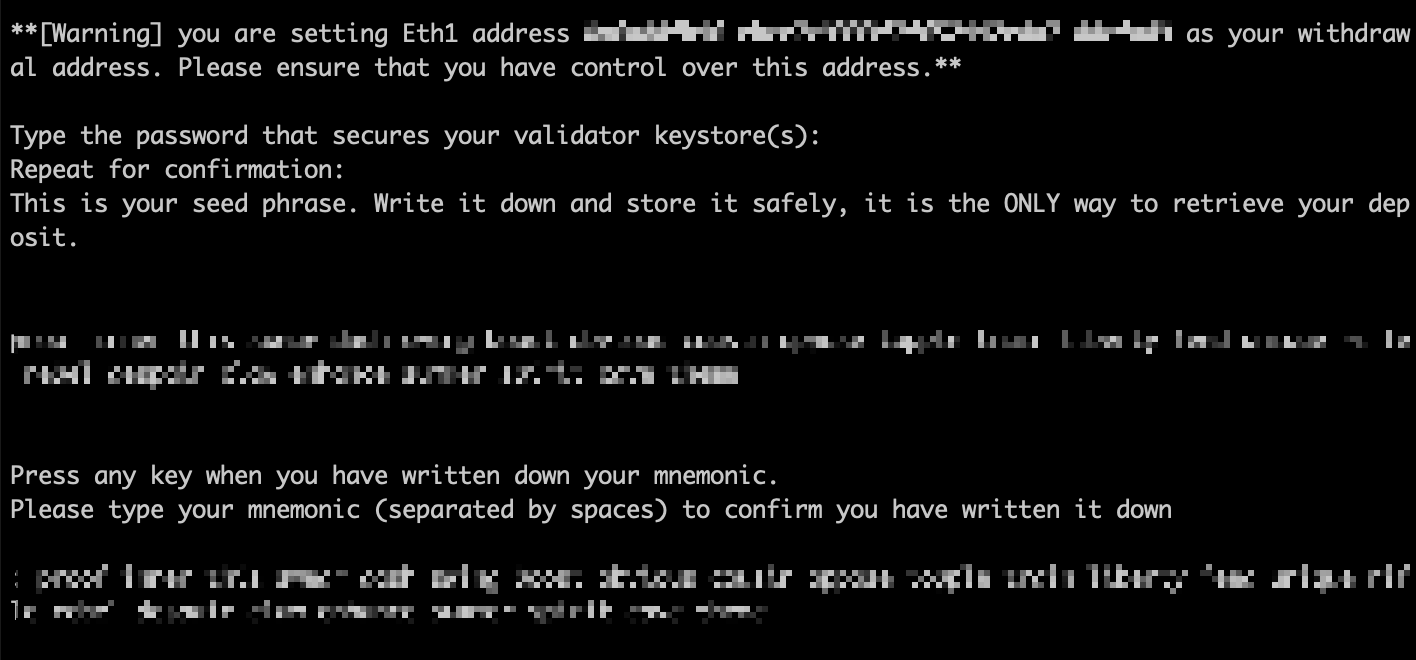
Following execution, the path you defined for /path/to/validator_keys will contain the keystores and deposit_data*.json file.
Drop down for variable descriptions
  • NUM The number of signing keys (validators) to generate.
  • START_NUM Index for the first validator key. If this is the first time generating keys with this mnemonic, use 0. If keys were previously generated with this mnemonic, use the subsequent index number (e.g., if 4 keys have been generated before (keys #0, #1, #2, #3, then enter 4 here).
  • WITHDRAWAL_ADDRESS Use this parameter to provide a regular Gnosis Chain 0x address for mGNO withdrawal. This parameter can also be omitted to generate withdrawal credentials with the mnemonic-derived withdrawal public key in the EIP-2334 format (ETH2 address format). Withdrawals will not be available until after the Shanghai upgrade.
  • /path/to/ should be replaced with a valid and existing path where you want to create the validator_keys folder. Or, to create the validator_keys folder in your current working directory, use $(PWD)/validator_keys:/app/validator_keys
  • More details about command line arguments can be found here
:::caution KEEP YOUR KEYSTORES SAFE We highly recommend generating keystores on a safe, completely offline device. To do so, you will need internet to access the latest release of Gnosis Chain Port of the Wagyu Key-Gen from [GitHub](https://github.com/alexpeterson91/wagyu-key-gen/releases) (step 1), then disconnect internet or better yet copy the program to a USB drive to proceed with completely offline key generation (step 2), then finally save your deposit_data.json file (step 3) to a usb key or other transfer method that does not require online connection. **Securely backup your mnemonic, keystores, and password, and keep them in a safe place.** ::: import GenerateValidatorKeysWagyuPartial from '@site/docs/node/manual/validator/\_partials/\_generate_validator_keys_wagyu.md'; ### Step 3: Upload Keystores to Web3Signer Now that you’ve generated your deposit data and keystores, go ahead and upload your keystores to Web3Signer Gnosis. Return to your DAppNode’s Admin UI and navigate to the [info page of the Web3Signer Gnosis package](http://my.dappnode/#/packages/web3signer-gnosis.dnp.dappnode.eth/info). ![DAppNode Step 4](/img/node/dappnode-step4.png) Open the UI by clicking the [`🏠Ui`](http://brain.web3signer-gnosis.dappnode/) link, then click the `Import Keystores` button on the lower part of the Web3Signer UI. ![DAppNode Step 4b](/img/node/dappnode-step4b.png) Select the keystore file(s) you generated the password you chose during the last step. ![DAppNode Step 4c](/img/node/dappnode-step4c.png) You will be able to see all the keystores you’ve uploaded. ![DAppNode Step 4d](/img/node/dappnode-step4d.png) You are now ready to fund these validators and start validating. ### Step 4: Fund Your Validators :::tip In case you need some xDai for transaction fees you can get some from the [Official xDai faucet for Gnosis](https://gnosisfaucet.com/). ::: 1. Navigate to: [https://deposit.gnosischain.com/](https://deposit.gnosischain.com/) 2. Connect your wallet. 3. Upload the `deposit_data*.json` you generated with the key generator tool in Step 3. 4. Your deposit file will be validated and list the number of validator deposits you are making and the required GNO to deposit. Click `Deposit` to continue. 5. Check that you understand the risks and ensure you are interacting with the correct contract before proceeding. 6. Click `Ok` and confirm the transaction in your wallet to complete the deposit. 7. Our proxy smart contract will deposit the GNO(s) to your validators! YOU control the private keys, YOU control the withdrawal key(s)... these validators are now **yours**. Take good care of them! --- // File: node/Node Tools/eth-docker import Tabs from '@theme/Tabs'; import TabItem from '@theme/TabItem'; # Eth-docker [Eth-docker](https://eth-docker.net/) is a docker automation project for Ethereum consensus and execution clients. It aims to make running a Ethereum staking full node simpler than setting everything up manually, while allowing the user choice when it comes to the exact client mix they wish to run. Eth-docker allows user to set up Gnosis clients by answering simple dialog-based questions on terminal. ## References 1. Eth-docker Docs: https://eth-docker.net/ 2. Github: https://github.com/eth-educators/eth-docker ## Prerequisite 1. Ensure compatible [hardware requirements](../README.md#requirements) for different clients. 2. [Configure the server](https://eth-docker.net/Usage/Prerequisites)(optional) ## Step 1: Install :::tip This demo has been tested on Ubuntu 20.04/22.04 and Debian11/12. ::: Open a new terminal, copy and paste the command below. Download eth-docker ```bash cd ~ && git clone https://github.com/eth-educators/eth-docker.git && cd eth-docker ``` Install pre-requisites such as Docker ```bash ./ethd install ``` ## Step 2: Configure and execute clients Configure eth-docker - have an Gnosis address handy where you want Execution Layer rewards to go ```bash ./ethd config ``` 1. Select Network: Gnosis Chain ![Select Network](../../../static/img/node/eth-docker-step1.png) 2. Select deployment type: Ethereum node or Ethereum RPC node, choose Ethereum node if you want to run consensus, execution and validator client. 3. Select consensus client: Lighthouse, Teku, or Nimbus. 4. Select execution client: Nethermind, or Erigon. 5. Select checkpoint sync: Choose Yes if you want to use CL rapid sync with remote checkpoint. 6. Configure checkpoint consensus client: paste the checkpoint URL from https://checkpoint.gnosischain.com/. 7. Select MEV Boost 8. Select Grafana dashboard 9. Configure Graffiti: Enter the graffiti for your validator. The Configuration will now be built. ![eth-docker Build](../../../static/img/node/eth-docker-config.png) Once the building part is done, start eth-docker by running ```bash ./ethd up ``` Check that execution/consensus client running correctly by running: ./ethd logs -f execution ./ethd logs -f consensus ./ethd logs -f validator ## Step 3: Run a validator You can either create validator key(s) from eth-docker or import the validator key(s) that are generated from [validator-data-generator](https://github.com/gnosischain/validator-data-generator). For the second option, please refer to [Interactive Guide: Generate validator keys](../manual/README.md#step-4a-generate-validator-keys). Import the key(s) by specifying the path to keystore file (folder where you keep the `keystore-m.json` file). ```bash ./ethd keys import --path PATH_OF_KEYS ``` Check that the key is imported by running ```bash ./ethd keys list ``` ## Step 4: Deposit for validator Once the execution and consensus clients are fully synced, you may proceed to [deposit for validator](../manual/README.md#step-4c-fund-your-validator). --- // File: node/Node Tools/sedge # Nethermind Sedge A one-click setup tool for PoS network/chain validators, this includes support for Gnosis chain mainnet and chiado testnet. **Sedge** takes care of the entire on-premise full node setup based on the chosen client, using generated docker-compose scripts based on the desired configuration. Repository: https://github.com/NethermindEth/sedge **Quickstart with Nethermind Sedge:** Instructions to get started with Nethermind Sedge found [here](https://docs.sedge.nethermind.io/docs/quickstart/complete-guide) **For Chiado Test network:** Instructions for Chiado Test Network can be found [here](https://docs.sedge.nethermind.io/docs/networks/chiado) ```mdx-code-block
FAQ
``` 1. My sedge-validator-blocker container has been showing `Endpoint is down, waiting 30 seconds before checking again...` for more than 10 mins. * The sedge-validator-blocker ensures that the validator node doesn't start until your beacon node health endpoint returns 200. You should check if beacon node (sedge-consensus-client) is synced. * Once the endpoint returns 200, the sedge-validator-client will start. ```mdx-code-block
``` --- // File: node/Node Tools/stereum # Stereum [Stereum](https://stereum.net/) is a tool to manage the process of setting up & maintaining an Gnosis node for you with a heavy focus on self sovereignty & privacy, and flexibility. Stereum aims to be the most flexible way to leverage your Gnosis node for staking, data science, dApp hosting and development or your own personal use case. We hope to explore every hermit’s dream with you! ## How to setup 1. [Gnosis Chain Validator Workshop - How to run validators with Stereum](https://www.youtube.com/watch?v=een_pYwCM8I) 2. [Gnosis Ecosystem Wednesday with Stereum](https://www.youtube.com/watch?v=oBst86wBwzI) ## Reference 1. [Stereum Github](https://github.com/stereum-dev) --- // File: node/README # Run a Node ![Screenshot 2025-04-09 at 09 55 38](https://github.com/user-attachments/assets/98a33f0a-37b3-4c14-8536-7ee91e67b100) **Image:** Gnosis nodes around the world, circa April 9 2025 ## Open Infrastructure Powered by Solo Stakers Gnosis is persistently committed to building the open infrastructure for a decentralized internet because we believe that web3 applications require an unstoppable network, a level playing field that’s open to anyone. ### Featured Headlines - Gnosis minimum stake is 1 GNO to run a validator. - Operating a Gnosis validator will earn you approximately 13% GNO validator rewards as well as transaction fees from the blocks you build in xDAI. - Gnosis has a strong culture of homestakers running nodes from their homes, that are not reliant on cloud providers or datacenters. - Gnosis has a stretch goal to have a node in every country by 2025. #### Gnosis vs. Ethereum - Gnosis runs the same composite client software and tooling stack as Ethereum - In some cases, Gnosis clients are just Ethereum clients run with a `--network` flag! (e.g. [Nethermind](https://downloads.nethermind.io/), [Lighthouse](https://lighthouse.sigmaprime.io/), etc) - Gnosis aims to be a learning ground for a new generation of node runners, requiring only 1 GNO (around $100 at April 2025) instead of the 32 ETH (around $47.000 at April 2025) minimum required for Ethereum - Gnosis Chain runs the same client software as Ethereum, with minor parameter tweaks. As such, Gnosis is a Proof-of-Stake network that uses Ethereum's Beacon Chain consensus. ## Choosing an Approach Refer from [Ethereum official docs](https://ethereum.org/en/developers/docs/nodes-and-clients/run-a-node/#choosing-approach). To spin up a node, you must choose the client implementation(of both execution and consensus clients), the environment(hardware, system), and the parameters for client settings. To choose from client implementations, see all the available Gnosis and Chiado ready execution clients, consensus clients, and learn about client diversity. Decide whether to run the software on your own hardware or in the cloud, considering clients' requirements. Once the environment is set up, install the chosen clients either with beginner-friendly interface or manually using a terminal with advanced options. When the node is running and syncing, you are ready to use it. You must always keep an eye on its maintenance to avoid penalties. ## Environment and Hardware ### Environment and Hardware #### **Local or Cloud** Gnosis clients are able to run on consumer grade computers and don't require any special hardware, like mining machines for example. Therefore, you have various options for deploying the node based on your needs. To simplify, let's think about running a node on both a local physical machine and a cloud server: - Cloud - Providers offer high server uptime and static public IP addresses - Getting dedicated or virtual server can be more comfortable than building your own - Trade off is trusting a third party - server provider - Because of the required storage size for full node, the price of a rented server might get high - Own hardware - More trustless and sovereign approach - One time investment - An option to buy preconfigured machines - You have to physically prepare, maintain, and potentially troubleshoot the machine and networking Both options have different advantages summed up above. If you are looking for a cloud solution, in addition to many traditional cloud computing providers, there are also services focused on deploying nodes. For example: - [Gateway](https://gateway.fm/) - [Gnosis](../tools/RPC%20Providers/README.md) - [Ankr](https://www.ankr.com/rpc/gnosis/) - [Chainnodes](https://www.chainnodes.org/chains/gnosis) - [Blast](https://blastapi.io/public-api/gnosis) - [GetBlock](https://getblock.io/nodes/gno/) - [BlockPI](https://docs.blockpi.io/documentations/api-reference/gnosis) Check out also [rpc providers](../tools/RPC%20Providers/README.md) for more options on hosted nodes. #### **Hardware** However, a censorship-resistant, decentralized network should not rely on cloud providers. Instead, running your node on your own local hardware is healthier for the ecosystem. Estimations show a large share of nodes run on the cloud, which could become a single point of failure. Gnosis clients can run on your computer, laptop, server, or even a single-board computer. While running clients on your personal computer is possible, having a dedicated machine just for your node can significantly enhance its performance and security while minimizing the impact on your primary computer. Using your own hardware can be very easy. There are many simple options as well as advanced setups for more technical people. So let's look into the requirements and means for running Gnosis clients on your machine. #### **Requirements** Hardware requirements differ by client but generally are not that high since the node just needs to stay synced. Don't confuse it with mining, which requires much more computing power. Sync time and performance do improve with more powerful hardware however. Before installing any client, please ensure your computer has enough resources to run it. You can find the minimum and recommended requirements below. The bottleneck for your hardware is mostly disk space. Syncing the Gnosis blockchain is very input/output intensive and requires a lot of space. It is best to have a solid-state drive (SSD) with hundreds of GBs of free space to spare even after the synchronization. Refer to [this post](https://gist.github.com/yorickdowne/f3a3e79a573bf35767cd002cc977b038) for good and bad SSD model. The size of the database and speed of the initial synchronization depends on the chosen client, its configuration and sync strategy. Also make sure your internet connection is not limited by a bandwidth cap. It's recommended to use an unmetered connection since initial sync and data broadcasted to the network could exceed your limit. **Operating System** All clients support major operating systems - Linux, MacOS, Windows. This means you can run nodes on regular desktop or server machines with the operating system (OS) that suits you the best. Make sure your OS is up to date to avoid potential issues and security vulnerabilities. **Requirements** - CPU with at least 4 threads - At least 16 GB of RAM - NVMe SSD (preferred) or SATA SSD Requirements vary client to client, for more detail see the associated system requirements below. | Execution Layer | | | --------------- | ------------------------------------------------------------------------------------------------------------------------ | | Nethermind | [Nethermind: System Requirements](https://docs.nethermind.io/nethermind/first-steps-with-nethermind/system-requirements) | | Besu | [Besu: System Requirements](https://besu.hyperledger.org/en/stable/public-networks/get-started/system-requirements/) | | Erigon | [Erigon: System Requirements](https://github.com/ledgerwatch/erigon#system-requirements) | | Geth | [Geth: Hardware](https://geth.ethereum.org/docs/interface/hardware) | **Gnosis Chain only supports Nethermind and Erigon at the moment.** | Consensus Layer | | | --------------- | ------------------------------------------------------------------------------------------------------------------------------------- | | Lighthouse | [Lighthouse: System Requirements](https://lighthouse-book.sigmaprime.io/installation.html#recommended-system-requirements) | | Lodestar | [Lodestar: Specifications](https://chainsafe.github.io/lodestar/#specifications) | | Nimbus | [Nimbus: Hardware](https://nimbus.guide/hardware.html) | | Teku | TBD | | Prysm | [Prysm: Prerequisites](https://docs.prylabs.network/docs/install/install-with-script/#step-1-review-prerequisites-and-best-practices) | **Gnosis Chain doesn't support Prysm at the moment.** Check out [Rocketpool's excellent guide](https://docs.rocketpool.net/guides/node/local/hardware.html) that explains hardware requirements for running a node. ### **Gnosis in Ethereumverse** Running a Gnosis node requires no different hardware configuration from other nodes in Ethereum universe. [Ethereum on ARM](https://twitter.com/EthereumOnARM/status/1641374712348409859) demonstrates that it is possible to run a Gnosis, Ethereum, Starknet, and Arbitrum node using the same hardware configuration with less than $400 per node. (March 2023) | Hardware | Price (USD) | | --------------------------------------------------- | ----------- | | [Rock 5B board(16GB)](http://radxa.com/products/rock5/5b/) | $189 | | Acrylic case with passive heatsink | $13 | | Crucial P2 NVMe SSD 2TB | $140 | | MicroSD | $8 | | Ethernet cable | $6 | | Power supply | $9 | ### Network Connectivity Running a node requires a reliable internet connection, as nodes are constantly exchanging data across the peer-to-peer network. Brief offline periods will result in [small inactivity penalties](./rewards-penalties), but this will typically be recouped quickly as long as the outage is short. A Gnosis node with an average number of peers consumes approximately 700 mb/hour of upload bandwidth, and this may increase with time. Note that syncing the execution layer of Gnosis may take up to 1-3 days, depending on your setup. For better understanding of the network throughput requirements, a benchmark was conducted on the [Lighthouse v2.2.1 client](./manual/beacon/lighthouse.md) running a GBC on 4th May 2022. The client was configured to maintain 100 simultaneous peer connections. Inbound and outbound traffic consumption was measured while altering the number of active validators connected to the beacon node. Validators are advised to consider those numbers when planning their infrastructure and budget. With growth of the overall validator set, these requirements will increase over time as well. Make sure to allocate enough spare resources to account for future network growth. | Number of validators | Inbound traffic | Outbound traffic | Approximate monthly traffic | | -------------------- | --------------- | ---------------- | --------------------------- | | 10 | 1.0 MB/s | 1.8 MB/s | 7.2 TB | | 32 | 2.4 MB/s | 3.15 MB/s | 14.2 TB | | 64 | 4.5 MB/s | 3.8 MB/s | 21.2 TB | | 128 | 4.6 MB/s | 3.8 MB/s | 21.5 TB | | >256 | 4.6 MB/s | 3.9 MB/s | 21.7 TB | ### **Plug-and-play solutions** The easiest option for running a node with your own hardware is using plug-and-play boxes. Preconfigured machines from vendors offer the most straightforward experience: order, connect, run. Everything is preconfigured and runs automatically with an intuitive guide and dashboard for monitoring and controlling the software. - [DappNode](https://docs.gnosischain.com/node/Node%20Tools/dappnode) - [Avado](https://docs.ava.do/more-staking-opportunities/gnosis-staking) - [eNode](https://enode.ebunker.io/) - [Orange Pi 5 Plus](http://www.orangepi.org/html/hardWare/computerAndMicrocontrollers/details/Orange-Pi-5-plus-32GB.html) - [NanoPC T6 board 16 GB ](https://www.friendlyelec.com/index.php?route=product/product&product_id=292) ## Spinning up the node The actual client setup can be done either with automated launchers or manually, setting up client software directly. For less advanced users, the recommended approach is to use a launcher, software that guides you through the installation and automates the client setup process. However, if you have some experience of using a terminal, the steps for manual setup should be simple to follow. ### Guided setup Multiple user-friendly projects aim to improve the experience of setting up a client. These launchers provide automatic client installation and configuration, with some even offering a graphical interface for guided setup and monitoring of clients. Below are a few projects which can help you install and control clients just with a few clicks: - [DappNode](../node/Node%20Tools/dappnode.md) - DappNode doesn't come only with a machine from a vendor. The software, the actual node launcher and control center with many features can be used on arbitrary hardware. - [Stereum](../node/Node%20Tools/stereum.md) - Launcher for installing clients on a remote server via SSH connection with a GUI setup guide, control center, and many other features. - [Sedge](../node/Node%20Tools/sedge.md) - Node setup tool which automatically generates a Docker configuration using CLI wizard. Written in Go by Nethermind. - [eth-docker](../node/Node%20Tools/eth-docker.md) - A docker automation project for Gnosis consensus and execution clients. Easy to setup by answering simple dialog-based questions on terminal. ### Manual setup The other option is to download, verify, and configure the client software manually. Even if some clients offer a graphical interface, a manual setup still requires basic skills with the terminal but offers much more versatility. As explained before, setting up your own Gnosis node will require running a pair of consensus and execution clients. Some clients might include a light client of the other kind and sync without any other software needed. However, full trustless verification requires both implementations. #### **Getting the client software** First, you need to obtain your preferred execution client and consensus client software. You can simply download an executable application or installation package that suits your operating system and architecture. Always verify the signatures and checksums of downloaded packages. Some clients also offer repositories or Docker images for easier installation and updates. All of the clients are open source, so you can also build them from source. This is a more advanced method, but in some cases, it might be required. Instructions for installing each client are provided in the documentation linked in the client lists above. Here are the release pages of clients where you can find their pre-built binaries or instructions on installation: **Execution clients** - [Nethermind](https://downloads.nethermind.io/) - [Erigon](https://github.com/ledgerwatch/erigon/releases) **Consensus clients** - [Lighthouse](https://github.com/sigp/lighthouse/releases) - [Lodestar](https://github.com/ChainSafe/lodestar/releases) - [Teku](https://github.com/ConsenSys/teku/releases) - [Nimbus](https://github.com/status-im/nimbus-eth2/releases) [Client diversity](https://eth2book.info/capella/part2/incentives/diversity/) is critical for consensus nodes running validators. If majority of validators is running a single client implementation, network security is at risk. It is therefore recommended to consider choosing a minority client. #### Verifying the software When downloading software from the internet, it's recommended to verify its integrity. This step is optional but especially with crucial infrastructure piece like the Gnosis client, it's important to be aware of potential attack vectors and avoid them. If you downloaded a pre-built binary, you need to trust it and risk that an attacker could swap the executable for a malicious one. Developers sign released binaries with their PGP keys so you can cryptographically verify you are running exactly the software they created. You just need to obtain public keys used by developers, which can be found on client release pages or in documentation. After downloading the client release and its signature, you can use a PGP implementation, e.g. [GnuPG](https://gnupg.org/download/index.html) to easily verify them. Check out a tutorial on verifying open-source software using `gpg` on [Linux](https://www.tecmint.com/verify-pgp-signature-downloaded-software/) or [Windows/MacOS](https://freedom.press/training/verifying-open-source-software/). Another form of verification is to make sure that the hash, a unique cryptographic fingerprint, of the software you downloaded matches the one provided by developers. This is even easier than using PGP, and some clients offer only this option. Just run the hash function on the downloaded software and compare it to the one from the release page. For example: ```sh sha256sum teku-22.6.1.tar.gz 9b2f8c1f8d4dab0404ce70ea314ff4b3c77e9d27aff9d1e4c1933a5439767dde ``` ### **Client setup** After installing, downloading, or compiling the client software, you are ready to run it. This only means it has to be executed with the proper configuration. Clients offer rich configuration options, which can enable various features. Let's start with options that can significantly influence client performance and data usage. Sync modes represent different methods of downloading and validating blockchain data. Before starting the node, you should decide what network and sync mode to use. The most important things to consider are the disk space, and sync time the client will need. Pay attention to the client's docs to determine which sync mode is the default. If that doesn't suit you, pick another one based on the level of security, available data, and cost. Apart from the synchronization algorithm, you can also set pruning of different kinds of old data. Pruning enables deleting outdated data, e.g. removing state trie nodes that are unreachable from recent blocks. Other basic configuration options are, e.g. choosing a network - Mainnet or testnets, enabling HTTP endpoint for RPC or WebSockets, etc. You can find all features and options in the client's documentation. Various client configurations can be set by executing the client with the corresponding flags directly in the CLI or config file. Each client is a bit different; please always refer to its official documentation or help page for details on config options. For testing purposes, you might prefer to run a client on Chiado testnet. #### **Starting the execution client** Before starting the Gnosis client software, perform a last check that your environment is ready. For example, make sure: - There is enough disk space considering the chosen network and sync mode. - Memory and CPU is not halted by other programs. - Operating system is updated to the latest version. - System has the correct time and date. - Your router and firewall accept connections on listening ports. By default Gnosis clients use a listener (TCP) port and a discovery (UDP) port, both on 30303 by default. Run your client on a testnet first to help make sure everything is working correctly. You need to declare any client settings that aren't default at the start. You can use flags or the config file to declare your preferred configuration. Set of features and config syntax of each client differs. Check out your client's documentation for the specifics. Execution and consensus clients communicate via an authenticated endpoint specified in [Engine API](https://github.com/ethereum/execution-apis/tree/main/src/engine). In order to connect to a consensus client, the execution client must generate a [`jwtsecret`](https://jwt.io/) at a known path. For security and stability reasons, clients should run on the same machine, and both clients must know this path as it is used to authenticate a local RPC connection between them. The execution client must also define a listening port for authenticated APIs. This token is generated automatically by the client software, but in some cases, you might need to do it yourself. You can generate it using [OpenSSL](https://www.openssl.org/): ```sh openssl rand -hex 32 > jwtsecret ``` #### Running an execution client This section will guide you through starting execution clients. It only serves as an example of a basic configuration, which will start the client with these settings: - Specifies network to connect to, mainnet in our examples - You can instead choose Chiado for preliminary testing of your setup - Defines data directory, where all the data including blockchain will be stored - Make sure to substitute the path with a real one, e.g. pointing to your external drive - Enables interfaces for communicating with the client - Including JSON RPC and Engine API for communication with consensus client - Defines path to `jwtsecret` for authenticated API - Make sure to substitute the example path with a real one which can be accessed by clients, e.g. `/tmp/jwtsecret` Please keep in mind that this is just a basic example, all other settings will be set to default. Pay attention to the documentation of each client to learn about default values, settings, and features. For more features, for example for running validators, monitoring, etc., please refer to the documentation of the specific client. > Note that backslashes `\` in examples are only for formatting purposes; config flags can be defined in a single line. **Running Nethermind** Nethermind offers various [installation options](https://docs.nethermind.io/get-started/installing-nethermind). The package comes with various binaries, including a Launcher with a guided setup, which will help you to create the configuration interactively. Alternatively, you find Runner which is the executable itself and you can just run it with config flags. JSON RPC is enabled by default. ``` nethermind --config gnosis \ --datadir /data/gnosis \ --JsonRpc.JwtSecretFile=/path/to/jwtsecret ``` Nethermind docs offer a [complete guide](https://docs.nethermind.io/nethermind/first-steps-with-nethermind/running-nethermind-post-merge) on running Nethermind with consensus client. An execution client will initiate its core functions, chosen endpoints, and start looking for peers. After successfully discovering peers, the client starts synchronization. The execution client will await a connection from consensus client. Current blockchain data will be available once the client is successfully synced to the current state. #### **Starting the consensus client** The consensus client must be started with the right port configuration to establish a local RPC connection to the execution client. The consensus clients have to be run with the exposed execution client port as configuration argument. The consensus client also needs the path to the execution client's `jwtsecret` in order to authenticate the RPC connection between them. Similar to execution examples above, each consensus client has a configuration flag which takes the jwt token file path as an argument. This must be consistent with the `jwtsecret` path provided to the execution client. If you plan to run a validator, make sure to add a configuration flag specifying the Gnosis address of the fee recipient. This is where ether rewards for your validator accumulate. Each consensus client has an option, e.g. `--suggested-fee-recipient=0xabcd1`, that takes an Gnosis address as an argument. When starting a Beacon Node on a testnet, you can save significant syncing time by using a public endpoint for [Checkpoint sync](https://checkpoint.gnosischain.com/). #### **Running a consensus client** **Running Lighthouse** Before running Lighthouse, learn more on how to install and configure it in [Lighthouse Book](https://lighthouse-book.sigmaprime.io/). ```bash ./lighthouse \ --network gnosis beacon_node \ --datadir=data \ --http \ --execution-endpoint http://localhost:8551 \ --execution-jwt /path/to/jwtsecret \ --checkpoint-sync-url "https://checkpoint.gnosischain.com" ``` **Running Lodestar** [Lodestar](https://chainsafe.github.io/lodestar/) ```bash ./lodestar beacon \ --network gnosis \ --dataDir="/data" --jwt-secret /path/to/jwtsecret \ --eth1.enabled=true \ --execution.urls="http://127.0.0.1:8551" \ ``` **Running Teku** [Teku](https://docs.teku.consensys.net/) ```bash teku \ --network gnosis \ --data-path "/data/gnosis" \ --ee-endpoint http://localhost:8551 \ --ee-jwt-secret-file "/path/to/jwtsecret" \ ``` ### **Adding Validators** A consensus client serves as a Beacon Node for validators to connect. Each consensus client has its own validator software described in detail in its respective documentation. Running your own validator allows for [solo staking](https://ethereum.org/en/staking/solo/), the most impactful and trustless method to support the Gnosis network. This requires only 1 GNO. Check out how to [deposit validators](/node/manual/validator/deposit). If you don't want to run your own node but interested in staking your GNO to earn fee, look into [liquid staking](/tools/beacon-chain/liquid-staking) for an overview about staking options. ## Reference - [Gnosis Chain Staking Resource](https://forum.gnosis.io/t/awesome-gnosis-chain-staking-resources/7392) --- // File: node/architecture ![](../../static/img/node/node-architecture.png) Image: Diagram representing the composite client architecture of a Gnosis node ## Architecture Gnosis is an open peer-to-peer network of nodes operated by anyone in the world who runs the Gnosis client software. Gnosis utilizes the same architecture as Ethereum, and has committed to building together with Ethereum and contributing to the research, engineering and tooling for Ethereum's stack. Gnosis started out as a [proof-of-authority ](../about/specs/consensus/aura.md) sidechain to Ethereum with its own consensus algorithm in 2017. Gnosis [Merged](/updates/2022/12/10/merge) successfully at block 6,306,357 deprecating legacy differences and aligning with Ethereum's new architecture, beginning with the Merge, with a goal of achieving 1:1 parity with Ethereum. ## Composite Network Architecture ![](../../static/img/node/composite-networks.png) Gnosis (post-merge) utilizes the same [composite layer architecture](https://hackmd.io/@n0ble/the-merge-terminology) as Ethereum. Gnosis' network is created through the interaction of two layers: an Execution Layer (EL) network and a Consensus Layer (CL) network. To run a Gnosis node, you need to run an Execution Layer and Consensus Layer clients, and allow them to communicate with each other. The combined EL-CL network works together to function as a Gnosis node. ### Execution Layer ![](../../static/img/node/execution-layer-architecture.png) Gnosis Execution Layer is the legacy xDai "Eth1" network. The Execution Layer is where smart contracts and the EVM and network rules reside. Prior to the Merge, the Execution Layer utilized a [Proof-of-Authority consensus](../about/specs/consensus/aura.md), which was deprecated by the merge in favor of the Consensus Layer instead. | Period | Ethereum | Gnosis | | -------------------- | --------------- | --------------------------------------------------- | | Pre-Merge Consensus | Proof-of-Work | [Proof-of-Authority](../about/specs/consensus/aura.md) | | Post-Merge Consensus | Consensus Layer | Consensus Layer | Node Operators will need to run an Execution Layer client, which will interact with the Execution Layer network. - [Nethermind](./manual/execution/nethermind.md) - [Erigon](./manual/execution/erigon.md) - [Geth](./manual/execution/geth.md) (in progress) Gnosis used to be supported by the [Parity OpenEthereum client](./manual/execution/openethereum.md), but it has since been deprecated. ### Consensus Layer ![](../../static/img/node/consensus-layer-architecture.png) Gnosis' Consensus Layer utilizes the same architecture and tooling as Ethereum's Consensus Layer, and is a key sister chain to Ethereum in the emerging Ethereum Beaconverse. It is responsible for proof-of-stake incentives, and maintaining consensus chain, proposals and attestations, and fork choices. The Consensus Layer consists of the Beacon Node and Validator Client software. | Component | Description | Communicates with | | ----------- | ---------------------------------------------------------------------------------------------------------------------------------- | ------------------------------------------------- | | Beacon Node | Coordinates proof-of-stake consensus with other Beacon Nodes in p2p network | Other Beacon Nodes in Consensus Layer p2p Network | | Validator | Optional component that allows node operator to stake GNO and become an active participant in block proposals and attestations | Only the local Beacon Node | Node operators will need to run a Consensus Layer client. In most cases, these are the same Ethereum Consensus Layer client, just run with a `--network` flag! - [Lodestar](./manual/beacon/lodestar.md) - [Nimbus](./manual/beacon/nimbus.md) - [Teku](./manual/beacon/teku.md) - [Lighthouse](./manual/beacon/lighthouse.md) - [Prysm](./manual/beacon/prysm.md) (in progress) ### Inter-Layer Communication :::info [This post](https://hackmd.io/@n0ble/ethereum_consensus_upgrade_mainnet_perspective) offers a good explanation of how the Execution and Consensus Layer work with each other. ::: ## Types of Nodes Gnosis is similar to Ethereum in the types of nodes available: - [Light Nodes](https://ethereum.org/en/developers/docs/nodes-and-clients/#light-node) - [Full Nodes](https://ethereum.org/en/developers/docs/nodes-and-clients/#full-node) - Full Nodes (w/o Validator) - [Archival Nodes](https://ethereum.org/en/developers/docs/nodes-and-clients/#archive-node) --- // File: node/management/migrating-validator Migrating validators from one node to another (or from one vm instance to another) requires careful attention to avoid slashing. If you accidentally run the same validator key on 2 instances at the same time, even for a very short time period, you risk being slashed for an Attestation Violation. If this occurs, you will be removed as a validator and your GNO will be frozen and unavailable for withdrawal until after a hard-fork post GC/GBC merge. :::note Curious about validators who have been slashed? You can find them here: [https://gnosischa.in/validators/slashings](https://gnosischa.in//validators/slashings) ::: ## Order of Operations Specific instructions will differ depending on the client you are running. In general, you will want to follow these steps to prevent slashing when performing a migration. You will experience some downtime but it's much better than being slashed! 1. Download initial state from original validator. 2. Stop original validator. 3. Export slashing protection history from original validator. ([EIP-3076](https://eips.ethereum.org/EIPS/eip-3076)) 4. Download and backup original validator accounts (keystores). 5. Import initial state and slashing protection history from original validator to the new validator. 6. Remove account data from original validator, make sure it is not running! This is critical to avoid slashing! Some recommendations: - Rename or move keys folder in the original validator to another location. - Stop and remove containers (`docker-compose down`) if you are using Docker. - Remove old images (`docker rmi $(docker images | grep 'gbc-')` if you used the Launchpad). 7. Start new validator. :::danger Best practice to minimize slashing risks is to wait > 1 epoch [(you can check here to see epoch)](https://gnosischa.in//epochs) following any actions taken by the original validator before starting the new (migrated) validator. This will happen naturally if you stop the original validator at the beginning of the process. ::: ## Lighthouse ### Export {#lighthouse-export} Lighthouse supports the slashing protection interchange format. You can export Lighthouse's database for use with another client with this command: ```bash lighthouse account validator slashing-protection export ``` ### Import {#lighthouse-import} With your validator client stopped, you can import a .json interchange file from another client using this command: ```bash lighthouse account validator slashing-protection import ``` - For more info, see the [Lighthouse Import and Export docs](https://lighthouse-book.sigmaprime.io/slashing-protection.html#import-and-export). ## Lodestar ### Export {#lodestar-export} Export an interchange JSON file for all validators in the slashing protection DB: ```bash validator slashing-protection export --network gnosis --file interchange.json ``` ### Import {#lodestar-import} Import an interchange file to the slashing protection DB: ```bash validator slashing-protection import --network gnosis --file interchange.json ``` - For more info, see the [Lodestar Command Line Reference doc](https://chainsafe.github.io/lodestar/validator-management/validator-cli/#validator-slashing-protection-import). ## Nimbus ### Export {#nimbus-export} Run the following to export your Nimbus validator's slashing protection history: ```bash build/nimbus_beacon_node slashingdb export slashing-protection.json ``` ### Import {#nimbus-import} To import the slashing protection history run: ```bash build/nimbus_beacon_node slashingdb import path/to/export_dir/slashing-protection.json ``` - For more info, see the Nimbus [Migration](https://nimbus.guide/migration.html) docs. ## Prysm ### Export {#prysm-export} Run the following to export your Prysm validator's slashing protection history: ```bash prysm.sh validator slashing-protection-history export --datadir=/your/prysm/wallet --slashing-protection-export-dir=/path/to/export_dir ``` ### Import {#prysm-import} You can import it as follows using any installation method for your Prysm validator. ```bash prysm.sh validator slashing-protection-history import --datadir=/path/to/your/validator/db --slashing-protection-json-file=/path/to/desiredimportfile ``` - For more info, see the Prysm [Import & export slashing protection history](https://docs.prylabs.network/docs/wallet/slashing-protection) doc. ## Teku ### Export {#teku-export} You can export Teku's database with this command: ```bash teku slashing-protection export --data-path=/home/me/me_node --to=/home/slash/slashing-protection.json ``` ### Import {#teku-import} When importing the slashing-protection file, Teku imports the file to the `/validators/slashprotection/` directory in the format `.yml` (with no 0x prefix). ```bash teku slashing-protection import --data-path=/home/me/me_node --from=/home/slash/slashing-interchange-format.json ``` - For more info, see the Teku [Slashing protection](https://docs.teku.consensys.net/en/latest/HowTo/Prevent-Slashing/) docs. ## More Resources - [Lighthouse, Prysm and other client implementations)](https://www.coincashew.com/coins/overview-eth/guide-or-how-to-setup-a-validator-on-eth2-mainnet/part-iii-tips/switching-migrating-consensus-client) from Coin Cashew --- // File: node/management/monitoring-node To monitor a node in the network, you can either observe your own node's status or the entire network. Monitoring your own node can give you insight into its status, and setting up a monitoring dashboard using Prometheus and Grafana is commonly used. To monitor the network, options include ethstats, forkmon, beacon.gnosischain, and blockscout, each providing different types of information about the network and validator related metrics. ## Monitoring your own node with Prometheus + Grafana **Prometheus** is a systems monitoring tool that pulls data from certain endpoint and stores the data into a database. **Grafana** is a data visualisation tool that allows user to create their own dashboard from different data sources, including Prometheus. **Node exporter** is a monitoring tool that exposes your hardware and OS metrics. It can provide your system metrics to Prometheus. ![Prometheus-Grafana-NodeExporter](../../../static/img/node/prometheus-grafana.png) To set up these tools, please refer to the excellent guide from ethstaker on [how to do monitoring for an Ethereum validator](https://github.com/eth-educators/ethstaker-guides/blob/main/monitoring.md). You may also refer to the [Ethereum Setup Instructions ](https://launchpad.ethereum.org/en/)and [CoinCashew's guide](https://www.coincashew.com/coins/overview-eth/guide-or-how-to-setup-a-validator-on-eth2-mainnet/part-i-installation/monitoring-your-validator-with-grafana-and-prometheus) for best monitoring practices. In order to expose your node's clients data to Prometheus, please ensure the execution or consensus client has enabled the appropriate metrics flag. ## Default metrics port | Client | Port | | --------------------------- | ---- | | Nethermind | 6060 | | Lighthouse Beacon | 5054 | | Lighthouse Validator | 5064 | | Lodestar Beacon | 8008 | | Lodestar Validator | 5064 | | Teku (Beacon & Validator) | 8008 | | Nimbus (Beacon & Validator) | 8008 | | Prysm Beacon | 8080 | | Prysm Validator | 8081 | ### Execution client ``` --Metrics.Enabled true --Metrics.ExposePort $PORT --Metrics.PushGatewayUrl Refer to https://docs.nethermind.io/nethermind/ethereum-client/metrics/setting-up-local-metrics-infrastracture ``` WIP ### Consensus client ```shell --metrics --metrics-port=$PORT https://lighthouse-book.sigmaprime.io/advanced_metrics.html https://github.com/sigp/lighthouse-metrics ``` ```shell --metrics=true --metrics.port=$PORT https://chainsafe.github.io/lodestar/logging-and-metrics/prometheus-grafana/ https://chainsafe.github.io/lodestar/beacon-management/beacon-cli/#-metrics ``` --metrics-enabled=true ``` https://docs.teku.consensys.net/en/latest/HowTo/Monitor/Metrics/ ```shell --metrics --metrics-port=$PORT ``` https://nimbus.guide/metrics-pretty-pictures.html#simple-metrics https://docs.prylabs.network/docs/prysm-usage/monitoring/grafana-dashboard/ ## Monitoring the network ### Ethstats Ethstats provides real-time insight about the entire state of Gnosis network such as Block Time, Transactions per block, Gas per block; as well as individual node's metrics such as node's OS, Execution client version, peers number, etc. :::tip By default, your node data will not be listed on the ethstats page. Listing a node on ethstats is a voluntary process. ::: To enable [ethstats module](https://docs.nethermind.io/nethermind/ethereum-client/configuration/ethstats) in Nethermind, set `--EthStats.Enabled true`. - Gnosis chain: https://ethstats.gnosischain.com/ - Chiado: https://ethstats.chiadochain.net/ ![ethstats](../../../static/img/node/monitor-node/ethstats.png) ### Forkmon Forkmon (Fork monitor) is another tool to monitor Node's status. - Gnosis Chain: https://forkmon.gnosischain.com/ - Chiado: https://forkmon.chiadochain.net/ ### d14n.info :::note The site is deprecated ::: [d14n.info](https://d14n.info/) is a real-time dashboard that measures decentralization of Gnosis Chain and Ethereum networks. ![d14n dashboard](../../../static/img/node/monitor-node/d14n.png) ### GnosisPools.info [GnosisPools.info](https://gnosispools.info/d/Pz05j7dVk/gnosispools-public?orgId=1&refresh=5m&from=now-24h&to=now) allows you to monitor the performance of Gnosis consensus staking pool. Some of the metrics you can track include: - % of inactive validators - Delta in rewards/penalties between consecutive epochs - Proposed and missed blocks for each epoch ### Block explorer #### Execution Layer - **Gnosisscan** [Gnosisscan](https://gnosisscan.io/) provides data about blocks, transactions, validator's reward on Execution Layer, etc. To check your Execution Layer Reward (in xDAI): 1. Search your `fee-recipient-address` that is set when [running validator](../manual/README.md#step-4-run-a-validator) 2. Click **Validated Blocks** ![GnosisScan Block Validated by Validator](../../../static/img/node/monitor-node/gnosisscan-validated-block.png) - **Blockscout** [Blockscout](https://blockscout.com/xdai/mainnet) is another block explorer similar to Gnosisscan. ![Blockscout Block Validator by Validator](../../../static/img/node/monitor-node/blockscout-validated-block.png) #### Consensus Layer - **beacon.gnosischain** [beacon.gnosischain](https://gnosischa.in//) provides insight on consensus layer such as most recent epochs, most recent blocks, and validator's reward on Consensus layer. You can view your validator's info by using its public key or index. To check your Consensus Layer Reward (in mGNO): 1. Search your validator by Index or Public Key. 2. **Income** section indicates the overall consensus layer reward the validator has gained, **Validator History** shows the reward per epoch. ![beacon reward](../../../static/img/node/monitor-node/beacon-gnosischain-validator-reward.png) --- // File: node/management/monitoring-validators After setting up your validators, ensuring they are running and, most importantly, performing correctly is essential. ## Tool The [bootnode.dev](https://www.bootnode.dev/) team has created a [Telegram bot](https://t.me/gbc_validators_bot) to assist you. Anyone running validators can set it up by just providing withdrawal address(es). The Bot will retrieve all the validators for you. Once registered, the bot will update you on your validators' performance and alert you if any issue occurs. ### Continuously updated information on - The number of validators you're running and their statuses (active, inactive, slashed, exited). - The total effective balance of all your validators, combined. - Validator’s overall performance(daily, weekly, and monthly) based on the last 100 attestations. - Rewards earned in GNO (daily, weekly, and monthly). - The total amount of rewards you can claim. - Additionally, the Bot provides subsidized rewards claims, sponsored by [bootnode.dev](https://www.bootnode.dev/). ### Immediate alert when You'll receive notifications in the following situations: - If a validator misses more than 5 attestations consecutively. - If the overall performance falls below 90%. - If a validator's status changes from active to inactive, or vice versa. :::note This Bot is compatible with all consensus and execution clients. ::: --- // File: node/management/voluntary-exit If you decide to stop validating and disable your node, you can initiate a voluntary exit. This will freeze your balance at its current value (rewards and/or penalties will no longer accrue). If you initiates a voluntary exit, your validator will receive the full staked funds to the withdrawal address, provided that the validator has [withdrawal credentials](withdrawals.md#check-withdrawal-credential) of type `0x01`. Voluntary exit procedures vary depending on your client. :::caution Exits are non-reversible; once you have exited you cannot restart your validator. It is recommended to update your withdrawal credentials to the `0x01` type before exiting your validator. Updating your withdrawal credentials later, when your node is stopped, will be more difficult. [withdrawal credentials](withdrawals.md#check-withdrawal-credential). ::: ### Dappnode Navigate to the Stakers > Gnosis Chain menu, click on the "Upload Keystores" button on the Web3Signer card. Once you are in the Web3Signer UI, select the validators you want to exit and click on the "Exit Validator" button on the top right part of the UI. Follow the instructions and type `I want to exit`, followed then click the "Exit" button. - For more info, see the [Dappnode Docs](https://docs.dappnode.io/docs/user/staking/gnosis-chain/solo#1-exit-the-validator-from-the-dappnode-ui). ### Lighthouse In order to initiate an exit, users can use the lighthouse account validator exit command. ```bash lighthouse --network gnosis account validator exit --keystore /path/to/keystore --beacon-node http://consensus:5052 ``` - For more info, see the [Lighthouse Voluntary Exit docs](https://lighthouse-book.sigmaprime.io/voluntary-exit.html). ### Lodestar Follow the syntax of the Lodestar CLI commands and their options. ```bash validator voluntary-exit --network gnosis --pubkeys 0xF00 ``` - For more info, see the [Lodestar Command Line Reference doc](https://chainsafe.github.io/lodestar/validator-management/validator-cli/#validator-voluntary-exit). ### Nimbus To perform a voluntary exit, make sure your beacon node is running with the `--rest` option enabled, then run: ```bash build/nimbus_beacon_node deposits exit --data-dir=build/data/shared_gnosis_0 --validator= ``` - For more info, see the Nimbus [Perform a voluntary exit](https://nimbus.guide/voluntary-exit.html) docs. ### Prysm Use [prysmctl tool](https://docs.prylabs.network/docs/prysm-usage/prysmctl) to voluntarily exit your validator. ```bash prysmctl validator exit --wallet-dir= --beacon-rpc-provider=<127.0.0.1:4000> ``` - For more info, see the Prysm [Exit your validator](https://docs.prylabs.network/docs/wallet/exiting-a-validator/) doc. ### Teku Use the voluntary-exit subcommand to initiate a voluntary exit for specified validators. ```bash teku voluntary-exit --beacon-node-api-endpoint=http://consensus:5051 \ --validator-keys=validator/keys/validator_ABC.json:validator/passwords/validator_ABC.txt ``` - For more info, see the Teku [Voluntarily exit a validator](https://docs.teku.consensys.net/how-to/voluntarily-exit#:~:text=A%20voluntary%20exit%20is%20when,successfully%20exited%20to%20avoid%20penalties.) docs. --- // File: node/management/withdrawals :::info Validator withdrawal has now been enabled! Gnosis Chain underwent Shanghai/Capella Hardfork successfully on August 1, 2023 at 11:34.20 UTC, slot 10379264, epoch 648704. ::: # What is Validator Withdrawal? Validator withdrawal allows a validator's account balance get withdrawn from Beacon Chain to Execution Layer, in the form of GNO. The GNO will be accrued on validator's withdrawal address on the Execution Layer, which is set using `eth1_withdrawal_address` option during validator key generation. There are 2 types of withdrawals: Partial Withdrawal and Full Withdrawal. **Partial Withdrawal**: Any balance in excess of 1 GNO from the account balance get withdrawn back to withdrawal address. **Full Withdrawal**: All the balance from validator's account get withdrawn back to withdrawal address. This has to be initiated by validator, signing [voluntary_exit](./voluntary-exit.md) message and broadcasting it to the network. It is irreversible. ## What is the difference between validator withdrawal in Gnosis Chain and Ethereum? ![](../../../static/img/node/withdrawal/GCvsETH.png) **For users: it is the same!** **Technically:** Withdrawals are handled by a smart contract on Gnosis Chain - specifically implemented for Gnosis in execution layer clients - same contract as the deposit one - pays out in GNO - If there's no GNO left in the contract, withdrawals are retried whenever it's topped up - The failed withdrawal queue is cleared at a constant rate per slot (4-16/slot, TBD), in addition to new withdrawals. **Reference** 1. [Gnosis Chain Withdrawals spec](https://github.com/gnosischain/concepts/specs/blob/master/execution/withdrawals.md) 2. [Withdrawal Contract](https://github.com/gnosischain/deposit-contract/blob/master/contracts/SBCDepositContract.sol) ## What action should a validator take? ### Check Withdrawal Credential For any type of withdrawals, a validator need to have `0x01` withdrawal credential. You’re fine if you used `--eth1_withdrawal_address` to create your validator keys. If not, tooling will be made available. There are 2 ways to check withdrawal credential of a validator: 1. Search on [https://gnosischa.in/](https://gnosischa.in/) 2. Search on deposit*m*\*.json file of your validator. ![](../../../static/img/node/withdrawal/CheckWC.png) ![](../../../static/img/node/withdrawal/deposit_json.png) ### How to change the withdrawal credential? 1. Generate BLStoExecution file using [ethdo](https://notes.ethereum.org/@launchpad/withdrawals-guide#BLS-to-execution-with-ethdo). 2. Post the file to the BLStoExecution pool. ```mdx-code-block
Step-by-Step tutorial
``` **Online and Offline process** The online and offline process contains three steps. 1. Generate data on the online computer. 2. Generate change-credential.json on an offline computer. 3. Broadcast the credential change operations to the Gnosis Network. **Prerequisite** 1. On your online computer, open a terminal and download [ethdo](https://github.com/wealdtech/ethdo/releases) from Github/ ``` wget https://github.com/wealdtech/ethdo/releases/download//ethdo--linux-amd64.tar.gz ``` 2. Extract ethdo ``` tar -xvf ethdo--linux-amd64.tar.gz ``` 3. Check that ethdo is installed correctly by running ``` ./ethdo --help ``` **Step 1: Obtain `offline-preparation.json` file** 1. Connect to your consensus node, and generate `offline-preparation.json` ``` ./ethdo --connection=http://localhost: validator credentials set --prepare-offline ``` Check the port of your consensus node, i.e. Lighthouse's default http port is 5052. An `offline-preparation.json` file will be created. 2. Copy the `offline-preparation.json` file and ethdo software into a USB. **Step 2: Generate `change-operations.json` file offline** 1. Use the file you've copied into the USB and run the following command on an offline computer. Make sure your `offline-preparation.json` is at the same directory where ethdo software is running. ``` ./ethdo validator credentials set --offline --mnemonic="abandon abandon abandon … art" --withdrawal-address=0x0123…cdef ``` Replace `mnemonic` with the validator's mnemonic and `withdrawal-address` with a gnosis address for your validator's withdrawal reward. A `change-operations.json` file will be created. 2. Copy the `change-operations.json` file from offline computer to an online computer. **Step 3: Broadcast `change-operations.json` to the network** There are two ways to broadcast the operations: i. Using UI ii. Using curl to broadcast the data to your beacon node(advanced) **Using UI:** Upload `change-operations.json` to https://gnosischa.in/tools/broadcast, and click 'Submit & Broadcast'. ![](../../../static/img/node/withdrawal/changeWithdrawalCredentialBroadast.png) **Using curl** This option is only recommended for advanced user. Please use it at your own risk. 1. Open a terminal, navigate to the same directory as you store your `change-operations.json`. Make sure to change the beacon_node_port according to your consensus client. Run the following command. ``` curl -d @change-operations.json -H "Content-Type: application/json" -X POST http://127.0.0.1:/eth/v1/beacon/pool/bls_to_execution_changes ``` ```mdx-code-block
``` ![](../../../static/img/node/withdrawal/conversion_tool.png) **Reference** 1. [Changing withdrawal credential by ethdo](https://github.com/wealdtech/ethdo/blob/master/docs/changingwithdrawalcredentials.md) 2. [BLS to execution with ethdo](https://notes.ethereum.org/@launchpad/withdrawals-guide#BLS-to-execution-with-ethdo) 3. [BLS To Execution Change from Ethereum](https://launchpad.ethereum.org/en/btec/#broadcast-message) 4. [Teku's postBlsToExecutionChange API ](https://consensys.github.io/teku/#tag/Beacon/operation/postBlsToExecutionChange) ## How to receive my withdrawal (full or partial)? As we have modified some specs regarding the withdrawals to enable withdrawing GNO instead of the native gas token xDai, unlike Ethereum, partial and full withdrawals do not happen automatically. Currently you need to manually claim your withdrawal on the contract : https://gnosisscan.io/address/0x0B98057eA310F4d31F2a452B414647007d1645d9#writeProxyContract. :::info If you want to perform full withdrawal, don't forget to initiate [voluntary exit](./voluntary-exit.md) before calling `claimWithdrawal`. ::: 1. Connect your wallet to Gnosisscan (it can be any wallet, doesn't have to be your validator address, anyone can trigger a withdrawal claim) and then enter your validator recipient(withdrawal) address(s) in [`claimWithdrawal`](https://gnosisscan.io/address/0x0b98057ea310f4d31f2a452b414647007d1645d9#writeProxyContract#F3) or [`claimWithdrawals`](https://gnosisscan.io/address/0x0b98057ea310f4d31f2a452b414647007d1645d9#writeProxyContract#F4) 2. Click "write" and perform the send tx action on your wallet. 3. Once the transaction is confirmed, you should see the GNO tokens being transferred to your withdrawal address. Don't use the full length address that you might see on Gnosischa.in, use the recipient address under "Withdrawal" tab. The `withdrawal address` and the `recipient address` are the same thing. ![validator_recipient_address](../../../static/img/node/withdrawal/validator_recipient_address.png) ## Reference 1. [Gnosis Validator Meetup #5: Shanghai/Capella Upgrade](https://www.youtube.com/watch?v=6G7CmTHTor0) --- // File: node/manual/configure-server # Configure Server We recommend the following steps to configure your server with sensible system and security defaults. We currently provide a guide for Ubuntu users, but the principles extend to whichever OS you intend to use. ## Configure Server ### Update Server Update Ubuntu with the latest software and security updates. ```shell $ sudo apt -y update && sudo apt -y upgrade $ sudo apt dist-upgrade && sudo apt autoremove $ sudo reboot ``` ### Configure Timekeeping Consensus Layer clients are very sensitive to time, and require accurate timekeeping for proper synchronization with the blockchain network. For Ubuntu machines, we recommend using the [NTP service](https://ubuntu.com/server/docs/network-ntp), which helps ensure system time is synchronized. ```shell ## Check time and date $ timedatectl ## Setup NTP service $ sudo timedatectl set-ntp on ``` :::tip Recommended Some users recommend using [Chrony](https://chrony.tuxfamily.org/) as a [method of configuring NTP](https://ubuntu.com/blog/ubuntu-bionic-using-chrony-to-configure-ntp) ::: ### Create JWT import JwtGenerationPartial from '@site/docs/node/manual/server/_partials/_jwt-generation-partial.md'; ## Set up Networking Ubuntu ships with a [ufw firewall](https://wiki.ubuntu.com/UncomplicatedFirewall) that helps prevent unwanted connections to your server. As your server is connected to the public internet, this is very important as there will be adversaries that will port scan for vulnerabilities. ### Install UFW Ubuntu should have `ufw` installed, otherwise you can install it. ```shell $ sudo apt install ufw ``` ### Apply UFW Defaults ```shell $ sudo ufw default deny incoming $ sudo ufw default allow outgoing ``` ### (Optional) Deny or Allow SSH If you are hosting your node locally (i.e. homestaker), we highly recommend you deny the SSH Port 22, which is a very common attack vector. If you are hosting your node in the cloud, you will need to allow the SSH Port 22 to connect to your machine. Make sure to allow ```shell ## Deny SSH $ sudo ufw deny 22/tcp ## Allow SSH $ sudo ufw allow 22/tcp ``` ### Allow Execution Client Port 30303 The Execution Client uses port 30303 to communicate with Execution Layer network peers. ```shell $ sudo ufw allow 30303 ``` ### Allow Consensus Client port 9000 Most Consensus Layer Clients use port `9000` to communicate with the Consensus Layer network peers, with the exception of Prysm, which uses ports `13000/TCP` and `12000/UDP` instead. ```shell ## Lighthouse, Nimbus, Teku, Lodestar $ sudo ufw allow 9000 ## Prysm $ sudo ufw allow 13000/tcp $ sudo ufw allow 12000/udp ``` ### Enable Firewall ```shell $ sudo ufw enable $ sudo ufw status numbered ``` ## Advanced ### Increasing Swap Space Gnosis clients (e.g. Erigon) tend to use large amounts of memory when syncing or running, which may lead to out-of-memory errors. Advanced users can consider allocating swap space, which allows the system to store in-memory data on their hard drives. :::tip Read More - [Step 5: Create a Swap Space of Somer Esat's Guide](https://someresat.medium.com/guide-to-staking-on-ethereum-ubuntu-lodestar-193a2553a161) ::: --- // File: node/manual/README :::tip Before you start Hey node runners, to provide a comprehensive guideline for both beginners and experienced node runners, we offer two paths for you to choose from for building your node: Interactive Guide and Step-by-Step. **Interactive Guide**: By selecting the configurations below, you are given a general walk-through of setting up the node based on different Operating system, Network, Execution client and Consensus client. In the current version, CLI commands are given to run as system process. _Recommended for experienced node runners_. **Step-by-Step**: A detailed flow on running a node. Options include running as system process and using docker. _Recommended for beginners_. :::
## Select a configuration import InstallIntroPartial from '@site/docs/node/manual/\_partials/\_install-intro.md';
## Review prerequisites and best practices import InstallPrereqsPartial from '@site/docs/node/manual/server/\_partials/\_install-prereqs.md'; ## Step 1: Configure Server :::tip Check out all recommended steps to [configure server](./configure-server.md) ::: import InstallInitialPartial from '@site/docs/node/manual/server/\_partials/\_install-initial.md'; ## Step 2: Run an Execution client In this step, you'll install an execution-layer client that the consensus-layer node will connect to. import RunExecutionNodePartial from '@site/docs/node/manual/execution/\_partials/\_run-execution-client.md'; ## Step 3: Run a Beacon Node import RunBeaconNodePartial from '@site/docs/node/manual/beacon/\_partials/\_run-consensus-client.md'; ## Step 4: Run a Validator
### Step 4a: Generate Validator Keys import GenerateValidatorKeysPartial from '@site/docs/node/manual/validator/\_partials/\_generate_validator_keys_cli.md'; ### Step 4b: Run a Validator import InstallValidatorPartial from '@site/docs/node/manual/validator/\_partials/\_install-validator.md'; ### Step 4c: Fund your validator import FundValidatorPartial from '@site/docs/node/manual/validator/\_partials/\_fund-validator.md'; ### Step 4d: Verify Validator import VerifyValidatorPartial from '@site/docs/node/manual/validator/\_partials/\_verify-validator.md';

Chiado testnet does not support public participation yet.

Step 4 is omitted.

--- ## More Resources - [Frequently Asked Questions](../../faq/node.md) - [1-click tools](../tools/) - [Managing your Node](../management/) --- // File: node/manual/_partials/_install-intro import Tabs from '@theme/Tabs'; import TabItem from '@theme/TabItem'; import MultidimensionalContentControlsPartial from '@site/docs/node/manual/_partials/_multidimensional-content-controls-partial.md'; ## Introduction At a high level, we'll walk through the following flow: 1. Configure an **execution node** using an execution-layer client. 2. Configure a **beacon node** using a consensus-layer client. 3. Configure a **validator** and stake GNO (optional). --- // File: node/manual/_partials/_multidimensional-content-controls-partial import Tabs from '@theme/Tabs'; import TabItem from '@theme/TabItem'; import {MultiDimensionalContentWidget} from '@site/src/components/MultiDimensionalContentWidget.js';

* disabled options: unsupported clients

--- // File: node/manual/beacon/_partials/_beacon_folder_structure Create new folders: ```shell mkdir -p /home/$USER/gnosis/consensus/data ``` Including the folders from your Execution client, your folder structure should now look like: ```shell /home/$USER/gnosis/ ├── jwtsecret/ ├── execution/ └── consensus/ └── data/ ``` --- // File: node/manual/beacon/_partials/_install_cl_lighthouse import Tabs from '@theme/Tabs'; import TabItem from '@theme/TabItem'; - Go to the [lighhouse releases page](https://github.com/sigp/lighthouse/releases) and copy the url of the latest release based on your OS version. - Download the lighthouse-VERSION-ARQ.tar.gz binary. ```bash wget [URL_FROM_PREVIOUS_STEP] ``` - Extract the downloaded file ```bash tar -xvf lighthouse-VERSION-ARQ.tar.gz --directory consensus ``` - Get into the folder ```bash cd consensus ``` - Execute Lighthouse ```bash ./lighthouse \ --network gnosis beacon_node \ --datadir=data \ --http \ --execution-endpoint http://localhost:8551 \ --execution-jwt ../jwtsecret/jwt.hex \ --checkpoint-sync-url "https://checkpoint.gnosischain.com" ``` Lighthouse only runs on Linux. To run it on Windows, [Install Linux on Windows with WSL](https://learn.microsoft.com/en-us/windows/wsl/install), and follow the instructions on the WSL terminal. - Go to the [lighhouse releases page](https://github.com/sigp/lighthouse/releases) and copy the url of the latest release based on your OS version. - Download the lighthouse-VERSION-ARQ.tar.gz binary. ```bash wget [URL_FROM_PREVIOUS_STEP] ``` - Extract the downloaded file ```bash tar -xvf lighthouse-VERSION-ARQ.tar.gz --directory consensus ``` - Get into the folder ```bash cd consensus ``` - Execute Lighthouse ```bash ./lighthouse \ --network gnosis beacon_node \ --datadir=data \ --http \ --execution-endpoint http://localhost:8551 \ --execution-jwt ../jwtsecret/jwt.hex \ --checkpoint-sync-url "https://checkpoint.gnosischain.com" ``` - Go to the [lighhouse releases page](https://github.com/sigp/lighthouse/releases) and copy the url of the latest release based on your OS version. - Download the lighthouse-VERSION-ARQ.tar.gz binary. ```bash wget [URL_FROM_PREVIOUS_STEP] ``` - Extract the downloaded file ```bash tar -xvf lighthouse-VERSION-ARQ.tar.gz --directory consensus ``` - Get into the folder ```bash cd consensus ``` - Clone Gonsis Chain configuration repository from github ```bash git clone https://github.com/gnosischain/configs.git ``` - Run Lighthouse beacon node ```bash ./lighthouse bn \ --network chiado \ --execution-endpoints=http://localhost:8551 \ --execution-jwt=../jwtsecret/jwt.hex \ --checkpoint-sync-url https://checkpoint.chiadochain.net \ --disable-deposit-contract-sync ``` Lighthouse only runs on Linux. To run it on Windows, [Install Linux on Windows with WSL](https://learn.microsoft.com/en-us/windows/wsl/install), and follow the instructions on the WSL terminal. - Go to the [lighhouse releases page](https://github.com/sigp/lighthouse/releases) and copy the url of the latest release based on your OS version. - Download the lighthouse-VERSION-ARQ.tar.gz binary. ```bash wget [URL_FROM_PREVIOUS_STEP] ``` - Extract the downloaded file ```bash tar -xvf lighthouse-VERSION-ARQ.tar.gz --directory consensus ``` - Get into the folder ```bash cd consensus ``` - Clone Gonsis Chain configuration repository from github ```bash git clone https://github.com/gnosischain/configs.git ``` - Run Lighthouse beacon node ```bash ./lighthouse bn \ --network chiado \ --execution-endpoints=http://localhost:8551 \ --execution-jwt=../jwtsecret/jwt.hex \ --checkpoint-sync-url https://checkpoint.chiadochain.net \ --disable-deposit-contract-sync ``` --- // File: node/manual/beacon/_partials/_install_cl_lodestar import Tabs from '@theme/Tabs'; import TabItem from '@theme/TabItem'; - Clone the repo locally ```shell git clone https://github.com/chainsafe/lodestar.git ``` - Install and build all the packages ```shell cd lodestar yarn install yarn build ``` Your repo will look like this ``` 📂gnosis ├── 📂 jwtsecret/ ├── 📂 execution/ └── 📂 consensus/ ├── 📂 lodestar/ ├── 📂 data/ ├── 📂 keystores/ └── 📂 validators/ ``` :::tip Check that you are install correctly by running `./lodestar --help' ::: - Execute Lodestar Beacon Chain ```bash ./lodestar beacon \ --network=gnosis \ --execution.urls=http://localhost:8551 \ --jwt-secret=../../jwtsecret/jwt.hex \ --metrics=true \ --metrics.port=8008 \ --checkpointSyncUrl=https://checkpoint.gnosischain.com/ ``` Lodestar only runs on Linux. To run it on Windows, [Install Linux on Windows with WSL](https://learn.microsoft.com/en-us/windows/wsl/install), and follow the instructions on the WSL terminal. - Clone the repo locally ```shell git clone https://github.com/chainsafe/lodestar.git ``` - Install and build all the packages ```shell cd lodestar yarn install yarn build ``` Your repo will look like this ``` 📂gnosis ├── 📂 jwtsecret/ ├── 📂 execution/ └── 📂 consensus/ ├── 📂 lodestar/ ├── 📂 data/ ├── 📂 keystores/ └── 📂 validators/ ``` :::tip Check that you are install correctly by running `./lodestar --help' ::: - Execute Lodestar Beacon Chain ```bash ./lodestar beacon \ --network=gnosis \ --execution.urls=http://localhost:8551 \ --jwt-secret=../../jwtsecret/jwt.hex \ --metrics=true \ --metrics.port=8008 \ --checkpointSyncUrl=https://checkpoint.gnosischain.com/ ``` Lodestar doesn't support Chiado at the moment. Lodestar doesn't support Chiado at the moment. --- // File: node/manual/beacon/_partials/_install_cl_nimbus import Tabs from '@theme/Tabs'; import TabItem from '@theme/TabItem'; Please refer to [Run a Beacon Node: Nimbus](../nimbus.md) Please refer to [Run a Beacon Node: Nimbus](../nimbus.md) Please refer to [Run a Beacon Node: Nimbus](../nimbus.md) Please refer to [Run a Beacon Node: Nimbus](../nimbus.md) --- // File: node/manual/beacon/_partials/_install_cl_teku import Tabs from '@theme/Tabs'; import TabItem from '@theme/TabItem'; ## Prerequisites 1. Java 11+ ## Install and Run - Go to the [Teku release page](https://github.com/ConsenSys/teku/releases) and copy the url of the binary distribution under **Downloads** section. - Download the teku Source code .tar.gz binary. ```bash wget [URL_FROM_PREVIOUS_STEP] ``` - Extract the downloaded file and move under consensus directory ```bash tar -xvf VERSION.tar.gz --directory consensus ``` - Get into the teku folder ```bash cd consensus && cd teku-${version} ``` Your repo will look like this ``` 📂gnosis ├── 📂 jwtsecret/ ├── 📂 execution/ └── 📂 consensus/ ├── 📂 teku-${version}/ ├── 📂 data/ ├── 📂 keystores/ └── 📂 validators/ ``` If you're installing on macOS with Homebrew, check out [here](https://docs.teku.consensys.net/en/latest/HowTo/Get-Started/Installation-Options/Install-Binaries/#macos-with-homebrew). Check that you are installing correctly by running `./bin/teku --help' :::tip You can run both beacon and validator with a single command. If you wish to run with a single command, skip to [step 4: Run a validator](../../README.md#step-4-run-a-validator). ::: - Execute beacon node(Optional) ```shell ./bin/teku \ --network=gnosis \ --ee-endpoint=http://localhost:8551 \ # highlight-next-line --ee-jwt-secret-file=${PATH_TO_JWT_SECRET} \ --metrics-enabled=true \ --rest-api-enabled=true \ # highlight-next-line --initial-state=${checkpoint url} \ ``` Get the latest checkpoint url at https://checkpoint.gnosis.gateway.fm/. ## Prerequisites 1. Java 11+ 2. [Microsoft Visual C++ 2010 security update](https://www.microsoft.com/en-us/download/details.aspx?id=26999) ## Install and Run - Go to the [Teku release page](https://github.com/ConsenSys/teku/releases) and copy the url of the binary distribution under **Downloads** section. - Download the teku Source code .tar.gz binary. ```bash wget [URL_FROM_PREVIOUS_STEP] ``` - Extract the downloaded file and move under consensus directory ```bash tar -xvf VERSION.tar.gz --directory consensus ``` - Get into the teku folder ```bash cd consensus && cd teku-${version} ``` Your repo will look like this ``` 📂gnosis ├── 📂 jwtsecret/ ├── 📂 execution/ └── 📂 consensus/ ├── 📂 teku-${version}/ ├── 📂 data/ ├── 📂 keystores/ └── 📂 validators/ ``` If you're installing on macOS with Homebrew, check out [here](https://docs.teku.consensys.net/en/latest/HowTo/Get-Started/Installation-Options/Install-Binaries/#macos-with-homebrew). Check that you are installing correctly by running `bin\teku --help' :::tip You can run both beacon and validator with a single command. If you wish to run with a single command, skip to [step 4: Run a validator](../../README.md#step-4-run-a-validator). ::: - Execute beacon node(Optional) ```shell ./bin/teku \ --network=gnosis \ --ee-endpoint=http://localhost:8551 \ # highlight-next-line --ee-jwt-secret-file=${PATH_TO_JWT_SECRET} \ --metrics-enabled=true \ --rest-api-enabled=true \ # highlight-next-line --initial-state=${checkpoint url} \ ``` Get the latest checkpoint url at https://checkpoint.gnosis.gateway.fm/. Teku doesn't support Chiado at the moment. Teku doesn't support Chiado at the moment. --- // File: node/manual/beacon/_partials/_run-consensus-client import Tabs from '@theme/Tabs'; import TabItem from '@theme/TabItem'; import InstallLighthousePartial from '@site/docs/node/manual/beacon/_partials/_install_cl_lighthouse.md'; import InstallLodestarPartial from '@site/docs/node/manual/beacon/_partials/_install_cl_lodestar.md'; import InstallTekuPartial from '@site/docs/node/manual/beacon/_partials/_install_cl_teku.md'; import InstallNimbusPartial from '@site/docs/node/manual/beacon/_partials/_install_cl_nimbus.md'; ```mdx-code-block ``` :::info Please refer to [Run a Beacon Node: Prysm](../prysm.md) ::: ```mdx-code-block ``` --- // File: node/manual/beacon/lighthouse import BeaconFolderStructurePartial from '@site/docs/node/manual/beacon/\_partials/\_beacon_folder_structure.md'; # Run Beacon Node: Lighthouse :::caution Version check This page's content is up-to-date for [Lighthouse v4.2.0](https://github.com/sigp/lighthouse/releases/tag/v4.2.0). ::: :::caution Prerequisites The Beacon Node requires an Execution client in order to operate. See [Step 2: Run Execution Client](../execution/) for more information. ::: ## Overview Lighthouse is an Ethereum and Gnosis consensus layer client written in Rust by [Sigma Prime](https://lighthouse.sigmaprime.io/). ### Key Links :::info Download Lighthouse Visit Lighthouse's page on how to download Lighthouse. https://lighthouse-book.sigmaprime.io/installation.html ::: :::tip Learn More about Lighthouse - Lighthouse Repo: [https://github.com/sigp/lighthouse](https://github.com/sigp/lighthouse) - Lighthouse Documentation: [https://lighthouse-book.sigmaprime.io/](https://lighthouse-book.sigmaprime.io/) ::: :::info Gnosis maintains a repo with sample Lighthouse Dockerfiles and configs [https://github.com/gnosischain/lighthouse-client](https://github.com/gnosischain/lighthouse-client) ::: | Content | Link | | --------------- | --------------------------------------------------------- | | Release Page | https://github.com/sigp/lighthouse/releases/ | | Docker Images | https://hub.docker.com/repository/docker/sigp/lighthouse/ | | Lighthouse Docs | https://lighthouse-book.sigmaprime.io/ | | Github Repo | https://github.com/sigp/lighthouse | ### Checkpoint Sync We recommend the use of Checkpoint sync to sync your Beacon Node quickly, and avoid long range attacks. Gnosis provides a checkpoint sync server at https://checkpoint.gnosischain.com/. ```shell # Usage $ lighthouse bn --checkpoint-sync-url https://checkpoint.gnosischain.com/ ``` :::info More about Checkpoint Sync - Lighthouse's [Checkpoint Sync docs](https://lighthouse-book.sigmaprime.io/checkpoint-sync.html) - Gnosis' [Checkpoint Sync server Status](https://checkpoint.gnosischain.com/) ::: ## Option 1: Run as a System Process Refer to [Guide](../README.md#step-3-run-a-beacon-node) ## Option 2: Run using Docker Images are referenced under the following pattern `sigp/lighthouse:{image-tag}` with the `image-tag` referring to the image available on [Docker Hub](https://hub.docker.com/r/sigp/lighthouse/tags). Most users should use the `latest-modern` tag, which corresponds to the latest stable release of Lighthouse with optimizations enabled. If you are running on older hardware then the default latest image bundles a portable version of Lighthouse which is slower but with better hardware compatibility. :::caution The Beacon Node requires an Execution client in order to operate. See [Step 2: Run Execution Client](../execution/) for more information. ::: ### 1. Folder Structure ### 2. Docker Compose Modify your docker-compose file with your favorite text editor and add the `consensus` container. The file should now look like: ```yaml title="/home/$USER/gnosis/docker-compose.yml" showLineNumbers version: "3" services: execution: # From Step 2 # ... // highlight-start consensus: container_name: consensus image: sigp/lighthouse:latest-modern restart: always networks: - gnosis_net ports: - 9000:9000/tcp # p2p - 9000:9000/udp # p2p - 5054:5054/tcp # metrics expose: - 4000 # http volumes: // highlight-start - /home/$USER/gnosis/consensus/data:/data - /home/$USER/gnosis/jwtsecret/jwt.hex:/jwt.hex // highlight-end - /etc/timezone:/etc/timezone:ro - /etc/localtime:/etc/localtime:ro command: | lighthouse beacon_node // highlight-next-line --network=gnosis --disable-upnp --datadir=/data --port=9000 --http --http-address=0.0.0.0 --http-port=4000 --execution-endpoint=http://execution:8551 --execution-jwt=/jwt.hex // highlight-next-line --checkpoint-sync-url=https://checkpoint.gnosischain.com/ logging: driver: "local" networks: gnosis_net: name: gnosis_net ``` ### 3. Start Containers Start the consensus layer client listed in the compose file: ```shell cd /home/$USER/gnosis docker-compose up -d ``` ### 4. Monitor Logs Check your logs for each service (`execution` and `consensus`) with: import MonitorLogsDockerPartial from '@site/docs/node/manual/validator/\_partials/\_monitor_logs_docker.md'; ### 5. Updating your Node To update, just pull the new images, then stop and restart your docker-compose file: ```shell cd /home/$USER/gnosis docker-compose pull docker-compose stop docker-compose up -d ``` --- // File: node/manual/beacon/lodestar import BeaconFolderStructurePartial from '@site/docs/node/manual/beacon/\_partials/\_beacon_folder_structure.md'; # Run Beacon Node: Lodestar :::caution Version check This page's content is up-to-date for [Lodestar v1.5.1](https://github.com/ChainSafe/lodestar/releases/tag/v1.5.1). ::: :::caution Prerequisites The Beacon Node requires an Execution client in order to operate. See [Step 2: Run Execution Client](../execution/) for more information. ::: ## Overview - An Ethereum consensus client by [ChainSafe](https://lodestar.chainsafe.io/). ### Key Links :::info Download Lodestar Visit Lodestar's docs on how to download Lodestar. https://chainsafe.github.io/lodestar/ ::: :::tip Gnosis' maintains a repo with sample Lodestar Dockerfiles and configs [https://github.com/gnosischain/lodestar-client](https://github.com/gnosischain/lodestar-client) ::: | Content | Link | | ------------- | --------------------------------------------------- | | Release Page | https://github.com/ChainSafe/lodestar/releases/ | | Docker Images | https://hub.docker.com/r/chainsafe/lodestar/tags | | General Docs | https://chainsafe.github.io/lodestar/ | | CLI Reference | https://chainsafe.github.io/lodestar/reference/cli/ | ### Checkpoint Sync We recommend the use of Checkpoint sync to sync your Beacon Node quickly, and avoid long range attacks. Gnosis provides a checkpoint sync server at https://checkpoint.gnosischain.com/. ```shell # Usage $ lodestar beacon --checkpointSyncUrl https://checkpoint.gnosischain.com/ ``` :::info More about Checkpoint Sync - Lodestar's [Checkpoint Sync docs](https://chainsafe.github.io/lodestar/getting-started/starting-a-node/#checkpoint-sync) - Gnosis' [Checkpoint Sync server Status](https://checkpoint.gnosischain.com/) ::: ## Option 1: Run as a System Process Refer to [Guide](../README.md#step-3-run-a-beacon-node) ## Option 2: Run using Docker Images are referenced under the following pattern `chainsafe/lodestar:{image-tag}` with the `image-tag` referring to the image available on [Docker Hub](https://hub.docker.com/r/chainsafe/lodestar/tags). ### 1. Folder Structure ### 2. Docker Compose Modify your docker-compose file with your favorite text editor and add the `consensus` container. The file should now look like: ```yaml title="/home/$USER/gnosis/docker-compose.yml" showLineNumbers version: "3" services: execution: # From Step 2 # ... consensus: container_name: consensus image: chainsafe/lodestar:latest restart: always networks: - gnosis_net ports: - 9000:9000/tcp # p2p - 9000:9000/udp # p2p - 5054:5054/tcp # metrics expose: - 4000 volumes: // highlight-start - /home/$USER/gnosis/consensus/data:/data - /home/$USER/gnosis/jwtsecret/jwt.hex:/jwt.hex // highlight-end - /etc/timezone:/etc/timezone:ro - /etc/localtime:/etc/localtime:ro environment: - NODE_OPTIONS=--max-old-space-size=6144 command: | beacon // highlight-next-line --network=gnosis --dataDir=/data // highlight-next-line --preset=gnosis --eth1=true --execution.urls=http://execution:8551 --jwt-secret=/jwt.hex --logFile=/data/logs/beacon.log --logFileLevel=info --port=9000 --rest=true --rest.address=0.0.0.0 --rest.port=4000 --rest.cors=* --discv5=true --targetPeers=50 --metrics=true --metrics.port=5054 // highlight-next-line --checkpointSyncUrl=https://checkpoint.gnosischain.com/ logging: driver: "local" networks: gnosis_net: name: gnosis_net ``` ### 3. Start Containers Start the consensus layer client listed in the compose file: ```shell cd /home/$USER/gnosis docker-compose up -d ``` ### 4. Monitor Logs Check your logs for each service (`execution` and `consensus`) with: import MonitorLogsDockerPartial from '@site/docs/node/manual/validator/_partials/_monitor_logs_docker.md'; ### 5. Updating your Node To update, just pull the new images, then stop and restart your docker-compose file: ```shell cd /home/$USER/gnosis docker-compose pull docker-compose stop docker-compose up -d ``` --- // File: node/manual/beacon/nimbus import BeaconFolderStructurePartial from '@site/docs/node/manual/beacon/\_partials/\_beacon_folder_structure.md'; # Run Beacon Node + Validator: Nimbus Nimbus is a client implementation that strives to be as lightweight as possible in terms of resources used. Nimbus has consensus layer clients for Ethereum and Gnosis Chain. :::tip Learn More about Nimbus - Nimbus Repo: [https://github.com/status-im/nimbus-eth2](https://github.com/status-im/nimbus-eth2) - Nimbus Docs: [https://nimbus.team/docs/](https://nimbus.team/docs/) ::: :::info - Gnosis' Nimbus repo has sample Dockerfiles and configs - [https://github.com/gnosischain/gnosis-nimbus-eth2](https://github.com/gnosischain/gnosis-nimbus-eth2) ::: ## Option 1: Run as System Process We currently do not release Gnosis compatible binaries for Nimbus, nor do we intend to for the time being. ## Option 2: Run using Docker This tutorial runs Nimbus beacon node and validator on the same container, please make sure you have your [generated validator key](../README.md#step-4a-generate-validator-keys) and [jwtsecret](../README.md#step-1-configure-server) before moving to the next step. ### 1. Folder Structure Folder structure ```shell /home/$USER/gnosis/ ├── jwtsecret/ ├── execution/ └── consensus/ └── data/ └── validator_key/ ``` ### 2. Docker Compose Modify your docker-compose file with your favorite text editor and add the `consensus` container. The file should now look like: Create `docker-compose.yml` and insert the configuration below. ```yaml title="/home/$USER/gnosis/docker-compose.yml" showLineNumbers version: "3" services: execution: # From Step 2 # ... consensus: container_name: consensus image: ghcr.io/gnosischain/gnosis-nimbus-eth2:latest restart: unless-stopped networks: - gnosis_net volumes: - ./consensus/data:/data // highlight-start - ${Path_to_jwtsecret}:/jwt:ro - ${Path_to_keystore}:/validators // highlight-end ports: - 9100:9100 - 9100:9100/udp command: | --data-dir=/data --web3-url=http://localhost:8551 --jwt-secret=/jwt --light-client-data-serve=true --light-client-data-import-mode=full --tcp-port:9100 --udp-port:9100 --validators-dir=/validators // highlight-start --suggested-fee-recipient=${Fee address} --graffiti=${Graffiti} // highlight-end --rest --rest-address=0.0.0.0 --network=gnosis --history=prune logging: driver: "local" networks: gnosis_net: name: gnosis_net ``` Replace `suggested-fee-recipient` with your Gnosis address. This fee recipient address will receive tips from user transactions from the block the validator proposed. If not set, the tips will be sent to zero address, that is burnt completely. It is strongly recommended that you configure this value in your setup. Learn more about [suggested fee recipient](https://nimbus.guide/suggested-fee-recipient.html) flag in Nimbus docs. Replace `graffiti` with your own [graffiti](https://nimbus.guide/graffiti.html). It is an optional field that can be used to add a message to the [block](https://ethereum.org/en/developers/docs/blocks/) by the proposer. ### 3. Start Containers Start the consensus layer client listed in the compose file: ```shell cd /home/$USER/gnosis docker-compose up -d ``` ### 4. Monitor Logs Check your logs for each service (`execution` and `consensus`) with: import Tabs from '@theme/Tabs'; import TabItem from '@theme/TabItem'; ```shell docker logs -f --tail 500 execution ``` ```shell docker logs -f --tail 500 consensus ``` ### 5. Updating your Node To update, just pull the new images, then stop and restart your docker-compose file: ```shell cd /home/$USER/gnosis docker-compose pull docker-compose stop docker-compose up -d ``` --- // File: node/manual/beacon/prysm # Run Beacon Node: Prysm :::danger This client is not yet ready for public use. Validators are encouraged to run Lighthouse, Teku or Lodestar in the interim. ::: The [Prysm](https://github.com/prysmaticlabs/prysm) project is a Go implementation of the Ethereum protocols consensus layer, by [prysmaticlabs](https://prysmaticlabs.com/) This project builds a customized version of the prysm client with Gnosis Chain modifications. Repository: [https://github.com/gnosischain/prysm-client](https://github.com/gnosischain/prysm-client) ## Option 1: Run as System Process :::danger This client is not yet ready for public use. Validators are encouraged to run Teku, Lodestar, or Lighthouse in the interim. ::: ## Option 2: Run using Docker :::danger This client is not yet ready for public use. Validators are encouraged to run Teku, Lodestar, or Lighthouse in the interim. ::: **Beacon Node** ```shell docker pull gnosischain/prysm-beacon:latest- ``` **Validator Node ** ```shell docker pull gnosischain/prysm-validator:latest- ``` Example Docker-compose.yml [https://github.com/gnosischain/prysm-client/blob/main/docker-compose.yml](https://github.com/gnosischain/prysm-client/blob/main/docker-compose.yml) **Import validator keys ** Add your keystores in `./keystores` and the `password.txt` in a file `./keystores/password.txt` **Run Beacon Chain node with the attached Validator Process** ```shell docker-compose up -d consensus docker-compose up -d validator ``` **Make Deposit ** :::caution **At this stage you should have your EL and CL fully Synced and validators must be imported to your CL ** ::: --- // File: node/manual/beacon/teku import BeaconFolderStructurePartial from '@site/docs/node/manual/beacon/\_partials/\_beacon_folder_structure.md'; # Run Beacon Node: Teku :::caution Version check This page's content is up-to-date for [Teku v23.3.0](https://github.com/ConsenSys/teku/releases/tag/23.3.0). ::: :::caution The Beacon Node requires an Execution client in order to operate. See [Step 2: Run Execution Client](../execution/) for more information. ::: ## Overview Teku is a consensus client built to meet institutional needs and security requirements. Built by PegaSys, an arm of ConsenSys, who are dedicated to building enterprise-ready clients and tools for interacting with the core Ethereum platform. More information on [Teku](https://consensys.net/knowledge-base/ethereum-2/teku/). ### Key Links :::info Download Teku Visit Teku's page on how to download Teku. https://docs.teku.consensys.net/en/latest/ ::: :::tip Gnosis' maintains a repo with sample Teku Dockerfiles and configs - [https://github.com/gnosischain/teku-client](https://github.com/gnosischain/teku-client) ::: | Content | Link | | ------------------ | ------------------------------------------------------------------- | | Release Page | https://github.com/ConsenSys/teku/releases | | Docker Images | https://hub.docker.com/r/consensys/teku | | Teku Docs | https://docs.teku.consensys.net/en/latest/ | | Teku CLI Reference | https://docs.teku.consensys.net/en/latest/Reference/CLI/CLI-Syntax/ | ### Checkpoint Sync We recommend the use of Checkpoint sync to sync your Beacon Node quickly, and avoid long range attacks. Gnosis provides a checkpoint sync server at https://checkpoint.gnosischain.com/. ```shell # Usage $ teku --initial-state https://checkpoint.gnosischain.com/eth/v2/debug/beacon/states/finalized ``` :::info More about Checkpoint Sync - Teku's [Checkpoint Sync docs](https://docs.teku.consensys.net/en/latest/HowTo/Get-Started/Checkpoint-Start/) - Gnosis' [Checkpoint Sync server Status](https://checkpoint.gnosischain.com/) ::: ## Option 1: Run as a System Process Refer to [Guide](../README.md#step-3-run-a-beacon-node) ## Option 2: Run using Docker Images are referenced under the following pattern `consensys/teku:{image-tag}` with the `image-tag` referring to the image available on [Docker Hub](https://hub.docker.com/r/consensys/teku/tags). ### 1. Folder Structure ### 2. Docker Compose Modify your docker-compose file with your favorite text editor and add the `consensus` container. The file should now look like: ```yaml title="/home/$USER/gnosis/docker-compose.yml" showLineNumbers version: "3" services: execution: # From Step 2 # ... consensus: user: "${PUID:-1000}" container_name: consensus image: consensys/teku:latest restart: always networks: - gnosis_net ports: - 9000:9000/tcp # p2p - 9000:9000/udp # p2p - 8008:8008/tcp # metrics expose: - 4000 volumes: // highlight-start - /home/$USER/gnosis/consensus:/data - /home/$USER/gnosis/jwtsecret/jwt.hex:/jwt.hex // highlight-end - /etc/timezone:/etc/timezone:ro - /etc/localtime:/etc/localtime:ro environment: - JAVA_OPTS=-Xmx4g command: | // highlight-next-line --network=gnosis --data-base-path=/data --data-storage-archive-frequency=2048 --data-storage-mode=PRUNE --data-storage-non-canonical-blocks-enabled=false --log-destination=CONSOLE --logging=info --p2p-enabled=true --p2p-port=9000 --p2p-peer-upper-bound=50 --rest-api-enabled=true --rest-api-host-allowlist=* --rest-api-interface=0.0.0.0 --rest-api-port=4000 --rest-api-cors-origins=* --rest-api-docs-enabled=false --ee-endpoint=http://execution:8551 --ee-jwt-secret-file=/jwt.hex --eth1-deposit-contract-max-request-size=8000 --metrics-enabled=true --metrics-host-allowlist=* --metrics-interface=0.0.0.0 --metrics-port=8008 // highlight-next-line --initial-state=https://checkpoint.gnosischain.com/eth/v2/debug/beacon/states/finalized logging: driver: "local" networks: gnosis_net: name: gnosis_net ``` ### 3. Environment Variables Add an `.env` file with your user id (`id --user`) in `/home/$USER/gnosis/.env`. ``` title="/home/$USER/gnosis/.env PUID=1000 ``` ### 4. Start Containers Start the consensus layer client listed in the compose file: ```shell cd /home/$USER/gnosis docker-compose up -d ``` ### 5. Monitor Logs Check your logs for each service (`execution` or `consensus`) with: import MonitorLogsDockerPartial from '@site/docs/node/manual/validator/_partials/_monitor_logs_docker.md'; ### 6. Updating your Node To update, just pull the new images, then stop and restart your docker-compose file: ```shell cd /home/$USER/gnosis docker-compose pull docker-compose stop docker-compose up -d ``` --- // File: node/manual/execution/_partials/_install_el_erigon import Tabs from '@theme/Tabs'; import TabItem from '@theme/TabItem'; - Install and build [Erigon](https://github.com/ledgerwatch/erigon#documentation). ```shell cd execution git clone --branch stable --single-branch https://github.com/ledgerwatch/erigon.git cd erigon make erigon ``` - Run Erigon ```shell ./build/bin/erigon \ --chain=gnosis \ --datadir=/data \ --authrpc.jwtsecret=../../jwtsecret/jwt.hex \ --prune=htcr ``` - Erigon run [Archive node](https://ethereum.org/en/developers/docs/nodes-and-clients/archive-nodes/#what-is-an-archive-node) by default. To run a pruned node, add `--prune=htcr`. - Install and build Erigon. ```shell cd execution git clone --branch stable --single-branch https://github.com/ledgerwatch/erigon.git cd erigon make erigon ``` - Run Erigon ```shell ./build/bin/erigon \ --chain=gnosis \ --datadir=/data \ --authrpc.jwtsecret=../../jwtsecret/jwt.hex ``` - Install and build Erigon. ```shell cd execution git clone --branch stable --single-branch https://github.com/ledgerwatch/erigon.git cd erigon make erigon ``` - Run Erigon ```shell ./build/bin/erigon \ --chain=chiado \ --datadir=/data \ --authrpc.jwtsecret=../../jwtsecret/jwt.hex ``` - Install and build Erigon. ```shell cd execution git clone --branch stable --single-branch https://github.com/ledgerwatch/erigon.git cd erigon make erigon ``` - Run Erigon ```shell ./build/bin/erigon \ --chain=chiado \ --datadir=/data \ --authrpc.jwtsecret=../../jwtsecret/jwt.hex ``` --- // File: node/manual/execution/_partials/_install_el_nethermind import Tabs from '@theme/Tabs'; import TabItem from '@theme/TabItem'; - Install dependencies ```shell sudo apt-get update && sudo apt-get install libsnappy-dev libc6-dev libc6 unzip -y ``` - Copy the download link for Linux, MacOS or Arm64 package from the [Nethermind download page](https://downloads.nethermind.io/). - Download Nethermind ```shell wget [URL_FROM_PREVIOUS_STEP] ``` - Unzip the downloaded file ```shell unzip [FILE_NAME] -d execution ``` - Get into the folder ```shell cd execution ``` - Execute Nethermind ```shell ./nethermind \ --config gnosis \ --JsonRpc.Enabled true \ --HealthChecks.Enabled true \ --HealthChecks.UIEnabled true \ --JsonRpc.EnginePort=8551 \ --JsonRpc.JwtSecretFile=../jwtsecret/jwt.hex ``` - Download the Windows package from the [Nethermind download page](https://downloads.nethermind.io/). - Unzip the file in the `execution` folder created in the previous step. - Navigate to the `execution` folder ```shell cd execution ``` - Run the following command: ```shell ./nethermind \ --config gnosis \ --JsonRpc.Enabled true \ --HealthChecks.Enabled true \ --HealthChecks.UIEnabled true \ --JsonRpc.EnginePort=8551 \ --JsonRpc.JwtSecretFile=../jwtsecret/jwt.hex ``` - Install dependencies ```shell sudo apt-get update && sudo apt-get install libsnappy-dev libc6-dev libc6 libicu-dev unzip wget openssl git -y ``` - Copy the download link for Linux, MacOS or Arm64 package from the [Nethermind download page](https://downloads.nethermind.io/). - Download Nethermind ```shell wget [URL_FROM_PREVIOUS_STEP] ``` - Unzip the downloaded file ```shell unzip [FILE_NAME] -d execution ``` - Get into the folder ```shell cd execution ``` - Execute Nethermind ```shell ./nethermind \ --config chiado \ --JsonRpc.Enabled true \ --HealthChecks.Enabled true \ --HealthChecks.UIEnabled true \ --JsonRpc.EnginePort=8551 \ --JsonRpc.JwtSecretFile=../jwtsecret/jwt.hex ``` - Download the Windows package from the [Nethermind download page](https://downloads.nethermind.io/). - Unzip the file in the `execution` folder created in the previous step. - Navigate to the `execution` folder ```shell cd execution ``` - Run the following command: ```shell ./nethermind \ --config chiado \ --JsonRpc.Enabled true \ --HealthChecks.Enabled true \ --HealthChecks.UIEnabled true \ --JsonRpc.EnginePort=8551 \ --JsonRpc.JwtSecretFile=../jwtsecret/jwt.hex ``` :::info Upgrading? Remove `AuraMerge.Enabled` since it is now covered in the `Merge.Enabled` key. ::: --- // File: node/manual/execution/_partials/_run-execution-client import Tabs from '@theme/Tabs'; import TabItem from '@theme/TabItem'; import InstallNethermindPartial from '@site/docs/node/manual/execution/_partials/_install_el_nethermind.md'; import InstallErigonPartial from '@site/docs/node/manual/execution/_partials/_install_el_erigon.md';

Besu is not yet supported, use Nethermind instead.

Geth is not yet supported, use Nethermind instead.

--- // File: node/manual/execution/besu # Besu Hyperledger [Besu](https://besu.hyperledger.org/en/stable/) is an open source Ethereum client developed under the Apache 2.0 license and written in Java. It runs on public and private networks. :::note Besu is currently working on a Gnosis implementation, please, use [Nethermind](./nethermind.md) ::: --- // File: node/manual/execution/erigon # Erigon Formerly TurboGeth, Erigon is an Ethereum client built to enable performance optimizations. Erigon is written in Go and licensed under the GNU LGPLv3. Repository: [https://github.com/erigontech/erigon](https://github.com/erigontech/erigon) There are 2 main options for running Erigon: - Option 1: [Using Docker](#using-docker) - Option 2: [As a system process](#as-system-process) ## Option 1: Using Docker {#using-docker} ### 1. Folder Structure Create your folder structure: ```shell mkdir -p /home/$USER/gnosis/{jwtsecret,execution} chown -R 1000:1000 /home/$USER/gnosis/execution ``` ``` /home/$USER/gnosis/ |── execution/ └── jwtsecret/ ``` ### 2. Docker Compose Create a docker-compose file with your favorite text editor in `/home/$USER/gnosis/docker-compose.yml`: ```shell title="/home/$USER/gnosis/docker-compose.yml" version: "3" services: execution: container_name: execution image: erigontech/erigon:latest restart: unless-stopped volumes: - /home/$USER/gnosis/execution:/home/erigon/.local/share/erigon - /home/$USER/gnosis/jwtsecret/jwt.hex:/jwt:ro networks: - gnosis_net ports: - 30303:30303 - 30303:30303/udp - 30304:30304 - 30304:30304/udp - 42069:42069 - 42069:42069/udp - 4000:4000/udp - 4001:4001 expose: - 8545 - 8551 command: | --chain=gnosis --http --http.api=eth,debug,net,trace,web3,erigon --ws --metrics --metrics.addr=0.0.0.0 --pprof --pprof.addr=0.0.0.0 --pprof.port=6070 --authrpc.addr=0.0.0.0 --authrpc.jwtsecret=/jwt --authrpc.vhosts=* --prune=htcr --torrent.download.rate=16mb --torrent.upload.rate=16mb user: 1000:1000 networks: gnosis_net: name: gnosis_net ``` :::tip Note [By default](https://github.com/ledgerwatch/erigon#other-ports), `metrics` and `pprof` use the same port, 6060. Therefore, it is required to configure the port correctly if both options are enabled. ::: ### 3. JWT Secret The JWT secret is a token that allows the EL client to communicate with the CL client, and is required for Erigon to operate post-merge. We use `rand` to create a random string, and store the `jwt.hex` file in `/home/$USER/gnosis/jwtsecret/`. Check [create JWT](../configure-server.md#create-jwt) section in `Step 1: Configure Server`. ### 4. Start Container Start the Execution layer client listed in the compose file: ```shell cd /home/$USER/gnosis docker-compose up -d ``` ### 5. Monitor Logs Check your logs with: import MonitorLogsDockerPartial from '@site/docs/node/manual/validator/\_partials/\_monitor_logs_docker.md'; ### 6. Updating your Node To update, just pull the new image, then stop and restart your docker-compose file: ```shell cd /home/$USER/gnosis docker-compose pull docker-compose stop docker-compose up -d ``` ## Option 2: Using system process {#as-system-process} Refer to [Erigon Guide](../README.md#step-2-run-an-execution-client). ## Erigon Archive Node [Archive node](https://ethereum.org/en/developers/docs/nodes-and-clients/archive-nodes/#what-is-an-archive-node) is the default option by Erigon. It takes about 370GB (January 2023) to run a Gnosis Chain Archive node. Please check the [system requirements](https://github.com/ledgerwatch/erigon#system-requirements) of your server before running an archive node. To run an Erigon pruned node, `--prune=htcr` command need to be added. --- // File: node/manual/execution/geth # Geth This is the most popular and majority Ethereum Client implementation written in Go, [Geth](https://geth.ethereum.org/) fully open source and licensed under the GNU LGPL v3. Repository: [https://github.com/gnosischain/go-ethereum](https://github.com/gnosischain/go-ethereum) ## Running as a system process ### Installing geth ``` > git clone https://github.com/gnosischain/go-ethereum > go install ./cmd/geth ``` ### Running geth ``` # Gnosis Mainnet > geth --gnosis --authrpc.jwtsecret /path/to/jwt.hex # Chiado Testnet > geth --chiado --authrpc.jwtsecret /path/to/jwt.hex ``` --- // File: node/manual/execution/nethermind # Nethermind Nethermind is an Execution layer client developed by the [Nethermind team](https://nethermind.io/nethermind-client/). :::note Nethermind currently holds the supermajority client position on Gnosis Chain. We suggest considering a switch to [Erigon.](https://docs.gnosischain.com/node/manual/execution/erigon) ::: **Nethermind reference:** [Nethermind documentation](https://docs.nethermind.io) There are 2 main options for running Nethermind: * Option 1: [Using Docker](#using-docker) * Option 2: [As a system process](#as-system-process) Nethermind can be configured to run different types of nodes: * Full Node (Recommended) * [Archival Node](#archival-node) :::note Ensure the prerequisite steps have been completed in **Step 1: Configure Server**. ::: ## Option 1: Using Docker {#using-docker} ### 1. Folder Structure Create your folder structure: ```shell mkdir -p /home/$USER/gnosis/execution mkdir /home/$USER/gnosis/jwtsecret ``` ``` /home/$USER/gnosis/ ├── jwtsecret/ └── execution/ ``` ### 2. Docker Compose Create a docker-compose file with your favorite text editor in `/home/$USER/gnosis/docker-compose.yml`: ```mdx-code-block
Example Docker Compose file
``` ```yaml title="/home/$USER/gnosis/docker-compose.yml" version: "3" services: execution: container_name: execution image: nethermind/nethermind:latest restart: always stop_grace_period: 1m networks: - gnosis_net ports: - 30303:30303/tcp # p2p - 30303:30303/udp # p2p expose: - 8545 # rpc - 8551 # engine api volumes: - /home/$USER/gnosis/execution:/data - /home/$USER/gnosis/jwtsecret/jwt.hex:/jwt.hex - /etc/timezone:/etc/timezone:ro - /etc/localtime:/etc/localtime:ro command: | --config gnosis --datadir /data --log INFO --Sync.SnapSync false --JsonRpc.Enabled true --JsonRpc.Host 0.0.0.0 --JsonRpc.Port 8545 --JsonRpc.EnabledModules [web3,eth,subscribe,net] --JsonRpc.JwtSecretFile /jwt.hex --JsonRpc.EngineHost 0.0.0.0 --JsonRpc.EnginePort 8551 --Network.DiscoveryPort 30303 --HealthChecks.Enabled false --Pruning.CacheMb 2048 logging: driver: "local" networks: gnosis_net: name: gnosis_net ``` ```mdx-code-block
``` ### 3. JWT Secret The JWT secret is a token that allows the EL client to communicate with the CL client, and is required for Nethermind to operate post-merge. We use `rand` to create a random string, and store the `jwt.hex` file in `/home/$USER/gnosis/jwtsecret/`. Check [create JWT](../configure-server.md#create-jwt) section in `Step 1: Configure Server`. ### 4. Start Container Start the Execution layer client listed in the compose file: ```shell cd /home/$USER/gnosis docker-compose up -d ``` ### 5. Monitor Logs Check your logs with: import MonitorLogsDockerPartial from '@site/docs/node/manual/validator/_partials/_monitor_logs_docker.md'; ### 6. Updating your Node To update, just pull the new image, then stop and restart your docker-compose file: ```shell cd /home/$USER/gnosis docker-compose pull docker-compose stop docker-compose up -d ``` ## Option 2: Running as System Process {#as-system-process} ### Installing Nethermind {#installing-nethermind} [github.com/nethermindeth/nethermind/releases/latest](https://github.com/NethermindEth/nethermind/releases/latest) ### Running Nethermind {#running-nethermind} [docs.nethermind.io/get-started/running-node](https://docs.nethermind.io/get-started/running-node) Windows ``` # Gnosis Mainnet ./nethermind --config gnosis --JsonRpc.JwtSecretFile path/to/jwt.hex # Chiado Testnet ./nethermind --config chiado --JsonRpc.JwtSecretFile path/to/jwt.hex ``` Linux and macOS ``` # Gnosis Mainnet nethermind --config gnosis --JsonRpc.JwtSecretFile path/to/jwt.hex # Chiado Testnet nethermind --config chiado --JsonRpc.JwtSecretFile path/to/jwt.hex ``` ## Nethermind Archival Node {#archival-node} An archival node executes a heavy historical sync verifying all the transactions and keeping all of the historical data. Archive sync is the 'heaviest' and slowest sync mode, and can take 2 - 6 weeks depending on the speed of your IO. :::caution Make sure there's enough disk space to accommodate the archive data, the minimum amount of disk required to run the archive node is +2 TB (Feb 2023). ::: Edit your `/home/$USER/gnosis/docker-compose.yml` and change the `--config` from `gnosis` to `gnosis_archive`. ```yaml command: | --config gnosis_archive ``` --- // File: node/manual/execution/openethereum # Open Ethereum :::danger OpenEthereum has been [deprecated](https://twitter.com/OpenEthereumOrg/status/1529147048758595585). Please, migrate to [Nethermind](nethermind). ::: - [OpenEthereum repository](https://github.com/openethereum/openethereum) - [OpenEthereum documentation](https://openethereum.github.io/) --- // File: node/manual/server/_partials/_install-initial import Tabs from '@theme/Tabs'; import TabItem from '@theme/TabItem'; Create the following folder structure on your disk, the entire tutorial will assume it: ``` 📂gnosis ├── 📂 jwtsecret/ ├── 📂 execution/ └── 📂 consensus/ ├── 📂 data/ ├── 📂 keystores/ └── 📂 validators/ ``` ```shell mkdir gnosis && cd gnosis && mkdir jwtsecret && mkdir execution && mkdir consensus && cd consensus && mkdir data && mkdir keystores && mkdir validators && cd .. ```

Generate JWT Secret

import JwtGenerationPartial from '@site/docs/node/manual/server/_partials/_jwt-generation-partial.md'; :::tip Place the `jwt.hex` file in the jwtsecret folder, so it can be referenced in the next steps as `../jwtsecret/jwt.hex` for the `consensus` and `execution` clients. :::
--- // File: node/manual/server/_partials/_install-prereqs
Node type Benefits Requirements
Execution + beacon
  • Contributes to the security of Gnosis.
  • Lets you access the Gnosis network directly without having to trust a third party service.
  • Lets you run a validator post-Merge.
Check requirements section.
Validator Lets you stake GNO, propose + validate blocks, earn staking rewards + transaction fee tips.
  • Everything above, plus...
  • Software: Validator client, browser-based crypto wallet (instructions below)
  • Hardware: (Recommended) A new machine that has never been connected to the internet that you can use to securely generate your mnemonic phrase and keypair
  • 1 GNO (Gnosis Mainnet)
  • 1 Testnet GNO (Chiado)
--- // File: node/manual/server/_partials/_jwt-generation-partial import Tabs from '@theme/Tabs'; import TabItem from '@theme/TabItem'; import JWTGenerator from '@site/src/components/JWTGenerator'; The HTTP connection between your beacon node and execution node needs to be authenticated using a [JWT token](https://jwt.io/). Use a utility like OpenSSL to create the token via command: ```shell openssl rand -hex 32 | tr -d "\n" > "./jwtsecret/jwt.hex" ```
Other ways to generate the jwt.hex file 2. Use an execution or consensus client to generate the `./jwtsecret/jwt.hex` file (check their documentation). 3. Use an online generator like [this](https://seanwasere.com/generate-random-hex/). Copy and paste this value into a `./jwtsecret/jwt.hex` file. For options (1) and (3), create the file by running: ```shell echo 'PLACE_HERE_YOUR_TOKEN' > ./jwtsecret/jwt.hex ```
--- // File: node/manual/validator/Run Client/lighthouse # Run Validator: Lighthouse :::caution The Validator requires a Consensus Client (also known as Beacon Node) in order to operate. See See [Step 3: Run Beacon Node - Lighthouse](../../beacon/lighthouse.md) for more information. ::: ## Option 1: Run as System Process {#system-process} Refer to [Guide](../../README.md#step-4-run-a-validator) ## Option 2: Run using Docker {#docker} ### 1. Folder Structure Create new folders: ```shell mkdir /home/$USER/gnosis/consensus/keystores mkdir /home/$USER/gnosis/consensus/validators ``` Including the folders from your Execution and Consensus clients, your folder structure should now look like: ```shell /home/$USER/gnosis/ ├── jwtsecret/ ├── execution/ └── consensus/ ├── data/ ├── keystores/ └── validators/ ``` ### 2. Docker Compose Modify your docker-compose file with your favorite text editor and add the `validator` container. You will also need to add the command `--suggested-fee-recipient=$FEE_RECIPIENT` to your `consensus` container. The file should now look like: ```yaml title="/home/$USER/gnosis/docker-compose.yml" showLineNumbers version: "3" services: execution: # From Step 2 # ... consensus: # From Step 3 # ... # highlight-start validator: container_name: validator image: sigp/lighthouse:latest-modern restart: always command: | lighthouse validator_client --network=gnosis --validators-dir=/data/validators --beacon-nodes=http://consensus:4000 --graffiti=$GRAFFITI --debug-level=info --suggested-fee-recipient=$FEE_RECIPIENT --metrics --metrics-address=0.0.0.0 --metrics-port=5064 networks: - gnosis_net ports: - 5064:5064/tcp volumes: - /home/$USER/gnosis/consensus/validators:/data/validators - /etc/timezone:/etc/timezone:ro - /etc/localtime:/etc/localtime:ro logging: driver: "local" # highlight-end networks: gnosis_net: name: gnosis_net ``` ### 3. Environment Variables Add an `.env` file with your fee recipient (your Gnosis address) and graffiti in `/home/$USER/gnosis/.env`. ```yaml title="/home/$USER/gnosis/.env" FEE_RECIPIENT=0x0000000000000000000000000000000000000000 GRAFFITI=gnosischain/lighthouse ``` Replace `suggested-fee-recipient` with your Gnosis address. This fee recipient address will receive tips from user transactions from the block the validator proposed. If not set, the tips will be sent to zero address, that is burnt completely. It is strongly recommended that you configure this value in your setup. Learn more about [suggested fee recipient](https://lighthouse-book.sigmaprime.io/suggested-fee-recipient.html) flag in Lighthouse docs. Replace `graffiti` with your own [graffiti](https://lighthouse-book.sigmaprime.io/graffiti.html). It is an optional field that can be used to add a message to the [block](https://ethereum.org/en/developers/docs/blocks/) by the proposer. ### 4. Keystore Location Add your keystores in `/home/$USER/gnosis/consensus/keystores/` and their password in a file `/home/$USER/gnosis/consensus/keystores/password.txt` to get this file structure: :::note Note, keystores MUST follow one of these file names - `keystore-m_12381_3600_[0-9]+_0_0-[0-9]+.json` The format exported by the `eth2.0-deposit-cli` library ([source](https://github.com/sigp/lighthouse/blob/2983235650811437b44199f9c94e517e948a1e9b/common/account_utils/src/validator_definitions.rs#L402)) - `keystore-[0-9]+.json` The format exported by Prysm ([source](https://github.com/sigp/lighthouse/blob/2983235650811437b44199f9c94e517e948a1e9b/common/account_utils/src/validator_definitions.rs#L411)) ::: ```shell /home/$USER/gnosis/ ├── docker-compose.yml ├── .env ├── jwtsecret/ ├── execution/ └── consensus/ ├── data/ # highlight-start ├── keystores/ │   ├── keystore-001.json │   ├── keystore-002.json │   └── password.txt └── validators/ # highlight-end ``` ### 5. Import Keystores Import your validators: ```shell docker run \ --rm \ --volume /home/$USER/gnosis/consensus/keystores:/keystores \ --volume /home/$USER/gnosis/consensus:/data sigp/lighthouse:latest-modern lighthouse account validator import \ --network gnosis \ --password-file /keystores/password.txt \ --reuse-password \ --directory /keystores \ --datadir /data ``` ### 6. Start Containers Start the validator service listed in the compose file: ```shell cd /home/$USER/gnosis docker-compose up -d ``` ### 7. Monitor Logs Check your logs for each service (`execution`, `consensus`, or `validator`) with: import MonitorLogsDockerPartial from '@site/docs/node/manual/validator/_partials/_monitor_logs_docker.md'; ### 8. Make a Deposit Make a deposit once your node is fully synced (this can take a few hours depending on setup). :::caution **At this stage you should have your EL and CL fully synced and validators must be imported to your CL.** ::: _See section **Fund Validator**_ ### 9. Updating your Node To update, just pull the new images, then stop and restart your docker-compose file: ```shell cd /home/$USER/gnosis docker-compose pull docker-compose stop docker-compose up -d ``` --- // File: node/manual/validator/Run Client/lodestar # Run Validator: Lodestar :::caution The Validator requires a Consensus Client (also known as Beacon Node) in order to operate. See [Step 3: Run Beacon Node - Lodestar](../../beacon/lodestar.md) for more information. ::: ## Option 1: Run as System Process {#system-process} Refer to [Guide](../../README.md#step-4-run-a-validator) ## Option 2: Run using Docker {#docker} ### 1. Folder Structure Create new folders: ```shell mkdir /home/$USER/gnosis/consensus/keystores ``` ```shell /home/$USER/gnosis/ ├── jwtsecret/ ├── execution/ └── consensus/ ├── data/ └── keystores/ ``` ### 2. Docker Compose Modify your docker-compose file with your favorite text editor and add the `validator` container. You will also need to add the command `--suggestedFeeRecipient=$FEE_RECIPIENT` to your `consensus` container. The file should now look like: ```yaml title="/home/$USER/gnosis/docker-compose.yml" showLineNumbers version: "3" services: execution: # From Step 2 # ... consensus: # From Step 3 # ... // highlight-start validator: container_name: validator image: chainsafe/lodestar:latest restart: always networks: - gnosis_net ports: - 5064:5064/tcp volumes: - /home/$USER/gnosis/consensus/validators:/data/validators - /home/$USER/gnosis/consensus/keystores:/keystores - /etc/timezone:/etc/timezone:ro - /etc/localtime:/etc/localtime:ro environment: - NODE_OPTIONS=--max-old-space-size=4096 command: | validator --network=gnosis --dataDir=/data/validators --logFile=/data/validators/logs/validator.log --logFileLevel=info --beaconNodes=http://consensus:4000 --metrics=true --metrics.address=0.0.0.0 --metrics.port=5064 --suggestedFeeRecipient=$FEE_RECIPIENT --graffiti=$GRAFFITI --importKeystores=/keystores --importKeystoresPassword=/keystores/password.txt logging: driver: "local" // highlight-end networks: gnosis_net: name: gnosis_net ``` ### 3. Environment Variables Add an `.env` file with your fee recipient (your Gnosis address) and graffiti in `/home/$USER/gnosis/.env`. ```yaml title="/home/$USER/gnosis/.env" FEE_RECIPIENT=0x0000000000000000000000000000000000000000 GRAFFITI=gnosischain/lodestar ``` Replace `suggestedFeeRecipient` with your Gnosis address. This fee recipient address will receive tips from user transactions from the block the validator proposed. If not set, the tips will be sent to zero address, that is burnt completely. It is strongly recommended that you configure this value in your setup. Learn more about [suggestedFeeRecipient](https://chainsafe.github.io/lodestar/validator-management/vc-configuration/#configuring-the-fee-recipient-address) flag in Lodestar docs. Replace `graffiti` with your own [graffiti](https://chainsafe.github.io/lodestar/validator-management/validator-cli/#-graffiti). It is an optional field that can be used to add a message to the [block](https://ethereum.org/en/developers/docs/blocks/) by the proposer. ### 4. Keystore Location Add your keystores in `/home/$USER/gnosis/consensus/keystores/` and their password in a file `/home/$USER/gnosis/consensus/keystores/password.txt` to get this file structure: ```shell /home/$USER/gnosis/ ├── docker-compose.yml ├── .env ├── jwtsecret/ ├── execution/ └── consensus/ ├── data/ # highlight-start └── keystores/    ├── keystore-001.json   ├── keystore-002.json    └── password.txt # highlight-end ``` ### 5. Import Keystores Import your validators: When the Lodestar `validator` container starts, it will search the directories for the keystores and password, and import them automatically. ### 6. Start Containers Start the validator service listed in the compose file: ```shell cd /home/$USER/gnosis docker-compose up -d ``` ### 7. Monitor Logs Check your logs for each service (`execution`, `consensus`, or `validator`) with: import MonitorLogsDockerPartial from '@site/docs/node/manual/validator/_partials/_monitor_logs_docker.md'; ### 8. Make a Deposit Make deposit once your node is fully synced (this can take a few hours depending on setup). :::caution **At this stage you should have your EL and CL fully synced and validators must be imported to your CL.** ::: See the [Validator Deposits](../deposit.md) section. ### 9. Updating your Node To update, just pull the new images, then stop and restart your docker-compose file: ```shell cd /home/$USER/gnosis docker-compose pull docker-compose stop docker-compose up -d ``` --- // File: node/manual/validator/Run Client/nimbus # Run Validator: Nimbus Refer to [Run a Beaco Node + Validator: Nimbus](../../beacon/nimbus.md) --- // File: node/manual/validator/Run Client/teku # Run Validator: Teku :::caution The Validator requires a Consensus client (also known as Beacon Node) in order to operate. See [Step 3: Run Beacon Node: Teku](../../beacon/teku.md) for more information. ::: ## Option 1: Run as System Process {#system-process} Refer to [Guide](../../README.md#step-4-run-a-validator) ## Option 2: Run using Docker {#docker} ### 1. Folder Structure Create new folders: ```shell mkdir -p /home/$USER/gnosis/consensus/validator/keys mkdir /home/$USER/gnosis/consensus/validator/passwords mkdir /home/$USER/gnosis/consensus/validator/slashprotection ``` Including the folders from your Execution and Consensus clients, your folder structure should now look like: ```shell /home/$USER/gnosis/ ├── jwtsecret/ ├── execution/ └── consensus/ ├── beacon/ └── validators/ ├── keys/ ├── passwords/ └── slashprotection/ ``` ### 2. Docker Compose Modify your docker-compose file with your favorite text editor and add the following commands to your `consensus` container. ``` --validators-proposer-default-fee-recipient=$FEE_RECIPIENT --validator-keys=/data/validator/keys:/data/validator/passwords --validators-keystore-locking-enabled=true --validators-graffiti=$GRAFFITI ``` The file should now look like: ```yaml title="/home/$USER/gnosis/docker-compose.yml" showLineNumbers version: "3" services: execution: # From Step 2 # ... consensus: user: "${PUID:-1000}" container_name: consensus image: consensys/teku:latest restart: always networks: - gnosis_net ports: - 9000:9000/tcp # p2p - 9000:9000/udp # p2p - 8008:8008/tcp # metrics expose: - 4000 volumes: - /home/$USER/gnosis/consensus:/data - /home/$USER/gnosis/jwtsecret/jwt.hex:/jwt.hex - /etc/timezone:/etc/timezone:ro - /etc/localtime:/etc/localtime:ro environment: - JAVA_OPTS=-Xmx4g command: | --network=gnosis --data-base-path=/data --data-storage-archive-frequency=2048 --data-storage-mode=PRUNE --data-storage-non-canonical-blocks-enabled=false --log-destination=CONSOLE --logging=info --p2p-enabled=true --p2p-port=9000 --p2p-peer-upper-bound=50 --rest-api-enabled=true --rest-api-host-allowlist=* --rest-api-interface=0.0.0.0 --rest-api-port=4000 --rest-api-cors-origins=* --rest-api-docs-enabled=false --ee-endpoint=http://execution:8551 --ee-jwt-secret-file=/jwt.hex --eth1-deposit-contract-max-request-size=8000 --metrics-enabled=true --metrics-host-allowlist=* --metrics-interface=0.0.0.0 --metrics-port=8008 --initial-state=https://checkpoint.gnosis.gateway.fm//eth/v2/debug/beacon/states/finalized # highlight-start --validators-proposer-default-fee-recipient=$FEE_RECIPIENT --validator-keys=/data/validator/keys:/data/validator/passwords --validators-keystore-locking-enabled=true --validators-graffiti=$GRAFFITI # highlight-end logging: driver: "local" networks: gnosis_net: name: gnosis_net ``` ### 3. Environment Variables Add an `.env` file with your fee recipient (your Gnosis address) and graffiti in `/home/$USER/gnosis/.env`. ```yaml title="/home/$USER/gnosis/.env" PUID=1000 FEE_RECIPIENT=0x0000000000000000000000000000000000000000 GRAFFITI=gnosischain/teku ``` Replace `validators-proposer-default-fee-recipient` with your Gnosis address. This fee recipient address will receive tips from user transactions from the block the validator proposed. If not set, the tips will be sent to zero address, that is burnt completely. It is strongly recommended that you configure this value in your setup. Learn more about [validators-proposer-default-fee-recipient](https://docs.teku.consensys.net/Reference/CLI/CLI-Syntax#validators-proposer-default-fee-recipient) flag in Teku docs. Replace [`validator-keys`](https://docs.teku.consensys.net/Reference/CLI/CLI-Syntax#validator-keys) with the location where `keystores- *.json` and `keystore- *.txt` are stored. Replace [`validators-graffiti`](https://docs.teku.consensys.net/Reference/CLI/CLI-Syntax#validators-graffiti) with your own graffiti. It is an optional field that can be used to add a message to the [block](https://ethereum.org/en/developers/docs/blocks/) by the proposer. Learn more about the CLI commands and their options [here](https://docs.teku.consensys.net/en/latest/Reference/CLI/CLI-Syntax/). ### 4. Keystore Location Add your keystores in `/home/$USER/gnosis/consensus/validator/keys/` and their password in a file `/home/$USER/gnosis/consensus/validator/passwords` to get this file structure: :::tip When specifying directories, Teku expects to find identically named keystore and password files. For each keystore file a corresponding password txt file is required. This is the case even if the password is the same for each validator. For example `validator_217179e.json` and `validator_217179e.txt`. ([source](https://docs.teku.consensys.net/en/latest/Reference/CLI/CLI-Syntax/#validator-keys)) ::: ```shell /home/$USER/gnosis/ ├── docker-compose.yml ├── .env ├── jwtsecret/ ├── execution/ └── consensus/ ├── beacon/ └── validators/ # highlight-start ├── keys/ │   ├── keystore-001.json │   └── keystore-002.json ├── passwords/ │   └── keystore-001.txt │   └── keystore-002.txt └── slashprotection/ # highlight-end ``` ### 5. Import Keystores Import your validators: When the Teku `consensus` container starts, it will search the directories for keystores and passwords, and import them automatically. :::tip When specifying directories, Teku expects to find identically named keystore and password files. For each keystore file a corresponding password txt file is required. This is the case even if the password is the same for each validator. For example `validator_217179e.json` and `validator_217179e.txt`. ([source](https://docs.teku.consensys.net/en/latest/Reference/CLI/CLI-Syntax/#validator-keys)) ::: ### 6. Restart Containers Restart the execution layer client and consensus layer client listed in the compose file: ```shell cd /home/$USER/gnosis docker-compose down docker-compose up -d ``` ### 7. Monitor Logs Check your logs for each service (`execution`, `consensus` or `validator`) with: import MonitorLogsDockerPartial from '@site/docs/node/manual/validator/_partials/_monitor_logs_docker.md'; ### 8. Make a Deposit Make deposit once your node is fully synced (this can take a few hours depending on setup). :::caution **At this stage you should have your EL and CL fully synced and validators must be imported to your CL.** ::: _See section **Fund Validator**_ ### 9. Updating your Node To update, just pull the new images, then stop and restart your docker-compose file: ```shell cd /home/$USER/gnosis docker-compose pull docker-compose stop docker-compose up -d ``` --- // File: node/manual/validator/_partials/_fund-validator Follow the instructions in the [Fund Validator](/node/manual/validator/deposit) page. Available options: 1. [Deposit UI](/node/manual/validator/deposit#option-1-deposit-ui) 2. [Direct interaction with Contracts](/node/manual/validator/deposit#option-2-direct-interaction-with-contracts) --- // File: node/manual/validator/_partials/_generate_validator_keys_cli import Tabs from '@theme/Tabs'; import TabItem from '@theme/TabItem'; :::danger We highly recommend generating keystores on a safe, completely offline device. ***Securely backup your mnemonic, keystores, and password and keep them in a safe place.*** ::: :::tip Learn more about [keys](https://kb.beaconcha.in/ethereum-2-keys) and [withdrawal credentials](https://launchpad.ethereum.org/en/faq#withdrawal-credentials). ::: - Copy the download link for Linux, MacOS or Arm64 package from the [validator data generation tool](https://github.com/gnosischain/validator-data-generator/releases). - Download the Validator Data Generation tool ```shell wget [URL_FROM_PREVIOUS_STEP] ``` - Unzip the downloaded file ```shell tar -xvf [FILE_NAME] ``` - Get into the folder ```shell cd deposit-cli-... ``` - Execute Validator Data Generation tool and follow the instructions. In case of doubts, check the [tool documentation](https://github.com/gnosischain/validator-data-generator/). > Tip: add the [`--eth1_withdrawal_address`](https://github.com/gnosischain/validator-data-generator/#new-mnemonic-arguments) flag when creating your keys, **pointing to an address you control**. - If you want to generate a new mnemonic: ```shell ./deposit new-mnemonic --folder ../consensus/keystores ``` - If you already have a mnemonic generated: ```shell ./deposit existing-mnemonic --folder ../consensus/keystores ``` You will be asked for a `mnemonic` and `index` (key number). - Download the Windows version of the [Validator Data Generation tool](https://github.com/gnosischain/validator-data-generator/releases) from the releases page. - Execute Validator Data Generation tool and follow the instructions. In case of doubts, check the [tool documentation](https://github.com/gnosischain/validator-data-generator/) - If you want to generate a new mnemonic: ```shell deposit.exe new-mnemonic --folder ../consensus/keystores ``` - If you already have a mnemonic generated: ```shell deposit.exe existing-mnemonic --folder ../consensus/keystores ``` You will be asked for a `mnemonic` and `index` (key number). - Select the language of the UI and mnemonic. - Choose the number of validators. Remember: 1 GNO = 1 validator. You can run many validators in the same machine. - Choose gnosis on the network/chain name. Choose chiado on the network/chain name. - Create a password to encrypt the keys. - The mnemonic (seed phrase) will show on screen. Save it in a secure place (ideally offline). - Type your mnemonic to confirm in the tool. - Wait until the keys are created. Two types of files will be generated: - `deposit_data-*.json` - One `keystore-*.json` per validator - Save the location of the generated keys, and copy them in a backup USB memory or any other secure storage. :::success For custom setup and more instructions, check the [Validator Data Generation tool documentation](https://github.com/gnosischain/validator-data-generator/). ::: --- // File: node/manual/validator/_partials/_generate_validator_keys_wagyu 1. Download the latest release of the Gnosis Wagyu Key Gen from [here](https://github.com/alexpeterson91/wagyu-key-gen/releases). There are binaries posted for Windows, macOS, Linux AMD64, and Linux ARM64, choose the appropriate binary for your OS, (or build from the source code if you’re so inclined). ![DAppNode Step 3b](/img/node/dappnode-step3b.png) 2. Once you have downloaded the appropriate binary for your OS and are disconnected from the internet, go ahead and open the program. You will be given 2 options, either create a new mnemonic or import an existing mnemonic. The GUI is very user friendly and explains all steps along the way. Below are screenshots showing the flow for creating a new mnemonic. If importing a mnemonic you will need to ensure you select the proper start index on the configuration page so that you don’t create duplicate keys. ![DAppNode Step 3c](/img/node/dappnode-step3c.png) ![DAppNode Step 3d](/img/node/dappnode-step3d.png) ![DAppNode Step 3e](/img/node/dappnode-step3e.png) ![DAppNode Step 3f](/img/node/dappnode-step3f.png) You will be shown this once again before you need to confirm it by entering each word one at a time. ![DAppNode Step 3g](/img/node/dappnode-step3g.png) ![DAppNode Step 3h](/img/node/dappnode-step3h.png) Fill this with the mnemonic you just created to confirm. ![DAppNode Step 3i](/img/node/dappnode-step3i.png) ![DAppNode Step 3j](/img/node/dappnode-step3j.png) :::caution Be sure to enter a withdrawal address at this step. This address will be used to receive partial or full withdrawals. You can also choose not to enter an address at this step, but please note that updating it later can be difficult. [Withdrawals](../node/management/withdrawals.md) Please note that once you have chosen a withdrawal address (either at this step or later), it will not be possible to update it to another address. Therefore, make sure to choose an address that you control and that is secure. ::: :::info If you are running this program to generate keys within the context of the DAppNode Gnosis Chain Hardware Validator Incentive Program, make sure to generate 4 validators and to fill in the ETH1 Withdrawal Address Field with an address you have full control over. Also make sure to choose a directory that reflects the folder where you want the files to be saved. ::: ![DAppNode Step 3k](/img/node/dappnode-step3k.png) Confirm your keystore password. ![DAppNode Step 3l](/img/node/dappnode-step3l.png) Select the folder where your keys should be saved. ![DAppNode Step 3m](/img/node/dappnode-step3m.png) ![DAppNode Step 3n](/img/node/dappnode-step3n.png) Confirm that your keys have been generated. ![DAppNode Step 3o](/img/node/dappnode-step3o.png) The key generation is complete, and your keys have been saved to the folder you selected. --- // File: node/manual/validator/_partials/_install-validator import Tabs from '@theme/Tabs'; import TabItem from '@theme/TabItem'; import InstallTekuValidatorPartial from '@site/docs/node/manual/validator/_partials/clients/_install_validator_teku.md'; ```mdx-code-block import InstallLighthouseValidatorPartial from '@site/docs/node/manual/validator/_partials/clients/_install_validator_lighthouse.md'; import InstallLodestarValidatorPartial from '@site/docs/node/manual/validator/_partials/clients/_install_validator_lodestar.md'; ``` :::info Please refer to [Run a Beacon Node: Nimbus](../../beacon/nimbus.md) ::: ```mdx-code-block ``` :::info Please refer to [Run a Beacon Node: Prysm](../../beacon/prysm.md) ::: ```mdx-code-block ``` --- // File: node/manual/validator/_partials/_monitor_logs_docker import Tabs from '@theme/Tabs'; import TabItem from '@theme/TabItem'; ```shell docker logs -f --tail 500 execution ``` ```shell docker logs -f --tail 500 consensus ``` ```shell docker logs -f --tail 500 validator ``` --- // File: node/manual/validator/_partials/_verify-validator After [depositing](../deposit.md) and starting your validator, your validator will go through a process of becoming active. ![](/img/node/verify/verify-status.png) **Image:** Process of Validator Activation You can verify the status of your validators following these steps: 1. Navigate to the [deposit tool](https://deposit.gnosischain.com) and click on the `Validator Status` tab.
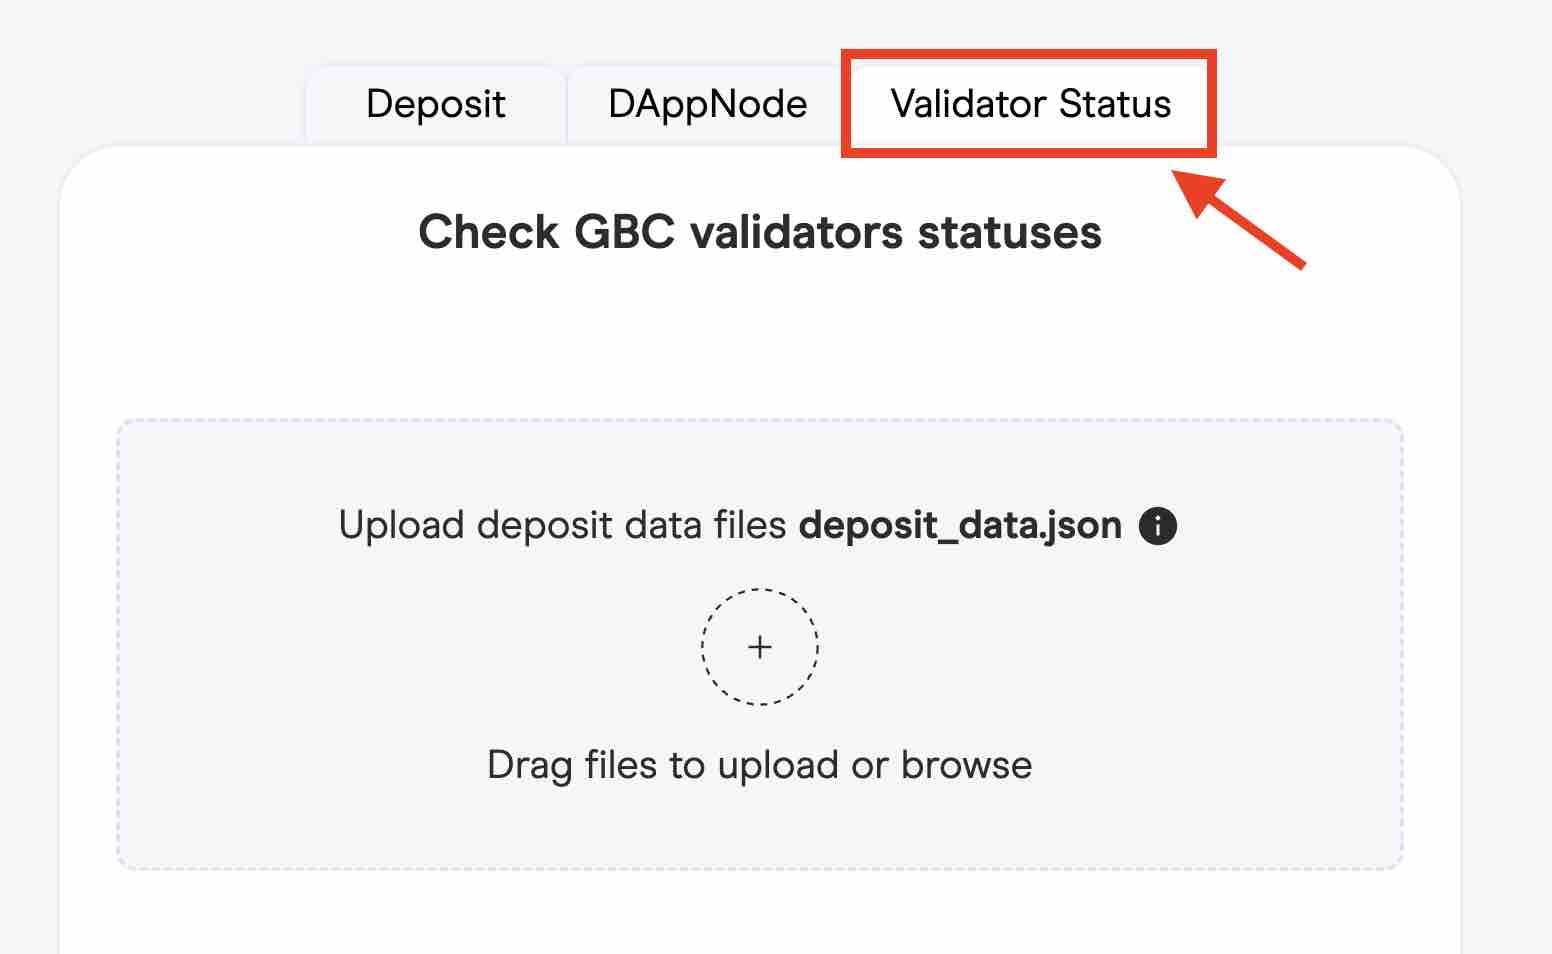
2. Upload your `deposit_data.json` file used during the [deposit](../deposit.md) step.
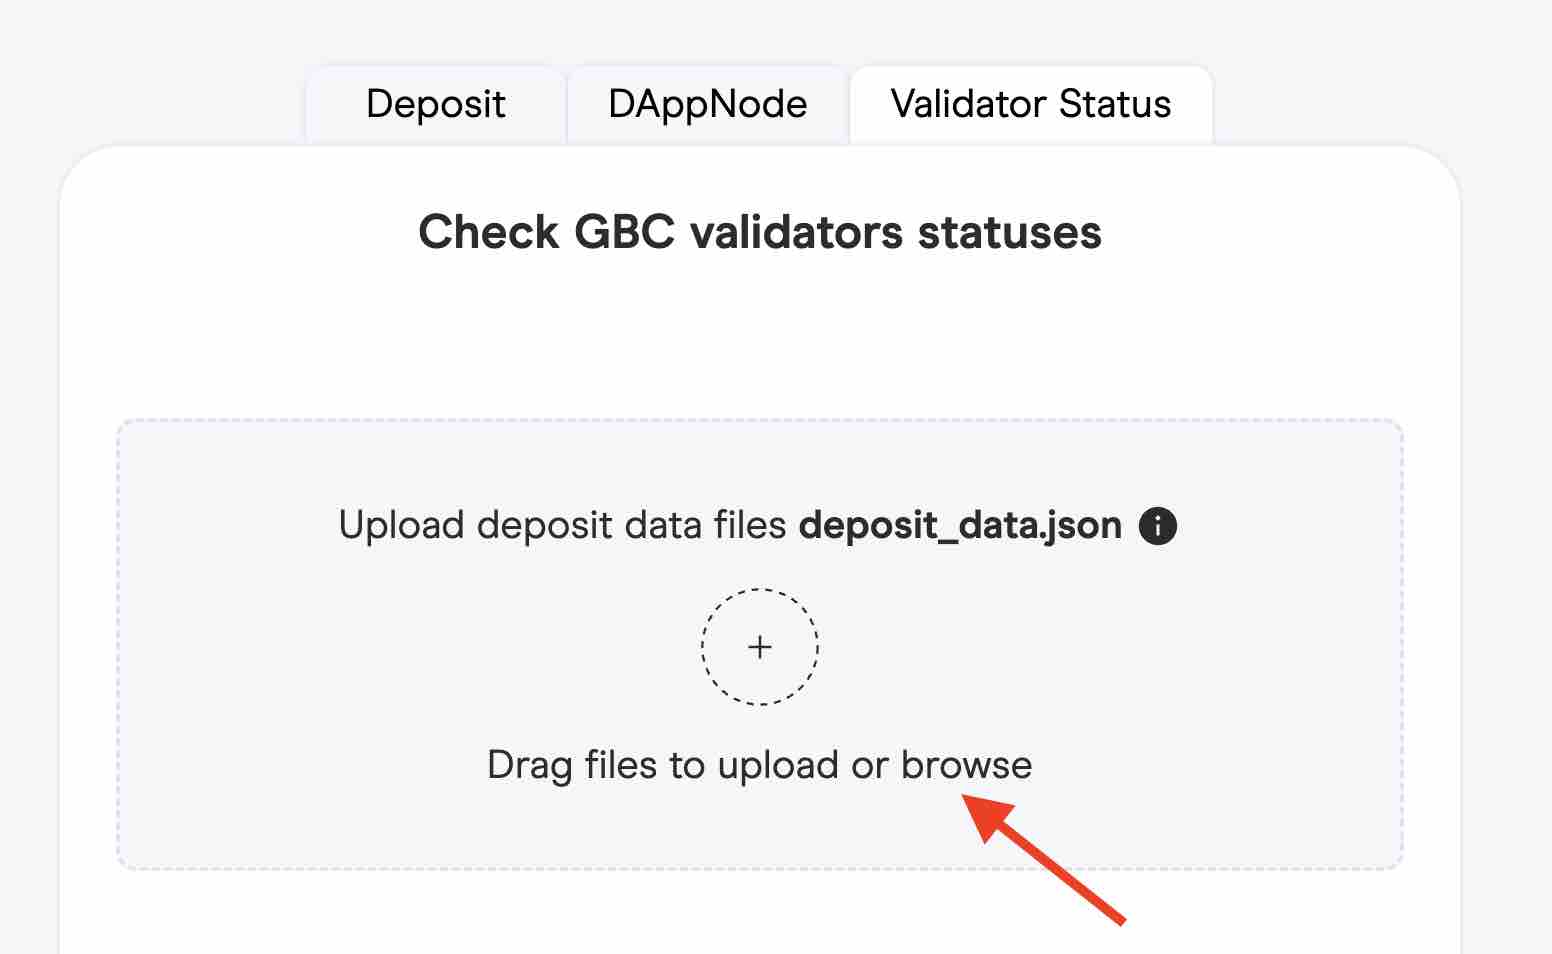
3. Check the status of all your validators included in the `deposit_data.json` file.
4. Optionally, click on the `import all validators into the Beacon Chain Explorer Dashboard` to see detailed status of your validators.
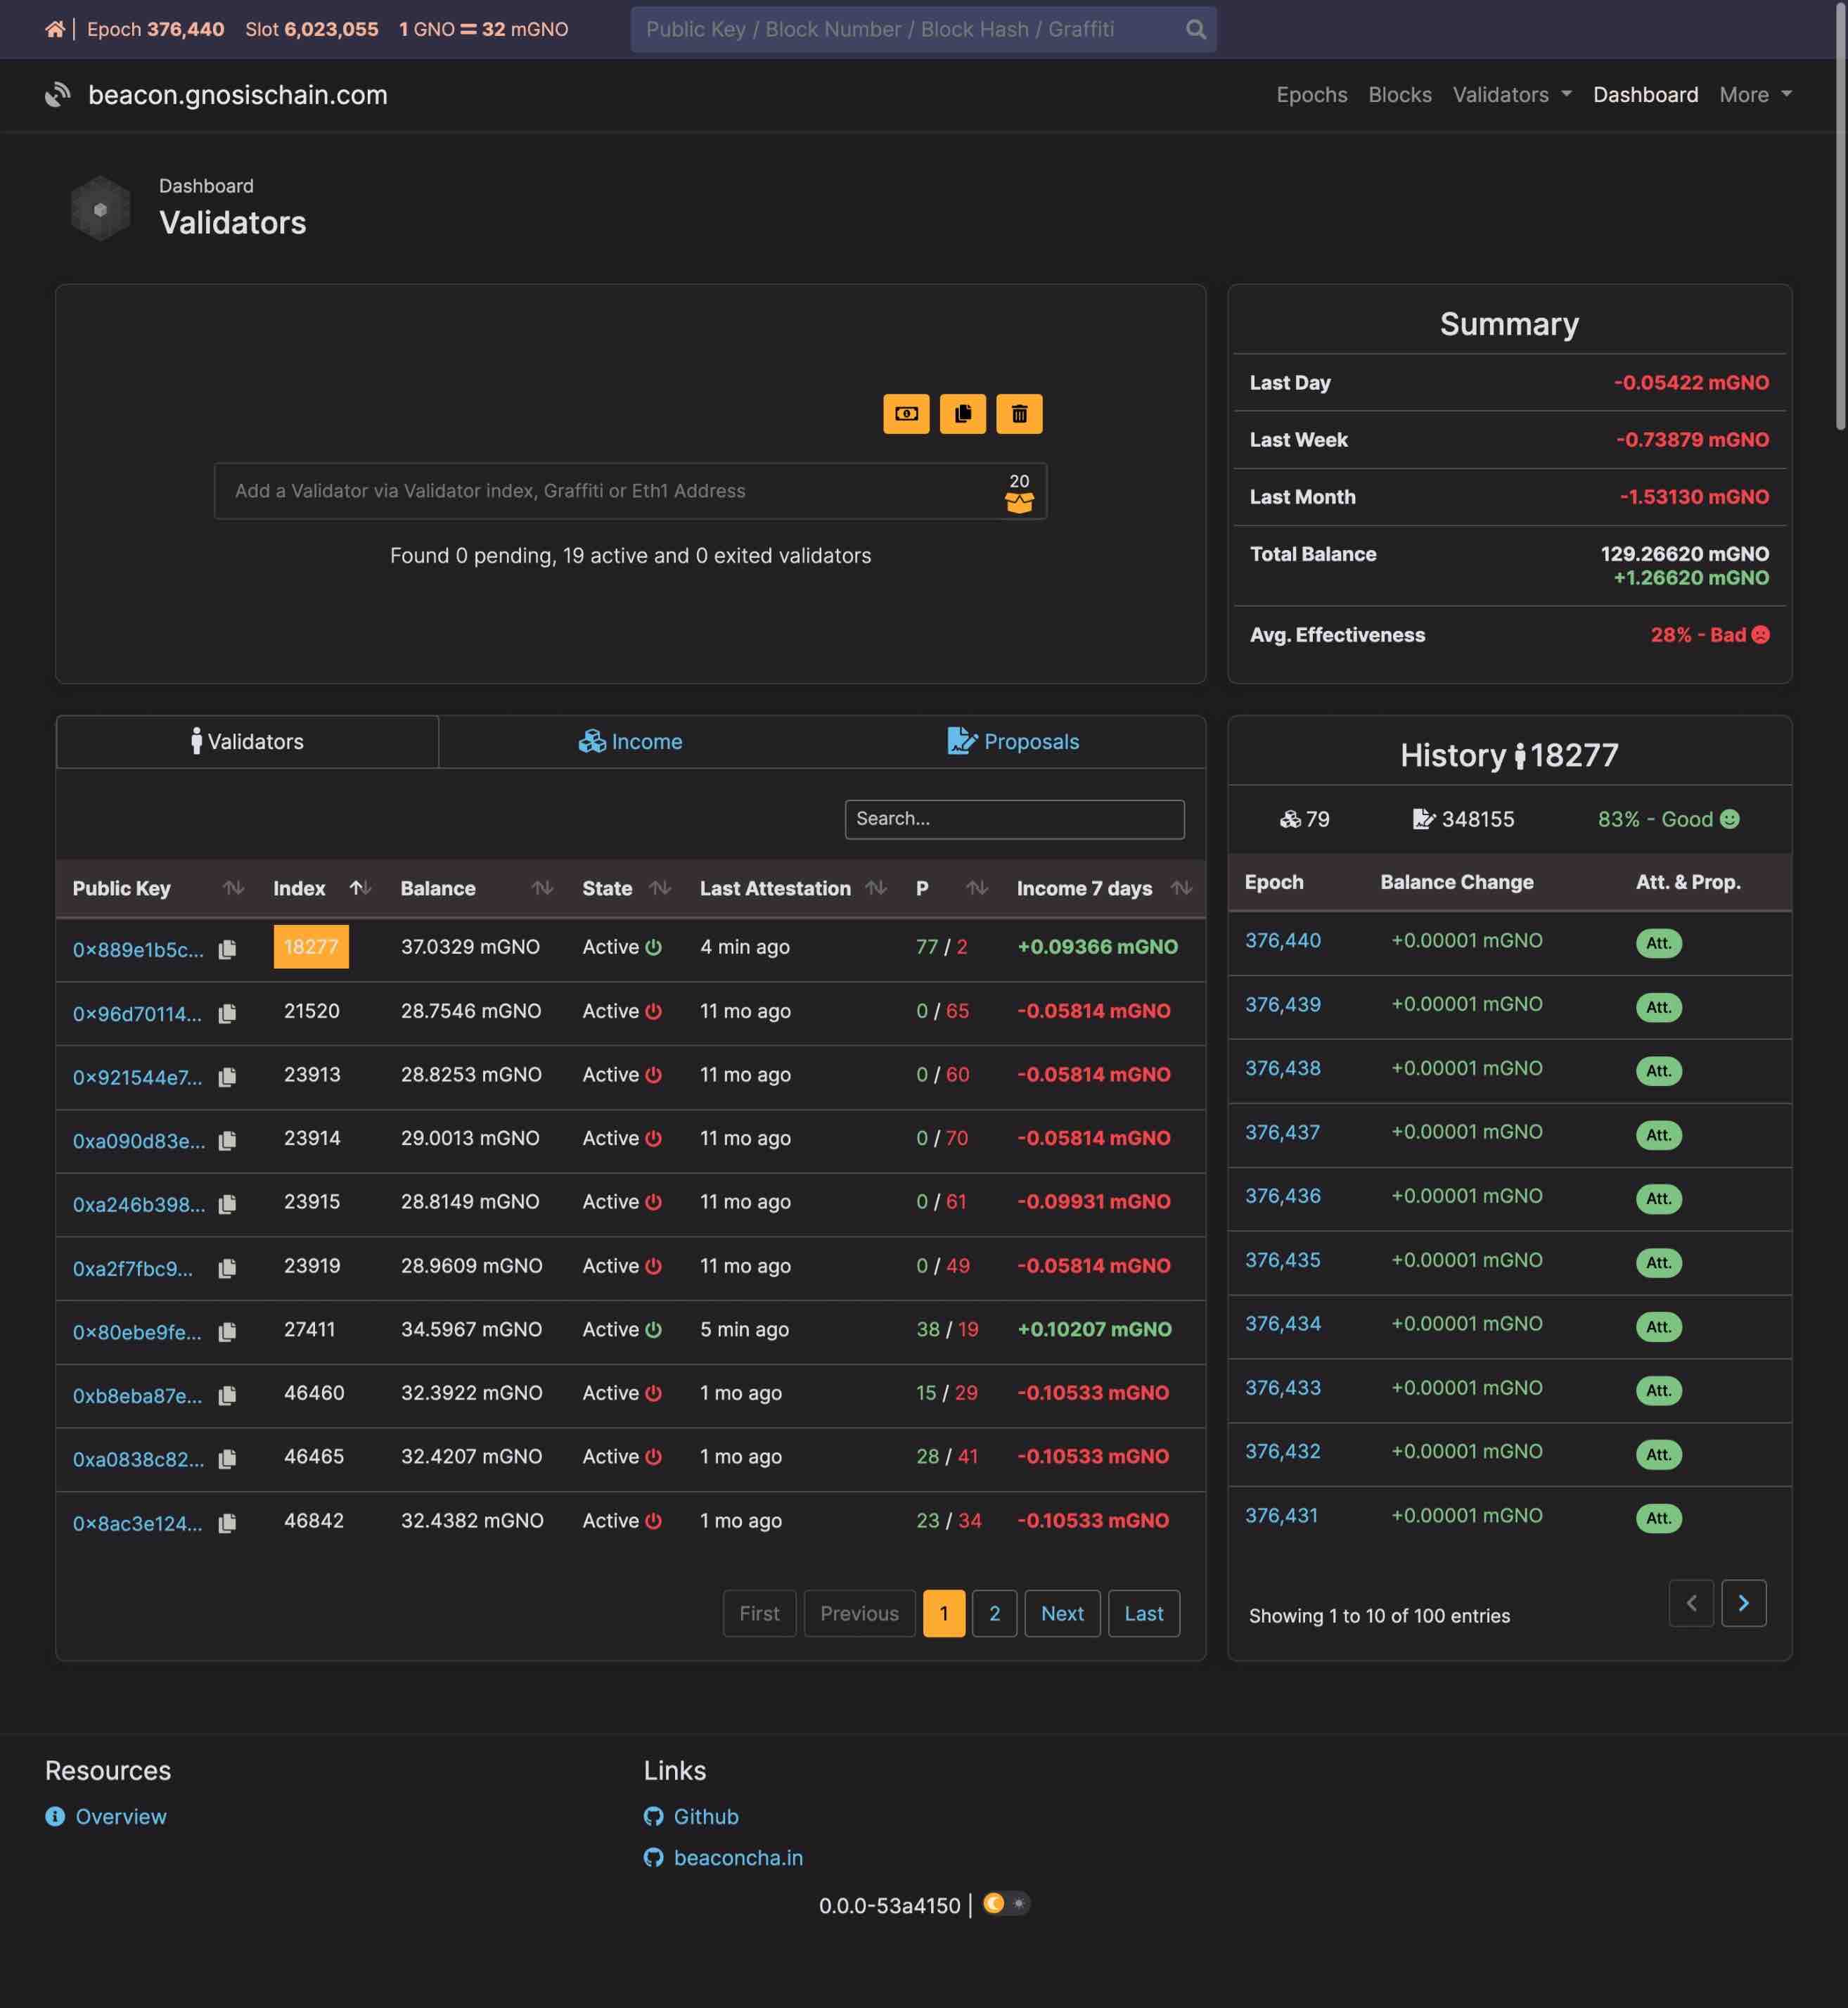
5. The Gnosis [Beacon Chain Explorer](https://gnosischa.in/) is a fork of the [Ethereum Beaconcha.in](https://beaconcha.in/) explorer. See more about the validator statuses and [Deposit Process](https://kb.beaconcha.in/ethereum-2.0-depositing) in the Beaconcha.in Knowledge Base. --- // File: node/manual/validator/_partials/clients/_install_validator_lighthouse import Tabs from '@theme/Tabs'; import TabItem from '@theme/TabItem'; :::info Lighthouse only runs on Linux. To run it on Windows, [Install Linux on Windows with WSL](https://learn.microsoft.com/en-us/windows/wsl/install), and follow the instructions on the WSL terminal. ::: To run a validator, we need to first import the keys generated in the previous step. * In a new command line window, navigate to the `consensus` folder and execute Lighthouse validator client * To ease the import process, we will create a `password.txt` file containing the password used to encrypt the validator keys. ```shell echo 'PLACE_HERE_YOUR_PASSWORD' > keystores/password.txt ``` * Import the validator keys using lighthouse: ```shell ./lighthouse account_manager validator import \ --network gnosis \ --password-file keystores/password.txt \ --reuse-password \ --directory keystores \ --datadir validators ``` * Start your lighthouse validator: ```shell ./lighthouse validator_client \ --network gnosis \ --datadir validators \ --enable-doppelganger-protection \ # highlight-start --suggested-fee-recipient="0x0" \ # highlight-end --metrics \ --metrics-address=0.0.0.0 \ --metrics-port=5064 \ # highlight-start --graffiti "gnosis-docs-graffiti" # highlight-end ``` Replace `suggested-fee-recipient` with your Gnosis address. This fee recipient address will receive tips from user transactions from the block the validator proposed. If not set, the tips will be sent to zero address, that is burnt completely. It is strongly recommended that you configure this value in your setup. Learn more about [suggested fee recipient](https://lighthouse-book.sigmaprime.io/suggested-fee-recipient.html) flag in Lighthouse docs. Replace `graffiti` with your own [graffiti](https://lighthouse-book.sigmaprime.io/graffiti.html). It is an optional field that can be used to add a message to the [block](https://ethereum.org/en/developers/docs/blocks/) by the proposer.
--- // File: node/manual/validator/_partials/clients/_install_validator_lodestar import Tabs from '@theme/Tabs'; import TabItem from '@theme/TabItem'; :::info Lodestar only runs on Linux. To run it on Windows, [Install Linux on Windows with WSL](https://learn.microsoft.com/en-us/windows/wsl/install), and follow the instructions on the WSL terminal. ::: To run a validator, we need to first import the keys generated in the previous step. * In a new command line window, navigate to the `consensus` folder and execute Lodestar validator client * To ease the import process, we will create a `password.txt` file containing the password used to decrypt the validator keys. ```shell echo 'PLACE_HERE_YOUR_PASSWORD' > keystores/password.txt ``` You can import the keys when starting the validator. * Import the validator keys using Lodestar: ```shell ./lodestar validator \ --network=gnosis \ --importKeystores=keystores \ --importKeystoresPassword=keystores/password.txt \ --dataDir=/data/validators \ # highlight-start --suggestedFeeRecipient=${FEE_RECIPIENT} \ --graffiti=${GRAFFITI} # highlight-end ``` Replace `suggestedFeeRecipient` with your Gnosis address. This fee recipient address will receive tips from user transactions from the block the validator proposed. If not set, the tips will be sent to zero address, that is burnt completely. It is strongly recommended that you configure this value in your setup. Learn more about [suggestedFeeRecipient](https://chainsafe.github.io/lodestar/validator-management/vc-configuration/#configuring-the-fee-recipient-address) flag in Lodestar docs. Replace `graffiti` with your own [graffiti](https://chainsafe.github.io/lodestar/validator-management/validator-cli/#-graffiti). It is an optional field that can be used to add a message to the [block](https://ethereum.org/en/developers/docs/blocks/) by the proposer.
--- // File: node/manual/validator/_partials/clients/_install_validator_teku import Tabs from '@theme/Tabs'; import TabItem from '@theme/TabItem'; :::info If you're using Windows, please [Install Linux on Windows with WSL](https://learn.microsoft.com/en-us/windows/wsl/install), and follow the instructions on the WSL terminal. ::: To run a validator, we need to first import the keys generated in the previous step. * In a new command line window, navigate to the `consensus` folder and execute Teku validator client * To ease the import process, we will create a password txt file containing the password used to encrypt the validator keys. ```shell echo 'PLACE_HERE_YOUR_PASSWORD' > keystores/keystore-${m_...}.json.txt ``` If the Launchpad creates a key named keystore-m_12381_3600_0_0_0-1596485378.json, then the password file must be named keystore-m_12381_3600_0_0_0-1596485378.txt to comply with [EIP-2335](https://docs.teku.consensys.net/en/latest/HowTo/Get-Started/Connect/Connect-To-Mainnet/#create-a-password-file-for-each-validator-key) You can import the keys when starting the validator. * navigate to teku folder ```shell cd teku-${version} ``` * Execute Teku Beacon Chain and Validator(s): ```shell ./bin/teku \ --network=gnosis \ --ee-endpoint=http://localhost:8551 \ # highlight-next-line --ee-jwt-secret-file=${PATH_TO_JWT_SECRET} \ --metrics-enabled=true \ --rest-api-enabled=true \ # highlight-start --initial-state=https://checkpoint.gnosis.gateway.fm//eth/v2/debug/beacon/states/finalized \ --validators-proposer-default-fee-recipient=${Fee Recipient Address} \ --validator-keys=${path to key file}:${path to password file} --validators-graffiti=${GRAFFITI} # highlight-end ``` If you wish to run validator only, run the following command: ```shell ./bin/teku validator-client \ --network=gnosis \ # highlight-start --beacon-node-api-endpoint=${endpoint} \ --validator-keys=${path to key file}:${path to password file} # highlight-end ``` Replace `validators-proposer-default-fee-recipient` with your Gnosis address. This fee recipient address will receive tips from user transactions from the block the validator proposed. If not set, the tips will be sent to zero address, that is burnt completely. It is strongly recommended that you configure this value in your setup. Learn more about [validators-proposer-default-fee-recipient](https://docs.teku.consensys.net/Reference/CLI/CLI-Syntax#validators-proposer-default-fee-recipient) flag in Teku docs. Replace [`validator-keys`](https://docs.teku.consensys.net/Reference/CLI/CLI-Syntax#validator-keys) with the location where `keystores- *.json` and `keystore- *.txt` are stored, and [`beacon-node-api-endpoint`](https://docs.teku.consensys.net/Reference/CLI/Subcommands/Validator-Client#beacon-node-api-endpoint-beacon-node-api-endpoints) with the endpoint of the beacon node’s REST API (default is http://127.0.0.1:5051). Replace [`validators-graffiti`](https://docs.teku.consensys.net/Reference/CLI/CLI-Syntax#validators-graffiti) with your own graffiti. It is an optional field that can be used to add a message to the [block](https://ethereum.org/en/developers/docs/blocks/) by the proposer. Learn more about the CLI commands and their options [here](https://docs.teku.consensys.net/en/latest/Reference/CLI/CLI-Syntax/).
--- // File: node/manual/validator/deposit ## Overview - You will need to make a deposit of 1 GNO for each validator. - You can make a bulk deposit for up to 128 validators at a time. ### Pre-requisites - Execution Layer client and Beacon Node should be fully synced - Validator process should already be running ### GNO on Gnosis Chain - Validators need to be funded using [GNO on Gnosis Chain](/concepts/tokens/gno) - You will need to bridge GNO over from Ethereum to Gnosis Chain :::tip You can use [Transferto.xyz](https://transferto.xyz/) or the [Omnibridge](https://omni.gnosischain.com/bridge) to bridge GNO from Ethereum to Gnosis Chain. ::: ## Option 1: Deposit UI ### Step 1: Connect your Wallet 1. Go to [https://deposit.gnosischain.com/](https://deposit.gnosischain.com) and connect your web3 wallet on the Gnosis Chain to the application. In this example we use MetaMask. ![](/img/node/UI-1A.png) ![](/img/node/UI-2A.jpg) ### Step 2: Upload `deposit_data.json` 2. Select the Deposit tab. Upload your `deposit_data.json` file from [Step 4 of the interactive guide](/node/manual#step-4-run-a-validator) It will be located in the same folder as the generated keystores. :::note If you can't upload the file, you may want to check the file permissions to make sure the user account you are logged in as has read permissions. You can grant permissions using the `sudo chmod` command. ::: ![](/img/node/upload-info1.jpg) ### Step 3: Validate Deposit data 3. The app will validate the json file and list the number of validator deposits you are making and the required GNO to deposit. Click **Deposit** to continue. ![](/img/node/deposit-2.png) ### Step 4: Verify Transaction Parameters You are responsible for the transaction. Fraudulent websites might try to lure you into sending funds to them, instead of the official deposit contract. Make sure that you are sending the transaction with the correct data. :::caution Verify that the contract address you're interacting with is [0x9C58BAcC331c9aa871AFD802DB6379a98e80CEdb](https://gnosis.blockscout.com/address/0x9C58BAcC331c9aa871AFD802DB6379a98e80CEdb/transactions) (GNO on Gnosis Chain) ![](/img/node/safety-1.png) ::: :::caution Check that the transaction uses the `transferAndCall` method. ![](/img/node/safety-2.png) ::: :::caution Check that the transaction's data includes the Deposit Contract address ([0x0B98057eA310F4d31F2a452B414647007d1645d9](https://gnosis.blockscout.com/address/0x0B98057eA310F4d31F2a452B414647007d1645d9/transactions)) ``` 0x4000aea00000000000000000000000000b98057ea310f4d31f2a452b414647007d1645d9 ``` ![](/img/node/safety-3.png) ::: ### Step 5: Complete Deposit 4. Complete the deposit. ![](/img/node/confirm.png) ![](/img/node/dep-made.png) ### Step 6: Validator Activation :::tip It will take about 1.5 hours for your validators to start proposing and attesting to blocks. ::: - Following a successful deposit, the Gnosis Beacon Chain will wait for 1024 Gnosis Chain blocks plus up to 64 Gnosis Beacon Chain epochs before adding validators to the pool. - This is roughly 1 hour and 25 minutes before the validators start proposing and attesting blocks on the Gnosis Chain. - Once live, you can view your validator(s) on the explorer. Copy the pubkey(s) listed in the deposit_data.json file (a key will be generated for each validator as "pubkey": "<your-public-key>") and paste into the search box at [https://gnosischa.in/](https://gnosischa.in/). ### Step 7 (optional): Subscribe Autoclaim 5. Select the Autoclaim Rewards tab. Set the frequency and minimum threshold for automatic token claims based on your preference. After configuring, click **Register** to continue. ![](/img/node/autoclaim.jpg) ## Option 2: Direct interaction with Contracts A modification to the Gnosis Chain deposit contract allows you to deposit in batches (this functionality is not available for the ETH2 deposit contract). One transaction can be used to initiate deposits for up to 128 validators. The assumption is that every validator deposits 1 GNO in every entry of the batch. The following script simplifies the process. ### Step 1: Get Deposit Script Pull the docker image with the deposit script: ```bash docker pull ghcr.io/gnosischain/deposit-script:latest ``` ### Step 2: Configure `.env` file Prepare `.env` file with the following lines: ```bash STAKING_ACCOUNT_PRIVATE_KEY=0000000000000000000000000000000000000000000000000000000000000000 RPC_URL=https://rpc.gnosischain.com GAS_PRICE=2000000000 # number of deposits in one transaction, should be in range [1, 128] BATCH_SIZE=128 # total number of deposits to read from file N=256 # index of the first deposit to read from file OFFSET=0 # address of the GNO token TOKEN_ADDRESS=0x9C58BAcC331c9aa871AFD802DB6379a98e80CEdb # address of the GBC deposit contract DEPOSIT_CONTRACT_ADDRESS=0x0B98057eA310F4d31F2a452B414647007d1645d9 # block where the deposit contract was deployed at START_BLOCK_NUMBER=19469077 ``` `STAKING_ACCOUNT_PRIVATE_KEY` is the private key of the account which holds the necessary amount of GNO tokens for deposit. Any account may be used for funding, but it must also have a small amount of xDai to process transactions. In the above example, 2 transactions will occur with 256 total deposits of 1 GNO each. ### Step 3: Import `deposit_data.json` files Copy the `deposit_data.json` generated during [Step 4 of the interactive guide](/node/manual#step-4-run-a-validator) to the current directory. ### Step 4: Run Deposit script Run the deposit script (`/path/to/` should be a valid path to the .env file you have created): ```bash docker run --rm --env-file /path/to/.env \ -v $(pwd)/deposit_data-xxxxxxxxxx.json:/tmp/deposit_data.json \ ghcr.io/gnosischain/deposit-script:latest /tmp/deposit_data.json ``` ### Step 5: Validator Activation :::tip It will take about 1.5 hours for your validators to start proposing and attesting to blocks. ::: - Following a successful deposit, the Gnosis Beacon Chain will wait for 1024 Gnosis Chain blocks plus up to 64 Gnosis Beacon Chain epochs before adding validators to the pool. - This is roughly 1 hour and 25 minutes before the validators start proposing and attesting blocks on the Gnosis Chain. - Once live, you can view your validator(s) on the explorer. Copy the pubkey(s) listed in the deposit_data.json file (a key will be generated for each validator as "pubkey": "<your-public-key>") and paste into the search box at [https://gnosischa.in//](https://gnosischa.in/). ## Option 3: Running Your Own Deposit UI Instance Locally ### Step 1: Dependencies Ensure that you have [NodeJS](https://nodejs.org/en) and [npm](https://docs.npmjs.com/downloading-and-installing-node-js-and-npm) installed. You can check the installation by running ```node -v``` and ```npm -v``` in your terminal. Additionally, install [Next.js](https://nextjs.org/) by running the command ```npm install next```. ### Step 2: Download the Deposit UI from GitHub Download the Deposit UI files from the corresponding Gnosis Chain [GitHub Repo](https://github.com/gnosischain/gbc-deposit-ui/). Extract the ZIP file to wherever you want to. ### Step 3: Edit Configuration Files 1. Edit the file ```wagmi.ts``` in the ```main project folder```: change the **Mainnet RPC** to ```https://gnosis-rpc.publicnode.com``` on ```line 11``` (you may also choose another RPC, not all work) 2. Edit the file ```fetchEvents.ts``` in the ```utils folder```: change the ```BLOCK_RANGE_SIZE``` to **```10000```** on ```line 6``` (previous value was ```1000000```) ### Step 4: Run the UI 1. Run the UI using the command ```npm run dev``` (in the main folder of the UI); if this doesn't work, it might need to be built or dependencies are missing try something like ```npm install typescript```. 2. Open [http://localhost:3000/](http://localhost:3000/) in your browser, the UI should appear now if it all works correctly. ### Step 5: Use the UI 1. Connect your wallet and ensure you are connected on the right network (Gnosis Chain). 2. Ensure that you have an adequate amount of GNO in your wallet to deposit to all pending validators listed in your ```deposit_data.json```. 3. Add your ```deposit_data.json``` file to the UI once you're asked for it. 4. Wait for the UI to load the completed deposits from the external RPC. Please have some patience as the RPC is rate limited. :::tip This process will take about 20 minutes. The UI will not show any progress for getting the blocks from the RPC once you've submitted your JSON file. If you use the browser console window (using right-click "Inspect"), you can see the block number going up though. ::: ### Step 6: Send Deposit Transactions For each validator in the file, a deposit transaction will be generated and sent to your wallet. Verify the transaction details (closer described in Option 1 above). Once verified, send out the transactions and wait for validator activation. ### Step 7: Validator Activation :::tip It will take about 1.5 hours for your validators to start proposing and attesting to blocks. ::: - Following a successful deposit, the Gnosis Beacon Chain will wait for 1024 Gnosis Chain blocks plus up to 64 Gnosis Beacon Chain epochs before adding validators to the pool. - This is roughly 1 hour and 25 minutes before the validators start proposing and attesting blocks on the Gnosis Chain. - Once live, you can view your validator(s) on the explorer. Copy the pubkey(s) listed in the deposit_data.json file (a key will be generated for each validator as "pubkey": "<your-public-key>") and paste into the search box at [https://gnosischa.in/](https://gnosischa.in/). ## Appendix ### Depositing For Chiado Testnet Required: 1. Chiado Testnet xDai and GNO: https://faucet.chiadochain.net/ 2. Connect to Deposit UI [https://deposit.gnosischain.com/](https://deposit.gnosischain.com) using Gnosis Chiado Testnet and follow the Option 1: Deposit UI. --- // File: node/manual/validator/generate-keys/README The purpose of the validator private key is to actively sign on-chain operations such as block proposals and attestations. Generate your validator keys using one of the following methods: 1. [Command Line Tool](./cli/) 2. [Wagyu Key Gen](./wagyu.md) Read more about Keys in [Beaconcha.in KB](https://kb.beaconcha.in/ethereum-2-keys). --- // File: node/manual/validator/generate-keys/cli/README Select the Operating System and follow the instructions: import GenerateValidatorKeysPartial from '@site/docs/node/manual/validator/_partials/_generate_validator_keys_cli.md'; --- // File: node/manual/validator/generate-keys/wagyu import GenerateValidatorKeysWagyuPartial from '@site/docs/node/manual/validator/_partials/_generate_validator_keys_wagyu.md'; --- // File: node/manual/validator/verify import VerifyValidatorPartial from '@site/docs/node/manual/validator/_partials/_verify-validator.md'; --- // File: node/participate-validator/liquid-staking # Liquid Staking Liquid staking allows anyone to stake on Gnosis Chain without running the infrastructure themselves. It also gives stakers an opportunity to use their tokenized staked resources (osGNO) for liquidity, yield farming or lending while still helping to secure Gnosis Chain. StakeWise - a long-standing partner of the Gnosis ecosystem - is the primary provider of liquid-staking for GNO, through their osGNO token. Following the [launch of StakeWise V3](https://stakewise.medium.com/announcing-the-launch-of-stakewise-v3-on-gnosis-chain-0231285bd8e3) in July 2024, GNO holders can stake with any of a variety of providers through StakeWise to mint osGNO. This page explains how liquid staking with StakeWise works. ![](/img/node/stakewise-1.png) ## osGNO StakeWise V3 provides users with a marketplace of staking providers, each competing to offer the highest yields, the lowest fees and the most consistent performance. By distributing demand for staking among a selection of providers, StakeWise helps to decentralise the network's validator set and increase the quantity of assets securing the network. However, in unifying arrangements with each of these providers around a single liquid-staking token — osGNO — it also provides a consistent and reliable experience for users, regardless of their chosen provider. *"osGNO"* stands for overcollateralized staked token. *"Overcollateralized"* refers to the limits on osGNO issuance, where only 90% of the stake (i.e. GNO tokens) provided can be made liquid through osGNO. However, 100% of the provided stake serves as backing for the liquid-staking token, leaving a substantial buffer in the event that stake is slashed for any reason. ![](/img/node/stakewise-2.png) osGNO ([0xF490c80aAE5f2616d3e3BDa2483E30C4CB21d1A0](https://gnosisscan.io/token/0xf490c80aae5f2616d3e3bda2483e30c4cb21d1a0)) is a non-rebasing token, meaning that the balance of tokens held by the user is naturally static, but the value of each token rises continually as the underlying amount of GNO per token increases due to staking rewards. This enables seamless integration of osGNO into other DeFi applications like decentralised exchanges and lending protocols. This also means that osGNO is not issued 1:1 with GNO tokens, and you will receive less osGNO tokens than the underlying amount of GNO tokens backing them. StakeWise processes two fees as part of its V3 implementation on Gnosis Chain: * A flat fee of 5% of all staking rewards associated with your osGNO tokens is sent to StakeWise DAO. This fee is omitted for users who stake with StakeWise but do not mint osGNO; and * A *"Vault Fee"* is set by the provider and charged on all rewards earned by the GNO you stake with them. For StakeWise's own Genesis Vault, this fee is set at 15% of all rewards earned. ## StakeWise Tutorial To access StakeWise V3 on Gnosis Chain and mint osGNO, simply: 1) Head to [https://app.stakewise.io](https://app.stakewise.io), connect your wallet, and switch to Gnosis Chain. ![](/img/node/stakewise-3.png) 2) On the Stake interface, you can select the amount of GNO you wish to stake, approve it for staking and then stake immediately into osGNO with the provider(s) allocated by the app. ![](/img/node/stakewise-4.png) 3) Alternatively, head to the Vaults interface to select the provider you wish to stake with. Once you've selected a provider and moved to their page, select *"Stake"*, enter the amount of GNO, approve it and then stake it. ![](/img/node/stakewise-5.png) 4) Where you've staked with a specific vault, the relevant vault page will then show the amount staked with an option to *"Unstake"*. Below, it will also show the amount of osGNO minted for your stake, as well as options to *"Mint"* and *"Burn"* osGNO as appropriate. ![](/img/node/stakewise-6.png) There you have it! You can now use your osGNO tokens freely, safe in the knowledge that your deposited GNO is earning staking rewards with StakeWise V3. ![](/img/node/stakewise-7.png) ## V2 Migration :::note StakeWise V2 has been deprecated, so will no longer be maintained. Please migrate to StakeWise V3 to continue earning staking rewards and supporting the network. ::: Prior to the [V3 launch](https://stakewise.medium.com/announcing-the-launch-of-stakewise-v3-on-gnosis-chain-0231285bd8e3), StakeWise operated its V2 staking protocol for GNO on Gnosis Chain. Though support for V2 has been deprecated, liquidity for some V2 assets remain on the chain. StakeWise V2 consisted of 2 core assets: * sGNO ([0xa4ef9da5ba71cc0d2e5e877a910a37ec43420445 ](https://gnosisscan.io/address/0xa4ef9da5ba71cc0d2e5e877a910a37ec43420445)) represents the initial stake of GNO deposited into StakeWise. This figure is static, but is used as the basis to calculate rewards owing to the user; and * rGNO ([0x6ac78efae880282396a335ca2f79863a1e6831d4 ](https://gnosisscan.io/address/0x6ac78efae880282396a335ca2f79863a1e6831d4)) represents the earned staking rewards and are updated on a periodic basis, based on the amount of sGNO held. The V2 contracts frequently check and update the rGNO balance of all sGNO holders, to reflect both rewards earned and deductions from any slashing. In V2, StakeWise charged a 10% commission for operating the network on all staking rewards before distributing them as rGNO. At all times, the total amount of tokens that had been issued to users in StakeWise V2 was equal to: *sGNO + rGNO = GNO deposits + (GNO rewards * (100% — 10%))*. ![](/img/node/stakewise-8.png) If you hold or purchase any remaining sGNO or rGNO, StakeWise has provided a migration interface to move the underlying GNO tokens into V3. Follow this [tutorial](https://docs.stakewise.io/guides/stakewise-v2/migrate-to-stakewise-v3-on-gnosis-chain) to migrate, and check the Genesis Vault in V3 to find your migrated GNO. ## Learn More You can find out more about StakeWise V3, the Gnosis deployment and osGNO with the following resources: * Read the StakeWise V3 [Documentation](https://docs.stakewise.io/); * Read StakeWise's [launch blog post](https://stakewise.medium.com/stakewise-v3-on-gnosis-chain-what-to-expect-how-to-migrate-1149a5367c76) on what to expect with osGNO; * Watch the Gnosis [Community Call](https://www.youtube.com/watch?v=fVVWtY_YBFo) with StakeWise from July 2024; and * Reach out to the community through the [StakeWise Discord Server](https://discord.gg/StakeWise). If you're interested in operating a vault in StakeWise V3, check out the recording of the [Vault Operator Workshop](https://www.youtube.com/watch?v=kX11K4ymn1Q). --- // File: node/participate-validator/swarm/README # Swarm Swarm is a peer-to-peer network of Bee nodes that collectively provide censorship resistant decentralised storage and communication services. Swarm's mission is to shape the future towards a self-sovereign global society and permissionless open markets by providing scalable base-layer data storage infrastructure for the decentralised internet. Its incentive system is enforced through smart contracts on the Gnosis Chain blockchain and powered by the xBZZ token, making it economically self-sustaining. --- // File: node/participate-validator/swarm/a-quickstart-swarm import Tabs from '@theme/Tabs'; import TabItem from '@theme/TabItem'; # Swarm Quickstart Shell Script The following is a guide to get you started running a Bee full node with staking on Swarm using [the official shell script provided by Swarm](https://github.com/ethersphere/bee/blob/master/install.sh) which automatically detects your system and installs the correct version of Bee. :::warning Note that we append 127.0.0.1 (localhost) to our Bee API's port (1633 by default), since we do not want to expose our Bee API endpoint to the public internet, as that would allow anyone to control our node. Make sure you do the same, and it's also recommended to use a firewall to protect access to your node(s). ::: :::info The guide below is for a full Bee node with staking. To run a light node (uploads and downloads only), set `--full-node` to false, or to run in ultra light (downloads only) mode you can set both `--full-node` and `--swap-enable` to false. ::: ## Prerequisites ### Hardware :::warning If you are running on a home Wi-Fi you may need to configure your router to use [port forwarding](https://www.noip.com/support/knowledgebase/general-port-forwarding-guide) or take other steps to ensure your node is reachable by other nodes on the network. See [here](https://docs.ethswarm.org/docs/bee/installation/connectivity/#navigating-through-the-nat) for more guidance. If you are running on a VPS or cloud based server you will likely have no issues. ::: :::caution While it is possible to run multiple Bee nodes on a single machine, due to the high rate of I/O operations required by a full Bee node in operation, it is not recommended to run more than a handful of Bee nodes on the same physical disk (depending on the disk speed). ::: * Dual core, recent generation, 2ghz processor * 4gb RAM * 30gb SSD * Stable internet connection ### Software * A computer running a supported version of Linux (almost all commonly used distros should work). macOS will also work but you may need to slightly modify some commands. * A Gnosis Chain RPC endpoint (either by running your own node or the [free RPC endpoint](https://xdai.fairdatasociety.org) offered from the Fair Data Society. Other free public options are available at the [Gnosis Chain docs](https://docs.gnosischain.com/tools/RPC%20Providers/). * (Optional) [jq utility](https://jqlang.github.io/jq/) for formatting API output. * (Optional) [bashtop utility] for monitoring processes (such as our Bee node). :::info The [`jq` utility](https://jqlang.github.io/jq/) is used in this guide to automatically format the output from the Bee API. It can help make API output much more readable, however it is totally optional. ::: ### Tokens * A small amount of xDAI to pay for Gnosis Chain transactions, 0.1 xDAI should be enough * 10 xBZZ (BZZ on Gnosis Chain) is required for staking ## Full node setup process Run the install shell script using either `curl` or `wget`: :::caution In the example below, the version is specified using `TAG=v2.2.0`, make sure that you [check if there is a newer tagged version of Bee](https://github.com/ethersphere/bee/tags) and if so, modify the commands below to use the most recent tag number so that you have the latest version of Bee. ::: ```bash curl -s https://raw.githubusercontent.com/ethersphere/bee/master/install.sh | TAG=v2.2.0 bash ``` **wget** ```bash wget -q -O - https://raw.githubusercontent.com/ethersphere/bee/master/install.sh | TAG=v2.2.0 bash ``` Let's check that the script ran properly: ```bash= bee ``` If the script ran without any problems you should see this: ```bash= Ethereum Swarm Bee Usage: bee [command] Available Commands: start Start a Swarm node dev Start a Swarm node in development mode init Initialise a Swarm node deploy Deploy and fund the chequebook contract version Print version number db Perform basic DB related operations split Split a file into chunks printconfig Print default or provided configuration in yaml format help Help about any command completion Generate the autocompletion script for the specified shell Flags: --config string config file (default is $HOME/.bee.yaml) -h, --help help for bee Use "bee [command] --help" for more information about a command. ``` ### Start node Let's try starting up our node for the first time with the command below, make sure to pick a [strong password](https://xkcd.com/936/) of your own: ```bash bee start \ --password flummoxedgranitecarrot \ --full-node \ --swap-enable \ --api-addr 127.0.0.1:1633 \ --blockchain-rpc-endpoint https://xdai.fairdatasociety.org ``` :::info Command explained: 1. **`bee start`**: This is the command to start the Bee node. 2. **`--password flummoxedgranitecarrot`**: The password to decrypt the private key associated with the node. Replace "flummoxedgranitecarrot" with your actual password. 3. **`--full-node`**: This option enables the node to run in full mode, sharing its disk with the network, and becoming eligible for staking. 4. **`--swap-enable`**: This flag enables SWAP, which is the bandwidth incentives scheme for Swarm. It will initiate a transaction to set up the SWAP chequebook on Gnosis Chain (required for light and full nodes). 5. **`--api-addr 127.0.0.1:1633`**: Specifies that the Bee API will be accessible locally only via `127.0.0.1` on port `1633` and not accessible to the public. 6. **`--blockchain-rpc-endpoint https://xdai.fairdatasociety.org`**: Sets the RPC endpoint for interacting with the Gnosis blockchain (required for light and full nodes). ::: Logs will begin printing to the terminal, and should look like this: ```bash Welcome to Swarm.... Bzzz Bzzzz Bzzzz \ / \ o ^ o / \ ( ) / ____________(%%%%%%%)____________ ( / / )%%%%%%%( \ \ ) (___/___/__/ \__\___\___) ( / /(%%%%%%%)\ \ ) (__/___/ (%%%%%%%) \___\__) /( )\ / (%%%%%) \ (%%%) ! DISCLAIMER: This software is provided to you "as is", use at your own risk and without warranties of any kind. It is your responsibility to read and understand how Swarm works and the implications of running this software. The usage of Bee involves various risks, including, but not limited to: damage to hardware or loss of funds associated with the Ethereum account connected to your node. No developers or entity involved will be liable for any claims and damages associated with your use, inability to use, or your interaction with other nodes or the software. version: 2.2.0-06a0aca7 - planned to be supported until 11 December 2024, please follow https://ethswarm.org/ "time"="2024-09-24 18:15:34.383102" "level"="info" "logger"="node" "msg"="bee version" "version"="2.2.0-06a0aca7" "time"="2024-09-24 18:15:34.428546" "level"="info" "logger"="node" "msg"="swarm public key" "public_key"="0373fe2ab33ab836635fc35864cf708fa0f4a775c0cf76ca851551e7787b58d040" "time"="2024-09-24 18:15:34.520686" "level"="info" "logger"="node" "msg"="pss public key" "public_key"="03a341032724f1f9bb04f1d9b22607db485cccd74174331c701f3a6957d94d95c1" "time"="2024-09-24 18:15:34.520716" "level"="info" "logger"="node" "msg"="using ethereum address" "address"="0x1A801dd3ec955E905ca424a85C3423599bfb0E66" "time"="2024-09-24 18:15:34.533789" "level"="info" "logger"="node" "msg"="fetching target neighborhood from suggester" "url"="https://api.swarmscan.io/v1/network/neighborhoods/suggestion" "time"="2024-09-24 18:15:36.773501" "level"="info" "logger"="node" "msg"="mining a new overlay address to target the selected neighborhood" "target"="00100010110" "time"="2024-09-24 18:15:36.776550" "level"="info" "logger"="node" "msg"="using overlay address" "address"="22d502d022de0f8e9d477bc61144d0d842d9d82b8241568c6fe4e41f0b466615" "time"="2024-09-24 18:15:36.776576" "level"="info" "logger"="node" "msg"="starting with an enabled chain backend" "time"="2024-09-24 18:15:37.388997" "level"="info" "logger"="node" "msg"="connected to blockchain backend" "version"="erigon/2.60.7/linux-amd64/go1.21.5" "time"="2024-09-24 18:15:37.577840" "level"="info" "logger"="node" "msg"="using chain with network network" "chain_id"=100 "network_id"=1 "time"="2024-09-24 18:15:37.593747" "level"="info" "logger"="node" "msg"="starting debug & api server" "address"="127.0.0.1:1633" "time"="2024-09-24 18:15:37.969782" "level"="info" "logger"="node" "msg"="using default factory address" "chain_id"=100 "factory_address"="0xC2d5A532cf69AA9A1378737D8ccDEF884B6E7420" "time"="2024-09-24 18:15:38.160249" "level"="info" "logger"="node/chequebook" "msg"="no chequebook found, deploying new one." "time"="2024-09-24 18:15:38.728534" "level"="warning" "logger"="node/chequebook" "msg"="cannot continue until there is at least min xDAI (for Gas) available on address" "min_amount"="0.0003750000017" "address"="0x1A801dd3ec955E905ca424a85C3423599bfb0E66" ``` Here you can see that the node has started up successfully, but our node still needs to be funded with xDAI and xBZZ (xDAI for Gnosis Chain transactions and xBZZ for uploads/downloads and staking). ### Fund node Check the logs from the previous step. Look for the line which says: ``` "time"="2024-09-24 18:15:34.520716" "level"="info" "logger"="node" "msg"="using ethereum address" "address"="0x1A801dd3ec955E905ca424a85C3423599bfb0E66" ``` That address is your node's address on Gnosis Chain which needs to be funded with xDAI and xBZZ. Copy it and save it for the next step. xDAI is widely available from many different centralized and decentralized exchanges, just make sure that you are getting xDAI on Gnosis Chain, and not DAI on some other chain. See [this page](https://www.ethswarm.org/get-bzz) for a list of resources for getting xBZZ (again, make certain that you are getting the Gnosis Chain version, and not BZZ on Ethereum). After acquiring some xDAI and some xBZZ, send them to the address you copied above. ***How Much to Send?*** Only a very small amount of xDAI is needed to get started, 0.1 is more than enough. You can start with just 2 or 3 xBZZ for uploading small amounts of data, but you will need at least 10 xBZZ if you plan on staking. ### Initialize full node After sending the required tokens (~0.1 xDAI and 10 xBZZ) to your node's Gnosis Chain address, close the bee process in your terminal (`Ctrl + C`). Then start it again with the same command: ```bash bee start \ --password flummoxedgranitecarrot \ --full-node \ --swap-enable \ --api-addr 127.0.0.1:1633 \ --blockchain-rpc-endpoint https://xdai.fairdatasociety.org ``` After funding and restarting your node, the logs printed to the terminal should look something like this: ```bash Welcome to Swarm.... Bzzz Bzzzz Bzzzz \ / \ o ^ o / \ ( ) / ____________(%%%%%%%)____________ ( / / )%%%%%%%( \ \ ) (___/___/__/ \__\___\___) ( / /(%%%%%%%)\ \ ) (__/___/ (%%%%%%%) \___\__) /( )\ / (%%%%%) \ (%%%) ! DISCLAIMER: This software is provided to you "as is", use at your own risk and without warranties of any kind. It is your responsibility to read and understand how Swarm works and the implications of running this software. The usage of Bee involves various risks, including, but not limited to: damage to hardware or loss of funds associated with the Ethereum account connected to your node. No developers or entity involved will be liable for any claims and damages associated with your use, inability to use, or your interaction with other nodes or the software. version: 2.2.0-06a0aca7 - planned to be supported until 11 December 2024, please follow https://ethswarm.org/ "time"="2024-09-24 18:57:16.710417" "level"="info" "logger"="node" "msg"="bee version" "version"="2.2.0-06a0aca7" "time"="2024-09-24 18:57:16.760154" "level"="info" "logger"="node" "msg"="swarm public key" "public_key"="0373fe2ab33ab836635fc35864cf708fa0f4a775c0cf76ca851551e7787b58d040" "time"="2024-09-24 18:57:16.854594" "level"="info" "logger"="node" "msg"="pss public key" "public_key"="03a341032724f1f9bb04f1d9b22607db485cccd74174331c701f3a6957d94d95c1" "time"="2024-09-24 18:57:16.854651" "level"="info" "logger"="node" "msg"="using ethereum address" "address"="0x1A801dd3ec955E905ca424a85C3423599bfb0E66" "time"="2024-09-24 18:57:16.866697" "level"="info" "logger"="node" "msg"="using overlay address" "address"="22d502d022de0f8e9d477bc61144d0d842d9d82b8241568c6fe4e41f0b466615" "time"="2024-09-24 18:57:16.866730" "level"="info" "logger"="node" "msg"="starting with an enabled chain backend" "time"="2024-09-24 18:57:17.485408" "level"="info" "logger"="node" "msg"="connected to blockchain backend" "version"="erigon/2.60.1/linux-amd64/go1.21.5" "time"="2024-09-24 18:57:17.672282" "level"="info" "logger"="node" "msg"="using chain with network network" "chain_id"=100 "network_id"=1 "time"="2024-09-24 18:57:17.686479" "level"="info" "logger"="node" "msg"="starting debug & api server" "address"="127.0.0.1:1633" "time"="2024-09-24 18:57:18.065029" "level"="info" "logger"="node" "msg"="using default factory address" "chain_id"=100 "factory_address"="0xC2d5A532cf69AA9A1378737D8ccDEF884B6E7420" "time"="2024-09-24 18:57:18.252410" "level"="info" "logger"="node/chequebook" "msg"="no chequebook found, deploying new one." "time"="2024-09-24 18:57:19.576100" "level"="info" "logger"="node/chequebook" "msg"="deploying new chequebook" "tx"="0xf7bc9c5b04e96954c7f70cecfe717cad9cdc5d64b6ec080b2cbe712166ce262a" "time"="2024-09-24 18:57:27.619377" "level"="info" "logger"="node/transaction" "msg"="pending transaction confirmed" "sender_address"="0x1A801dd3ec955E905ca424a85C3423599bfb0E66" "tx"="0xf7bc9c5b04e96954c7f70cecfe717cad9cdc5d64b6ec080b2cbe712166ce262a" "time"="2024-09-24 18:57:27.619437" "level"="info" "logger"="node/chequebook" "msg"="chequebook deployed" "chequebook_address"="0x261a07a63dC1e7200d51106155C8929b432181fb" ``` Here we can see that after our node has been funded, it was able to issue the transactions for deploying the chequebook contract, which is a prerequisite for running a staking node. Next your node will begin to sync [postage stamp data](https://docs.ethswarm.org/docs/develop/access-the-swarm/buy-a-stamp-batch), which can take ~5 to 10 minutes. You will see this log message while your node is syncing postage stamp data: ```bash "time"="2024-09-24 22:21:19.664897" "level"="info" "logger"="node" "msg"="waiting to sync postage contract data, this may take a while... more info available in Debug loglevel" ``` After your node finishes syncing postage stamp data it will start in full node mode and begin to sync all the chunks of data it is responsible for storing as a full node: ```bash "time"="2024-09-24 22:30:19.154067" "level"="info" "logger"="node" "msg"="starting in full mode" "time"="2024-09-24 22:30:19.155320" "level"="info" "logger"="node/multiresolver" "msg"="name resolver: no name resolution service provided" "time"="2024-09-24 22:30:19.341032" "level"="info" "logger"="node/storageincentives" "msg"="entered new phase" "phase"="reveal" "round"=237974 "block"=36172090 "time"="2024-09-24 22:30:33.610825" "level"="info" "logger"="node/kademlia" "msg"="disconnected peer" "peer_address"="6ceb30c7afc11716f866d19b7eeda9836757031ed056b61961e949f6e705b49e" ``` This process can take a while, up to several hours depending on your system and network. You can check the progress of your node through the logs which print out to the Bee API: You check your node's progress with the `/status` endpoint: :::info The [`jq` utility](https://jqlang.github.io/jq/) is used here to automatically format the output from the Bee API. It can help make API output more readable. You may need to install it, the exact steps will depend on your Linux distro and package manager of choice. Also feel free to remove the `| jq` from the command as it is only a convenience, not a requirement. ::: ```bash curl -s http://localhost:1633/status | jq ``` ```bash { "overlay": "22dc155fe072e131449ec7ea2f77de16f4735f06257ebaa5daf2fdcf14267fd9", "proximity": 256, "beeMode": "full", "reserveSize": 686217, "reserveSizeWithinRadius": 321888, "pullsyncRate": 497.8747754074074, "storageRadius": 11, "connectedPeers": 148, "neighborhoodSize": 4, "batchCommitment": 74510761984, "isReachable": false, "lastSyncedBlock": 36172390 } ``` We can see that our node has not yet finished syncing chunks since the `pullsyncRate` is around 497 chunks per second. Once the node is fully synced, this value will go to zero. However, we do not need to wait until our node is fully synced in order to stake our node, so we can now move immediately to the next step. ### Stake node Now we're ready to begin staking, we will slightly modify our startup command so that it now runs in the background instead of taking control of our terminal: ```bash nohup bee start \ --password flummoxedgranitecarrot \ --full-node \ --swap-enable \ --api-addr 127.0.0.1:1633 \ --blockchain-rpc-endpoint https://xdai.fairdatasociety.org > bee.log 2>&1 & ``` :::info 1. **`nohup`**: This ensures that the `bee start` process will continue even after the terminal is closed. 2. **`> bee.log 2>&1`**: Redirects both standard output and standard error to a log file called `bee.log`. 3. **`&`**: This sends the process to the background, allowing the terminal to be used for other commands while the Bee node continues running. ::: Let's check the Bee API to confirm the node is running: ``` curl localhost:1633 ``` If the node is running we should see: ``` Ethereum Swarm Bee ``` Now with our node properly running in the background, we're ready to stake our node. You can use the following command to stake 10 xBZZ: ```bash curl -XPOST localhost:1633/stake/100000000000000000 ``` If the staking transaction is successful a `txHash` will be returned: ``` {"txHash":"0x258d64720fe7abade794f14ef3261534ff823ef3e2e0011c431c31aea75c2dd5"} ``` We can also confirm that our node has been staked with the `/stake` endpoint: ```bash curl localhost:1633/stake ``` The results will be displayed in PLUR units (1 PLUR is equal to 1e-16 xBZZ). If you have properly staked the minimum 10 xBZZ, you should see the output below: ```bash {"stakedAmount":"100000000000000000"} ``` Congratulations! You have now installed your Bee node and are connected to the network as a full staking node. Your node will now be in the process of syncing chunks from the network. Once it is fully synced, your node will finally be eligible for earning staking rewards. ### Logs and monitoring With our previously modified command, our Bee node will now be running in the background and the logs will be written to the `bee.log` file. To review our node's logs we can simply view the file contents: ```bash cat bee.log ``` The file will continue to update with all the latest logs as they are output: ```bash "time"="2024-09-27 18:05:34.096641" "level"="info" "logger"="node/kademlia" "msg"="connected to peer" "peer_address"="03b48e678938d63c0761c74a805fbe0446684c9c417330c2bec600ecfd6c492f" "proximity_order"=8 "time"="2024-09-27 18:05:35.168425" "level"="info" "logger"="node/kademlia" "msg"="connected to peer" "peer_address"="0e9388fff473a9c74535337c32cc74d8f921514d2635d0c4a49c6e8022f5594e" "proximity_order"=4 "time"="2024-09-27 18:05:35.532723" "level"="info" "logger"="node/kademlia" "msg"="disconnected peer" "peer_address"="3c195cd8882ee537d170e92d959ad6bd72a76a50097a671c72646e83b45a1832" ``` There are many different ways to monitor your Bee node's process, but one convenient way to do so is the [bashtop command line tool](https://github.com/aristocratos/bashtop). The method of [installation](https://github.com/aristocratos/bashtop?tab=readme-ov-file#installation) will vary depending on your system. After installation, we can launch it with the `bashtop` command: ```bash bashtop ``` ![](/img/node/bashtop_01.png) We can use the `f` key to filter for our Bee node's specific process by searching for the `bee` keyword (use the arrow keys to navigate and `enter` to select). From here we can view info about our node's process, or shut it down using the `t` key (for "terminate"). ![](/img/node/bashtop_02.png) **Checking the Node's status with the Bee API** To check your node's status as a staking node, we can use the `/redistributionstate` endpoint: ```bash curl -s http://localhost:1633/redistributionstate | jq ``` Below is the output for a node which has been running for several days: ```bash { "minimumGasFunds": "11080889201250000", "hasSufficientFunds": true, "isFrozen": false, "isFullySynced": true, "phase": "claim", "round": 212859, "lastWonRound": 207391, "lastPlayedRound": 210941, "lastFrozenRound": 210942, "lastSelectedRound": 212553, "lastSampleDuration": 491687776653, "block": 32354719, "reward": "1804537795127017472", "fees": "592679945236926714", "isHealthy": true } ``` For a complete breakdown of this output, check out [this section in the Bee docs](https://docs.ethswarm.org/docs/bee/working-with-bee/bee-api#redistributionstate). You can read more other important endpoints for monitoring your Bee node in the [official Bee docs](https://docs.ethswarm.org/docs/bee/working-with-bee/bee-api), and you can find complete information about all available endpoints in [the API reference docs](https://docs.ethswarm.org/api/). --- // File: node/participate-validator/swarm/b-docker-swarm # Swarm with Docker The following is a guide to get you started running a Bee full node with staking on Swarm using Docker. Docker images for Bee are hosted at [Docker Hub](https://hub.docker.com/r/ethersphere/bee). :::caution In the examples below we specify the exact version number of the image using the 2.2.0 tag. It's recommended to only use the exact version number tags. Make sure to check that you're on the latest version of Bee by reviewing the tags for Bee on [Docker Hub](https://hub.docker.com/r/ethersphere/bee/tags), and replace 2.2.0 in the commands below if there is a newer full release. ::: :::warning Note that in all the examples below we map the Bee API to 127.0.0.1 (localhost), since we do not want to expose our Bee API endpoint to the public internet, as that would allow anyone to control our node. Make sure you do the same, and it's also recommended to use a firewall to protect access to your node(s). ::: :::info The guide below is for a full Bee node with staking. To run a light node (uploads and downloads only), set `BEE_FULL_NODE` to false, or to run in ultra light (allows downloads only) mode you can set both `BEE_FULL_NODE` and `BEE_SWAP_ENABLE` to false. ::: ## Prerequisites ### Hardware :::warning If you are running on a home network you may need to configure your router to use [port forwarding](https://www.noip.com/support/knowledgebase/general-port-forwarding-guide) or take other steps to ensure your node is reachable by other nodes on the network. See [here](https://docs.ethswarm.org/docs/bee/installation/connectivity/#navigating-through-the-nat) for more guidance. If you are running on a VPS or cloud based server you will likely have no issues. ::: :::caution While it is possible to run multiple Bee nodes on a single machine, due to the high rate of I/O operations required by a full Bee node in operation, it is not recommended to run more than a handful of Bee nodes on the same physical disk (depending on the disk speed). ::: * Docker - [Get Docker](https://docs.docker.com/get-started/get-docker/) install instructions from the official docs. * Dual core, recent generation, 2ghz processor * 4gb RAM * 30gb SSD * Stable internet connection ### Software * A Gnosis Chain RPC endpoint (either by running your own node or the [free RPC endpoint](https://xdai.fairdatasociety.org) offered from the Fair Data Society. Other free public options are available at the [Gnosis Chain docs](https://docs.gnosischain.com/tools/RPC%20Providers/). * [jq utility](https://jqlang.github.io/jq/) for formatting API output (optional) :::info The [`jq` utility](https://jqlang.github.io/jq/) is used in this guide to automatically format the output from the Bee API. It can help make API output much more readable, however it is totally optional. ::: ### Tokens * A small amount of xDAI to pay for Gnosis Chain transactions, 0.1 xDAI should be enough * 10 xBZZ (BZZ on Gnosis Chain) is required for staking ## Full node setup process This section will guide you through setting up and running a single Bee full node using Docker. In the guide, we use a single line command for running our Bee node, with the Bee config options being set through environment variables, and a single volume hosted for our node's data. ### Start node ```bash docker run -d --name bee-1 \ --restart always \ -p 127.0.0.1:1633:1633 \ -p 1634:1634 \ -e BEE_API_ADDR=":1633" \ -e BEE_FULL_NODE="true" \ -e BEE_SWAP_ENABLE="true" \ -e BEE_PASSWORD="flummoxedgranitecarrot" \ -e BEE_BLOCKCHAIN_RPC_ENDPOINT="https://xdai.fairdatasociety.org" \ -v bee-1:/home/bee/.bee \ ethersphere/bee:2.2.0 start ``` Here is the same command in a single line in case you run into issues with the line breaks in the command above: ```bash docker run -d --name bee-1 --restart always -p 127.0.0.1:1633:1633 -p 1634:1634 -e BEE_API_ADDR=":1633" -e BEE_FULL_NODE="true" -e BEE_SWAP_ENABLE="true" -e BEE_PASSWORD="flummoxedgranitecarrot" -e BEE_BLOCKCHAIN_RPC_ENDPOINT="https://xdai.fairdatasociety.org" -v bee-1:/home/bee/.bee ethersphere/bee:2.2.0 start ``` #### Command explained: - **`-d`**: Runs the container in the background. - **`--restart always`**: Sets the [restart policy](https://docs.docker.com/engine/containers/start-containers-automatically/) for the container to `always` - **`--name bee-1`**: Names the container `bee-1`. - **`-p 127.0.0.1:1633:1633`**: Exposes the API on port 1633, only accessible locally. - **`-p 1634:1634`**: Exposes the P2P port 1634 to the public. - **`-e BEE_API_ADDR=":1633"`**: Sets the Bee API to use port 1633. - **`-e BEE_FULL_NODE="true"`**: Runs as a full node. - **`-e BEE_SWAP_ENABLE="true"`**: Enables the SWAP protocol for payments. - **`-e BEE_PASSWORD="flummoxedgranitecarrot"`**: Sets the keystore password, make sure to replace with your own. - **`-e BEE_BLOCKCHAIN_RPC_ENDPOINT="https://xdai.fairdatasociety.org"`**: Connects to the Gnosis Chain. - **`-v bee-1:/home/bee/.bee`**: Persists node data in the `bee-1` volume. - **`ethersphere/bee:2.2.0 start`**: Runs Bee version 2.2.0 and starts the node. This setup runs the Bee node in a container, with full-node functionality, SWAP enabled, and connections to the Gnosis blockchain for chequebook and postage stamp management, while persisting its data using a volume. :::info We have included the password as part of the start command by setting it as an environment variable with `-e BEE_PASSWORD="flummoxedgranitecarrot"`. You may wish to use a password file instead, which can be set with the `BEE_PASSWORD_FILE` command. However this will likely require some modifications on your host machine, the details of which will vary from system to system. ::: ```bash docker ps ``` If everything is set up correctly, you should see your Bee node listed: ```bash CONTAINER ID IMAGE COMMAND CREATED STATUS PORTS NAMES 37f4ad8b4060 ethersphere/bee:2.2.0 "bee start" 6 seconds ago Up 5 seconds 127.0.0.1:1633->1633/tcp, 0.0.0.0:1634->1634/tcp, :::1634->1634/tcp bee-1 ``` And check the logs: ```bash docker logs -f bee-1 ``` The output should contain a line which prints a message notifying you of the minimum required xDAI for running a node as well as the address of your node. Copy the address and save it for use in the next section. ```bash "time"="2024-09-24 22:06:51.363708" "level"="warning" "logger"="node/chequebook" "msg"="cannot continue until there is at least min xDAI (for Gas) available on address" "min_amount"="0.0003576874793" "address"="0x91A7e3AC06020750D32CeffbEeFD55B4c5e42bd6" ``` You can use `Ctrl + C` to exit the logs. Before moving on to funding, stop your node: ```bash docker stop bee-1 ``` And let's confirm that it has stopped: ```bash docker ps ``` We can confirm no Docker container processes are currently running. ```bash CONTAINER ID IMAGE COMMAND CREATED STATUS PORTS NAMES ```` ### Fund node Check the logs from the previous step. Look for the line which says: ``` "time"="2024-09-24 18:15:34.520716" "level"="info" "logger"="node" "msg"="using ethereum address" "address"="0x1A801dd3ec955E905ca424a85C3423599bfb0E66" ``` That address is your node's address on Gnosis Chain which needs to be funded with xDAI and xBZZ. Copy it and save it for the next step. xDAI is widely available from many different centralized and decentralized exchanges, just make sure that you are getting xDAI on Gnosis Chain, and not DAI on some other chain. See [this page](https://www.ethswarm.org/get-bzz) for a list of resources for getting xBZZ (again, make certain that you are getting the Gnosis Chain version, and not BZZ on Ethereum). After acquiring some xDAI and some xBZZ, send them to the address you copied above. ***How Much to Send?*** Only a very small amount of xDAI is needed to get started, 0.1 is more than enough. You can start with just 2 or 3 xBZZ for uploading small amounts of data, but you will need at least 10 xBZZ if you plan on staking. ### Initialize full node After you have a small amount of xDAI in your node's Gnosis Chain address, you can now restart your node using the same command as before so that it can issue the required smart contract transactions and also sync data. ```bash docker start bee-1 ``` Let's check the logs to see what's happening: ```bash docker logs -f bee-1 ``` Your logs should look something like this: ```bash Welcome to Swarm.... Bzzz Bzzzz Bzzzz \ / \ o ^ o / \ ( ) / ____________(%%%%%%%)____________ ( / / )%%%%%%%( \ \ ) (___/___/__/ \__\___\___) ( / /(%%%%%%%)\ \ ) (__/___/ (%%%%%%%) \___\__) /( )\ / (%%%%%) \ (%%%) ! DISCLAIMER: This software is provided to you "as is", use at your own risk and without warranties of any kind. It is your responsibility to read and understand how Swarm works and the implications of running this software. The usage of Bee involves various risks, including, but not limited to: damage to hardware or loss of funds associated with the Ethereum account connected to your node. No developers or entity involved will be liable for any claims and damages associated with your use, inability to use, or your interaction with other nodes or the software. version: 2.2.0-06a0aca7 - planned to be supported until 11 December 2024, please follow https://ethswarm.org/ "time"="2024-09-24 22:21:04.543661" "level"="info" "logger"="node" "msg"="bee version" "version"="2.2.0-06a0aca7" "time"="2024-09-24 22:21:04.590823" "level"="info" "logger"="node" "msg"="swarm public key" "public_key"="02f0e59eafa3c5c06542c0a7a7fe9579c55a163cf1d28d9f6945a34469f88d1b2a" "time"="2024-09-24 22:21:04.686430" "level"="info" "logger"="node" "msg"="pss public key" "public_key"="02ea739530bbf48eed49197f21660f3b6564709b95bf558dc3b472688c34096418" "time"="2024-09-24 22:21:04.686464" "level"="info" "logger"="node" "msg"="using ethereum address" "address"="0x8288F1c8e3dE7c3bf42Ae67fa840EC61481D085e" "time"="2024-09-24 22:21:04.700711" "level"="info" "logger"="node" "msg"="using overlay address" "address"="22dc155fe072e131449ec7ea2f77de16f4735f06257ebaa5daf2fdcf14267fd9" "time"="2024-09-24 22:21:04.700741" "level"="info" "logger"="node" "msg"="starting with an enabled chain backend" "time"="2024-09-24 22:21:05.298019" "level"="info" "logger"="node" "msg"="connected to blockchain backend" "version"="Nethermind/v1.28.0+9c4816c2/linux-x64/dotnet8.0.8" "time"="2024-09-24 22:21:05.485287" "level"="info" "logger"="node" "msg"="using chain with network network" "chain_id"=100 "network_id"=1 "time"="2024-09-24 22:21:05.498845" "level"="info" "logger"="node" "msg"="starting debug & api server" "address"="[::]:1633" "time"="2024-09-24 22:21:05.871498" "level"="info" "logger"="node" "msg"="using default factory address" "chain_id"=100 "factory_address"="0xC2d5A532cf69AA9A1378737D8ccDEF884B6E7420" "time"="2024-09-24 22:21:06.059179" "level"="info" "logger"="node/chequebook" "msg"="no chequebook found, deploying new one." "time"="2024-09-24 22:21:07.386747" "level"="info" "logger"="node/chequebook" "msg"="deploying new chequebook" "tx"="0x375ca5a5e0510f8ab307e783cf316dc6bf698c15902a080ade3c1ea0c6059510" "time"="2024-09-24 22:21:19.101428" "level"="info" "logger"="node/transaction" "msg"="pending transaction confirmed" "sender_address"="0x8288F1c8e3dE7c3bf42Ae67fa840EC61481D085e" "tx"="0x375ca5a5e0510f8ab307e783cf316dc6bf698c15902a080ade3c1ea0c6059510" "time"="2024-09-24 22:21:19.101450" "level"="info" "logger"="node/chequebook" "msg"="chequebook deployed" "chequebook_address"="0x66127e4393956F11947e9f54599787f9E455173d" "time"="2024-09-24 22:21:19.506515" "level"="info" "logger"="node" "msg"="using datadir" "path"="/home/bee/.bee" "time"="2024-09-24 22:21:19.518258" "level"="info" "logger"="migration-RefCountSizeInc" "msg"="starting migration of replacing chunkstore items to increase refCnt capacity" "time"="2024-09-24 22:21:19.518283" "level"="info" "logger"="migration-RefCountSizeInc" "msg"="migration complete" "time"="2024-09-24 22:21:19.566160" "level"="info" "logger"="node" "msg"="starting reserve repair tool, do not interrupt or kill the process..." "time"="2024-09-24 22:21:19.566232" "level"="info" "logger"="node" "msg"="removed all bin index entries" "time"="2024-09-24 22:21:19.566239" "level"="info" "logger"="node" "msg"="removed all chunk bin items" "total_entries"=0 "time"="2024-09-24 22:21:19.566243" "level"="info" "logger"="node" "msg"="counted all batch radius entries" "total_entries"=0 "time"="2024-09-24 22:21:19.566247" "level"="info" "logger"="node" "msg"="parallel workers" "count"=20 "time"="2024-09-24 22:21:19.566271" "level"="info" "logger"="node" "msg"="migrated all chunk entries" "new_size"=0 "missing_chunks"=0 "invalid_sharky_chunks"=0 "time"="2024-09-24 22:21:19.566294" "level"="info" "logger"="migration-step-04" "msg"="starting sharky recovery" "time"="2024-09-24 22:21:19.664643" "level"="info" "logger"="migration-step-04" "msg"="finished sharky recovery" "time"="2024-09-24 22:21:19.664728" "level"="info" "logger"="migration-step-05" "msg"="start removing upload items" "time"="2024-09-24 22:21:19.664771" "level"="info" "logger"="migration-step-05" "msg"="finished removing upload items" "time"="2024-09-24 22:21:19.664786" "level"="info" "logger"="migration-step-06" "msg"="start adding stampHash to BatchRadiusItems, ChunkBinItems and StampIndexItems" "time"="2024-09-24 22:21:19.664837" "level"="info" "logger"="migration-step-06" "msg"="finished migrating items" "seen"=0 "migrated"=0 "time"="2024-09-24 22:21:19.664897" "level"="info" "logger"="node" "msg"="waiting to sync postage contract data, this may take a while... more info available in Debug loglevel" ``` Your node will take some time to finish [syncing postage contract data](https://docs.ethswarm.org/docs/develop/access-the-swarm/buy-a-stamp-batch/) as indicated by the final line: ```bash "msg"="waiting to sync postage contract data, this may take a while... more info available in Debug loglevel" ``` You may need to wait 5 - 10 minutes for your node to finish syncing in this step. Eventually you will be able to see when your node finishes syncing, and the logs will indicate your node is starting in full node mode: ```bash "time"="2024-09-24 22:30:19.154067" "level"="info" "logger"="node" "msg"="starting in full mode" "time"="2024-09-24 22:30:19.155320" "level"="info" "logger"="node/multiresolver" "msg"="name resolver: no name resolution service provided" "time"="2024-09-24 22:30:19.341032" "level"="info" "logger"="node/storageincentives" "msg"="entered new phase" "phase"="reveal" "round"=237974 "block"=36172090 "time"="2024-09-24 22:30:33.610825" "level"="info" "logger"="node/kademlia" "msg"="disconnected peer" "peer_address"="6ceb30c7afc11716f866d19b7eeda9836757031ed056b61961e949f6e705b49e" ``` Your node will now begin syncing chunks from the network, this process can take several hours. You check your node's progress with the `/status` endpoint: ```bash curl -s http://localhost:1633/status | jq ``` ```bash { "overlay": "22dc155fe072e131449ec7ea2f77de16f4735f06257ebaa5daf2fdcf14267fd9", "proximity": 256, "beeMode": "full", "reserveSize": 686217, "reserveSizeWithinRadius": 321888, "pullsyncRate": 497.8747754074074, "storageRadius": 11, "connectedPeers": 148, "neighborhoodSize": 4, "batchCommitment": 74510761984, "isReachable": false, "lastSyncedBlock": 36172390 } ``` We can see that our node has not yet finished syncing chunks since the `pullsyncRate` is around 497 chunks per second. Once the node is fully synced, this value will go to zero. It can take several hours for syncing to complete, but we do not need to wait until our node is full synced before staking, so we can move directly to the next step. ### Stake node You can use the following command to stake 10 xBZZ: ```bash curl -XPOST localhost:1633/stake/100000000000000000 ``` If the staking transaction is successful a `txHash` will be returned: ``` {"txHash":"0x258d64720fe7abade794f14ef3261534ff823ef3e2e0011c431c31aea75c2dd5"} ``` We can also confirm that our node has been staked with the `/stake` endpoint: ```bash curl localhost:1633/stake ``` The results will be displayed in PLUR units (1 PLUR is equal to 1e-16 xBZZ). If you have properly staked the minimum 10 xBZZ, you should see the output below: ```bash {"stakedAmount":"100000000000000000"} ``` Congratulations! You have now installed your Bee node and are connected to the network as a full staking node. Your node will now be in the process of syncing chunks from the network. Once it is fully synced, your node will finally be eligible for earning staking rewards. ### Logs and monitoring Docker provides convenient built-in tools for logging and monitoring your node, which you've already encountered if you've read through earlier sections of this guide. **Viewing node logs:** To monitor your node’s logs in real-time, use the following command: ```bash docker logs -f bee-1 ``` This command will continuously output the logs of your Bee node, helping you track its operations. The `-f` flag ensures that you see new log entries as they are written. Press `Ctrl + C` to stop following the logs. You can read more about how Docker manages container logs [in their official docs](https://docs.docker.com/reference/cli/docker/container/logs/). **Checking the Node's status with the Bee API** To check your node's status as a staking node, we can use the `/redistributionstate` endpoint: ```bash curl -s http://localhost:1633/redistributionstate | jq ``` Below is the output for a node which has been running for several days: ```bash { "minimumGasFunds": "11080889201250000", "hasSufficientFunds": true, "isFrozen": false, "isFullySynced": true, "phase": "claim", "round": 212859, "lastWonRound": 207391, "lastPlayedRound": 210941, "lastFrozenRound": 210942, "lastSelectedRound": 212553, "lastSampleDuration": 491687776653, "block": 32354719, "reward": "1804537795127017472", "fees": "592679945236926714", "isHealthy": true } ``` For a complete breakdown of this output, check out [this section in the Bee docs](https://docs.ethswarm.org/docs/bee/working-with-bee/bee-api#redistributionstate). You can read more other important endpoints for monitoring your Bee node in the [official Bee docs](https://docs.ethswarm.org/docs/bee/working-with-bee/bee-api), and you can find complete information about all available endpoints in [the API reference docs](https://docs.ethswarm.org/api/). **Stopping Your Node** To gracefully stop your Bee node, use the following command: ```bash docker stop bee-1 ``` Replace `bee-1` with the name of your node if you've given it a different name. --- // File: node/participate-validator/swarm/c-dappnode-swarm # Swarm with Dappnode The following is a beginner friendly guide to get you started running a Bee full node with staking on Swarm using Dappnode. ## Prerequisites ### Hardware - A [Dappnode Home](https://dappnode.com/collections/frontpage) box - Or Dappnode Core installed or any machine/VPS that meets the [hardware requirements](https://docs.dappnode.io/docs/user/install/overview/#specifications--minimum-requirements). ### Software Please refer to the official Dappnode [installation guide](https://docs.dappnode.io/docs/user/install/overview/) to setup Dappnode Core and [connect to it](https://docs.dappnode.io/docs/user/access-your-dappnode/vpn/overview). You will also need a Gnosis RPC Endpoint (such as Nethermind xDAI) for your bee node to be operate as a full node. Dappnode makes it very easy to [spin up a Gnosis node](http://my.dappnode/stakers/gnosis). ### Tokens * A small amount of [xDAI](https://docs.ethswarm.org/docs/learn/tokens#xdai) to pay for Gnosis Chain transactions, 0.1 xDAI should be enough * [xBZZ](https://docs.ethswarm.org/docs/learn/tokens#xbzz) (BZZ on Gnosis Chain) is required for funding the chequebook, buying stamps for storage and staking (minimum 10 xBZZ) ## Full node setup process This section will guide you through setting up and running a single Bee full node using Dappnode. ### Install the Swarm package (1) Once you connect to your Dappnode's network or via a VPN you can access the its dashboard UI at [my.dappnode](http://my.dappnode/) ![Dappnode Dashboard](/img/tools/swarm/dappnode-dashboard.png) (2) Open the DAppStore using the sidebar to the left. Search for **Swarm** using the DAppStore search bar. You should see the latest version of the Swarm package in the listed dApps. Click the **GET** button under the Swarm package. ![DAppStore Swarm Package](/img/tools/swarm/dappnode-package-get.png) (3) This should take you to the [DAppStore Swarm page](http://my.dappnode/installer/dnp/swarm.public.dappnode.eth) page. Click **INSTALL**. ![DAppStore Swarm Package Install](/img/tools/swarm/dappnode-package-install.png) (4) On the setup page, for the **Blockchain RPC Endpoint** field, enter the Querying API endpoint of the Gnosis execution client you have installed on your Dappnode. The rest of the fields can be left to its default values. Scroll down and click **Submit**. Then click **Accept** on the disclaimer page. This should begin the process of downloading, verifying and installing your Swarm package. ![Configure Blockchain Endpoint](/img/tools/swarm/gnosis-blockchain-endpoint.png) (5) Once the Swarm package is installed, navigate to the Swarm Package Info page. Checkout the bee logs under the **Logs** tab. Look for the line which says something like: ``` "time"="2024-10-02 08:48:34.948528" "level"="warning" "logger"="node/chequebook" "msg"="cannot continue until there is at least min xDAI (for Gas) available on address" "min_amount"="0.0004999999995" "address"="0x1A...3CD" ``` Send a small amount of `xDAI` (bit more than the `min_amount` above) to the bee node `address`in the log message. This should automatically deploy the chequebook for your bee node on the gnosis blockchain. And the bee node will proceed to sync data from the Swarm network. ![DAppStore Swarm Package Info](/img/tools/swarm/dappnode-package-info.png) (6) On the **Info** page, you can find the link to the Bee dashboard Ui right below the "Homepage" link - http://dashboard.swarm.public.dappnode/ ![DAppStore Swarm Package Info](/img/tools/swarm/dashboard-ui-link.png) (7) Go to the Bee Dashboard and click the **Account** link in the sidebar. You can find your bee nodes wallet address and the amount of xDAI and xBZZ it holds. ![DAppStore Swarm Package Info](/img/tools/swarm/dashboard-account-page.png) You will also find additional tabs here for: - Chequebook: to deposit and withdraw xBZZ used to facilitate settlements between nodes based on their relative consumption of bandwidth. Funding the chequebook incentivisez your pbee node's peers and helps boost your download speeds. - Stamps: to buy and manage stamps which are required to upload data to the Swarm network - Feeds: to create and update feeds which provide the ability to update your immutable content in a mutable world - Staking: to stake `xBZZ` and earn rewards ### Staking xBZZ In order to earn rewards, your bee node must stake a minimum of `10` xBZZ. Once you have transferred some xBZZ to the node wallet, you can stake a minimum of `10` xBZZ (`100000000000000000` PLUR) or more through the Bee dashboard's Account page under the **Staking** tab. Once the funds have been staked, your bee node will begin participating in the redistribution game and earn rewards for contributing storage and bandwidth to the Swarm. ![DAppStore Swarm Package Info](/img/tools/swarm/dashboard-staking-page.png) ## Links: - Swarm Documentation - https://docs.ethswarm.org/ - Swarm Repo - https://github.com/ethersphere/bee - Swarm Dappnode Package Repo - https://github.com/w3rkspacelabs/dappnodepackage-swarm --- // File: node/rewards-penalties ## Overview You are responsible for your node, including ensuring uptime, correct behavior, and monitoring. If your node is not responding properly, or is displaying dishonest behavior (like running keys on 2 nodes at the same time), you will be penalized. ### Proof-of-Stake - Gnosis (and Ethereum) utilize a Proof-of-Stake cryptoeconomic incentive system to secure the network and disincentivize malicious behavior by nodes. - Nodes that play an active role in validating the network are required to stake [1 GNO ](../about/tokens/gno.md) per validator. They receive periodic rewards for each epoch that they stay online and performing their duties. - However, if they engage in malicious or disruptive activity on the network, their stake gets "slashed", and they can also be permanently removed from the validator pool. - Nodes that go offline also attract a penalty for "inactivity leaks", although these are significantly less harsh if the node is offline only for a short period of time. ## Rewards ### Current Yield - The current yield on GNO staking can be found in this [Dune Dashboard](https://dune.com/gnosischain_team/gnosischain). and [Gnosis Metrics](https://www.gnosismetrics.com/). - As of Aug 2023, GNO staking has a ~14% yield. ### Rewards Calculation: - **Block Proposals**: The reward for proposing a block consists of a base reward and an additional reward proportional to the validator's index. While the base reward remains constant, the additional reward decreases as the validator's index increases, ensuring equal block proposal opportunities for all validators. Example: A validator with index 10 proposes a block. The base reward for proposing a block is 100, and the additional reward is 10 / 100 = 0.1. The total reward for the validator is 100 + 0.1 = 100.1. - **Block Attestations**: The reward for attesting to a block features a base reward that diminishes over time. Initially set at 100%, the base reward decreases by 1% for every 1000 slots, maintaining the attractiveness of block proposal rewards even as the number of validators grows. Example: A validator with index 100 attests to a block. The base reward for attesting to a block is 100, and the additional reward is 99%. The total reward for the validator is 100 \* 0.99 = 99. ### Understanding Gas Consumption and Transaction Fees - The gas consumption for processing a transaction depends on its complexity. For instance, an ETH transfer between two accounts requires less gas than deploying a new smart contract. - Transaction fees are computed by multiplying the base fee with the gas price. The Ethereum network determines the base fee, which fluctuates according to block space demand. Users set the gas price, which can vary. For example, if the base fee is 10 gwei and the gas price is 100 gwei, then the fee for a transaction that uses 100,000 gas would be 1,000,000 gwei. ### Rewards Curve :::info Gnosis' rewards curve was [proposed in Nov 2021](https://forum.gnosis.io/t/launch-parameters-for-gnosis-beacon-chain-gbc/2200) in a Gnosis Forum post. ::: - The minimum initial stake to run a validator is [1 GNO](/concepts/tokens/gno) . - The reward rate drops with more active validators | GNO staked | % of GNO validating | reward for validators | Total GNO rewards | Overall inflation p.a. | | ---------- | ------------------- | --------------------- | ----------------- | ---------------------- | | 4096 | 0.23% | 83.85% | 3434.496 | 0.19% | | 50000 | 2.78% | 23.01% | 11505 | 0.64% | | 100000 | 5.56% | 16.65% | 16650 | 0.93% | | 200000 | 11.11% | 11.89% | 23780 | 1.32% | | 400000 | 22.22% | 8.45% | 33800 | 1.88% | | 800000 | 44.44% | 5.99% | 47920 | 2.66% | | 1800000 | 100.00% | 4.00% | 72000 | 4.00% | ## Claiming Rewards You can claim your Gnosis Chain rewards on the [Deposit website](https://deposit.gnosischain.com/) or by manually calling the `claimWithdrawal(address)` or `claimWithdrawals(addresses)` method in the [Deposit contract](https://gnosisscan.io/address/0x0B98057eA310F4d31F2a452B414647007d1645d9#writeProxyContract). ![faucet](/img/node/withdrawal/claim-withdrawal.png) > You can learn more about Deposit contracts in the [Deposit contracts](/concepts/specs/deposit-contracts) doc. ## Penalties Gnosis follows Ethereum's Proof-of-Stake penalties. ### "Offline" Penalties :::tip Read more [Upgrading Ethereum: Penalties](https://eth2book.info/capella/part2/incentives/penalties/) ::: The most common "penalty" validators encounter is if they are offline, or are late in performing their duties of attesting or proposing blocks. - Generally speaking, the penalties for being offline (or late) are equal to the rewards that a validator would have received if they were online - If your validator is [online more than 42.5% of the time](https://eth2book.info/capella/part2/incentives/penalties/#attestation-penalties), you will be earning a positive return - Missed, late or incorrect attestations are penalized. - There is no penalty for missing the head vote. - There is no penalty for failing to propose a block. - There is no penalty for missing a sync committee (except the lost rewards). ### Inactivity Leak :::tip Read more [Upgrading Ethereum: Inactivity Leak](https://eth2book.info/capella/part2/incentives/inactivity/) ::: Gnosis will move into a "inactivity leak" mode, if a large number (i.e. >1/3) of validators are offline at the same time causing the network to not finalize. - "Offline" validators receive increasingly large penalties based on their track records - This is designed to restore finality by reducing the stake of "offline" validators, who may get ejected from the network if their stake drops below the minimum required (i.e. 0.5 GNO) - While the initial stake is 1 GNO , a validator is allowed to continue validating even after being penalized so long as the stake is above 0.5 GNO. ### Slashings :::tip Read more - [Ethereum.org: Slashing](https://ethereum.org/en/developers/docs/consensus-mechanisms/pos/rewards-and-penalties/#slashing) - [Upgrading Ethereum: Slashing](https://eth2book.info/capella/part2/incentives/slashing/) ::: Slashing is the most serious penalty and results in losing a potentially significant amount of stake, and possible ejection of a validator from the network. This is when validators break very specific protocol rules that prevent the network from functioning effectively. In these cases, 1/32 of a validator's staked GNO is immediately burned, and the validator enters a removal process from the chain. - "Double signing" is the most common slashing offence, where a validator proposes and signs two different blocks at the same slot. This often happens when a validator is run in two machines at once (e.g. redundancy). - "Double voting" by attesting to two candidates for the same block - Attesting to a block that "surrounds" another one (i.e. changing history) ### Resources We recommend the following readings for a more in-depth understanding of validator penalties. - [Ethereum.org on Proof-of-stake Rewards and Penalties](https://ethereum.org/en/developers/docs/consensus-mechanisms/pos/rewards-and-penalties/) - [Upgrading Ethereum on "The Incentive Layer"](https://eth2book.info/capella/part2/incentives/) --- // File: shutterized-gc/README import React from 'react'; import Button from '@site/src/components/Button'; import { changeOrAddNetwork } from '@site/src/utils/changeNetwork'; ### Protecting Against MEV Attacks: Shutter embedded Gnosis Chain Maximal Extractable Value (MEV) refers to the maximum value that can be extracted from block production in blockchain protocols, particularly in Ethereum. It represents the profits that can be made by miners or validators by reordering, including, or censoring transactions within a block. To combat this, the Shutter network on Gnosis Chain introduces a mechanism for submitting transactions that resist censorship and front-running attacks by allowing users to encrypt their transactions. Transactions on the Shutterized enabled Gnosis Chain are only decrypted and executed after their inclusion in the blockchain is confirmed and the order of preceding transactions is finalized. Consequently, any third-party attempting to censor or front-run the transaction will be unable to do so without knowledge of its content, thereby nullifying their efforts. This ensures that transactions are protected from MEV attacks, safeguarding users from financial exploitation and maintaining the integrity of the decentralized system. ### Add the RPC endpoint to your wallet: Take the first step towards secure and private trades on the Gnosis Chain. ); } export default App; ``` ### 4. Getting Smart Account Address ```typescript import { useKernelClient } from "@zerodev/waas" function App() { const { address } = useKernelClient() return ( /* ...Create Smart Account */

{`Smart Account Address: ${address}`}

) } ``` ### 5. Sending UserOp sponsored transaction ```typescript import { parseAbi } from "viem" import { useKernelClient, useSendUserOperation } from "@zerodev/waas" function App() { const { address } = useKernelClient() const { data: userOpHash, write, isPending } = useSendUserOperation({ paymaster: { type: "SPONSOR" } }) const tokenAddress = "0x3870419Ba2BBf0127060bCB37f69A1b1C090992B" const abi = parseAbi(["function mint(address _to, uint256 amount) public"]) return ( /* ...Create & Get Smart Account */
{userOpHash &&

{`UserOp Hash: ${userOpHash}`}

}
) } ``` :::info Check out the quickstart code on [github](https://github.com/zerodevapp/waas-examples/tree/main/quick-start) and official documentation [here](https://docs.zerodev.app/smart-wallet/quickstart-core) --- If you want to check out how to pay gas fees using ERC20 Tokens, check out the [ZeroDev section for paying using ERC20 Tokens](https://docs.zerodev.app/smart-wallet/pay-gas-in-erc20s) ::: --- // File: technicalguides/custom-signers/README # Custom Signers Custom signers allow developers to inject their own signing mechanisms tailored to specific use cases. This flexibility enhances security, usability, and adaptability in different environments, such as multi-signature wallets or smart contract interactions. ## Why Use Custom Signers? ### Tailored Signing Methods With custom signers, you can personalize the signing process to fit your dApp’s specific needs. This could mean automatic signing for trusted operations, requiring additional confirmation for sensitive actions, or integrating unique hardware devices for enhanced security.Users can now interact with dapps by just using their emails or passkeys. ### Enhanced Security Custom signers give developers more control over how and where signing keys are stored. This can include signing transactions in hardware security modules (HSMs), using a multi-sig contract, or requiring multi-factor authentication before a transaction is signed. ### Optimized for Specific Use Cases Whether you’re dealing with privacy-focused transactions, or social recovery mechanisms, custom signers can be configured to handle the specific logic needed. They allow for flexibility in crafting unique user flows that require specialized transaction signing methods. --- // File: technicalguides/custom-signers/dynamic # Dynamic Dynamic offers smart and beautiful login flows for crypto-native users, simple onboarding flows for everyone else, and powerful developer tools that go beyond authentication. This is a basic guide which demonstrates the integration of Dynamic wallet with Gnosis chain and generate offchain user signatures. ![Dynamic Image](../../../static/img/signers/dynamic.png) ## Guide - Create a NextJs application from scratch ``` npx create-next-app dynamic-gnosis # install with Tailwind ``` - Install Dynamic labs SDK & some other dependencies ``` npm install @dynamic-labs/ethereum @dynamic-labs/ethers-v6 @dynamic-labs/sdk-react-core ``` - Create an account at [Dynamic Web App](https://app.dynamic.xyz/) and choose the Ethereum Sandbox option. In the dashboard, enable the networks you want to allow your users. For our example we will enable Gnosis network. Also make sure you have Email as an authentication enabled for your users. This helps create a wallet by just using user's email. - In the [developers section](https://app.dynamic.xyz/dashboard/developer/api), copy the Environment ID, we will need this in the next step. - Initialize the SDK in your **layout.tsx** file like this. The goal is to initialize the SDK as early as possible when loading you application. Put your Environment ID in the proper variable. Make sure you have **EthersExtension** also added in the extensions variable, this will be useful later! ``` export default function RootLayout({ children, }: { children: React.ReactNode; }) { return ( ", walletConnectors: [EthereumWalletConnectors], walletConnectorExtensions: [EthersExtension], }} > {children} ); } ``` - Create a components folder and inside that create a component **DynamicWidgetButton.tsx** and here we need to declare our DynamicWidget component provided to us by Dynamic SDK. ``` export const DynamicWidgetButton: React.FC = () => { return (
Wallet Interaction
); }; ``` - Now we can use and initialize the Dynamic wallet anywhere in our app by just using the above component! - Let's create our Main component in **page.tsx** file. In this file, we will [**useDynamicContext**](https://docs.dynamic.xyz/sdks/react-sdk/hooks/usedynamiccontext#header) provided by the dynamic sdk to fetch the wallet connected. We will also use this same wallet to execute all our ethers expression. ``` const { primaryWallet } = useDynamicContext(); ``` - In our application, we have built a basic **Signer** component which uses the connected Dynamic wallet to generate a signature from the user. ``` const signMessage = async () => { if (!primaryWallet) { console.error("No primary wallet connected"); return; } try { const signedMessage = await primaryWallet.connector.signMessage('You are signing an example message'); if (signedMessage) { setSignature(signedMessage); } else { setSignature(null); } } catch (error) { console.error("Error signing message:", error); setSignature(null); } }; ``` You can also see that the **signMessage** function is provided by the Dynamic SDK. So cool! ## Using ethers The last piece of component, I want to discuss is the **getBalance** component. Although Dybamic also gives a component to fetch user balance, this function is created to demonstrate how you can use standard ethers expression to build out your app further. ``` const getBalance = async () => { if (!primaryWallet) { console.error("No primary wallet connected"); return null; } const provider = await primaryWallet.connector?.ethers?.getRpcProvider(); if (!provider) { console.error("No provider available"); return null; } try { const balance = await provider.getBalance(primaryWallet.address); console.log(balance); return balance; } catch (error) { console.error("Error getting balance:", error); return null; } }; ``` ## Demo Application You can check out this [**repository**](https://github.com/gnosischain/developer-resources/tree/main/custom-signers/dynamic-gnosis) for the full stack application demo. --- // File: technicalguides/custom-signers/privy # Privy This guide will walk you through the steps to integrate the Privy Wallet and SDK into your Web3 DApp, with a specific configuration for the Gnosis chain(mainnet & Chiado testnet). ![Privy Image](../../../static/img/signers/privy.png) ## Guide The [Privy React SDK](https://www.npmjs.com/package/@privy-io/react-auth) is the easiest way to integrate Privy in your application. In order to integrate the Privy React SDK, your project must be on: - a minimum React version of 18 - a minimum TypeScript version of 5 ### 1. Install the Privy React SDK ```shell npm install @privy-io/react-auth@latest ``` ### 2. Setup Log-in methods & Privy App ID Navigate to your [Privy dashboard](https://dashboard.privy.io/apps) and from the **Login methods** methods tab, enable all the login methods you want the end-user to have. Also, note the **App ID** from the settings, we will need to configure while initializing Privy. ### 3. Setup Privy Provider and Gnosis Config We can now initialize **PrivyProvider**. Replace the App ID field with your own Privy App ID and import the chains you want to support in your dapp. In our case, we have imported **gnosisChiado** and **gnosis** from viem. We can also also customize with theme, logo and , colours and other [configs](https://docs.privy.io/guide/react/configuration/appearance#app-name). ```shell 'use client'; import {PrivyProvider} from '@privy-io/react-auth'; import {gnosisChiado, gnosis} from 'viem/chains'; export default function Providers({children}: {children: React.ReactNode}) { return ( {children} ); } ``` You can now import the above component and wrap around your application in the **layout.tsx** file(In case of a NextJS app). Here is an example: ```shell import type { Metadata } from "next"; import PrivyProvider from "./components/privy"; export const metadata: Metadata = { title: "Gnosis App Demo", description: "Gnosis App Demo", }; export default function RootLayout({ children, }: Readonly<{ children: React.ReactNode; }>) { return ( {children} ); } ``` ## Demo Application Here is a full-stack dapp which showcases Privy integration along with proper configurations to fetch wallet data and make on-chain transactions. The application integrates the Pirvy React SDK and uses it to mint ERC-1155 tokens on the Gnosis Chiado testnet. [**Link to Demo Application**](https://github.com/gnosischain/developer-resources/tree/main/custom-signers/privy-gnosis) --- // File: terms-conditions/README Last Updated: April 2023 **TERMS AND CONDITIONS** 1. **ACCEPTANCE OF THE TERMS AND CONDITIONS** 1. Thank you for your interest in Gnosis Chain and the Gnosis DApp Ecosystem! We invite you to participate in the Gnosis ecosystem. These terms of use (" **Terms**") govern your access and use of all content, documentation, features, information and services (collectively the " **Services**") available on or through [https://docs.gnosischain.com/](https://docs.gnosischain.com/) (the " **Site**"), which is provided to you free of charge. 2. These Terms form a legally binding contract between Gnosis Ltd (which together with its affiliates are referred to as " **Gnosis**", " **we**", " **us**" or " **our**") and you (whether you are acting personally or on behalf of an entity (" **you**" or " **your**"). 3. Please read these Terms carefully. By accessing, browsing or using this Site, you acknowledge that you have read, understood, and agree to be bound by these Terms. 4. The Services and the Site are intended for users who have reached sufficient age to enter into a legally binding contract with Gnosis. If you are using the Site for or on behalf of an organization, you are agreeing to the Terms on behalf of that organization, and you represent and warrant that you are authorized and have all requisite rights to do so. By accessing or using the Services and the Site, you represent that you meet these requirements. 5. You are responsible for ensuring that all persons who access our Site through your internet connection or device are aware of these Terms and that they comply with them. 6. If you do not accept these Terms or meet the requirements set out above, you must not access, browse or otherwise use the Site. 7. When using certain Services available on this Site, you may be required to accept additional terms and conditions relating to the use of such Services. Any additional terms and conditions will be published within the Services or the website associated with such Services. 2. **GNOSIS CHAIN** 1. We maintain this Site to provide a variety of information and resources related to Gnosis Chain, a decentralized Ethereum Virtual Machine compatible sidechain (" **Gnosis Chain**"). 2. By accessing and using this Site and the Services, you acknowledge and agree that: (a) we do not control, and are not responsible for the operation of the blockchain based software and protocols underlying Gnosis Chain, which is a decentralized permissionless blockchain that is community governed; (b) we do not have possession, custody or control over any cryptocurrencies deployed or available on Gnosis Chain (other than cryptocurrencies that we own and hold for ourselves); (c) we are not responsible for the settlement or execution of any transactions conducted on Gnosis Chain; and (d) the underlying technology on which Gnosis Chain relies may be subject to sudden changes and we cannot and do not guarantee that your access to Gnosis Chain will be uninterrupted or error free or that your cryptocurrencies will be secure at all times. 3. Additionally, by accessing and using the Site and the Services, you acknowledge and accept that we do not, and cannot, control: (a) activity or data on Gnosis Chain; (b) the activity of users who build and use applications on Gnosis Chain; (c) the validation of transactions or other operations on Gnosis Chain, (d) the availability, security or functionality of Gnosis Chain; or (e) any other uses of Gnosis Chain. 4. The Services available through this Site therefore do not cover your access and use of Gnosis Chain and you assume all risks associated with your use of Gnosis Chain. 3. **CHANGES TO THESE TERMS** 1. We reserve the right to make changes to the Terms from time to time at our sole discretion by publishing an updated version on the Site. Any variation to these Terms will become effective upon publishing to the Site. By continuing to use the Site after any changes to these Terms take effect, you shall be deemed to have accepted the changes to the Terms. It is your responsibility to check the Site regularly to understand the Terms that apply to your use of the Services at any given time. 4. **INFORMATION ON THE SITE** 1. This Site is provided for general information purposes only. None of the content or information on our Site, or made otherwise available to you in connection with its use, constitutes any legal, tax, financial or other advice. You should not take, or refrain from taking, any action based on information or resources available on this Site. You should conduct your own research and seek professional advice before making any financial, technical, legal or other decisions based on the information and resources available on this Site. 2. Although it is intended to provide accurate and timely information, the Site may not always be entirely accurate, complete or current and may also include technical inaccuracies or typographical errors. Accordingly, you should verify all information before relying on it. All decisions based on information contained on the Site are your sole responsibility and Gnosis shall have no liability for actions or decisions that you take as a result of any content or information on our Site. 3. We do not guarantee that our Site, or any content or information on it, will always be available or be uninterrupted. We may suspend or withdraw or restrict the availability of all or any part of our Site for business and/or operational reasons without notice to you. 5. **PROPER USE** You acknowledge that you are responsible for your own use of the Site and for any posting to the Site you make, including transmitting comments, ideas, code, or other information in any form (collectively referred to as " **Contributions**") to us. You agree that you will use the Site in compliance with all applicable national and international laws, rules and regulations. Like all communities, we ask that you participate in a manner that respects your community members in a productive and safe environment. To that end, you agree by way of example, and not as a limitation, that you will not: 1. Post any content to the Site that infringes any third party's intellectual property or other rights; 2. Post any content to the Site that is unlawful, racist, hateful, libellous, defamatory, obscene, or that intentionally discriminates against or harasses particular individuals or groups; 3. Post any private information, or otherwise harvest, collect or disclose information, about another person without his or her express consent; 4. Use the Site or Services for any unlawful purpose, or transmit or otherwise make available in connection with the Site any material that would give rise to criminal or civil liability; 5. Use the Site for unauthorised advertisements, chain letters, spam, survey solicitations, junk mail or solicitations; 6. Impersonate any person or entity, including any Gnosis employees, or falsely state or otherwise misrepresent your affiliation with any person or entity; 7. Imply that Gnosis endorses any of your statements or positions; 8. Take any action that imposes an unreasonable burden on the Site's server; 9. Use any device, software, router or other means to interfere or attempt to interfere with the proper working of the Site or any Services available on or through the Site; 10. Attempt to bypass any measures of the Site designed to prevent or restrict access to the Site, or any portion of the Site. 11. Attempt to decipher, decompile, disassemble or reverse-engineer any of the software comprising or making up the Site or the Services; and/or 12. Delete or alter any material posted by any other person or entity. 6. **UPLOADING CONTENT TO OUR SITE** 1. Whenever you make use of a feature that allows you to upload content to our Site, or to make contact with other users of our Site, you must comply with the content standards set out in the "PROPER USE" section above. You agree that any such Contributions shall comply with those standards, and you will be liable to us and indemnify us for any breach. This means you will be responsible for any loss or damage we suffer as a result of your breach. 2. By posting to the Site or otherwise transmitting Contributions, without abridging or limiting any open source licenses therein, you hereby grant to Gnosis a worldwide, non-exclusive, sublicensable, assignable, royalty-free, perpetual, irrevocable right (including moral rights) and license to use, reproduce, distribute, create derivative works based on, perform and/or display such Contributions (in whole or in part) in any media now known or hereafter developed, for any purpose whatsoever, without compensation to you or any other provider of the Contributions. 3. You also agree to permit any other user of the Site to access, display, view, copy, store and reproduce such Contributions and grant such users a worldwide, non-exclusive, sublicensable, assignable, royalty-free, perpetual, irrevocable right (including moral rights) and license to the Contributions for any purpose. 4. We reserve the right to disclose your identity to any third party who is claiming that any content posted or uploaded by you to our Site constitutes a violation of their intellectual property rights, or of their right to privacy. 5. We will not be responsible, or liable to any third party, for the content or accuracy of any content posted by you or any other user of our Site. 6. We have the right to remove any Contribution you make on or to our Site if, in our opinion, your Contribution does not comply with the content standards set out in our "PROPER USE" section. 7. **LICENSE TO OUR USERS** 1. The Site and its content is owned by Gnosis, its affiliated persons or entities (" **Affiliates**"), its licensors or other providers of such material and are protected by copyright, trademark and other intellectual property or proprietary laws. All such rights are reserved and you acknowledge that nothing in these Terms gives you any ownership rights in respect of any intellectual property owned by us, our Affiliates and/or our licensors. 2. We grant you a limited, revocable, non-exclusive, non-transferable, non-sublicensable license to access and use the Site solely for your own use. Gnosis, its Affiliates and its licensors shall remain the owner of the Site and its content at all times (except for any Contributions that you make) 3. The Site may contain code, commonly referred to as open source software, which is distributed under open source license terms, including terms which allow the free distribution and modification of the relevant software´s source code and/or which require all distributors to make such source code freely available upon request, including any contributions or modifications made by such distributor (" **Open Source Software**"). To the extent that the Site contains any Open Source Software, that element only is licensed to you under the relevant license terms of the applicable third party licensor (" **Open Source Licence Terms**") and not under these Terms, and you accept and agree to be bound by such Open Source Licence Terms. 4. You may not misuse the Site and may only use it as permitted by law. We reserve and retain all rights not expressly granted to you in these Terms. If you breach our intellectual property rights or the intellectual property rights of our Affiliates or licensors in violation of these Terms, your license to use our Site will automatically be revoked and terminated with immediate effect and you shall, at our option, return or destroy any copies of the materials you have made. 8. **TRADEMARKS** The Gnosis name, its logo and all related names (including product and services names), designs and slogans are trademarks of Gnosis or any Affiliates or licensors. You must not use such marks without the prior written permission of Gnosis. 9. **WE ARE NOT RESPONSIBLE FOR BUGS AND YOU MUST NOT INTRODUCE THEM** 1. We do not guarantee that our Site will be secure or free from bugs or viruses. 2. You are responsible for configuring your information technology and computer programmes to access our Site. You should use your own virus protection software. 3. You understand and accept that you use our Site at your own risk. 4. You must not misuse our Site by knowingly introducing viruses, trojans, worms, logic bombs or other material that is malicious or technologically harmful. You must not attempt to gain unauthorized access to our Site, the server on which our Site is stored or any server, computer or database connected to our Site. You must not attack our Site via a denial-of-service attack or a distributed denial-of service attack. By breaching this provision, you could be committing a criminal offense. We will report any such breach to the relevant law enforcement authorities and we will cooperate with those authorities by disclosing your identity to them. In the event of such a breach, your right to use our Site will cease immediately. 10. **THIRD PARTY CONTENT AND EXTERNAL LINKS** [These](https://www.lawinsider.com/clause/third-party-external-links) Terms apply only to the Site. In using the Site, you may be exposed to content and information, for example, data, text, files, information, usernames, graphics, images, photographs, profiles, audio, video, messages, services or links, from other users or third parties (" **Third-Party Content**"), either on our Site or through any links directing to third-party websites or mobile applications. We do not operate or control, and are not responsible for, any such Third-Party Content. The inclusion or appearance of Third-Party Content on the Site does not indicate any approval, verification or endorsement by Gnosis of such Third-Party Content. Gnosis is not responsible for, and hereby disclaims any and all liability that may arise from Third-Party Content or the act of accessing, browsing, or otherwise using such Third Party Content. 11. **RULES ABOUT YOU LINKING TO OUR SITE** 1. You may link to our Site, provided you do so in a way that is fair and legal and does not damage our reputation or take advantage of it. You must not establish a link in such a way as to suggest any form of association, approval or endorsement on our part where none exists. You must not establish a link to our Site in any website without the website owner's authorisation. 2. The website in which you are linking must comply in all respects with the content standards set out in these Terms. If you wish to link to or make any use of content on our Site other than that set out above, please contact us at [[info@gnosis.io](mailto:info@gnosis.io)]. 12. **DISCLAIMERS** 1. THE SITE IS PROVIDED ON AN "AS IS", "WHERE IS", AND "AS AVAILABLE" BASIS WITHOUT ANY WARRANTIES OR REPRESENTATIONS OF ANY KIND, WHETHER EXPRESS, IMPLIED, OR STATUTORY. IN PARTICULAR, BUT WITHOUT LIMITATION, WE EXPRESSLY EXCLUDE ANY AND ALL WARRANTIES: 1. THE SITE IS PROVIDED ON AN "AS IS", "WHERE IS", AND "AS AVAILABLE" BASIS WITHOUT ANY WARRANTIES OR REPRESENTATIONS OF ANY KIND, WHETHER EXPRESS, IMPLIED, OR STATUTORY. IN PARTICULAR, BUT WITHOUT LIMITATION, WE EXPRESSLY EXCLUDE ANY AND ALL WARRANTIES: 2. IN RELATION TO TITLE, MERCHANTABILITY, NON-INFRINGEMENT OF THIRD PARTY RIGHTS AND FITNESS FOR A PARTICULAR PURPOSE; 3. THAT THE SITE OR ITS SERVICES OR CONTENT WILL BE CONTINUOUS, UNINTERRUPTED OR SECURE, AND YOU ACKNOWLEDGE AND ACCEPT THAT THE OPERATION OF THE SITE MAY BE INTERFERED WITH BY FACTORS OUTSIDE OF OUR CONTROL; 4. THAT THE SITE WILL BE AVAILABLE AT ANY PARTICULAR TIME OR LOCATION, OR THAT THE SITE OR ITS SERVER(S) ARE FREE OF BUGS, VIRUSES OR OTHER MALICIOUS OR TECHNOLOGICALLY HARMFUL MATERIAL; OR 5. THAT THE SITE OR ANY SERVICES OR CONTENT, CONTRIBUTIONS OR THIRD-PARTY CONTENT IS ACCURATE, RELIABLE, COMPLETE OR UP TO DATE. 2. THESE TERMS ARE NOT INTENDED TO, AND DO NOT, CREATE OR IMPOSE ANY FIDUCIARY DUTIES ON US. TO THE FULLEST EXTENT PERMITTED BY LAW, YOU ACKNOWLEDGE AND AGREE THAT WE OWE NO FIDUCIARY DUTIES TO YOU OR ANY OTHER PART, AND THAT TO THE EXTENT ANY SUCH DUTIES MAY EXIST AT LAW OR IN EQUITY, THOSE DUTIES ARE HEREBY IRREVOCABLY DISCLAIMED AND WAIVED. 13. **LIMITATION OF LIABILITY** 1. WE WILL NOT BE LIABLE TO YOU FOR ANY LOSS OR DAMAGE (WHETHER IN CONTRACT, TORT, BREACH OF STATUTORY DUTY, OR OTHERWISE, EVEN IF FORESEEABLE), ARISING UNDER OR IN CONNECTION WITH: 1. THE USE OF, OR INABILITY TO USE, OUR SITE OR SERVICES; 2. USE OF OR RELIANCE ON ANY CONTENT (INCLUDING CONTRIBUTIONS AND THIRD PARTY CONTENT) DISPLAYED ON OUR SITE; OR 3. A CYBER-ATTACK, VIRUS OR OTHER MALICIOUS OR TECHNOLOGICALLY HARMFUL MATERIAL THAT MAY INFECT YOUR COMPUTER EQUIPMENT, DEVICES, APPLICATIONS, PROGRAMMES, DATA OR OTHER PROPRIETARY MATERIAL DUE TO YOUR USE OF THE SITE, THE SERVICES OR ANY CONTENT AVAILABLE ON THE SITE. 2. IN PARTICULAR, WE WILL NOT BE LIABLE FOR: 1. LOSS OF PROFITS, SALES, BUSINESS OR REVENUE; 2. BUSINESS INTERRUPTION; 3. LOSS OF ANTICIPATED SAVINGS; 4. LOSS OF BUSINESS OPPORTUNITY, GOODWILL OR REPUTATION; OR 5. ANY INDIRECT OR CONSEQUENTIAL LOSS OR DAMAGE. 3. IF AND TO THE EXTENT THAT WE ARE LIABLE TO YOU FOR ANY LOSS OR DAMAGE ARISING UNDER THESE TERMS, SUCH LIABILITY WILL BE LIMITED TO GBP 100 OR THE MINIMUM AMOUNT PERMITTED UNDER APPLICABLE LAW (WHICHEVER IS GREATER). 4. Some states do not allow exclusion of implied warranties or limitation of liability for incidental or consequential damages, so the above limitations or exclusions may not apply to you. IN SUCH STATES, THE LIABILITY OF GNOSIS, ITS AFFILIATES, THEIR RESPECTIVE OFFICERS, DIRECTORS, EMPLOYEES, AGENTS, SUPPLIERS, OR LICENSORS OR ANYONE ASSOCIATED WITH GNOSIS SHALL BE LIMITED TO THE GREATEST EXTENT PERMITTED BY LAW. 14. **INDEMNIFICATION** 1. You agree to defend, indemnify, and hold harmless Gnosis, Affiliates, licensors, and service providers, and its and their respective officers, directors, employees, contractors, agents, licensors, suppliers, successors, and assigns from and against any claims, liabilities, damages, judgments, awards, losses, costs, expenses, or fees (including reasonable attorneys' fees) arising or resulting from your breach of these Terms or your access, contribution to, use or misuse of the Site or Services. 2. Without prejudice and in addition to the indemnity provided in clause 14.1, in the event that a third party brings any claim, suit or proceeding against Gnosis as a result of your breach of these Terms, you agree to cooperate and provide all assistance as we may reasonably require or request in connection with our defence of such claim, suit or proceeding. 3. The indemnity set out here is in addition to, and not in lieu of, any other remedies that may be available to us under applicable law. 15. **RIGHT TO RESTRICT ACCESS AND TAKE LEGAL PROCEEDINGS** 1. WITHOUT LIMITING ANY OTHER PROVISION OF THESE TERMS, WE RESERVE THE RIGHT TO, IN OUR SOLE DISCRETION AND WITHOUT NOTICE OR LIABILITY, DENY ACCESS TO AND USE OF THE SITE (INCLUDING BLOCKING CERTAIN IP ADDRESSES), TO ANY PERSON FOR ANY REASON OR FOR NO REASON, INCLUDING, WITHOUT LIMITATION FOR BREACH OF ANY WARRANTY, REPRESENTATION CONTAINED IN THESE TERMS OR ANY APPLICABLE LAW OR REGULATION.We are not responsible for any loss or harm related to your inability to access or use our Site. 2. In addition, we reserve the right to take appropriate legal proceedings against anyone who, in our sole discretion, violates the law or these Terms and/or disclose such information to law enforcement authorities as we reasonably feel is necessary or as required by law. The actions we may take are not limited to those described, and we may take any other action we reasonably deem appropriate. 16. **THE TERMS ARE OUR ENTIRE AGREEMENT WITH YOU AND WE MAY ASSIGN THE TERMS** 1. We may assign these Terms to any of our Affiliates or in connection with a merger or other disposition of all or substantially all of our assets. 2. These Terms constitute the entire and exclusive agreement between us and you regarding its subject matter, and supersede and replace any previous or contemporaneous written or oral contract, promises, assurances, assurances, warranty, representation or understanding regarding its subject matter, whether written or oral. You shall have no claim for innocent or negligent misrepresentation or misstatement based on any statement in these Terms, though nothing in this clause shall limit or exclude any liability for fraud. 17. **USER DATA** Please refer to our Privacy Policy, available at [Privacy Policy (gnosis.io)](https://www.gnosis.io/privacy-policy)for information about how we collect, use, share and otherwise process information about you. By using the Site, you consent to all actions that may be taken by us with respect to your information in compliance with the Privacy Policy. Our Cookie Notice, available at [https://gnosis.io/cookie-policy](https://gnosis.io/cookie-policy) explains how we use cookies and similar technologies on our Site, as well as options you may have to control or opt out of certain cookies. The Privacy Policy and Cookie Notice are incorporated into these Terms by reference and form part of the contract between you and Gnosis in relation to your use of the Site and Services. 18. **GOVERNING LAW** This Agreement and any dispute or claim arising out or in connection with these Terms (including any dispute or claim relating to non-contractual obligations) shall be governed by and construed in accordance with Gibraltar law. 19. **HOW TO RESOLVE COMPLAINTS AND DISPUTES** If an alleged breach, controversy, claim, dispute or difference arises out of or in connection with these Terms (a " **Dispute**"), you agree to seek to resolve the matter with us amicably by referring the matter to [[info@gnosis.io](mailto:info@gnosis.io)] with a detailed description, the date and time the issue arose, your contact information to contact you on and the outcome you are seeking. 20. **DISPUTE RESOLUTION** 1. **YOU AGREE AND UNDERSTAND THAT BY ENTERING INTO THIS AGREEMENT, YOU EXPRESSLY WAIVE ANY RIGHT, IF ANY, TO A TRIAL BY JURY AND RIGHT TO PARTICIPATE IN A CLASS ACTION LAWSUIT.** 2. In the event a Dispute cannot be resolved amicably in accordance with clause 19 within a period of sixty (60) days, then any such Dispute, controversy or claim arising out of or in connection with these Terms, including any question regarding its existence, validity or termination, shall be referred to and finally resolved by arbitration under the rules of the London Court of International Arbitration (" **LCIA Rules**"). The seat of the arbitration shall be Gibraltar. The arbitration will be conducted confidentially by a single arbitrator appointed in accordance with the LCIA Rules. The language to be used in the arbitral proceedings shall be English. The governing law of these Terms shall be the substantive law of Gibraltar. 21. **PROVISIONS ARE SEVERABLE, IF FOUND INVALID** If any provision or part-provision of these Terms is or becomes invalid, illegal or unenforceable, it shall be deemed modified to the minimum extent necessary to make it valid, legal and enforceable. If such modification is not possible, the relevant provision or part-provision shall be deemed deleted. Any modification to or deletion of a provision or part-provision under this clause shall not affect the validity and enforceability of the rest of these Terms. 22. **NO WAIVER** Any waiver of a breach of these Terms must be in writing to be effective, and shall not constitute a waiver of any other breach or default of these Terms. No delay or omission in the exercise of any right or remedy shall impair or be construed as a waiver of such right or remedy. 23. **CONTACT US** All feedback, comments, requests for technical support and other communications relating to the Site should be directed to [[info@gnosis.io](mailto:info@gnosis.io)]. --- // File: tools/README # Tools Overview A home to all developer tools that would be helpful when you would be building dApps on Gnosis Chain. Find the support to following in this section : - Blockchain explorers - Faucets - Oracles - RPC Providers - User Onboarding - Wallets If you would like to request your product as part of developer tool for Gnosis Chain ecosystem, you can share request here. --- // File: tools/Blockchain Explorers/README # Explorers Explorers are pieces of software that scans Gnosis and make easier for users to search for blocks, transactions, addresses, contracts. Gnosis supports the following explorers: - [Blockscout](/tools/explorers/blockscout) - [Gnosisscan](https://gnosisscan.io/) - [Beacon Chain](https://gnosischa.in/) - [DexGuru Gnosis Block Explorer](https://gnosis.dex.guru/) - [3xpl](https://3xpl.com/gnosis-chain) --- // File: tools/Blockchain Explorers/blockscout # BlockScout BlockScout is a full-featured, open-source explorer for Gnosis Mainnet, Chiado Testnet and many other chains. [The Gnosis explorer is available here](https://blockscout.com/xdai/mainnet). With BlockScout you can: * View blocks, transactions, accounts, balances, token transfers * Access blockchain data via API functions * Read and verify smart contracts * Use My Account features for advanced transaction tagging and monitoring ![](/img/tools/blockscout.png) ## More links - GraphQL: [https://blockscout.com/poa/xdai/graphiql](https://blockscout.com/poa/xdai/graphiql) - RPC: [https://blockscout.com/xdai/mainnet/api-docs](https://blockscout.com/xdai/mainnet/api-docs) - Eth RPC: [https://blockscout.com/xdai/mainnet/eth-rpc-api-docs](https://blockscout.com/xdai/mainnet/eth-rpc-api-docs) --- // File: tools/Blockchain Explorers/tenderly # Tenderly Tenderly [Developer Explorer](https://docs.tenderly.co/developer-explorer/?mtm_campaign=ext-docs&mtm_kwd=gnosis) is a development toolbox designed to help developers effectively manage, debug, and monitor their projects. With Tenderly Developer Explorer you can: * Debug and simulate contracts with the integrated [**Debugger**](https://docs.tenderly.co/debugger/?mtm_campaign=ext-docs&mtm_kwd=gnosis), gaining insights to quickly identify and resolve issues. * Monitor deployed contracts and protocols on Gnosis Chain in real-time to ensure optimal performance and stability. * Set up critical [alerts](https://docs.tenderly.co/alerts/intro-to-alerts?mtm_campaign=ext-docs&mtm_kwd=gnosis) on contracts to proactively respond to issues and improve security practices. * Leverage Developer Explorer with [**Virtual TestNets**](https://docs.tenderly.co/virtual-testnets?mtm_campaign=ext-docs&mtm_kwd=gnosis) during the entire dapp development process, from testing to staging and go-live. ## More links - [Virtual TestNets](https://docs.tenderly.co/virtual-testnets?mtm_campaign=ext-docs&mtm_kwd=gnosis) - [Simulator UI](https://docs.tenderly.co/simulator-ui?mtm_campaign=ext-docs&mtm_kwd=gnosis) - [Github Action CI/CD infrastructure](https://docs.tenderly.co/virtual-testnets/ci-cd/github-actions-foundry?mtm_campaign=ext-docs&mtm_kwd=gnosis) --- // File: tools/Data Indexing/covalent # GoldRush - powered by Covalent [GoldRush](https://goldrush.dev/?utm_source=gnosis-chain&utm_medium=partner-docs) is a set of data tools that enable easy web3 development across [200+ supported blockchains](https://goldrush.dev/docs/networks/?utm_source=gnosis-chain&utm_medium=partner-docs), including Gnosis Chain. The mission of GoldRush is to improve the lives of developers by providing structured onchain data for dapps. Developers can utilize GoldRush via SDKs, APIs, UI Kits, human-readable transactions and pre-built templates for a number of web3 use cases. The GoldRush suite is powered by Covalent, which is decentralized and cryptographically secure. Whether you are fetching NFTs, DeFi transactions, or other onchain data, GoldRush helps scale hundreds of projects from crypto native teams to Fortune 500 companies. With GoldRush, you have access to: - Every wallet's token balances - Full transaction histories - Every contract log event - All NFTs including assets and metadata **Use GoldRush if you need:** - Wallet, Transactions, NFT, DEX, Staking or core blockchain data (i.e. log events, blocks, gas) - Normalized, aggregated and enhanced multichain data, well beyond what you get from RPC providers - Enterprise-grade performance > [Sign up to start building on Gnosis Chain](https://goldrush.dev/platform/?utm_source=gnosis-chain&utm_medium=partner-docs) ## APIs The GoldRush APIs enables developers to quickly and easily access structured onchain data. This means consistent response schemas that are blockchain agnostic. Available APIs and corresponding use cases include: ### Wallet API - **Features:** All token balances (ERC20, 721, 1155, native), token transfers and prices (spot and historical) for a wallet. - **Use cases:** [Wallets, portfolio trackers](https://goldrush-wallet-portfolio-ui.vercel.app/?utm_source=gnosis-chain&utm_medium=partner-docs), token gating, airdrop snapshots. ### Transactions API - **Features:** All historical transactions with human-readable log events. Includes gas usage/spend summaries. - **Use cases:** [Accounting and tax tools](https://bit.ly/crypto-tax-tool), branded in-app [transaction receipts](https://goldrush-dfk-tx-receipt-ui.vercel.app/tx/defi-kingdoms-mainnet/0x4e5c0af28b2cea27d06677fae1f573572e0ff863c43ae42d2959ca67b90c4390/?utm_source=gnosis-chain&utm_medium=partner-docs). ### NFT API - **Features:** Media assets, metadata, sales, owners, trait & attribute filters, thumbnails, and previews. - **Use cases:** [NFT galleries and marketplaces](https://goldrush-nft-gallery-ui.vercel.app/?utm_source=gnosis-chain&utm_medium=partner-docs), real world asset (RWA) tracking, token gating. ### Cross-Chain Activity API - **Features:** Single API call to fetch a list of active chains and the latest transaction date on each for an address. - **Use cases:** [App onboarding](https://goldrush-wallet-portfolio-ui.vercel.app/activity/0xfc43f5f9dd45258b3aff31bdbe6561d97e8b71de/?utm_source=gnosis-chain&utm_medium=partner-docs). ### Security API - **Features:** NFT and ERC20 token allowances, including value-at-risk. - **Use cases:** [Revoke features](https://goldrush-revokehub.vercel.app/?utm_source=gnosis-chain&utm_medium=partner-docs) in wallets, security applications. ### Blockchain API - **Features:** Block details, log events by contract address or topic hash, gas prices, token prices and holders. - **Use cases:** [Custom block explorers](https://goldrush-block-explorer.vercel.app/?utm_source=gnosis-chain>&utm_medium=partner-docs). ## Developer Tools There are 4 primary developer tools for using the APIs: 1. [GoldRush API](https://goldrush.dev/docs/api/?utm_source=gnosis-chain&utm_medium=partner-docs) - REST API with enterprise-grade endpoints to use with any programming language. Switch blockchains with one path parameter. ```bash curl -X GET https://api.covalenthq.com/v1/gnosis-mainnet/address/0x2C6900b24221dE2B4A45c8c89482fFF96FFB7E55/balances_v2/ \ -H 'Content-Type: application/json' \ -u YOUR_API_KEY: ``` 2. [GoldRush SDKs](https://goldrush.dev/docs/unified-api/sdk/?utm_source=gnosis-chain&utm_medium=partner-docs) - official client libraries including TypeScript, Python, Go and Viem. ```jsx npm install @covalenthq/client-sdk ``` ```jsx import { CovalentClient } from "@covalenthq/client-sdk"; (async () => { try { const client = new CovalentClient("YOUR_API_KEY"); const transactions = client.TransactionService.getAllTransactionsForAddress("gnosis-mainnet", "0x2C6900b24221dE2B4A45c8c89482fFF96FFB7E55"); for await (const tx of transactions) { console.log("tx", tx); } } catch (error) { console.log(error.message); } })(); ``` 3. [GoldRush UI Kit](https://github.com/covalenthq/goldrush-kit/?utm_source=gnosis-chain&utm_medium=partner-docs) - beautifully designed React components for your dApp frontend. [![GoldRush Component Example](https://www.datocms-assets.com/86369/1711147954-goldrush_wallet_ui_example.png)](https://goldrush-wallet-portfolio-ui.vercel.app/dashboard/balance/0xfc43f5f9dd45258b3aff31bdbe6561d97e8b71de/transfers/eth-mainnet/0xf8c3527cc04340b208c854e985240c02f7b7793f) 4. [GoldRush Decoder](https://github.com/covalenthq/goldrush-decoder/?utm_source=gnosis-chain&utm_medium=partner-docs) - decode any raw event logs into human-readable structured data. **Request:** ```bash curl -X POST http://localhost:8080/api/v1/tx/decode \ -H 'Content-Type: application/json' \ -d '{ "chain_name": "gnosis-mainnet", "tx_hash": "0xe9e807d78673ad214ce51d0c13d13cf15f2ddf8e85498db64e6ffad75e12733f" }' ``` **Custom decoded response:** ```json { "success": true, "events": [ { "action": "Account Abstraction Transaction", "category": "Others", "name": "User Operation Event", "protocol": { "logo": "https://logos.covalenthq.com/tokens/100/0x5ff137d4b0fdcd49dca30c7cf57e578a026d2789.png", "name": "4337 Entry Point" }, "details": [ { "heading": "Gas Cost", "value": "2504932000000000", "type": "text" }, { "heading": "Gas Used", "value": "1252466", "type": "text" }, { "heading": "Paymaster", "value": "0x00000f79B7FaF42EEBAdbA19aCc07cD08Af44789", "type": "address" }, { "heading": "Sender", "value": "0x1B19D70F192bEb4E1fc4FCf72219E742b0B3661c", "type": "address" }, { "heading": "User Operation Hash", "value": "0x31ec6a8084b4f3677120313986f0f2dc9dffdb5c15d4eccf2094603a690efcb6", "type": "address" } ] } ], "tx_metadata": { ... }, "explorers": [ { "label": null, "url": "https://gnosis.blockscout.com/tx/0xe9e807d78673ad214ce51d0c13d13cf15f2ddf8e85498db64e6ffad75e12733f" } ] } } ``` ## Get started - [API Key](https://goldrush.dev/platform/auth/register/?utm_source=gnosis-chain&utm_medium=partner-docs) - sign up for free - [Docs](https://goldrush.dev/docs/unified-api/?utm_source=gnosis-chain&utm_medium=partner-docs) - comprehensive knowledge base for all things GoldRush - [Guides](https://goldrush.dev/docs/unified-api/guides/?utm_source=gnosis-chain&utm_medium=partner-docs) - learn how to build for various use cases and expand your onchain knowledge --- // File: tools/Data Indexing/envio [Envio](https://envio.dev/) is a feature-rich indexing solution that provides developers with a seamless and efficient way to index and aggregate blockchain data for any EVM. The indexed data is easily accessible through custom GraphQL queries, providing developers with the flexibility and power to retrieve specific information. Envio offers native support for Gnosis (both testnet and mainnet) and has been designed to support high-throughput blockchain applications that rely on real-time data for their business requirements. Designed to optimize the user experience, Envio offers automatic code generation, flexible language support, quickstart templates, and a reliable cost-effective [hosted service](https://docs.envio.dev/docs/hosted-service). Indexers on Envio can be written in JavaScript, TypeScript, or ReScript. ## Envio HyperSync Envio supports [HyperSync](https://docs.envio.dev/docs/hypersync) on Gnosis mainnet. HyperSync is an indexed layer of the Gnosis blockchain, providing accelerated APIs (JSON-RPC bypass) for the hyper-speed syncing of historical data. Developers do not need to worry about RPC URLs, rate-limiting, or managing infrastructure, and can easily sync large datasets in a few minutes, something that would usually take 20-100x longer via JSON-RPC. ## Other Key Features - Contract Import: Autogenerate the key boilerplate for an entire Indexer project off a single smart contract definition. Deploy within minutes. - Multi-chain Support: Aggregate data across multiple networks into a single database. Query all your data with a unified GraphQL API. - Detailed logging and error messaging are provided for effective troubleshooting and debugging. - Quickstart templates with pre-defined indexing logic for popular OpenZeppelin contracts. ## Getting Started The following files are required from the user to run the Envio indexer: - Configuration (defaults to `config.yaml`) - GraphQL Schema (defaults to `schema.graphql`) - Event Handlers (defaults to `src/EventHandlers.*` depending on the language chosen) These files are auto-generated according to the template and language chosen by running the `envio init` command. [**Quickstart Guide**](https://docs.envio.dev/docs/quickstart) ```bash ? Would you like to start from a template or migrate from a subgraph? > "Template" "SubgraphMigration" [↑↓ to move, enter to select, type to filter] ``` Then choose a template out of the possible options ```bash ? Which template would you like to use? > "Blank" "Greeter" "ERC-20" [↑↓ to move, enter to select, type to filter] ``` Then choose a language from **Javascript**, **Typescript**, or **Rescript** to write the event handlers file. ```bash ? Which language would you like to use? > "Javascript" "Typescript" "Rescript" [↑↓ to move, enter to select, type to filter] ``` This will create the config, schema and event handlers files according to the template and language chosen. :::info Envio Indexer Examples Click [here](https://docs.envio.dev/docs/example-uniswap-v3) for Envio Indexer Examples. ::: ## Getting Help Indexing can be a rollercoaster, especially for more complex use cases. Our engineers are available to help you with your data availability needs. Join our growing community of elite builders, and find peace of mind with Envio. * [Discord](https://discord.gg/mZHNWgNCAc) * Email: [hello@envio.dev](mailto:hello@envio.dev) --- // File: tools/Data Indexing/moralis [Moralis](https://moralis.io/?utm_source=gnosis-docs&utm_medium=partner-docs) is a blockchain data platform that provides developers with all the data they need to build better blockchain applications. From NFT data and token data, through to raw blockchain data, Moralis offers a wide range of products that cover all major crypto and blockchain use cases, and it supports [Gnosis](https://moralis.io/chains/gnosis/?utm_source=gnosis-docs&utm_medium=partner-docs) together with all other major EVM chains. ## Moralis Nodes With [Moralis Nodes](https://moralis.io/nodes/?utm_source=gnosis-docs&utm_medium=partner-docs), you can get access to reliable and high performing RPC nodes on Gnosis and all other major EVM blockchains. ## Moralis APIs All Moralis APIs are supported on Gnosis and across all other major EVM blockchains. All endpoints support powerful filtering capabilities. ### Wallet API With Moralis [Wallet API](https://moralis.io/api/wallet/?utm_source=gnosis-docs&utm_medium=partner-docs) you can get Wallet balances for tokens, NFTs and native assets, get full wallet history, net worth and a lot more. ### NFT API With Moralis [NFT API](https://moralis.io/api/nft/?utm_source=gnosis-docs&utm_medium=partner-docs) you can get NFT data like collections, owners, prices, images and metadata. ### Token API With Moralis [Token API](https://moralis.io/api/token/?utm_source=gnosis-docs&utm_medium=partner-docs) you can get ERC20 token data like prices, ownership, metadata, transfers, approvals, liquidity, mints and burns. ### Blockchain API With Moralis [Blockchain API](http://moralis.io/api/blockchain/?utm_source=gnosis-docs&utm_medium=partner-docs) you can get core blockchain data like blocks, transactions and logs. ## Moralis Streams Moralis [Streams](https://moralis.io/streams/?utm_source=gnosis-docs&utm_medium=partner-docs) allow you to stream blockchain data in real-time via webhooks. Subscribe to any on-chain event, like NFT or token mints, transfers or swaps, add powerful filters and then watch the data flow to your destination in real time. Use it to build things like wallet notifications, Telegram alerts or just to keep your user balances up to date in real-time by streaming data to your database. ## Getting started with Moralis APIs In order to use the Moralis APIs you need a Moralis account and a Moralis API key. 1. Go to [admin.moralis.io](https://admin.moralis.io/?utm_source=gnosis-docs&utm_medium=partner-docs) and create a Moralis account 2. Login to access the admin interface 3. Go to settings and find your API key 4. Find all endpoints and SDKs in the [Moralis documentation](https://docs.moralis.io/?utm_source=gnosis-docs&utm_medium=partner-docs) You can now call any Moralis endpoint, see below for an example. ### Get NFT balances of Wallet **Request** ```javascript import Moralis from 'moralis'; try { await Moralis.start({ apiKey: "mmRBnJ94TQu5Fr2FSMCYBAtDtpDKz3axFSqcUZ7wr6skFnJtfrJXW3XRt3AeRyph" }); const response = await Moralis.EvmApi.nft.getWalletNFTs({ "chain": "0x1", "format": "decimal", "mediaItems": false, "address": "0xd8da6bf26964af9d7eed9e03e53415d37aa96045" }); console.log(response.raw); } catch (e) { console.error(e); } ``` **Response** ```json { "page": 1, "page_size": 100, "cursor": "eyJhbGciOiJIUzI1NiIsInR5cCI6IkpXVCJ9.eyJjdXN0b21QYXJhbXMiOnsid2FsbGV0QWRkcmVzcyI6IjB4ZDhkYTZiZjI2OTY0YWY5ZDdlZWQ5ZTAzZTUzNDE1ZDM3YWE5NjA0NSJ9LCJrZXlzIjpbIjE2ODU5MzY5NDQuNTE3Il0sIndoZXJlIjp7Im93bmVyX29mIjoiMHhkOGRhNmJmMjY5NjRhZjlkN2VlZDllMDNlNTM0MTVkMzdhYTk2MDQ1In0sImxpbWl0IjoxMDAsIm9mZnNldCI6MCwib3JkZXIiOltdLCJkaXNhYmxlX3RvdGFsIjp0cnVlLCJleGNsdWRlX3NwYW0iOmZhbHNlLCJ0b3RhbCI6bnVsbCwicGFnZSI6MSwidGFpbE9mZnNldCI6MSwiaWF0IjoxNjkzNDY3ODc0fQ.z5vEhLXquK4l91WxS62KgGzL3zgI8vYuWOe2Uzi64iI", "result": [ { "token_address": "0xb365e53b64655476e3c3b7a3e225d8bf2e95f71d", "token_id": "1", "amount": "1", "owner_of": "0xd8da6bf26964af9d7eed9e03e53415d37aa96045", ... }, ... ] } ``` ## Getting started with Moralis Streams 1. Go to [admin.moralis.io](https://admin.moralis.io/?utm_source=gnosis-docs&utm_medium=partner-docs) and create a Moralis account 2. Login to access the admin interface 3. Go to the Streams page 4. From there you can configure your Moralis Stream from the UI 5. Configure the trigger, what events or what addresses to watch 6. Configure the filters you want 7. Configure which chains you want the Stream to be active on. 8. Set up your destination webhook (where the data should be sent) You can also set up Streams programmatically, check out the [Moralis Streams documentation](https://docs.moralis.io/streams-api/evm/?utm_source=gnosis-docs&utm_medium=partner-docs) for a guide on how to do that. ## Tutorials & Guides ### Tutorials - [How to get all NFTs owned by a wallet address](https://docs.moralis.io/web3-data-api/evm/how-to-get-all-nfts-owned-by-an-address/?utm_source=gnosis-docs&utm_medium=partner-docs) - [How to get the metadata of an NFT](https://docs.moralis.io/web3-data-api/evm/how-to-get-the-metadata-of-an-nft/?utm_source=gnosis-docs&utm_medium=partner-docs) - [How to get all tokens owned by a wallet address](https://docs.moralis.io/web3-data-api/evm/how-to-get-all-erc20-tokens-owned-by-an-address/?utm_source=gnosis-docs&utm_medium=partner-docs) - [How to get the price of any ERC20 token](https://docs.moralis.io/web3-data-api/evm/how-to-get-the-price-of-an-erc20-token/?utm_source=gnosis-docs&utm_medium=partner-docs) - [How to get all token transfers of a wallet address](https://docs.moralis.io/web3-data-api/evm/how-to-get-all-erc20-transfers-by-wallet/?utm_source=gnosis-docs&utm_medium=partner-docs) ### Guides - [How to build an automated Telegram bot](https://docs.moralis.io/guides/automated-blockchain-telegram-bot/?utm_source=gnosis-docs&utm_medium=partner-docs) - [How to build an NFT gates website with NextJS](https://docs.moralis.io/guides/token-gating-website-nextjs/?utm_source=gnosis-docs&utm_medium=partner-docs) - [How to build a ZapperFi clone](https://docs.moralis.io/guides/zapper-clone/?utm_source=gnosis-docs&utm_medium=link) - [How to get Token Prices](https://www.youtube.com/watch?v=laDsODyofVU) - [How to build a Blur NFT Marketplace clone](https://www.youtube.com/watch?v=WVEqX8DL4KE) - [How to build a Metamask portfolio clone](https://www.youtube.com/watch?v=1UD0WqvsKZ8) --- // File: tools/Data Indexing/subquery # SubQuery Data Indexing [SubQuery](http://www.subquery.network/) is a leading data indexer that gives you fast, reliable, decentralised, and customised APIs for your web3 projects. We empower developers from over 80+ ecosystems (including Gnosis) with rich indexed data to allow them to build intuitive and immersive experiences for their users. The SubQuery Network powers your unstoppable apps with a resilient and decentralised infrastructure network. Use our blockchain developer toolkit to build the web3 applications of the future, without wasting time building a custom backend for data processing activities ## Creating a custom Gnosis Indexer with SubQuery :::info See [SubQuery's Documentation](https://academy.subquery.network/quickstart/quickstart_chains/gnosis.html) for more details. ::: The goal of this quick start guide is to index all [POAP](https://poap.xyz/) mints and transactions on the Gnosis mainnet. ## Steps: First, install SubQuery CLI globally on your terminal by using NPM `npm install -g @subql/cli`. Use the `subql` CLI to bootstrap a clean project in the network of your choosing by running `subql init` and following the prompts to initialise a Gnosis project. Don't forget to install dependencies with `npm install` or `yarn install`! In every SubQuery project, there are 3 key files to update. Let's begin updating them one by one. ### 1. Your Project Manifest File The Project Manifest (`project.yaml`) file works as an entry point to your Gnosis project. It defines most of the details on how SubQuery will index and transform the chain data. For Gnosis, there are three types of mapping handlers (and you can have more than one in each project): - [BlockHanders](https://academy.subquery.network/build/manifest/gnosis.html#mapping-handlers-and-filters): On each and every block, run a mapping function - [TransactionHandlers](https://academy.subquery.network/build/manifest/gnosis.html#mapping-handlers-and-filters): On each and every transaction that matches optional filter criteria, run a mapping function - [LogHanders](https://academy.subquery.network/build/manifest/gnosis.html#mapping-handlers-and-filters): On each and every log that matches optional filter criteria, run a mapping function Note that the manifest file has already been set up correctly and doesn’t require significant changes, but you need to import the correct contract definitions and update the datasource handlers. As we are indexing all transfers and mints for the POAP ERC721 contract, the first step is to import the contract abi definition which can be obtained from [here](https://gnosisscan.io/token/0x22c1f6050e56d2876009903609a2cc3fef83b415#code). Copy the entire contract ABI and save it as a file called `poap.abi.json` in the `/abis` directory. This section in the Project Manifest now imports all the correct definitions and lists the triggers that we look for on the blockchain when indexing. **Since we are indexing all mints and transfers for the POAP ERC721 contract, you need to update the `datasources` section as follows:** ```yaml dataSources: - kind: ethereum/Runtime # We use ethereum runtime since Gnosis is a layer-2 that is compatible startBlock: 12188423 # When the POAP contract was deployed https://gnosisscan.io/tx/0x2e4873cb1390f5328d389276624d1ffa833e3934657d5a791ee145defff663a2 options: # Must be a key of assets abi: poap address: "0x22c1f6050e56d2876009903609a2cc3fef83b415" # this is the contract address for POAPs on Gnosis https://gnosisscan.io/token/0x22c1f6050e56d2876009903609a2cc3fef83b415 assets: poap: file: "./abis/poap.abi.json" mapping: file: "./dist/index.js" handlers: - handler: handleTokenMint kind: ethereum/TransactionHandler # We use ethereum handlers since Gnosis is a layer-2 that is compatible filter: ## The function can either be the function fragment or signature # function: '0xaf68b302' function: mintToken(uint256 eventId, address to) - handler: handleTokenTransfer kind: ethereum/LogHandler filter: topics: ## Follows standard log filters https://docs.ethers.io/v5/concepts/events/ - Transfer(address indexed from, address indexed to, uint256 indexed tokenId) ``` The above code indicates that you will be running `handleTokenMint` and `handleTokenTransfer` mapping functions whenever there is a transaction with the function `mintToken` or a log with the signature `Transfer` on any transaction from the [POAP smart contract](https://gnosisscan.io/token/0x22c1f6050e56d2876009903609a2cc3fef83b415). Check out our [Manifest File](https://academy.subquery.network/build/manifest/gnosis.html) documentation to get more information about the Project Manifest (`project.yaml`) file. ### 2. Update Your GraphQL Schema File The `schema.graphql` file determines the shape of your data from SubQuery due to the mechanism of the GraphQL query language. Hence, updating the GraphQL Schema file is the perfect place to start. It allows you to define your end goal right at the start. Remove all existing entities and update the `schema.graphql` file as follows. Here you can see we are indexing token information such as the `id` and the `mintBlockHeight` along with all transfers of that token. There are [foreign keys](https://academy.subquery.network/build/graphql.html#entity-relationships) between all entities. ```graphql type Event @entity { id: ID! } type Token @entity { id: ID! mintBlockHeight: BigInt! mintTx: String! mintDate: Date! mintReceiver: Address! currentHolder: Address! event: Event! } type Address @entity { id: ID! } type TokenTransfer @entity { id: ID! # transactionHash txHash: String! date: Date! blockHeight: BigInt! from: Address! to: Address! token: Token! } ``` ::: warning Important When you make any changes to the schema file, please ensure that you regenerate your types directory. ::: SubQuery makes it easy and type-safe to work with your GraphQL entities, as well as smart contracts, events, transactions, and logs. SubQuery CLI will generate types from your project's GraphQL schema and any contract ABIs included in the data sources. ::: code-tabs @tab:active yarn ```shell yarn codegen ``` @tab npm ```shell npm run-script codegen ``` ::: This will create a new directory (or update the existing one) `src/types` which contains generated entity classes for each type you have defined previously in `schema.graphql`. These classes provide type-safe entity loading, and read and write access to entity fields - see more about this process in [the GraphQL Schema](https://academy.subquery.network/build/graphql.html). All entities can be imported from the following directory: ```ts import { Token, Event, Address, TokenTransfer } from "../types"; ``` If you're creating a new Ethereum based project, this command will also generate ABI types and save them into `src/types` using the `npx typechain --target=ethers-v5` command, allowing you to bind these contracts to specific addresses in the mappings and call read-only contract methods against the block being processed. It will also generate a class for every contract event to provide easy access to event parameters, as well as the block and transaction the event originated from. All of these types are written to `src/types/abi-interfaces` and `src/types/contracts` directories. In this example SubQuery project, you would import these types like so. ```ts import { EventTokenLog, MintTokenTransaction, TransferLog, } from "../types/abi-interfaces/PoapAbi"; ``` Check out the [GraphQL Schema](https://academy.subquery.network/build/graphql.html) documentation to get in-depth information on `schema.graphql` file. Now that you have made essential changes to the GraphQL Schema file, let’s proceed ahead with the Mapping Function’s configuration. ### 3. Add a Mapping Function Mapping functions define how chain data is transformed into the optimised GraphQL entities that we previously defined in the `schema.graphql` file. Navigate to the default mapping function in the `src/mappings` directory. You will be able to see two exported functions: `handleLog`, and `handleTransaction`. ```ts import { Token, Event, Address, TokenTransfer } from "../types"; import assert from "assert"; import { EventTokenLog, MintTokenTransaction, TransferLog, } from "../types/abi-interfaces/PoapAbi"; import { BigNumberish } from "ethers"; async function checkGetEvent(id: BigNumberish): Promise { let event = await Event.get(id.toString().toLowerCase()); if (!event) { event = Event.create({ id: id.toString().toLowerCase(), }); await event.save(); } return event; } async function checkGetAddress(id: string): Promise { let address = await Address.get(id.toLowerCase()); if (!address) { address = Address.create({ id: id.toLowerCase(), }); await address.save(); } return address; } export async function handleTokenMint(tx: MintTokenTransaction): Promise { logger.info(`New Token Mint transaction at block ${tx.blockNumber}`); assert(tx.args, "No tx.args"); // logger.info(JSON.stringify(tx.args)); const [eventId, receiverId] = tx.args; const event = await checkGetEvent(await eventId); const receiver = await checkGetAddress(await receiverId); // The tokenID is from the logs from this transaction // This searches by the function fragment signature to get the right log const log = tx.logs?.find((log) => log.topics.includes( "0x4b3711cd7ece062b0828c1b6e08d814a72d4c003383a016c833cbb1b45956e34" ) ) as EventTokenLog; if (log) { const tokenId = log.args?.tokenId; assert(tokenId, "No tokenID"); const newToken = Token.create({ id: tokenId.toString(), mintTx: tx.hash, mintBlockHeight: BigInt(tx.blockNumber), mintDate: new Date(Number(tx.blockTimestamp) * 1000), // Saved as a seconds epoch mintReceiverId: receiver.id, currentHolderId: receiver.id, eventId: event.id, }); await newToken.save(); } } export async function handleTokenTransfer(log: TransferLog) { logger.info(`New Token Transfer log at block ${log.blockNumber}`); assert(log.args, "No log.args"); // We ignore all transfers from 0x0000000000000000000000000000000000000000 since they are from the original mint if (log.args.from != "0x0000000000000000000000000000000000000000") { const from = await checkGetAddress(await log.args.from); const to = await checkGetAddress(await log.args.to); let token = await Token.get(await log.args.tokenId.toString()); if (!token) { token = Token.create({ id: log.args.tokenId.toString(), mintBlockHeight: BigInt(log.blockNumber), mintDate: new Date(Number(log.block.timestamp) * 1000), // Saved as a seconds epoch mintReceiverId: to.id, currentHolderId: to.id, }); } const newTokenTransfer = TokenTransfer.create({ id: log.transactionHash, txHash: log.transactionHash, date: new Date(Number(log.block.timestamp) * 1000), // Saved as a seconds epoch blockHeight: BigInt(log.blockNumber), fromId: from.id, toId: to.id, tokenId: token.id, }); await newTokenTransfer.save(); token.currentHolderId = to.id; await token.save(); } } ``` The `handleTokenMint` function receives a `tx` parameter of type `MintTokenTransaction` which is typed from the POAP ABI. This includes transaction function payload data. We first check that we already have an entity for the `Event` and `receiver` address. We then also search through the attached transaction logs for the specific log that includes the resulting `tokenId` that was minted. We extract this data and then save this to the store using the `.save()` function (_Note that SubQuery will automatically save this to the database_). The `handleTokenTransfer` receives a typed `TransferLog` that contains information about a transfer event of a specific POAP token. It extracts this, ignores if the transfer is from the root account (`0x0000000000000000000000000000000000000000`), and then saves this transfer data. It also retrieves and updates the `currentHolderId` of the token itself. Check out our [Mappings](https://academy.subquery.network/build/mapping/gnosis.html) documentation to get more information on mapping functions. ### 4. Build Your Project Next, build your work to run your new SubQuery project. Run the build command from the project's root directory as given here: ::: code-tabs @tab:active yarn ```shell yarn build ``` @tab npm ```shell npm run-script build ``` ::: ::: warning Important Whenever you make changes to your mapping functions, you must rebuild your project. ::: Now, you are ready to run your first SubQuery project. Let’s check out the process of running your project in detail. ### 5. Run Your Project Locally with Docker The simplest way to run your project is by running `yarn dev` or `npm run-script dev`. This does all of the following: 1. `yarn codegen` - Generates types from the GraphQL schema definition and contract ABIs and saves them in the `/src/types` directory. This must be done after each change to the `schema.graphql` file or the contract ABIs 2. `yarn build` - Builds and packages the SubQuery project into the `/dist` directory 3. `docker-compose pull && docker-compose up` - Runs a Docker container with an indexer, PostgreSQL DB, and a query service. This requires [Docker to be installed](https://docs.docker.com/engine/install) and running locally. The configuration for this container is set from your `docker-compose.yml` You can observe the three services start, and once all are running (it may take a few minutes on your first start), please open your browser and head to [http://localhost:3000](http://localhost:3000) - you should see a GraphQL playground showing with the schemas ready to query. [Read the docs for more information](https://academy.subquery.network/run_publish/run.html) or [explore the possible service configuration for running SubQuery](https://academy.subquery.network/run_publish/references.html). ### 6. Query your Project For this project, you can try to query with the following GraphQL code to get a taste of how it works (open your browser and head to `http://localhost:3000`). ```graphql # Write your query or mutation here query { tokens(first: 5, orderBy: MINT_BLOCK_HEIGHT_DESC) { nodes { id mintBlockHeight mintReceiverId mintDate eventId } } addresses(first: 5, orderBy: TOKENS_BY_CURRENT_HOLDER_ID_COUNT_DESC) { nodes { id tokensByCurrentHolderId(first: 5) { totalCount nodes { id } } } } } ``` You will see the result similar to below: ```json { "data": { "tokens": { "nodes": [ { "id": "16947", "mintBlockHeight": "12293177", "mintReceiverId": "0xbcb0d39073ad99aa68fb6d7b2c2a433892af6fb3", "mintDate": "2020-10-01T17:04:40", "eventId": "361" }, { "id": "16946", "mintBlockHeight": "12292651", "mintReceiverId": "0x05b512f909daae5575afb47b3eeb0b0afeb14c00", "mintDate": "2020-10-01T16:20:30", "eventId": "69" }, { "id": "16945", "mintBlockHeight": "12291133", "mintReceiverId": "0x0542e8f95f765b81cd6a08db37d914f664db5d3e", "mintDate": "2020-10-01T14:13:20", "eventId": "405" }, { "id": "16944", "mintBlockHeight": "12290462", "mintReceiverId": "0xa615f34b170329507b37c142f8f812b8e1393beb", "mintDate": "2020-10-01T13:16:35", "eventId": "405" }, { "id": "16943", "mintBlockHeight": "12290460", "mintReceiverId": "0xe07e487d5a5e1098bbb4d259dac5ef83ae273f4e", "mintDate": "2020-10-01T13:16:25", "eventId": "405" } ] }, "addresses": { "nodes": [ { "id": "0xb8d7b045d299c9c356bc5ee4fe2dddc8a31280a5", "tokensByCurrentHolderId": { "totalCount": 1, "nodes": [ { "id": "16924" } ] } }, { "id": "0xba993c1fee51a4a937bb6a8b7b74cd8dffdca1a4", "tokensByCurrentHolderId": { "totalCount": 1, "nodes": [ { "id": "16912" } ] } }, { "id": "0x2b098ce1d5a4f9c2729268a4a3f04b387d4cc7ec", "tokensByCurrentHolderId": { "totalCount": 1, "nodes": [ { "id": "16921" } ] } }, { "id": "0x60df279f7cc51d2f0ff903f68c3a8dfcf65419f7", "tokensByCurrentHolderId": { "totalCount": 1, "nodes": [ { "id": "16916" } ] } }, { "id": "0x626ea6d1e5ea3fbaba22f5d4005d98e7039d0c99", "tokensByCurrentHolderId": { "totalCount": 1, "nodes": [ { "id": "16919" } ] } } ] } } } ``` You can explore the different possible queries and entities to help you with GraphQL using the documentation draw on the right. ::: tip Note The final code of this project can be found [here](https://github.com/subquery/subquery-example-gnosis-poap). ::: ## Publish your project SubQuery is open-source, meaning you have the freedom to run it in the following three ways: - Locally on your own computer (or a cloud provider of your choosing), [view the instructions on how to run SubQuery Locally](https://academy.subquery.network/run_publish/run.html) - By publishing it to our enterprise-level [Managed Service](https://managedservice.subquery.network), where we'll host your SubQuery project in production ready services for mission critical data with zero-downtime blue/green deployments. We even have a generous free tier. [Find out how](https://academy.subquery.network/run_publish/publish.html) - [Coming Soon] By publishing it to the decentralised [SubQuery Network](https://subquery.network/network), the most open, performant, reliable, and scalable data service for dApp developers. The SubQuery Network indexes and services data to the global community in an incentivised and verifiable way ## What Next? Take a look at some of our advanced features to take your project to the next level! - [**Multi-chain indexing support**](https://academy.subquery.network/build/multi-chain.html) - SubQuery allows you to index data from across different layer-1 networks into the same database, this allows you to query a single endpoint to get data for all supported networks. - [**Dynamic Data Sources**](https://academy.subquery.network/build/dynamicdatasources.html) - When you want to index factory contracts, for example on a DEX or generative NFT project. - [**Project Optimisation Advice**](https://academy.subquery.network/build/optimisation.html) - Some common tips on how to tweak your project to maximise performance. - [**GraphQL Subscriptions**](https://academy.subquery.network/run_publish/subscription.html) - Build more reactive front end applications that subscribe to changes in your SubQuery project. ## Need Help? The fastest way to get support is by [searching our documentation](https://academy.subquery.network), or by [joining our discord](https://discord.com/invite/subquery) and messaging us in the `#technical-support` channel. --- // File: tools/Data Indexing/the-graph # The Graph Getting historical data on a smart contract can be frustrating when you’re building a dapp. [The Graph](https://thegraph.com/) provides a decentralized option to query smart contract data through APIs known as subgraphs, which utilize GraphQL.  The Graph’s infrastructure relies on a decentralized network of indexers, enabling your dapp to become truly decentralized. ## Quick Start These subgraphs only take a few minutes to set up and get running. To get started, follow these three steps: 1. Initialize your subgraph project 2. Deploy & Publish 3. Query from your dapp Pricing: **All developers receive 100K free queries per month on the decentralized network**. After these free queries, you only pay based on usage at $4 for every 100K queries. Here’s a step by step walk through: ## 1. Initialize your subgraph project ### Create a subgraph on Subgraph Studio⁠ Go to the [Subgraph Studio](https://thegraph.com/studio/) and connect your wallet. Once your wallet is connected, you can begin by clicking “Create a Subgraph”. Please choose a good name for the subgraph because this name can’t be edited later. It is recommended to use Title Case: “Subgraph Name Chain Name.” ![Create a Subgraph](https://lh7-us.googleusercontent.com/docsz/AD_4nXf8OTdwMxlKQGKzIF_kYR7NPKeh9TmWnZBYxb7ft_YbdOdx_VVtbp6PslN7N1KGUzNpIDCmaXppdrllM1cw_J4L8Na03BXOWzJTK1POCve0nkRjQYgWJ60QHAdtQ4Niy83SMM8m0F0f-N-AJj4PDqDPlA5M?key=fnI6SyFgXU9SZRNX5C5vPQ) You will then land on your subgraph’s page. All the CLI commands you need will be visible on the right side of the page: ![CLI commands](https://lh7-us.googleusercontent.com/docsz/AD_4nXe3YvCxiOH_LupSWe8zh9AmP-VrV4PlOq3f7Ix6hNlBUYcANUFuLuVIWR74OGiBs0nrugTyT0v3o6RPmTsgHONdv_ZJNWtcDWEkRntXPHlQGFcqmEBa-D6j4aoIPzUKYdOJMVUPu8O3fwjdZ4IaXXZoTzY?key=fnI6SyFgXU9SZRNX5C5vPQ) ### Install the Graph CLI⁠ On your local machine run the following: ``` npm install -g @graphprotocol/graph-cli ``` ### Initialize your Subgraph⁠ You can copy this directly from your subgraph page to include your specific subgraph slug: ``` graph init --studio ``` You’ll be prompted to provide some info on your subgraph like this: ![cli sample](https://lh7-us.googleusercontent.com/docsz/AD_4nXdTAUsUb5vbs3GtCrhKhuXM1xYoqqooYTxw6lfJfYtLJNP8GKVOhTPmjxlM1b6Qpx-pXNVOzRuc8BL12wZXqy4MIj8ja0tp15znfuJD_Mg84SSNj3JpQ4d31lNTxPYnpba4UOzZx8pmgOIsbI7vCz70v9gC?key=fnI6SyFgXU9SZRNX5C5vPQ) Simply have your contract verified on the block explorer and the CLI will automatically obtain the ABI and set up your subgraph. The default settings will generate an entity for each event. ## 2. Deploy & Publish ### Deploy to Subgraph Studio⁠ First run these commands: ```bash $ graph codegen $ graph build ``` Then run these to authenticate and deploy your subgraph. You can copy these commands directly from your subgraph’s page in Studio to include your specific deploy key and subgraph slug: ```bash $ graph auth --studio $ graph deploy --studio ``` You will be asked for a version label. You can enter something like v0.0.1, but you’re free to choose the format. ### Test your subgraph⁠ You can test your subgraph by making a sample query in the playground section. The Details tab will show you an API endpoint. You can use that endpoint to test from your dapp. ![Playground](https://lh7-us.googleusercontent.com/docsz/AD_4nXf3afwSins8_eO7BceGPN79VvwolDxmFNUnkPk0zAJCaUA-3-UAAjVvrMzwr7q9vNYWdrEUNgm2De2VfQpWauiT87RkFc-cVfoPSsQbYSgsmwhyY1-tpPdv2J1H4JAMq70nfWBhb8PszZBFjsbDAaJ5eto?key=fnI6SyFgXU9SZRNX5C5vPQ) ### Publish Your Subgraph to The Graph’s Decentralized Network Once your subgraph is ready to be put into production, you can publish it to the decentralized network. On your subgraph’s page in Subgraph Studio, click on the Publish button: ![publish button](https://edgeandnode.notion.site/image/https%3A%2F%2Fprod-files-secure.s3.us-west-2.amazonaws.com%2Fa7d6afae-8784-4b15-a90e-ee8f6ee007ba%2F2f9c4526-123d-4164-8ea8-39959c8babbf%2FUntitled.png?table=block&id=37005371-76b4-4780-b044-040a570e3af6&spaceId=a7d6afae-8784-4b15-a90e-ee8f6ee007ba&width=1420&userId=&cache=v2) Before you can query your subgraph, Indexers need to begin serving queries on it. In order to streamline this process, you can curate your own subgraph using GRT. When publishing, you’ll see the option to curate your subgraph. As of May 2024, it is recommended that you curate your own subgraph with at least 3,000 GRT to ensure that it is indexed and available for querying as soon as possible. ![Publish screen](https://lh7-us.googleusercontent.com/docsz/AD_4nXerUr-IgWjwBZvp9Idvz5hTq8AFB0n_VlXCzyDtUxKaCTANT4gkk-2O77oW-a0ZWOh3hnqQsY7zcSaLeCQin9XU1NTX1RVYOLFX9MuVxBEqcMryqgnGQKx-MbDnOWKuMoLBhgyVWQereg3cdWtCPcTQKFU?key=fnI6SyFgXU9SZRNX5C5vPQ) ## 3. Query your Subgraph Congratulations! You can now query your subgraph on the decentralized network! For any subgraph on the decentralized network, you can start querying it by passing a GraphQL query into the subgraph’s query URL which can be found at the top of its Explorer page. Here’s an example from the [CryptoPunks Ethereum subgraph](https://thegraph.com/explorer/subgraphs/HdVdERFUe8h61vm2fDyycHgxjsde5PbB832NHgJfZNqK) by Messari: ![Query URL](https://lh7-us.googleusercontent.com/docsz/AD_4nXebivsPOUjPHAa3UVtvxoYTFXaGBao9pQOAJvFK0S7Uv0scfL6TcTVjmNCzT4DgsIloAQyrPTCqHjFPtmjyrzoKkfSeV28FjS32F9-aJJm0ILAHey2gqMr7Seu4IqPz2d__QotsWG3OKv2dEghiD74eypzs?key=fnI6SyFgXU9SZRNX5C5vPQ) The query URL for this subgraph is: https://gateway-arbitrum.network.thegraph.com/api/**[api-key]**/subgraphs/id/HdVdERFUe8h61vm2fDyycHgxjsde5PbB832NHgJfZNqK Now, you simply need to  fill in your own API Key to start sending GraphQL queries to this endpoint. ### Getting your own API Key ![API keys](https://lh7-us.googleusercontent.com/docsz/AD_4nXdz7H8hSRf2XqrU0jN3p3KbmuptHvQJbhRHOJh67nBfwh8RVnhTsCFDGA_JQUFizyMn7psQO0Vgk6Vy7cKYH47OyTq5PqycB0xxLyF4kSPsT7hYdMv2MEzAo433sJT6VlQbUAzgPnSxKI9a5Tn3ShSzaxI?key=fnI6SyFgXU9SZRNX5C5vPQ) In Subgraph Studio, you’ll see the “API Keys” menu at the top of the page. Here you can create API Keys. ## Appendix ### Sample Query This query shows the most expensive CryptoPunks sold. ```graphql { trades(orderBy: priceETH, orderDirection: desc) { priceETH tokenId } } ``` Passing this into the query URL returns this result: ``` { "data": { "trades": [ { "priceETH": "124457.067524886018255505", "tokenId": "9998" }, { "priceETH": "8000", "tokenId": "5822" }, // ... ``` ### Sample code ```jsx const axios = require('axios'); const graphqlQuery = `{ trades(orderBy: priceETH, orderDirection: desc) { priceETH tokenId } }`; const queryUrl = 'https://gateway-arbitrum.network.thegraph.com/api/[api-key]/subgraphs/id/HdVdERFUe8h61vm2fDyycHgxjsde5PbB832NHgJfZNqK' const graphQLRequest = { method: 'post', url: queryUrl, data: { query: graphqlQuery, }, }; // Send the GraphQL query axios(graphQLRequest) .then((response) => { // Handle the response here const data = response.data.data console.log(data) }) .catch((error) => { // Handle any errors console.error(error); }); ``` ### Additional resources: - To explore all the ways you can optimize & customize your subgraph for a better performance, read more about [creating a subgraph here](https://thegraph.com/docs/en/developing/creating-a-subgraph/). - For more information about querying data from your subgraph, read more [here](https://thegraph.com/docs/en/querying/querying-the-graph/). --- // File: tools/Faucets # Faucets A faucet is a service that provides small amounts of [xDai tokens](/concepts/tokens/xdai) to users who are experimenting with Gnosis. Here is a list of the available faucets. :::note If the faucet is not functioning properly, feel free to seek assistance on the [Gnosis Chain Discord channel](https://discord.gg/gnosis). ::: ## Official Faucet - [Gnosis Chain Faucet](https://faucet.gnosischain.com/) - [Chiado Testnet Faucet](https://faucet.chiadochain.net/) ## Community Faucets - [Stakely](https://stakely.io/en/faucet/gnosis-chain-xdai) - [dRPC](https://drpc.org/faucet/gnosis) - [Tenderly](https://docs.tenderly.co/virtual-testnets/unlimited-faucet?mtm_campaign=ext-docs&mtm_kwd=gnosis) --- // File: tools/Oracle Providers/api3 # API3 [API3](https://api3.org/) is a collaborative project to deliver traditional API services to smart contract platforms in a decentralized and trust-minimized way. It is governed by a decentralized autonomous organization (DAO), namely the [API3 DAO](https://api3.org/dao). :::info The API3 DAO Read more about how The API3 DAO works. [Click here](https://docs.api3.org/explore/dao-members/) ::: ## Airnode Developers can use [Airnode](https://docs.api3.org/explore/airnode/what-is-airnode.html) to request off-chain data inside their Smart Contracts on the Gnosis Chain. An Airnode is a first-party oracle that pushes off-chain API data to your on-chain contract. Airnode lets API providers easily run their own first-party oracle nodes. That way, they can provide data to any on-chain dApp that's interested in their services, all without an intermediary. An on-chain smart contract makes a request in the [RRP (Request Response Protocol)](https://docs.api3.org/reference/airnode/latest/concepts/) contract (`AirnodeRrpV0.sol`) that adds the request to the event logs. The Airnode then accesses the event logs, fetches the API data and performs a callback to the requester with the requested data. ## 
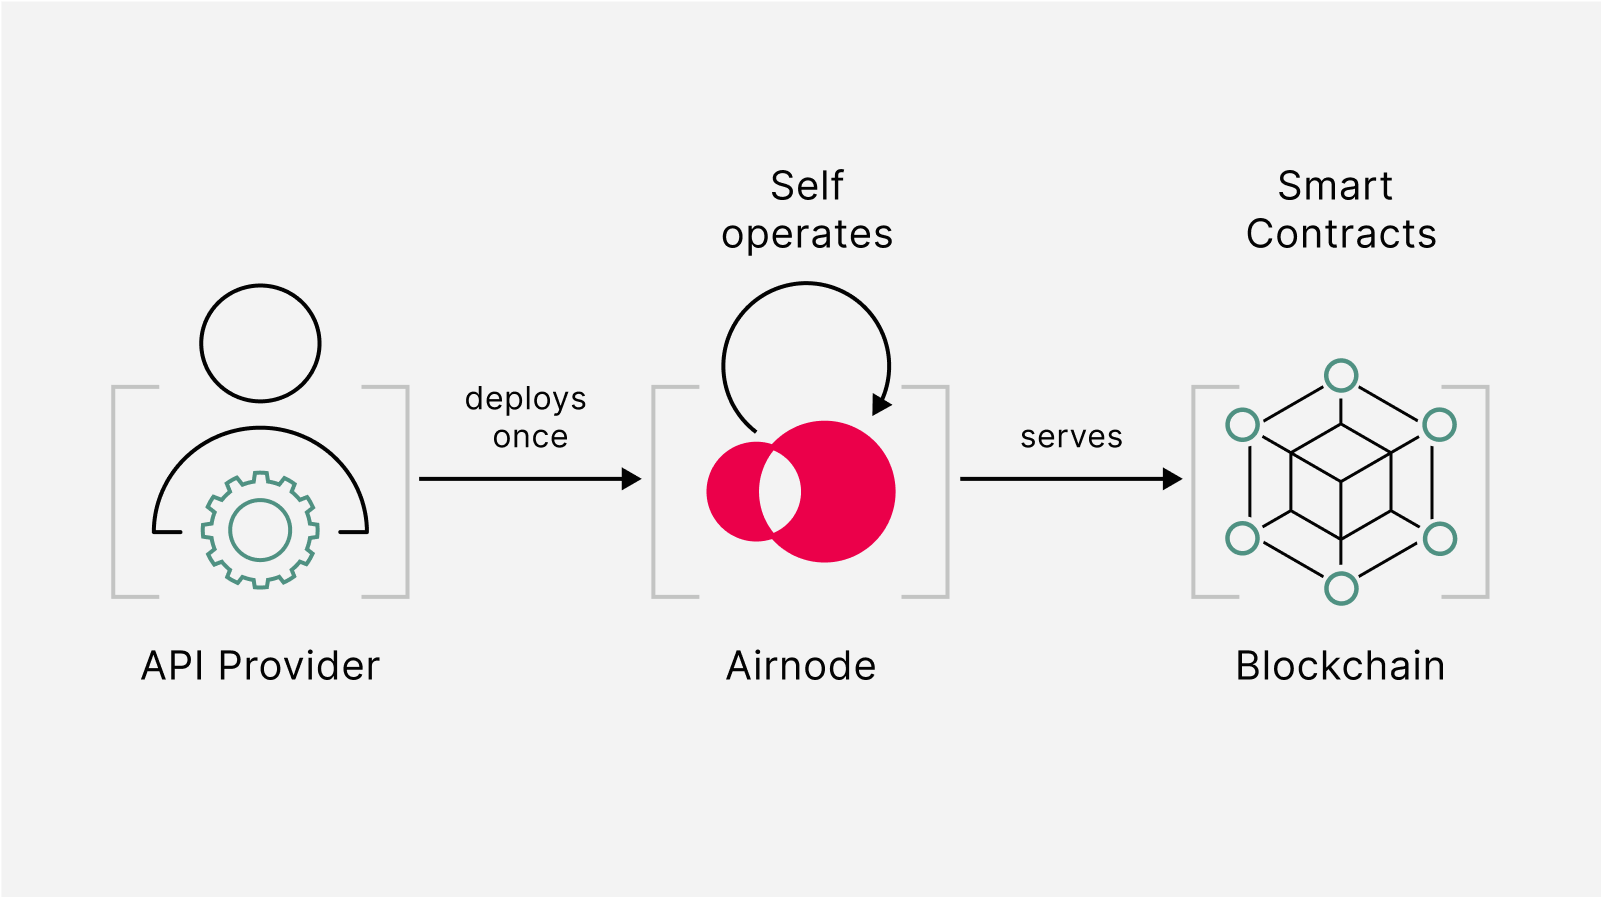
Requesting off-chain data by calling an Airnode Requesting off-chain data essentially involves triggering an Airnode and getting its response through your smart contract. The smart contract in this case would be the requester contract which will make a request to the desired off-chain Airnode and then capture its response. The requester calling an Airnode primarily focuses on two tasks: - Make the request - Accept and decode the response

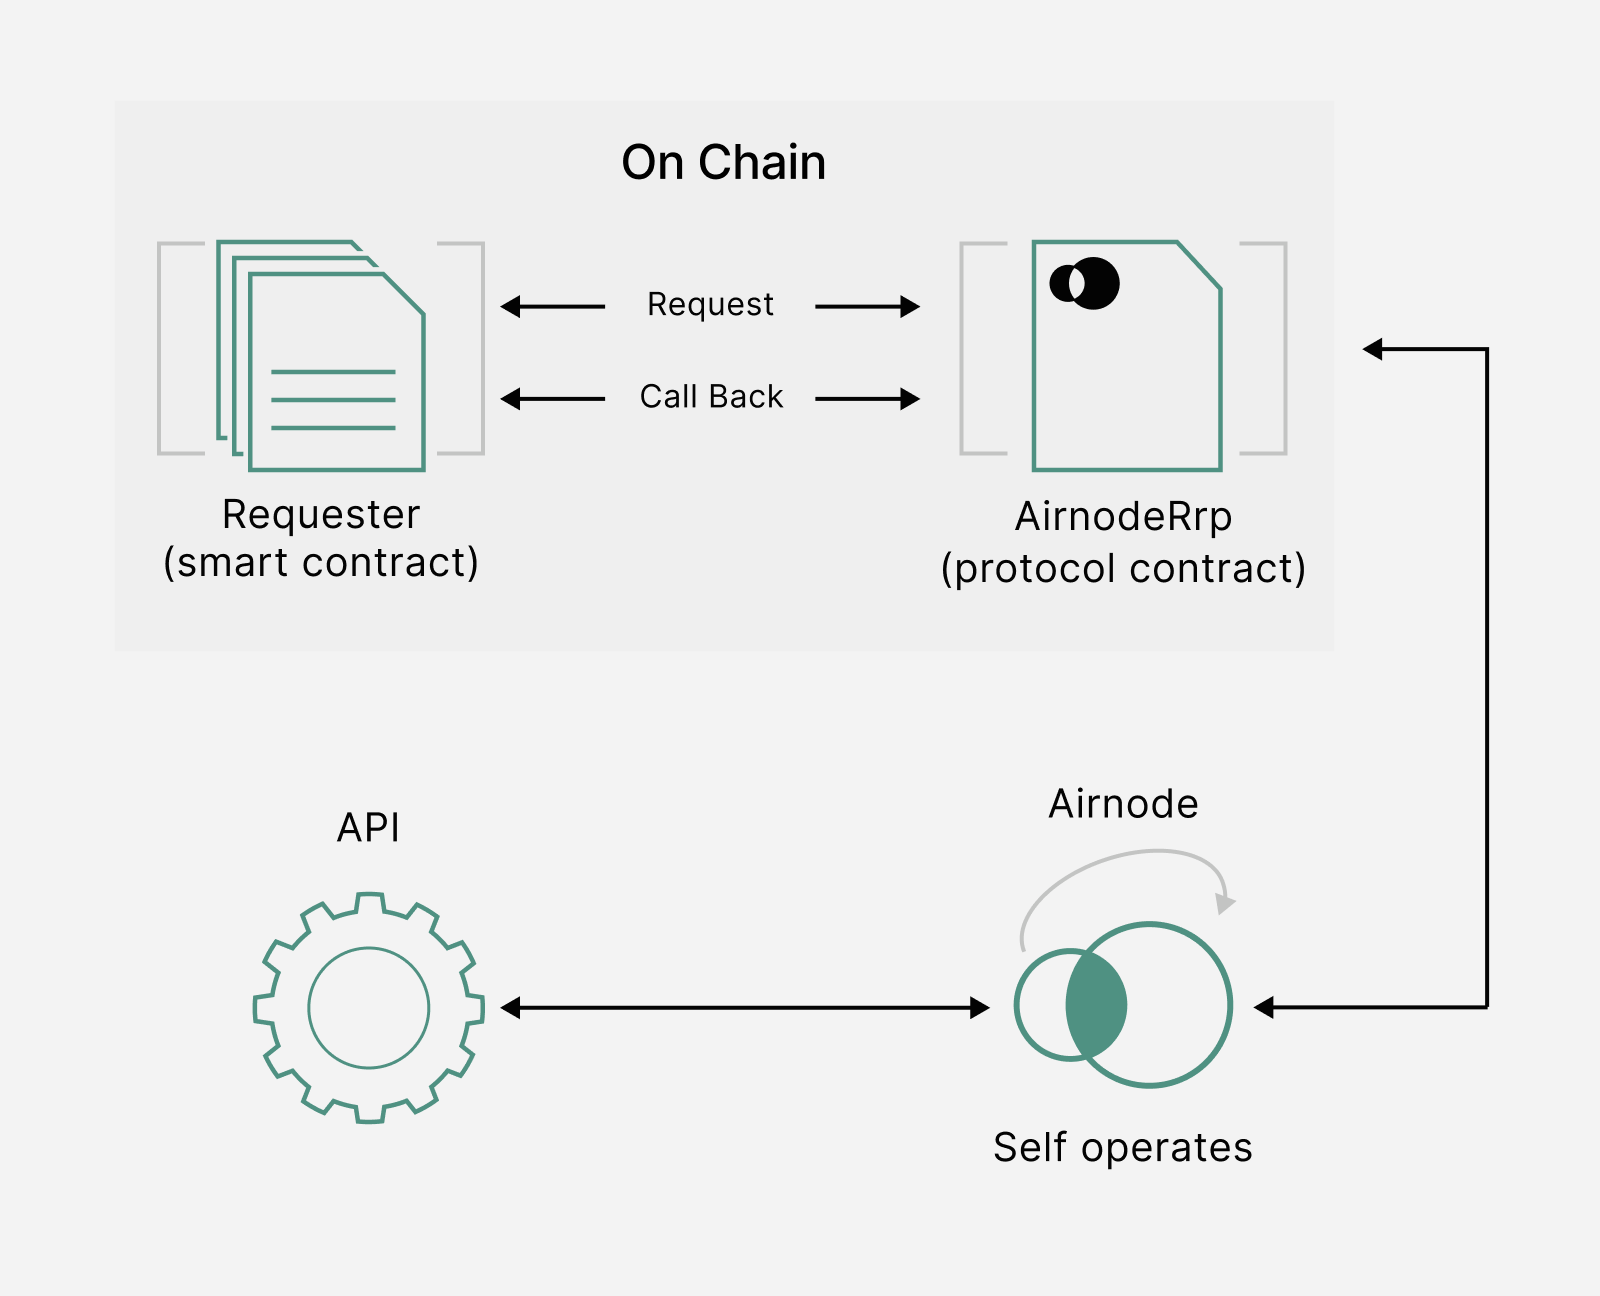
**Here is an example of a basic requester contract to request data from an Airnode:** ```solidity // SPDX-License-Identifier: MIT pragma solidity 0.8.9; import "@api3/airnode-protocol/contracts/rrp/requesters/RrpRequesterV0.sol"; import "@openzeppelin/contracts@4.9.5/access/Ownable.sol"; // A Requester that will return the requested data by calling the specified Airnode. contract Requester is RrpRequesterV0, Ownable { mapping(bytes32 => bool) public incomingFulfillments; mapping(bytes32 => int256) public fulfilledData; // Make sure you specify the right _rrpAddress for your chain while deploying the contract. constructor(address _rrpAddress) RrpRequesterV0(_rrpAddress) {} // To receive funds from the sponsor wallet and send them to the owner. receive() external payable { payable(owner()).transfer(address(this).balance); } // The main makeRequest function that will trigger the Airnode request. function makeRequest( address airnode, bytes32 endpointId, address sponsor, address sponsorWallet, bytes calldata parameters ) external { bytes32 requestId = airnodeRrp.makeFullRequest( airnode, // airnode address endpointId, // endpointId sponsor, // sponsor's address sponsorWallet, // sponsorWallet address(this), // fulfillAddress this.fulfill.selector, // fulfillFunctionId parameters // encoded API parameters ); incomingFulfillments[requestId] = true; } function fulfill(bytes32 requestId, bytes calldata data) external onlyAirnodeRrp contract Requester is RrpRequesterV0 { int256 decodedData = abi.decode(data, (int256)); fulfilledData[requestId] = decodedData; } // To withdraw funds from the sponsor wallet to the contract. function withdraw(address airnode, address sponsorWallet) external onlyOwner { airnodeRrp.requestWithdrawal( airnode, sponsorWallet ); } } ``` The `_rrpAddress` is the main `airnodeRrpAddress`. The RRP Contracts have already been deployed on-chain. You can check the address for Gnosis Chain [here](https://docs.api3.org/reference/airnode/latest/). You can also try [deploying it on Remix](https://remix.ethereum.org/#url=https://github.com/api3-ecosystem/remix-contracts/blob/master/contracts/RequesterWithWithdrawal.sol&optimize=false&runs=200&evmVersion=null&version=soljson-v0.8.9+commit.e5eed63a.js) | Contract | Addresses | |:------------------------:|:------------------------------------------------:| The callback to the Requester contains two parameters: Sponsors should not fund a `sponsorWallet` with more then they can trust the Airnode with, as the Airnode controls the private key to the `sponsorWallet`. The deployer of such Airnode undertakes no custody obligations, and the risk of loss or misuse of any excess funds sent to the `sponsorWallet` remains with the sponsor. ::: [Try deploying it on Remix!](https://remix.ethereum.org/#url=https://github.com/api3-ecosystem/remix-contracts/blob/master/contracts/RequesterWithWithdrawal.sol&optimize=false&runs=200&evmVersion=null&version=soljson-v0.8.9+commit.e5eed63a.js) ## Using dAPIs - API3 Datafeeds [dAPIs](https://docs.api3.org/reference/dapis/understand/) are continuously updated streams of off-chain data, such as the latest cryptocurrency, stock and commodity prices. They can power various decentralized applications such as DeFi lending, synthetic assets, stablecoins, derivatives, NFTs and more. The data feeds are continuously updated by [first-party oracles](https://docs.api3.org/explore/introduction/first-party.html) using signed data. dApp owners can read the on-chain value of any dAPI in real-time. Due to being composed of first-party data feeds, dAPIs offer security, transparency, cost-efficiency and scalability in a turn-key package. Apart from relying on deviation threshold and heartbeat configuration updates, unlike traditional data feeds, [OEV Network](https://docs.api3.org/explore/introduction/oracle-extractable-value.html) enables dApps using dAPIs to auction off the right to update the data feeds to searcher bots. Searcher bots can bid for price updates through the OEV Network to update the data feeds. All the OEV proceeds go back to the dApp. The [API3 Market](https://market.api3.org/gnosis) enables users to connect to a dAPI and access the associated data feed services. ![img](/img/tools/api3/dapi-main.png) [*To learn more about how dAPIs work, click here*](https://docs.api3.org/explore/dapis/what-are-dapis.html) ### Subscribing to dAPIs The [API3 Market](https://market.api3.org/gnosis) lets users access dAPIs on both [Gnosis Mainnet](https://market.api3.org/gnosis) and [Testnet](https://market.api3.org/gnosis-testnet). #### Exploring, selecting and configuring your dAPI The [API3 Market](https://market.api3.org/gnosis) provides a list of all the dAPIs available across multiple chains including testnets. You can filter the list by mainnet or testnet chains. After selecting the chain, you can now search for a specific dAPI by name. Once selected, you will land on the details page (eg ETH/USD on Gnosis Testnet) where you can find more information about the dAPI. The current supported configurations for dAPIs are: | Deviation | Heartbeat | | --------- | --------- | | 0.25% | 24 hours | | 0.5% | 24 hours | | 1% | 24 hours | | 5% | 24 hours | ![img](/img/tools/api3/dapi-1.png) #### Activating your dAPI :::note Note If a dAPI is already activated, make sure to check the expiration date and update parameters. You can update the parameters and extend the subscription by purchasing a new configuration. ::: After selecting the dAPI and the configuration, you will be presented with an option to purchase the dAPI and activate it. Make sure to check the time and amount of the subscription. If everything looks good, click on Purchase. ![img](/img/tools/api3/dapi-2.png) You can then connect your wallet and confirm the transaction. Once it's confirmed, you will be able to see the updated configuration for the dAPI. #### Getting the proxy address Once you are done configuring and activating the dAPI, you can now integrate it. To do so, click on the **Integrate** button on the dAPI details page. ![img](/img/tools/api3/dapi-5.png) You can now see the deployed proxy contract address. You can now use this to read from the configured dAPI. ### Reading from a dAPI Here's an example of a basic contract that reads from a dAPI. ``` // SPDX-License-Identifier: MIT pragma solidity 0.8.17; import "@openzeppelin/contracts@4.9.5/access/Ownable.sol"; import "@api3/contracts/api3-server-v1/proxies/interfaces/IProxy.sol"; contract DataFeedReaderExample is Ownable { // The proxy contract address obtained from the API3 Market UI. address public proxyAddress; // Updating the proxy contract address is a security-critical // action. In this example, only the owner is allowed to do so. function setProxyAddress(address _proxyAddress) public onlyOwner { proxyAddress = _proxyAddress; } function readDataFeed() external view returns (int224 value, uint256 timestamp) { // Use the IProxy interface to read a dAPI via its // proxy contract . (value, timestamp) = IProxy(proxyAddress).read(); // If you have any assumptions about `value` and `timestamp`, // make sure to validate them after reading from the proxy. } } ``` - `setProxyAddress()` is used to set the address of the dAPI Proxy Contract. - `readDataFeed()` is a view function that returns the latest price of the set dAPI. You can read more about dAPIs [here](https://docs.api3.org/guides/dapis/subscribing-to-dapis/). ### [Try deploying it on Remix!](https://remix.ethereum.org/#url=https://github.com/api3-ecosystem/remix-contracts/blob/master/contracts/DapiReader.sol&lang=en&optimize=false&runs=200&evmVersion=null&version=soljson-v0.8.18+commit.87f61d96.js) ## API3 QRNG [API3 QRNG](https://docs.api3.org/explore/qrng/) is a public utility we provide with the courtesy of Australian National University (ANU), Quintessence Labs and Quantum Blockchains. It is powered by an Airnode hosted by the QRNG Providers, meaning that it is a first-party service. It is served as a public good and is free of charge (apart from the gas costs), and it provides ‘true’ quantum randomness via an easy-to-use solution when requiring RNG on-chain. To request randomness on-chain, the requester submits a request for a random number to `AirnodeRrpV0`. The QRNG Airnode gathers the request from the `AirnodeRrpV0` protocol contract, retrieves the random number off-chain, and sends it back to `AirnodeRrpV0`. Once received, it performs a callback to the requester with the random number. Click here to check out the [AirnodeRrpV0](https://docs.api3.org/reference/qrng/chains.html) and available [QRNG Providers](https://docs.api3.org/reference/qrng/providers.html) on Gnosis. Here is an example of a basic `QrngRequester` that requests a random number: ```solidity //SPDX-License-Identifier: MIT pragma solidity 0.8.9; import "@api3/airnode-protocol/contracts/rrp/requesters/RrpRequesterV0.sol"; import "@openzeppelin/contracts@4.9.5/access/Ownable.sol"; /// @title Example contract that uses Airnode RRP to access QRNG services contract QrngExample is RrpRequesterV0, Ownable { event RequestedUint256(bytes32 indexed requestId); event ReceivedUint256(bytes32 indexed requestId, uint256 response); event RequestedUint256Array(bytes32 indexed requestId, uint256 size); event ReceivedUint256Array(bytes32 indexed requestId, uint256[] response); event WithdrawalRequested(address indexed airnode, address indexed sponsorWallet); address public airnode; /// The address of the QRNG Airnode bytes32 public endpointIdUint256; /// The endpoint ID for requesting a single random number bytes32 public endpointIdUint256Array; /// The endpoint ID for requesting an array of random numbers address public sponsorWallet; /// The wallet that will cover the gas costs of the request uint256 public _qrngUint256; /// The random number returned by the QRNG Airnode uint256[] public _qrngUint256Array; /// The array of random numbers returned by the QRNG Airnode mapping(bytes32 => bool) public expectingRequestWithIdToBeFulfilled; constructor(address _airnodeRrp) RrpRequesterV0(_airnodeRrp) {} /// @notice Sets the parameters for making requests function setRequestParameters( address _airnode, bytes32 _endpointIdUint256, bytes32 _endpointIdUint256Array, address _sponsorWallet ) external { airnode = _airnode; endpointIdUint256 = _endpointIdUint256; endpointIdUint256Array = _endpointIdUint256Array; sponsorWallet = _sponsorWallet; } /// @notice To receive funds from the sponsor wallet and send them to the owner. receive() external payable { payable(owner()).transfer(msg.value); emit WithdrawalRequested(airnode, sponsorWallet); } /// @notice Requests a `uint256` /// @dev This request will be fulfilled by the contract's sponsor wallet, /// which means spamming it may drain the sponsor wallet. function makeRequestUint256() external { bytes32 requestId = airnodeRrp.makeFullRequest( airnode, contract RemixQrngExample is RrpRequesterV0 { this.fulfillUint256.selector, "" ); expectingRequestWithIdToBeFulfilled[requestId] = true; emit RequestedUint256(requestId); } /// @notice Called by the Airnode through the AirnodeRrp contract to /// fulfill the request function fulfillUint256(bytes32 requestId, bytes calldata data) external onlyAirnodeRrp { require( expectingRequestWithIdToBeFulfilled[requestId], "Request ID not known" ); expectingRequestWithIdToBeFulfilled[requestId] = false; uint256 qrngUint256 = abi.decode(data, (uint256)); _qrngUint256 = qrngUint256; // Do what you want with `qrngUint256` here... emit ReceivedUint256(requestId, qrngUint256); } /// @notice Requests a `uint256[]` /// @param size Size of the requested array function makeRequestUint256Array(uint256 size) external { bytes32 requestId = airnodeRrp.makeFullRequest( airnode, endpointIdUint256Array, address(this), sponsorWallet, address(this), this.fulfillUint256Array.selector, // Using Airnode ABI to encode the parameters abi.encode(bytes32("1u"), bytes32("size"), size) ); expectingRequestWithIdToBeFulfilled[requestId] = true; emit RequestedUint256Array(requestId, size); } /// @notice Called by the Airnode through the AirnodeRrp contract to /// fulfill the request function fulfillUint256Array(bytes32 requestId, bytes calldata data) external onlyAirnodeRrp { require( expectingRequestWithIdToBeFulfilled[requestId], "Request ID not known" ); expectingRequestWithIdToBeFulfilled[requestId] = false; uint256[] memory qrngUint256Array = abi.decode(data, (uint256[])); // Do what you want with `qrngUint256Array` here... _qrngUint256Array = qrngUint256Array; emit ReceivedUint256Array(requestId, qrngUint256Array); } /// @notice Getter functions to check the returned value. function getRandomNumber() public view returns (uint256) { return _qrngUint256; } function getRandomNumberArray() public view returns(uint256[] memory) { return _qrngUint256Array; } /// @notice To withdraw funds from the sponsor wallet to the contract. function withdraw() external onlyOwner { airnodeRrp.requestWithdrawal( airnode, sponsorWallet ); } } ``` - The `setRequestParameters()` takes in `airnode` , `endpointIdUint256`, `sponsorWallet` and sets these parameters. You can get the Airnode address and the endpoint ID [here](https://docs.api3.org/reference/qrng/providers.html). - The `makeRequestUint256()` function calls the `airnodeRrp.makeFullRequest()` function of the `AirnodeRrpV0.sol` protocol contract which adds the request to its storage and returns a `requestId`. You can try QRNG on the Gnosis Chain for free. Check out the all the QRNG Provid Here are some additional developer resources - [API3 Docs](https://docs.api3.org/) - [API3 Market](https://market.api3.org/gnosis) - [Get started with dAPIs](https://docs.api3.org/guides/dapis/) - [get started with QRNG](https://docs.api3.org/guides/qrng/) - [Github](https://github.com/api3dao/) - [Medium](https://medium.com/api3) - [YouTube](https://www.youtube.com/API3DAO) --- // File: tools/Oracle Providers/chainlink # Chainlink Price Feeds Chainlink allows smart contracts to receive aggregated price feeds and access external data using a decentralized network of oracles. The Gnosis \<->\ Chainlink integration was completed by [Protofire with a Chainlink Community Grant.](https://blog.chain.link/protofire-receives-a-chainlink-community-grant-for-an-integration-with-xdai/) :::info Chainlink offers a tutorial on using secure data feeds with Gnosis. [See it in action](https://blog.chain.link/build-a-dapp-on-xdai-chain-with-secure-data-feeds/) ::: ## Addresses - **LINK Token on Gnosis**: [`0xE2e73A1c69ecF83F464EFCE6A5be353a37cA09b2`](https://gnosis.blockscout.com/address/0xE2e73A1c69ecF83F464EFCE6A5be353a37cA09b2) - **Price Feeds on Gnosis:** [Latest list is available in the Chainlink Documentation](https://docs.chain.link/docs/data-feeds-gnosis-chain/#Gnosis%20Chain%20Mainnet) ## Basic Tutorial: Price Feeds See the [Chainlink documentation](https://docs.chain.link/docs/getting-started) for more advanced tutorials and information. The following shows how to use MetaMask/Remix with Gnosis to deploy a simple price feed contract, then call the function using Blockscout. ### 1) Install and configure MetaMask See [MetaMask setup page](/tools/wallets/metamask) and follow the setup and configuration sections ### 2) Get xDai with Faucet You can get enough xDai to deploy your contracts and more with the a [Faucet](/tools/faucets). You should see it added to your address in a few seconds. ### 3) Open Remix and Create File Go to [https://remix.ethereum.org/](https://remix.ethereum.org/) There are several ways to create a new file. Here we: 1. Create a folder called Gnosis Price Feed. 2. Create a file in the folder called `PriceFeedTest.sol`. 3. Paste in the example code below the image. ![](/img/tools/chainlink/chain1.png) ### Example Code ```solidity /** This example code is designed to quickly deploy an example contract using Remix. * If you have never used Remix, try our example walkthrough: https://docs.chain.link/docs/example-walkthrough * You will need xDai to deploy on Gnosis. * - xDai Faucet: https://docs.gnosischain.com/tools/faucets * - LINK address on xDai: 0xE2e73A1c69ecF83F464EFCE6A5be353a37cA09b2 */ pragma solidity ^0.6.7; import "https://github.com/smartcontractkit/chainlink/blob/master/evm-contracts/src/v0.6/interfaces/AggregatorV3Interface.sol"; contract PriceConsumerV3 { AggregatorV3Interface internal priceFeed; /** * Network: Gnosis * Aggregator: ETH/USD * Address: 0xa767f745331D267c7751297D982b050c93985627 */ constructor() public { priceFeed = AggregatorV3Interface(0xa767f745331D267c7751297D982b050c93985627); } /** * Returns the latest price */ function getLatestPrice() public view returns (int) { ( uint80 roundID, int price, uint startedAt, uint timeStamp, uint80 answeredInRound ) = priceFeed.latestRoundData(); return price; } } ``` The code below uses the Chainlink standard Price Consumer contract along with several modifications: - We initialize the ETH/USD Gnosis Price Feed in the constructor ```solidity priceFeed = AggregatorV3Interface(0xa767f745331D267c7751297D982b050c93985627); ``` We use the `getLatestPrice` function to return the current price. It pulls this from the `latestRoundData` function in the imported `AggregatorV3Interface.sol` Contract ### 4) Compile Contract in Remix Click on the Compiler Icon, adjust items (if necessary, we keep defaults here) and click the Compile button. ![](/img/tools/chainlink/chain2.png) ### 5) Deploy Contract 1. Select **Deploy** Icon. 2. Change Environment to Web3. 3. Click **Deploy**. 4. Confirm the transaction in MetaMask. You account must be connected to Gnosis and have a small amount of xDai (see steps 1 and 2). ![](/img/tools/chainlink/chain3.png) ### 6) Check Contract Once deployed, click to expand the contract. Click `getLatestPrice` to check the ETH/USD price. ![](/img/tools/chainlink/chainlin-4.png) ## Verify Contract in BlockScout Block Explorer ### 1) Find Deployed Contract For transparency and interaction purposes, you can verify your contract on [BlockScout](https://blockscout.com/xdai/mainnet/). _Note, if a contract with the same bytecode has already been deployed and verified, your contract code may be viewable._ [_See this example_](https://gnosis.blockscout.com/address/0x681ef0446AA72723256f1De4d1BE7Dd9bb7F84Cf/contracts)_._ 1. Copy the deployed contract address in Remix. 2. Go to [BlockScout](https://blockscout.com/xdai/mainnet/) and paste into the search field. 3. Click the Code tab for verification methods. 4. Click the **Verify and Publish** Button. ![](/img/tools/chainlink/chain5.png) ![](/img/tools/chainlink/chain6.png) ![](/img/tools/chainlink/chain7.png) ### 2) Add Sources to Verify Select either a flattened file or Sources. In this example we select the Sources and metadata JSON files from Remix ![](/img/tools/chainlink/chain8.png) Remix does not have an auto-export feature. You can use the [`remixd`](https://ethereum.stackexchange.com/questions/60115/how-to-save-solidity-remix-ethereum-file-in-local-disk-with-sol-extensionhow-to) or copy the contents of each file and save in a text editor computer using the same names and file extensions. **Include all imported files called by the contract**, in this case the `AggregatorV3Interface.sol` file. ![](/img/tools/chainlink/chain9.png) Drag and drop the files into the interface and click **Verify & publish**. ![](/img/tools/chainlink/chain10.png) ### 3) View your Contract in BlockScout Once verified, you will see the checkmark next to the code, and you can read (and write) to your contract within the BlockScout environment. ![](/img/tools/chainlink/chain11.png) --- // File: tools/Oracle Providers/chronicle # Chronicle [Chronicle Protocol](https://chroniclelabs.org/) is a novel Oracle solution that has exclusively secured over $10B in assets for MakerDAO and its ecosystem since 2017. Chronicle overcomes the current limitations of transferring data on-chain by developing scalable, cost-efficient, decentralized, and verifiable Oracles, rewriting the rulebook on data transparency and accessibility. ### Querying the price of GNO using Chronicle Chronicle contracts are read-protected by a whitelist, meaning you won't be able to read them on-chain without your address being added to the whitelist. On the Testnet, users can add themselves to the whitelist through the SelfKisser contract, a process playfully referred to as "kissing" themselves. For access to production Oracles on the Mainnet, please open a support ticket on [Discord](https://discord.com/invite/CjgvJ9EspJ) in the 🆘|support channel. For the deployment addresses, please check out the [Dashboard](https://chroniclelabs.org/dashboard/oracles). ```solidity // SPDX-License-Identifier: MIT pragma solidity ^0.8.16; /** * @title OracleReader * @notice A simple contract to read from Chronicle oracles * @dev To see the full repository, visit https://github.com/chronicleprotocol/OracleReader-Example. * @dev Addresses in this contract are hardcoded for Gnosis. * For other supported networks, check the https://chroniclelabs.org/dashboard/oracles. */ contract OracleReader { /** * @notice The Chronicle oracle to read from. * GNO/USD - Chronicle_GNO_USD_2 - 0xBcC6BFFde7888A3008f17c88D5a5e5F0D7462cf9 * Network: Gnosis */ IChronicle public chronicle = IChronicle(address(0xBcC6BFFde7888A3008f17c88D5a5e5F0D7462cf9)); /** * @notice The SelfKisser granting access to Chronicle oracles. * SelfKisser_1:0x0Dcc19657007713483A5cA76e6A7bbe5f56EA37d * Network: Gnosis */ ISelfKisser public selfKisser = ISelfKisser(address(0x0Dcc19657007713483A5cA76e6A7bbe5f56EA37d)); constructor() { // Note to add address(this) to chronicle oracle's whitelist. // This allows the contract to read from the chronicle oracle. selfKisser.selfKiss(address(chronicle)); } /** * @notice Function to read the latest data from the Chronicle oracle. * @return val The current value returned by the oracle. * @return age The timestamp of the last update from the oracle. */ function read() external view returns (uint256 val, uint256 age) { (val, age) = chronicle.readWithAge(); } } // Copied from [chronicle-std](https://github.com/chronicleprotocol/chronicle-std/blob/main/src/IChronicle.sol). interface IChronicle { /** * @notice Returns the oracle's current value. * @dev Reverts if no value set. * @return value The oracle's current value. */ function read() external view returns (uint256 value); /** * @notice Returns the oracle's current value and its age. * @dev Reverts if no value set. * @return value The oracle's current value using 18 decimals places. * @return age The value's age as a Unix Timestamp . * */ function readWithAge() external view returns (uint256 value, uint256 age); } // Copied from [self-kisser](https://github.com/chronicleprotocol/self-kisser/blob/main/src/ISelfKisser.sol). interface ISelfKisser { /// @notice Kisses caller on oracle `oracle`. function selfKiss(address oracle) external; } ``` ### More examples For more examples on integrating Chronicle Oracles, please check the [documentation portal](https://docs.chroniclelabs.org/). ### Get in touch If you have any questions or need support, drop us a message on [Discord](https://discord.com/invite/CjgvJ9EspJ). --- // File: tools/Oracle Providers/gas-price # Gas Price Oracle ## Gnosisscan Endpoint Gnosisscan has a [gas tracker page](https://gnosisscan.io/gastracker) and an API endpoint to query the value. ```bash title="Gnosisscan endpoint - Gnosis Mainnet" https://api.gnosisscan.io/api?module=proxy&action=eth_gasPrice ``` Check the [Gnosisscan APIs documentation](https://docs.gnosisscan.io/) for more endpoints. ### Example response ```json {"jsonrpc":"2.0","result":"0xa83efbe0","id":73} ``` ![Gas price display on Gnosisscan]() ## Blockscout Endpoint The BlockScout gas price api endpoint shows a recommended gas price for average, fast and slow transactions based on recently accepted transactions. Users can decide whether to increase the gas price to speed up a transaction or input a lower gas price which may take longer but is still likely to be successful. ```bash title="Blockscout endpoint - Gnosis Mainnet" https://blockscout.com/xdai/mainnet/api/v1/gas-price-oracle ``` ```bash title="Blockscout endpoint - Chiado Testnet" https://blockscout.chiadochain.net/api/v1/gas-price-oracle ``` * Response calculated for **previous 200 blocks** and **updated every 30 seconds**. * Response criteria for average, fast and slow gas estimates follow [EthGasStation recommendations](https://github.com/ethgasstation/gasstation-express-oracle/blob/master/gasExpress.py#L16-L18). ### Example response ```json {"average":2.0,"fast":3.0,"slow":1.51} ``` | Response | Denomination |

Response Threshold
(Min gas price per block from previous 200 blocks)

| | -------- | ------------ | ---------------------------------------------- | | average | gwei | 60th percentile of min gas price txs | | fast | gwei | 90th percentile of min gas price txs (top 10%) | | slow | gwei | 35th percentile of min gas price txs | ![Gas price display on BlockScout]() --- // File: tools/Oracle Providers/pyth ## Overview The [Pyth network](https://pyth.network/) is the largest first-party financial oracle network, delivering real-time market data to over 40 blockchains securely and transparently. The network comprises some of the world’s largest exchanges, market makers, and financial services providers, publishing proprietary price data on-chain for aggregation and distribution to smart contract applications. ## Using Pyth network The Pyth network introduces an innovative low-latency [pull oracle design](https://docs.pyth.network/documentation/pythnet-price-feeds/on-demand), where users can pull price updates on-chain when needed, enabling everyone in the blockchain environment to access that data point. Developers on Gnosis have permissionless access to any of Pyth’s 350+ price feeds for equities, ETFs, commodities, foreign exchange pairs, and cryptocurrencies. Here is a working example of a contract that fetches the latest price on the Gnosis network. You have to pass [Pyth's contract address](https://docs.pyth.network/price-feeds/contract-addresses/evm) for Gnosis mainnet/testnet(Chiado) and the desired [price feed ID](https://pyth.network/developers/price-feed-ids) to fetch the latest price. ```solidity // SPDX-License-Identifier: UNLICENSED pragma solidity ^0.8.13; import "@pythnetwork/pyth-sdk-solidity/IPyth.sol"; contract MyFirstPythContract { IPyth pyth; constructor(address _pyth) { pyth = IPyth(_pyth); } function fetchPrice( bytes[] calldata pythPriceUpdate, bytes32 priceFeed ) public payable returns (int64) { uint updateFee = pyth.getUpdateFee(pythPriceUpdate); pyth.updatePriceFeeds{value: updateFee}(pythPriceUpdate); // Fetch the latest price PythStructs.Price memory price = pyth.getPrice(priceFeed); return price.price; } } ``` Here you can fetch the `updateData` from our [`Hermes` feed](https://docs.pyth.network/price-feeds/pythnet-price-feeds/hermes), which listens to Pythnet and Wormhole for price updates, or you can use the [`pyth-evm-js`](https://github.com/pyth-network/pyth-crosschain/blob/main/target_chains/ethereum/sdk/js/src/EvmPriceServiceConnection.ts#L15) SDK. This [package](https://github.com/pyth-network/pyth-crosschain/tree/main/target_chains/ethereum/sdk/solidity) provides utilities for consuming prices from the Pyth network oracle using Solidity. Also, it contains the [Pyth Interface ABI](https://github.com/pyth-network/pyth-crosschain/blob/main/target_chains/ethereum/sdk/solidity/abis/IPyth.json) that you can use in your libraries to communicate with the Pyth contract. We recommend following the [consumer best practices](https://docs.pyth.network/documentation/pythnet-price-feeds/best-practices) when consuming Pyth data. For more information, check out the official [Pyth documentation](https://docs.pyth.network/price-feeds). There are details on the various functions available for interacting with the Pyth smart contract in the [API Reference section](https://docs.pyth.network/price-feeds/api-reference/evm). ## Pyth Price Feeds on Gnosis The Pyth Network smart contract is available at the following address: - Mainnet: [0x2880aB155794e7179c9eE2e38200202908C17B43](https://gnosisscan.io/address/0x2880ab155794e7179c9ee2e38200202908c17b43). - Chiado: [0x98046Bd286715D3B0BC227Dd7a956b83D8978603](https://gnosis-chiado.blockscout.com/address/0x98046Bd286715D3B0BC227Dd7a956b83D8978603) Additionally, click to access the [Pyth price-feed IDs](https://pyth.network/developers/price-feed-ids). ## Developers and community The Pyth network provides additional tools to developers, such as [TradingView Integration](https://docs.pyth.network/guides/how-to-create-tradingview-charts), or the [Gelato web3 functions](https://docs.pyth.network/guides/how-to-schedule-price-updates-with-gelato). If you have any questions or issues, contact us on the following platforms: - [Telegram](https://t.me/Pyth_Network) - [Discord](https://discord.gg/invite/PythNetwork) - [Website](https://pyth.network/contact) --- // File: tools/Oracle Providers/supraoracles/README :::info testnet SupraOracles only supports [Chiado testnet](/concepts/networks/chiado). ::: ## What is SupraOracles? [SupraOracles](https://supraoracles.com/) is a novel, high-throughput Oracle & IntraLayer: a vertically integrated toolkit of cross-chain solutions (data oracles, asset bridges, automation network, and more) that interlink all blockchains, public (L1s and L2s) or private (enterprises). ## How to use SupraOracles' Price Feeds SupraOracles currently supports many Solidity/EVM-based networks, like Gnosis Chiado TestNet. To see all of the networks SupraOracles supports, please visit [SupraOracles' Networks](https://supraoracles.com/docs/get-started/networks). To get started, you will want to visit [SupraOracles' docs site](https://supraoracles.com/docs/get-started/) and review the documentation or continue to follow this guide for a quick start. ### Step 1: Create The S-Value Interface Add the following code to the Solidity smart contract that you wish to retrieve an S-Value. ```solidity interface ISupraSValueFeed { function checkPrice(string memory marketPair) external view returns (int256 price, uint256 timestamp); } ``` This creates the interface that you will later apply in order to fetch a price from SupraOracles. ### Step 2: Configure The S-Value Feed Address To fetch the S-Value from a SupraOracles smart contract, you must first find the S-Value Feed Address for the chain of your choice. For Gnosis Chiado TestNet, the address is: ``` 0x700a89Ba8F908af38834B9Aba238b362CFfB665F ``` When you have the proper address, create an instance of the S-Value Feed using the interface we previously defined for Gnosis Chiado TestNet: ```solidity contract ISupraSValueFeedExample { ISupraSValueFeed internal sValueFeed; constructor() { sValueFeed = ISupraSValueFeed(0x700a89Ba8F908af38834B9Aba238b362CFfB665F); } } ``` ### Step 3: Get The S-Value Crypto Price Now you can simply access the S-Value Crypto Price of our supported market pairs. In this step, we'll get the price of ETH/USDT (eth_usdt) by applying the following code to our Smart Contract. ```solidity function getEthUsdtPrice() external view returns (int) { ( int price, /* uint timestamp */ ) = sValueFeed.checkPrice("eth_usdt"); return price; } ``` Here's an example of what your implementation should look like. ```solidity // SPDX-License-Identifier: MIT pragma solidity ^0.8.7; interface ISupraSValueFeed { function checkPrice(string memory marketPair) external view returns (int256 price, uint256 timestamp); } contract ISupraSValueFeedExample { ISupraSValueFeed internal sValueFeed; constructor() { sValueFeed = ISupraSValueFeed(0x700a89Ba8F908af38834B9Aba238b362CFfB665F); } function getEthUsdtPrice() external view returns (int) { ( int price, /* uint timestamp */ ) = sValueFeed.checkPrice("eth_usdt"); return price; } } ``` You now have a method in your Smart Contract that you can call at any time to retrieve the price of ETH in USDT. ### Extra: S-Value Feeds with ethers.js ```js // example assumes that the ethers library has been imported and is accessible within your scope const getEthUsdtPrice = async () => { const provider = new ethers.providers.JsonRpcProvider('https://data-seed-prebsc-1-s1.binance.org:8545/') const abi = [{ "inputs": [ { "internalType": "string", "name": "marketPair", "type": "string" } ], "name": "checkPrice", "outputs": [ { "internalType": "int256", "name": "price", "type": "int256" }, { "internalType": "uint256", "name": "timestamp", "type": "uint256" } ], "stateMutability": "view", "type": "function" } ] const address = '0x700a89Ba8F908af38834B9Aba238b362CFfB665F' const sValueFeed = new ethers.Contract(address, abi, provider) const price = (await sValueFeed.checkPrice('eth_usdt')).price console.log(`The price is: ${price.toString()}`) } getEthUsdtPrice() ``` For additional tutorials and guides based on example use-cases, please refer to the [Supra docs](https://supraoracles.com/docs/additional-guides). ## Going Further with SupraOracles If you want to take the next step, consider registering for the [Supra Network Activate Program (SNAP)](https://join.supraoracles.com/network-activate-program). The Supra Network Activate Program (SNAP) offers companies discounted oracle credits, technical documentation, and customer support to embed much-needed oracles and VRF/RNG. SNAP supports Web3 scaling and growth to buffer costs which could typically inhibit a company’s success. The SNAP program is partnered with some of Web3's most prolific names who are helping with project selection and qualification. ## SupraOracles community channels * [supraoracles.com](https://supraoracles.com) * [Docs](https://supraoracles.com/docs/overview) * [Telegram](https://t.me/SupraOracles) * [Twitter](https://twitter.com/SupraOracles) * [Discord](https://discord.gg/supraoracles) * [Youtube](https://www.youtube.com/SupraOfficial) --- // File: tools/Oracle Providers/supraoracles/vrf :::info testnet SupraOracles only supports [Chiado testnet](../../../about/networks/chiado.md). ::: ## What is a Verifiable Random Function (VRF)? Blockchain-based verifiable random functions (VRFs) enable the generation of numbers that are as good as random (pseudorandom), and can be (publicly) verified cryptographically. Pseudorandomness guarantees both unpredictability and fairness, whereas tamper-proofness is guaranteed by their public verifiability. Using a VRF for random number generation (RNG) is the gold standard for on-chain applications that require these properties, such as gaming operations, NFT-minting, lotteries, and randomized processes. More information about [Supra](https://supraoracles.com/) VRF can be found [here](https://supraoracles.com/docs/vrf1). ## How to use SupraOracles' VRF SupraOracles currently supports many Solidity/EVM-based networks, like Gnosis Chiado TestNet. To see all of the networks SupraOracles supports, please visit [SupraOracles' Networks](https://supraoracles.com/docs/vrf1/network-addresses) To get started, you will want to visit [SupraOracles' docs site](https://supraoracles.com/docs/vrf1) and review the documentation or continue to follow this guide for a quick start. ### Step 1: Create The Supra Router Contract Interface Add the following code to the requester contract i.e, the contract which uses VRF as a service. You can also add the code in a separate Interface and inherit the interface in the requester contract. ```solidity interface ISupraRouter { function generateRequest(string memory _functionSig , uint8 _rngCount, uint256 _numConfirmations) external returns(uint256); function generateRequest(string memory _functionSig , uint8 _rngCount, uint256 _numConfirmations, uint256 _clientSeed) external returns(uint256); } ``` This interface will help the requester contract interact with the Supra Router contract and through which the requester contract can use the VRF service. ### Step 2: Configure the Supra Router Contract Address Contracts that need random numbers should utilize the Supra Router Contract. In order to do that, they need to create an interface and bind it to the on-chain address of the Supra Router contract. For Gnosis Chiado TestNet, the address is: ``` 0xb2667190b753720188a4039dd2b6014f01e07fea ``` We’ll store the set the address within the constructor and use it later to interact with the interface. ```solidity contract ExampleContract { address supraAddr; constructor() { supraAddr = 0xb2667190b753720188a4039dd2b6014f01e07fea; } } ``` ### Step 3: Use the VRF service and request a Random Number In this step, we'll use the “generateRequest” function of the Supra Router Contract to create a request for random numbers. There are two modes for the "generateRequest" function. The only difference between them is that you can optionally provide a client-side input, which will also be part of the payload being threshold signed to provide randomness. * **_functionSig** - a string parameter, here the requester contract will have to pass the function signature which will receive the callback i.e., a random number from the Supra Router Contract. The function signature should be in the form of the function name following the parameters it accepts. We'll see an example later in the document. * **_rngCount** - an integer parameter, it is for the number of random numbers a particular requester wants to generate. Currently, we can generate a maximum of 255 random numbers per request. * **numConfirmations** - an integer parameter that specifies the number of block confirmations needed before supra VRF can generate the random number. * **_clientSeed** (optional) - an optional integer parameter that could be provided by the client (defaults to 0). This is for additional unpredictability. The source of the seed can be a UUID of 256 bits. This can also be from a centralized source. Supra's VRF process requires splitting the contract logic into two functions. * The request function - the signature of this function is up to the developer * The callback function - the signature must be of the form **“uint256 nonce, uint256[] calldata rngList”** ```solidity function exampleRNG() external { //Function validation and logic // requesting 10 random numbers uint8 rngCount = 10; // we want to wait for 1 confirmation before the request is considered complete/final uint256 numConfirmations = 1; uint256 generated_nonce = ISupraRouter(supraAddr).generateRequest(“exampleCallback(uint256,uint256[])”, rngCount, numConfirmations); // store generated_nonce if necessary (eg: in a hashmap) // this can be used to track parameters related to the request, such as user address, nft address etc in a lookup table // these can be accessed inside the callback since the response from supra will include the nonce } ``` ### Step 4 - Add the validation in the callback function of requester contract Inside the callback function where the requester contract wants the random number (in this example the callback function is exampleCallback), the requester contract will have to add the validation such that only the Supra router contract can call the function. The validation is necessary to protect against malicious contracts/users executing the callback with fake data. ```solidity function exampleCallback(uint256 _nonce ,uint256[] _rngList) external { require(msg.sender == supraAddr); // Following the required logic of the function } ``` ### Example Implementation In the example below, * The function getRNGForUser is using the VRF service by calling the generateRequest function of the Supra Router Contract. * Then we store the username of the user requesting the random number mapped to the nonce returned by generateRequest. * Then the callback function prints the random numbers requested by a specific user and it has the signature: myCallbackUsername(uint256 nonce, uint256[] calldata rngList) Once Supra generates the random number and it is verified by the on-chain logic to be authentic, myCallbackUsername is executed by the Supra Router, which completes the second half of the process. The nonce from the first argument is used to look up the username that originated the request. ```solidity // SPDX-License-Identifier: MIT pragma solidity ^0.8.0; interface ISupraRouter { function generateRequest(string memory _functionSig , uint8 _rngCount, uint256 _numConfirmations, uint256 _clientSeed) external returns(uint256); function generateRequest(string memory _functionSig , uint8 _rngCount, uint256 _numConfirmations) external returns(uint256); } contract Interaction { address supraAddr; constructor() { supraAddr = 0xb2667190b753720188a4039dd2b6014f01e07fea; } mapping (uint256 => string ) result; mapping (string => uint256[] ) rngForUser; function getRNGForUser(uint8 rngCount, string memory username) external { uint256 nonce = ISupraRouter(supraAddr).generateRequest("myCallbackUsername(uint256,uint256[])", rngCount, 1, 123); result[nonce] = username; } function myCallbackUsername(uint256 nonce, uint256[] calldata rngList) external { require(msg.sender == supraAddr, "only supra router can call this function"); uint8 i = 0; uint256[] memory x = new uint256[](rngList.length); rngForUser[result[nonce]] = x; for(i=0; i ``` https://rpc.gnosis.gateway.fm ``` ``` https://rpc.chiado.gnosis.gateway.fm ``` ## Gnosis Gnosis' Core Team provides a free "starter" RPC without any SLA or availability guarantees. We encourage projects and developers to work with professional RPC providers in the ecosystem, who are better equipped to serve their needs. ```shell # HTTP RPC https://rpc.gnosischain.com/ # WSS RPC wss://rpc.gnosischain.com/wss ``` ```shell # HTTP RPC https://rpc.chiadochain.net # WSS RPC wss://rpc.chiadochain.net/wss ``` ## Nodies DLB [Nodies DLB](https://nodies.app) offers free public endpoints for Gnosis Mainnet and Chiado (available on request), in addition to Pay-As-You-Go and enterprise plans that cater to the individual needs of developers. - [Docs](https://docs.nodies.app/) ``` https://lb.nodies.app/v1/406d8dcc043f4cb3959ed7d6673d311a ``` ## Ankr - [Ankr's Docs for Gnosis RPCs](https://www.ankr.com/protocol/public/gnosis/) ``` https://rpc.ankr.com/gnosis ``` ``` https://rpc.ankr.com/gnosis_testnet ``` ## Chainnodes Chainnodes provides low-latency archival nodes for Gnosis, including debug and trace APIs. Once signed up you can use your dedicated HTTP and Websocket RPC URL with high throughput for your production grade projects. - [Chainnodes](https://www.chainnodes.org/) - [Docs](https://www.chainnodes.org/docs) Free API keys after signing up. ## Quicknode - [Quicknode's Docs for Gnosis RPCs](https://www.quicknode.com/docs/gnosis) ## Chainstack - [Chainstack's Docs for Gnosis RPCs](https://chainstack.com/build-better-with-gnosis-chain/) ## POKT - [POKT's Docs for Gnosis Chain RPCs](https://docs.pokt.network/supported-blockchains/) ``` https://gnosis-pokt.nodies.app ``` ## Blast - [Blast's Docs for Gnosis RPCs](https://blastapi.io/public-api/gnosis) ```shell # HTTP RPC https://gnosis-mainnet.public.blastapi.io # WSS RPC wss://gnosis-mainnet.public.blastapi.io ``` ## GetBlock - [GetBlock's Docs for Gnosis Chain RPCs](https://getblock.io/nodes/gno/) ```shell # HTTP RPC https://go.getblock.io/ # WSS RPC wss://go.getblock.io/ ``` ## BlockPI Network - [BlockPI's Docs for Gnosis RPCs](https://docs.blockpi.io/documentations/api-reference/gnosis) ``` https://gnosis.blockpi.network/v1/rpc/ ``` ## Chain49 Free API keys available after signing up. Archive data for Mainnet and Chiado Testnet is available for paid subscriptions. - [Chain49.com](https://chain49.com/) - [Chain49 Docs for EVM-based chains](https://chain49.readme.io/reference/evm-based) ```shell # Gnosis Mainnet RPC https://rpc.chain49.com/gnosis/ # Gnosis Chiado Testnet RPC https://rpc.chain49.com/gnosis-chiado/ ``` ## OnFinality - [OnFinality](https://onfinality.io) - [OnFinality's Docs for Gnosis RPCs](https://onfinality.io/networks/gnosis) ``` https://gnosis.api.onfinality.io/public ``` --- // File: tools/User Onboarding/Readme # User Onboarding Web3 onboarding often faces challenges due to complex wallet setups, unfamiliarity with blockchain concepts, and intimidating security practices. To drive mainstream adoption, it’s crucial to offer intuitive solutions that reduce friction while maintaining security. Providing well thought out end-to-end wallet interaction flows is a key approach to make Web3 more accessible for everyday users. --- // File: tools/User Onboarding/reown # Reown (prev. known as WalletConnect) **[Reown](https://reown.com/?utm_source=gnosis&utm_medium=docs&utm_campaign=backlinks)** gives developers the tools to build user experiences that make digital ownership effortless, intuitive, and secure. Reown has two major product offerings, they are, **AppKit** and **WalletKit**. ## AppKit AppKit is a powerful, free, and fully open-source SDK for developers looking to integrate wallet connections and other Web3 functionalities into their apps on any EVM and non-EVM chain. In just a few simple steps, you can provide your users with seamless wallet access, one-click authentication, social logins, and notifications—streamlining their experience while enabling advanced features like on-ramp functionality, in-app token swaps and smart accounts. ## WalletKit WalletKit is a robust, open-source SDK designed to empower seamless wallet connections and interactions across any blockchain. With WalletKit, you can offer your users a simple and secure way to connect with thousands of apps, enabling features like one-click authentication, secure transaction signing, and streamlined wallet address verification. Its chain-agnostic design ensures effortless multi-chain support, eliminating the need for complex integrations while delivering unmatched connectivity and security. To summarize, **AppKit** is for **Web3 applications** and **WalletKit** is for **Web3 wallets**. You will be able to use Reown AppKit to power end-to-end wallet interactions on your Web3 app deployed on Gnosis. Some links to learn more about Reown: - [Website](https://reown.com/?utm_source=gnosis&utm_medium=docs&utm_campaign=backlinks) - [Blog](https://reown.com/blog?utm_source=gnosis&utm_medium=docs&utm_campaign=backlinks) - [Docs](https://docs.reown.com/?utm_source=gnosis&utm_medium=docs&utm_campaign=backlinks) --- // File: tools/token-distribution # Token Distribution Sending tokens to multiple receivers could be cumbersome. This section shows ways to send tokens to multiple addresses in batch. Various tools built by the community are available. ## Platforms Supporting Gnosis - [LinkDrop](https://linkdrop.io/): features SDK, mult-chain and multi-token support. - [Token MultiSender](https://multisender.app/): dev-focused & security minded interface. - [Iroiro](https://xdai.iroiro.social/): airdrops with lower fees, csv generation for bulk sends. - [AirdropMe](https://airdropme.io/): simple and free multi-chain airdrops. :::info Connect to Gnosis All the platforms above requires to [connect MetaMask to Gnosis](/tools/wallets/metamask/). ::: --- // File: tools/wallets/README # Wallets Wallets store private keys, keeping your crypto safe and accessible. They also allow to receive and send assets, some also to interact with smart contracts and dApps. :::caution Third-Party Wallets Do you own research while selecting your wallet, keep your seed and funds safely. For extra security, use [safe wallet](/tools/wallets/safe). ::: ## Gnosis Wallets Visit [Gnosis Wallets](https://gnosiswallets.com/) to find a wallet that fits your needs. Discover all supported Gnosis Chain wallets and search based on their unique features and compatibility. ## Software wallets - [Alpha Wallet](https://alphawallet.com/asset/the-best-wallet-for-xdai/) - [Ambire Wallet](https://www.ambire.com/) - [Coinbase Wallet](https://www.coinbase.com/wallet) - [DEX Wallet](https://www.dexwallet.io/) - [Enkrypt](https://www.enkrypt.com/?mtm_campaign=Gnosis%20Chain%20Wallet%20Wiki&mtm_kwd=Wiki) - [Frame](https://frame.sh/) - [Mt Pelerin](https://www.mtpelerin.com/bridge-wallet) - [MetaMask](/tools/wallets/metamask) - [Minerva Wallet](https://minerva.digital/) - [MyCrypto](https://app.mycrypto.com/) - [Nabox Wallet](https://nabox.io/) - [O3Labs](https://o3.network/) - [Pillar Wallet](https://www.pillar.fi/) - [Poketto Cash](https://poketto.cash/) - [Portis Wallet](https://wallet.portis.io/) - [Rabby Wallet](https://rabby.io/) - [TokenPocket](https://tokenpocket-gm.medium.com/how-to-add-xdai-chain-through-adding-custom-network-72d95597b017) - [Wallet3](https://wallet3.io/) ## Hardware Wallets - [D'CENT](/tools/wallets/dcent) - [Ledger](/tools/wallets/ledger) - [Trezor](/tools/wallets/trezor) --- // File: tools/wallets/dcent # D'CENT Get a D'CENT device in their [official website](https://www.dcentwallet.com). ## Guides - [Setup](https://userguide.dcentwallet.com/biometric-wallet/setting-up) - [How to add a custom token account](https://userguide.dcentwallet.com/mobile-app/create-account/how-to-add-a-custom-token-account) - [Connect with MetaMask](https://userguide.dcentwallet.com/external-service/qrbasedmetamask) --- // File: tools/wallets/ledger # Ledger Ledger is a hardware wallet, a device that stores the private keys to your cryptocurrency funds in a more secure manner, away from the internet. Even if you make transactions from it, the wallet confirms the transactions in an offline environment. This process helps keep your private keys away from the risks of the internet at all times. Get a device and learn more on the [Ledger Website](https://www.ledger.com/). ## Connecting with Gnosis There is not an "Gnosis" dedicated application, you will use the [Ethereum application](https://support.ledger.com/hc/en-us/articles/4404366864657-How-to-access-your-Ledger-Ethereum-ETH-account-via-MetaMask?docs=true) to interact with Gnosis through [MetaMask](/tools/wallets/metamask). Be sure your ledger firmware is updated and you have setup [Ledger Live](https://www.ledger.com/ledger-live/). If interacting with a contract (for example claiming tokens with a bridge transfer or conducting a token swap), you will need to enable blind signing. If you recently updated your hardware, you will need to re-enable. 1. Connect and unlock your Ledger device. 2. Open the **Ethereum (ETH)** application. 3. Press the right button to navigate to **Settings**. Then press both buttons to validate. Your Ledger device displays **Blind Signing**. 4. Press both buttons to enable transaction blind signing. The device displays **Enabled**. You're done. 5. Retry your transaction. For more help with Ledger, please see their [support docs.](https://support.ledger.com/hc/en-us/articles/4405481324433-Enable-blind-signing-in-the-Ethereum-ETH-app?docs=true) --- // File: tools/wallets/metamask/README # MetaMask [MetaMask](https://metamask.io/) is a web browser extension and mobile app that allows you to manage your Gnosis private keys. By doing so, it serves as a wallet for xDai, GNO and other tokens, and allows you to interact with decentralized applications, or dapps. :::info New to MetaMask? Read their article: [Getting started with MetaMask](https://metamask.zendesk.com/hc/en-us/articles/360015489531-Getting-started-with-MetaMask) ::: ## 1. Download The official [MetaMask Download](https://metamask.io/download/) page will detect your browser and link to the correct extension store. It supports Chrome, Firefox, Opera, Edge and Brave. It also has Android and iOS versions. ## 2. Configure After the installation, MetaMask require a configuration to work with Gnosis, follow one of the instructions: ### A. Quick configuration Use ChainList for a one-click configuration and follow the instructions. Click on this deeplink to auto-configure Gnosis in MetaMask and follow the instructions. Click on this deeplink to auto-configure Chiado Testnet in MetaMask and follow the instructions. ### B. Manual Configuration 1) Open MetaMask, and select **Custom RPC** from the Network Dropdown. ![](/img/tools/custom-rpc.png) 2) In the **Custom RPC** Settings, add in the Gnosis network details and click **Save**: ```jsx title="Network Name" Gnosis ``` ```jsx title="New RPC URL" https://rpc.gnosischain.com ``` ```jsx title="Chain ID" 100 ``` ```jsx title="Symbol" XDAI ``` ```jsx title="Block Explorer URL" https://gnosisscan.io ``` ```jsx title="Network Name" Chiado ``` ```jsx title="New RPC URL" https://rpc.chiadochain.net ``` ```jsx title="Chain ID" 10200 ``` ```jsx title="Symbol" Chiado XDAI ``` ```jsx title="Block Explorer URL" https://blockscout.com/gnosis/chiado ``` ## More configurations - [Add MetaMask programmatically in your dApp](/developers/interact/metamask) - [Add custom tokens](https://metamask.zendesk.com/hc/en-us/articles/360015489031-How-to-add-unlisted-tokens-custom-tokens-in-MetaMask) - [Change RPC URL](/tools/wallets/metamask/change-rpc-url) - [Using MetaMask with a Ledger or Trezor](https://metamask.zendesk.com/hc/en-us/articles/360020394612-How-to-connect-a-Trezor-or-Ledger-Hardware-Wallet) --- // File: tools/wallets/metamask/change-rpc-url # Change RPC URL 1) Open MetaMask, Click on your account and scroll down to settings. ![]() 2) Select Networks ![]() 3) Select your Gnosis instance ![](/img/tools/mm-3.png) 4) Update to a new RPC URL Choose a performant url from [Chainlist](https://chainlist.org/?search=gnosis). ![](/img/tools/mm-4.png) 5) Scroll down to Save MetaMask will now connect to the new RPC URL ![](/img/tools/mm-5.png) --- // File: tools/wallets/safe # Safe The most trusted platform to manage digital assets on Gnosis ## Safe on Gnosis * Safe Application: [https://app.safe.global/?chain=gno](https://app.safe.global/?chain=gno) * Safe Tutorials: [https://help.safe.global/en/](https://help.safe.global/en/) ## Connect a Wallet There are several options including [MetaMask](/tools/wallets/metamask), hardware wallets, and WalletConnect. WalletConnect allows you to use a 3rd party wallet on your mobile device. 1) Go to the [Safe application on Gnosis](https://app.safe.global/?chain=gno). Click Connect. ![]() 2) Choose your wallet. ![]() ### Connecting with MetaMask Select the MetaMask option in the connect wallet menu. Check that the correct MetaMask account is active and [connected to Safe](../wallets/metamask#b-manual-configuration). ![](/img/tools/safe/mm_connect.png) ### Connecting with WalletConnect Current WalletConnect functionality is limited to wallets that support Gnosis Chain. You can use MetaMask Mobile with WalletConnect if you have set up the [Gnosis custom RPC](/tools/wallets/metamask/#manual-configuration). If you choose to use WalletConnect, select the WalletConnect option in the connect wallet menu. Scan the QR code with your application and accept the message to connect in your mobile wallet. ![](/img/tools/safe/IMG_6490.png) ## Create A New Safe 1) Press **Continue with MetaMask**. ![](/img/tools/safe/safe1.png) 2) Name the Safe. This will be stored locally. Press **Next** to continue. ![](/img/tools/safe/safe2.png) 3) Add additional owners if wanted. For each additional owner: 1. Click Add new owner. 2. Give Owner a Name. 3. Enter Owner Address. 4. Select how many owners will be required to confirm a transaction. 5. Press Next. ![](/img/tools/safe/safe3.png) 4) Confirm the transaction. You will need a very small amount of xDai to confirm the tx. ![](/img/tools/safe/safe4.png) ## Deposit Assets When sending to your new Safe, make sure you are connected to Gnosis Chain, copy the Safe address, and process as you would any other Gnosis transaction. For more information, see this tutorial from Safe: [How can I receive assets?](https://help.safe.global/en/articles/40867-how-can-i-receive-assets) :::danger Safe Address The Safe deployed to Gnosis Chain is not present in Ethereum or other networks. So, the Safe address is not shared across chains. Be careful when sending assets, ensure you are doing it in the correct network. ::: ## Connect a DApp with WalletConnect You can connect to WalletConnect to interact with supported DApps using Safe. 1) Press the Button with the WalletConnect icon in the header. ![](/img/tools/safe/safewallet1.png) 2) Visit the application and connect to your wallet. This will differ based on the application (the DApp must be deployed on Gnosis Chain). Here we use Snapshot. ![](/img/tools/safe/safewallet2.png) ![Click on WalletConnect]() ![Copy the QR code as an image and save to your clipboard.](/img/tools/safe/safewallet4.png) 4) Return to Safe, paste the image into the Paste QR code field and click Approve. The DApp will now be connected, and you can use the Safe to confirm transactions. ![](/img/tools/safe/safewallet5.png) ![](/img/tools/safe/safewallet6.png) ## Need more help? [Safe Support Page](https://help.safe.global/en/) --- // File: tools/wallets/trezor # Trezor [Get your Trezor](https://trezor.io/#comparison) device to store your Gnosis assets securely. ## Connect to Gnosis Once connected to [Gnosis in MetaMask](/tools/wallets/metamask) and your Trezor wallet, you will be forwarded to the [https://suite.trezor.io/](https://suite.trezor.io/) interface to connect and complete transactions. ## More Guides - [Apps compatible with Trezor](https://wiki.trezor.io/User_manual:Trezor_Apps) - [Developers guide](https://wiki.trezor.io/Developers_guide) - [Supported coins & tokens](https://trezor.io/coins/) --- // File: tools/web3-name-sdk # Space ID Web3 Name Sdk Resolve web3 domain name or reverse resolve conventional address ## Overview​ The primary capabilities of the SDK include: - Domain Name Resolution: It resolves domain names to obtain essential information about the domain, including its associated conventional address, various records (such as avatars, IPFS links, social data), and metadata, etc. - Reverse Resolution: The SDK facilitates reverse address resolution. This feature makes it possible to determine the primary domain name associated with a given address, even across different blockchains or TLDs, returning Chain Primary Name or TLD Primary Name. ### Key Terminology TLD Primary Name: - Every address is able to set TLD Primary Name to configure a reverse resolution domain for each Top-Level Domain, regardless of whether it has been verified or not on SPACE ID. - Examples include setting "allen.eth" as TLD Primary Name for .eth, "allen.gno" for .gno, "allen.bnb" for .bnb. Chain Primary Name: - Each address is permitted to have only one unique Chain Primary Name for each blockchain or network. - Specifically, when multiple TLDs verified on a single chain exist, only one domain name can be chosen as such reverse resolution domain for that particular chain. - For instance, "allen.eth" could serve as Chain Primary Name for Ethereum, and "allen.gno" might function as the primary name for Gnosis Chain. By default, all EVM-based domain names are supported for domain resolution in the Web3 Name SDK. Reverse resolution returns a Chain Primary Name for each EVM chain. Project administrators have the flexibility to choose whether to integrate support for all or only specific chains and TLDs. They can also configure custom settings for reverse resolution as needed. This adaptability allows projects to tailor the SDK's functionality to their specific requirements. ## Get Started Developers can resolve web3 domain name or reverse resolve conventional address with Web3 Name SDK with zero configuration. ## Install `npm install @web3-name-sdk/core viem@^1.20` If you are using next.js, please add the following configuration in your next.config.js in order to transpile commonjs dependencies: ```typescript const nextConfig = { transpilePackages: ["@web3-name-sdk/core"], }; ``` ### 1. Setup client​ ```typescript import { createWeb3Name } from "@web3-name-sdk/core"; const web3Name = createWeb3Name(); ``` ### 2. Resolve a domain name​ You can get address from domain name with a single request: ```typescript const address = await web3name.getAddress("gnosis.gno"); const address = await web3name.getAddress("bts_official.lens"); const address = await web3name.getAddress("beresnev.crypto"); const address = await web3name.getAddress("registry.gno"); ``` ### 3. Resolve an address​ There are optional parameters in the method to select your target chain or TLD (top-level Domain). By providing chain IDs, you can resolve addresses on selected chains and get an available domain name from all TLDs deployed on these chains. ```typescript // Resolve an address from Gnosis Chain const name = await web3name.getDomainName({ address: "0x18ce5dc03a2bd7275ff5b69f76b76267ba7da9f4", queryChainIdList: [2818], }); // expect: goncalo.gno ``` By providing TLDs, address can be resolved from the selected TLDs and get an available TLD primary name. ```typescript // Resolve an address from .gno TLD const name = await web3name.getDomainName({ address: "0x18ce5dc03a2bd7275ff5b69f76b76267ba7da9f4", queryTldList: ["gno"], }); // expect: goncalo.gno ``` ### 4. Record Domain text records can be fetched by providing domain name and the key. For example, the avatar record of goncalo.gno is returned from this method given key name avatar: ```typescript const record = await web3Name.getDomainRecord({ name: "goncalo.gno", key: "avatar", }); ``` ### 5. Metadata​ Domain metadata can be fetched by SDK directly. ```typescript // requesting const metadata = await web3Name.getMetadata({ name: "public.gno" }); ```