Interactive Guide
Hey node runners, to provide a comprehensive guideline for both beginners and experienced node runners, we offer two paths for you to choose from for building your node: Interactive Guide and Step-by-Step.
Interactive Guide: By selecting the configurations below, you are given a general walk-through of setting up the node based on different Operating system, Network, Execution client and Consensus client. In the current version, CLI commands are given to run as system process. Recommended for experienced node runners.
Step-by-Step: A detailed flow on running a node. Options include running as system process and using docker. Recommended for beginners.
Select a configuration
- Operating system:
- Linux, MacOS, Arm64
- Windows
- Network:
- Gnosis
- Chiado
- Execution client:
- Nethermind
- Erigon
- Reth
- Geth
- Consensus client:
- Lighthouse
- Lodestar
- Teku
- Nimbus
Introduction
At a high level, we'll walk through the following flow:
- Configure an execution node using an execution-layer client.
- Configure a beacon node using a consensus-layer client.
- Configure a validator and stake GNO (optional).
Review prerequisites and best practices
| Node type | Benefits | Requirements |
|---|---|---|
| Execution + beacon |
| Check requirements section. |
| Validator | Lets you stake GNO, propose + validate blocks, earn staking rewards + transaction fee tips. |
|
Step 1: Configure Server
Check out all recommended steps to configure server
Create the following folder structure on your disk, the entire tutorial will assume it:
📂gnosis
├── 📂 jwtsecret/
├── 📂 execution/
└── 📂 consensus/
    ├── 📂 data/
    ├── 📂 keystores/
    └── 📂 validators/
mkdir gnosis && cd gnosis &&
mkdir jwtsecret && mkdir execution && mkdir consensus &&
cd consensus &&
mkdir data && mkdir keystores && mkdir validators &&
cd ..
- JWT
- IPC
Generate JWT Secret
The HTTP connection between your beacon node and execution node needs to be authenticated using a JWT token.
Use a utility like OpenSSL to create the token via command:
openssl rand -hex 32 | tr -d "\n" > "./jwtsecret/jwt.hex"
Other ways to generate the jwt.hex file
- Use an execution or consensus client to generate the
./jwtsecret/jwt.hexfile (check their documentation). - Use an online generator like this. Copy and paste this value into a
./jwtsecret/jwt.hexfile.
For options (1) and (3), create the file by running:
echo 'PLACE_HERE_YOUR_TOKEN' > ./jwtsecret/jwt.hex
Place the jwt.hex file in the jwtsecret folder, so it can be referenced in the next steps as ../jwtsecret/jwt.hex for the consensus and execution clients.
Step 2: Run an Execution client
In this step, you'll install an execution-layer client that the consensus-layer node will connect to.
- Nethermind
- Erigon
- Reth
- Geth
- Gnosis
- Chiado
- Linux, MacOS, Arm64
- Windows
-
Install dependencies
sudo apt-get update && sudo apt-get install libsnappy-dev libc6-dev libc6 unzip -y -
Copy the download link for Linux, MacOS or Arm64 package from the Nethermind download page.
-
Download Nethermind
wget [URL_FROM_PREVIOUS_STEP] -
Unzip the downloaded file
unzip [FILE_NAME] -d execution -
Get into the folder
cd execution -
Execute Nethermind
./nethermind \
    --config gnosis \
    --JsonRpc.Enabled true \
    --HealthChecks.Enabled true \
    --HealthChecks.UIEnabled true \
    --JsonRpc.EnginePort=8551 \
    --JsonRpc.JwtSecretFile=../jwtsecret/jwt.hex
-
Download the Windows package from the Nethermind download page.
-
Unzip the file in the
executionfolder created in the previous step. -
Navigate to the
executionfoldercd execution -
Run the following command:
./nethermind \
    --config gnosis \
    --JsonRpc.Enabled true \
    --HealthChecks.Enabled true \
    --HealthChecks.UIEnabled true \
    --JsonRpc.EnginePort=8551 \
    --JsonRpc.JwtSecretFile=../jwtsecret/jwt.hex
- Linux, MacOS, Arm64
- Windows
-
Install dependencies
sudo apt-get update && sudo apt-get install libsnappy-dev libc6-dev libc6 libicu-dev unzip wget openssl git -y -
Copy the download link for Linux, MacOS or Arm64 package from the Nethermind download page.
-
Download Nethermind
wget [URL_FROM_PREVIOUS_STEP] -
Unzip the downloaded file
unzip [FILE_NAME] -d execution -
Get into the folder
cd execution -
Execute Nethermind
./nethermind \
    --config chiado \
    --JsonRpc.Enabled true \
    --HealthChecks.Enabled true \
    --HealthChecks.UIEnabled true \
    --JsonRpc.EnginePort=8551 \
    --JsonRpc.JwtSecretFile=../jwtsecret/jwt.hex
-
Download the Windows package from the Nethermind download page.
-
Unzip the file in the
executionfolder created in the previous step. -
Navigate to the
executionfoldercd execution -
Run the following command:
./nethermind \
    --config chiado \
    --JsonRpc.Enabled true \
    --HealthChecks.Enabled true \
    --HealthChecks.UIEnabled true \
    --JsonRpc.EnginePort=8551 \
    --JsonRpc.JwtSecretFile=../jwtsecret/jwt.hex
- Gnosis
- Chiado
- Linux, MacOS, Arm64
- Windows
- Install and build Erigon.
cd execution
git clone https://github.com/erigontech/erigon.git
cd erigon
make erigon
- Run Erigon
./build/bin/erigon \
    --chain=gnosis \
    --datadir=/data \
    --authrpc.jwtsecret=../../jwtsecret/jwt.hex
- Erigon uses
--prune.mode=fullby default. If you need archive data or minimal disk usage, set--prune.mode=archiveor--prune.mode=minimalbefore the first start.
- Install and build Erigon.
cd execution
git clone https://github.com/erigontech/erigon.git
cd erigon
make erigon
- Run Erigon
./build/bin/erigon \
    --chain=gnosis \
    --datadir=/data \
    --authrpc.jwtsecret=../../jwtsecret/jwt.hex
- Linux, MacOS, Arm64
- Windows
- Install and build Erigon.
cd execution
git clone https://github.com/erigontech/erigon.git
cd erigon
make erigon
- Run Erigon
./build/bin/erigon \
    --chain=chiado \
    --datadir=/data \
    --authrpc.jwtsecret=../../jwtsecret/jwt.hex
- Install and build Erigon.
cd execution
git clone https://github.com/erigontech/erigon.git
cd erigon
make erigon
- Run Erigon
./build/bin/erigon \
    --chain=chiado \
    --datadir=/data \
    --authrpc.jwtsecret=../../jwtsecret/jwt.hex
Install prerequisites first: git, a recent Rust toolchain, and common native build tools (clang, cmake, pkg-config).
- Gnosis
- Chiado
- Linux, MacOS, Arm64
- Windows
- Install and build Reth for Gnosis.
cd execution
git clone https://github.com/gnosischain/reth_gnosis.git
cd reth_gnosis
cargo build --release
- Run Reth.
./target/release/reth node \
    --chain gnosis \
    --datadir=/data \
    --http \
    --http.addr=0.0.0.0 \
    --http.port=8545 \
    --http.api=admin,net,eth,web3,debug,trace \
    --authrpc.addr=127.0.0.1 \
    --authrpc.port=8551 \
    --authrpc.jwtsecret=../../jwtsecret/jwt.hex \
    --discovery.addr=0.0.0.0 \
    --discovery.port=30303
For Windows, use WSL and run the same commands from the WSL terminal.
- Install and build Reth for Gnosis.
cd execution
git clone https://github.com/gnosischain/reth_gnosis.git
cd reth_gnosis
cargo build --release
- Run Reth.
./target/release/reth node \
    --chain gnosis \
    --datadir=/data \
    --http \
    --http.addr=0.0.0.0 \
    --http.port=8545 \
    --http.api=admin,net,eth,web3,debug,trace \
    --authrpc.addr=127.0.0.1 \
    --authrpc.port=8551 \
    --authrpc.jwtsecret=../../jwtsecret/jwt.hex \
    --discovery.addr=0.0.0.0 \
    --discovery.port=30303
- Linux, MacOS, Arm64
- Windows
- Install and build Reth for Gnosis.
cd execution
git clone https://github.com/gnosischain/reth_gnosis.git
cd reth_gnosis
cargo build --release
- Run Reth.
./target/release/reth node \
    --chain chiado \
    --datadir=/data \
    --http \
    --http.addr=0.0.0.0 \
    --http.port=8545 \
    --http.api=admin,net,eth,web3,debug,trace \
    --authrpc.addr=127.0.0.1 \
    --authrpc.port=8551 \
    --authrpc.jwtsecret=../../jwtsecret/jwt.hex \
    --discovery.addr=0.0.0.0 \
    --discovery.port=30303
For Windows, use WSL and run the same commands from the WSL terminal.
- Install and build Reth for Gnosis.
cd execution
git clone https://github.com/gnosischain/reth_gnosis.git
cd reth_gnosis
cargo build --release
- Run Reth.
./target/release/reth node \
    --chain chiado \
    --datadir=/data \
    --http \
    --http.addr=0.0.0.0 \
    --http.port=8545 \
    --http.api=admin,net,eth,web3,debug,trace \
    --authrpc.addr=127.0.0.1 \
    --authrpc.port=8551 \
    --authrpc.jwtsecret=../../jwtsecret/jwt.hex \
    --discovery.addr=0.0.0.0 \
    --discovery.port=30303
On first startup, Reth initializes from the network-specific bootstrap state. Keep the process running until synchronization starts.
Install prerequisites first: git, make, and a recent Go toolchain.
- Gnosis
- Chiado
- Linux, MacOS, Arm64
- Windows
- Install and build Gnosis Geth.
cd execution
git clone https://github.com/gnosischain/go-ethereum.git
cd go-ethereum
make geth
- Run Geth.
./build/bin/geth \
    --gnosis \
    --datadir=/data \
    --http \
    --http.addr=0.0.0.0 \
    --http.port=8545 \
    --http.api=eth,net,web3 \
    --authrpc.addr=127.0.0.1 \
    --authrpc.port=8551 \
    --authrpc.jwtsecret=../../jwtsecret/jwt.hex
For Windows, use WSL and run the same commands from the WSL terminal.
- Install and build Gnosis Geth.
cd execution
git clone https://github.com/gnosischain/go-ethereum.git
cd go-ethereum
make geth
- Run Geth.
./build/bin/geth \
    --gnosis \
    --datadir=/data \
    --http \
    --http.addr=0.0.0.0 \
    --http.port=8545 \
    --http.api=eth,net,web3 \
    --authrpc.addr=127.0.0.1 \
    --authrpc.port=8551 \
    --authrpc.jwtsecret=../../jwtsecret/jwt.hex
- Linux, MacOS, Arm64
- Windows
- Install and build Gnosis Geth.
cd execution
git clone https://github.com/gnosischain/go-ethereum.git
cd go-ethereum
make geth
- Run Geth.
./build/bin/geth \
    --chiado \
    --datadir=/data \
    --http \
    --http.addr=0.0.0.0 \
    --http.port=8545 \
    --http.api=eth,net,web3 \
    --authrpc.addr=127.0.0.1 \
    --authrpc.port=8551 \
    --authrpc.jwtsecret=../../jwtsecret/jwt.hex
For Windows, use WSL and run the same commands from the WSL terminal.
- Install and build Gnosis Geth.
cd execution
git clone https://github.com/gnosischain/go-ethereum.git
cd go-ethereum
make geth
- Run Geth.
./build/bin/geth \
    --chiado \
    --datadir=/data \
    --http \
    --http.addr=0.0.0.0 \
    --http.port=8545 \
    --http.api=eth,net,web3 \
    --authrpc.addr=127.0.0.1 \
    --authrpc.port=8551 \
    --authrpc.jwtsecret=../../jwtsecret/jwt.hex
Step 3: Run a Beacon Node
- Lighthouse
- Lodestar
- Teku
- Nimbus
- Gnosis
- Chiado
- Linux, MacOS, Arm64
- Windows
-
Go to the Lighthouse releases page and copy the URL of the latest release for your OS/architecture.
-
Download the
lighthouse-<VERSION>-<ARCH>.tar.gzbinary.wget [URL_FROM_PREVIOUS_STEP] -
Extract the downloaded file.
tar -xvf [FILE_NAME] --directory consensus -
Get into the folder.
cd consensus -
Execute Lighthouse beacon node.
./lighthouse beacon_node \
  --network gnosis \
  --datadir=data \
  --http \
  --execution-endpoint=http://localhost:8551 \
  --execution-jwt=../jwtsecret/jwt.hex \
  --checkpoint-sync-url=https://checkpoint.gnosischain.com
Lighthouse only runs on Linux. To run it on Windows, install Linux on Windows with WSL, and follow the same steps in the WSL terminal.
- Linux, MacOS, Arm64
- Windows
-
Go to the Lighthouse releases page and copy the URL of the latest release for your OS/architecture.
-
Download the
lighthouse-<VERSION>-<ARCH>.tar.gzbinary.wget [URL_FROM_PREVIOUS_STEP] -
Extract the downloaded file.
tar -xvf [FILE_NAME] --directory consensus -
Get into the folder.
cd consensus -
Run Lighthouse beacon node.
./lighthouse beacon_node \
  --network chiado \
  --datadir=data \
  --execution-endpoint=http://localhost:8551 \
  --execution-jwt=../jwtsecret/jwt.hex \
  --checkpoint-sync-url=https://checkpoint.chiadochain.net
Lighthouse only runs on Linux. To run it on Windows, install Linux on Windows with WSL, and follow the same steps in the WSL terminal.
- Gnosis
- Chiado
- Linux, MacOS, Arm64
- Windows
-
Download Lodestar from the official release page and extract it in your
consensusdirectory. -
Run Lodestar beacon node.
./lodestar beacon \
  --network=gnosis \
  --dataDir=./data \
  --execution.urls=http://localhost:8551 \
  --jwtSecret=../jwtsecret/jwt.hex \
  --metrics=true \
  --metrics.port=8008 \
  --checkpointSyncUrl=https://checkpoint.gnosischain.com
Lodestar supports Windows, but for consistency with the rest of this guide we recommend WSL.
Run the same command from the WSL terminal.
- Linux, MacOS, Arm64
- Windows
Use the same setup as Gnosis and replace:
--network=gnosiswith--network=chiado--checkpointSyncUrl=https://checkpoint.gnosischain.comwith--checkpointSyncUrl=https://checkpoint.chiadochain.net
Use the same setup as Gnosis and replace:
--network=gnosiswith--network=chiado--checkpointSyncUrl=https://checkpoint.gnosischain.comwith--checkpointSyncUrl=https://checkpoint.chiadochain.net
- Gnosis
- Chiado
- Linux, MacOS, Arm64
- Windows
Prerequisites
- Java runtime compatible with the current Teku release. See Teku system requirements.
Install and Run
-
Go to the Teku release page and copy the URL for your OS/architecture under Downloads.
-
Download the Teku archive.
wget [URL_FROM_PREVIOUS_STEP] -
Extract the downloaded file under the
consensusdirectory.tar -xvf [FILE_NAME].tar.gz --directory consensus -
Get into the Teku folder.
cd consensus && cd teku-[VERSION]
Check that Teku is installed correctly:
./bin/teku --help
You can run both beacon and validator with a single command. If you want this mode, continue to Step 4: Run a validator.
- Execute beacon node (optional):
./bin/teku \
    --network=gnosis \
    --ee-endpoint=http://localhost:8551 \
    --ee-jwt-secret-file=../jwtsecret/jwt.hex \
    --metrics-enabled=true \
    --rest-api-enabled=true \
    --checkpoint-sync-url=https://checkpoint.gnosischain.com
You can also use --initial-state if you already have a checkpoint state file.
Prerequisites
- Java runtime compatible with the current Teku release. See Teku system requirements.
- Microsoft Visual C++ 2010 security update
Install and Run
- Go to the Teku release page and copy the URL for your OS/architecture under Downloads.
- Download and extract Teku in your
consensusdirectory. - Run the same beacon command shown above from your Windows shell (or from WSL).
- Linux, MacOS, Arm64
- Windows
Use the same setup as Gnosis and replace:
--network=gnosiswith--network=chiado--checkpoint-sync-url=https://checkpoint.gnosischain.comwith--checkpoint-sync-url=https://checkpoint.chiadochain.net
Use the same setup as Gnosis and replace:
--network=gnosiswith--network=chiado--checkpoint-sync-url=https://checkpoint.gnosischain.comwith--checkpoint-sync-url=https://checkpoint.chiadochain.net
- Gnosis
- Chiado
- Linux, MacOS, Arm64
- Windows
-
Download Nimbus from the official release page and extract it in your
consensusdirectory. -
Run Nimbus beacon node.
./nimbus_beacon_node \
    --network=gnosis \
    --data-dir=./data \
    --el=http://127.0.0.1:8551 \
    --jwt-secret=../jwtsecret/jwt.hex
Nimbus can run validator duties in the beacon node process. Once your beacon node is synced, continue to Step 4: Run a validator to import your keys and restart Nimbus with a fee recipient.
-
Download the Windows archive from the official release page and extract it in your
consensusdirectory. -
Run the same beacon node command from PowerShell, replacing
./nimbus_beacon_nodewith./nimbus_beacon_node.exe.
- Linux, MacOS, Arm64
- Windows
Use the same setup as Gnosis and replace:
--network=gnosiswith--network=chiado
Use the same setup as Gnosis and replace:
--network=gnosiswith--network=chiado./nimbus_beacon_nodewith./nimbus_beacon_node.exe
Step 4: Run a Validator
- Gnosis
- Chiado
Step 4a: Generate Validator Keys
We highly recommend generating keystores on a safe, completely offline device.
Securely backup your mnemonic, keystores, and password and keep them in a safe place.
Learn more about keys and withdrawal credentials.
- Linux, MacOS, Arm64
- Windows
-
Copy the download link for Linux, MacOS or Arm64 package from the ETHstaker Deposit CLI.
-
Download the Validator Data Generation tool
wget [URL_FROM_PREVIOUS_STEP] -
Unzip the downloaded file
tar -xvf [FILE_NAME] -
Get into the folder
cd deposit-cli-... -
Execute Validator Data Generation tool and follow the instructions. In case of doubts, check the tool documentation.
Tip: add the
--eth1_withdrawal_addressflag when creating your keys, pointing to an address you control.-
If you want to generate a new mnemonic:
./deposit new-mnemonic --folder ../consensus/keystores -
If you already have a mnemonic generated:
./deposit existing-mnemonic --folder ../consensus/keystoresYou will be asked for a
mnemonicandindex(key number).
-
-
Download the Windows version of the ETHstaker Deposit CLI from the releases page.
-
Execute Validator Data Generation tool and follow the instructions. In case of doubts, check the tool documentation
-
If you want to generate a new mnemonic:
deposit.exe new-mnemonic --folder ../consensus/keystores -
If you already have a mnemonic generated:
deposit.exe existing-mnemonic --folder ../consensus/keystoresYou will be asked for a
mnemonicandindex(key number).
-
- Select the language of the UI and mnemonic.
- Choose the number of validators. Remember: 1 GNO = 1 validator. You can run many validators in the same machine.
- Gnosis
- Chiado
gnosis on the network/chain name.chiado on the network/chain name.- Create a password to encrypt the keys.
- The mnemonic (seed phrase) will show on screen. Save it in a secure place (ideally offline).
- Type your mnemonic to confirm in the tool.
- Wait until the keys are created. Two types of files will be generated:
deposit_data-*.json- One
keystore-*.jsonper validator
- Save the location of the generated keys, and copy them in a backup USB memory or any other secure storage.
For custom setup and more instructions, check the ETHstaker Deposit CLI documentation.
Step 4b: Run a Validator
- Lighthouse
- Lodestar
- Nimbus
- Teku
- Linux, MacOS, Arm64
- Windows
Lighthouse only runs on Linux. To run it on Windows, install Linux on Windows with WSL, and follow the instructions in the WSL terminal.
- Gnosis
- Chiado
To run a validator, we need to first import the keys generated in the previous step.
- In a new command line window, navigate to the
consensusfolder and execute Lighthouse validator client - To ease the import process, we will create a
password.txtfile containing the password used to encrypt the validator keys.
echo 'PLACE_HERE_YOUR_PASSWORD' > keystores/password.txt
- Import the validator keys using lighthouse:
./lighthouse account validator import \
    --network gnosis \
    --password-file keystores/password.txt \
    --reuse-password \
    --directory keystores \
    --datadir validators
- Start your lighthouse validator:
./lighthouse validator_client \
    --network gnosis \
    --datadir validators \
    --enable-doppelganger-protection \
    --suggested-fee-recipient="0x0" \
    --metrics \
    --metrics-address=0.0.0.0 \
    --metrics-port=5064 \
    --graffiti "gnosis-docs-graffiti"
Replace suggested-fee-recipient with your Gnosis address. This fee recipient address will receive tips from user transactions from the block the validator proposed. If not set, the tips will be sent to zero address, that is burnt completely. It is strongly recommended that you configure this value in your setup.
Learn more about suggested fee recipient flag in Lighthouse docs.
Replace graffiti with your own graffiti. It is an optional field that can be used to add a message to the block by the proposer.
- Linux, MacOS, Arm64
- Windows
Lodestar supports Windows, but for consistency with the rest of this guide we recommend WSL.
- Gnosis
- Chiado
To run a validator, we need to first import the keys generated in the previous step.
- In a new command line window, navigate to the
consensusfolder and execute Lodestar validator client - To ease the import process, we will create a
password.txtfile containing the password used to decrypt the validator keys.
echo 'PLACE_HERE_YOUR_PASSWORD' > keystores/password.txt
You can import the keys when starting the validator.
- Import the validator keys using Lodestar:
./lodestar validator \
    --network=gnosis \
    --importKeystores=keystores \
    --importKeystoresPassword=keystores/password.txt \
    --dataDir=validators \
    --suggestedFeeRecipient=${FEE_RECIPIENT} \
    --graffiti=${GRAFFITI}
Replace suggestedFeeRecipient with your Gnosis address. This fee recipient address will receive tips from user transactions from the block the validator proposed. If not set, the tips will be sent to zero address, that is burnt completely. It is strongly recommended that you configure this value in your setup.
Learn more about suggestedFeeRecipient flag in Lodestar docs.
Replace graffiti with your own graffiti. It is an optional field that can be used to add a message to the block by the proposer.
- Linux, MacOS, Arm64
- Windows
Nimbus supports Windows natively. Run the same commands from PowerShell, replacing ./nimbus_beacon_node with ./nimbus_beacon_node.exe.
- Gnosis
- Chiado
Nimbus runs validator duties in the beacon node process, so there is no separate validator client to launch in the interactive guide.
-
Stop the beacon node if it is still running.
-
Import the validator keys generated in the previous step:
./nimbus_beacon_node deposits import \
    --data-dir=./data \
    ./keystores
Nimbus will print Keystore imported for each imported validator key.
- Restart Nimbus beacon node with your execution client connection and validator settings:
./nimbus_beacon_node \
    --network=gnosis \
    --data-dir=./data \
    --el=http://127.0.0.1:8551 \
    --jwt-secret=../jwtsecret/jwt.hex \
    --suggested-fee-recipient=${FEE_RECIPIENT} \
    --graffiti=${GRAFFITI}
Replace suggested-fee-recipient with your Gnosis address. This fee recipient address will receive tips from user transactions from the block the validator proposed. If not set, the tips will be sent to zero address, that is burnt completely. It is strongly recommended that you configure this value in your setup.
Learn more about suggested fee recipient flag in Nimbus docs.
Replace graffiti with your own graffiti. It is an optional field that can be used to add a message to the block by the proposer.
To confirm the validator keys were loaded, look for Local validator attached in the Nimbus logs after restart.
- Linux, MacOS, Arm64
- Windows
If you're using Windows, please Install Linux on Windows with WSL, and follow the instructions on the WSL terminal.
- Gnosis
- Chiado
To run a validator, we need to first import the keys generated in the previous step.
- In a new command line window, navigate to the
consensusfolder and execute Teku validator client - To ease the import process, we will create a password txt file containing the password used to encrypt the validator keys.
echo 'PLACE_HERE_YOUR_PASSWORD' > keystores/keystore-${m_...}.json.txt
If the Launchpad creates a key named keystore-m_12381_3600_0_0_0-1596485378.json, then the password file must be named keystore-m_12381_3600_0_0_0-1596485378.txt to comply with EIP-2335
You can import the keys when starting the validator.
- Navigate to the Teku folder.
cd teku-[VERSION]
- Execute Teku Beacon Chain and Validator(s):
./bin/teku   \
  --network=gnosis \
  --ee-endpoint=http://localhost:8551   \
  --ee-jwt-secret-file=${PATH_TO_JWT_SECRET} \
  --metrics-enabled=true    \
  --rest-api-enabled=true   \
  --checkpoint-sync-url=https://checkpoint.gnosischain.com \
  --validators-proposer-default-fee-recipient=${FEE_RECIPIENT}  \
  --validator-keys=${KEYS_DIR}:${PASSWORDS_DIR} \
  --validators-graffiti=${GRAFFITI}
If you wish to run validator only, run the following command:
./bin/teku validator-client \
  --network=gnosis \
  --beacon-node-api-endpoint=${BEACON_NODE_API_ENDPOINT} \
  --validator-keys=${KEYS_DIR}:${PASSWORDS_DIR}
Replace validators-proposer-default-fee-recipient with your Gnosis address. This fee recipient address will receive tips from user transactions from the block the validator proposed. If not set, the tips will be sent to zero address, that is burnt completely. It is strongly recommended that you configure this value in your setup.
Learn more about validators-proposer-default-fee-recipient flag in Teku docs.
Replace validator-keys with the location where keystores- *.json and keystore- *.txt are stored, and beacon-node-api-endpoint with the endpoint of the beacon node’s REST API (default is http://127.0.0.1:5051).
Replace validators-graffiti with your own graffiti. It is an optional field that can be used to add a message to the block by the proposer.
Learn more about the CLI commands and their options here.
Step 4c: Fund your validator
Follow the instructions in the Fund Validator page.
Available options:
Step 4d: Verify Validator
After depositing and starting your validator, your validator will go through a process of becoming active.
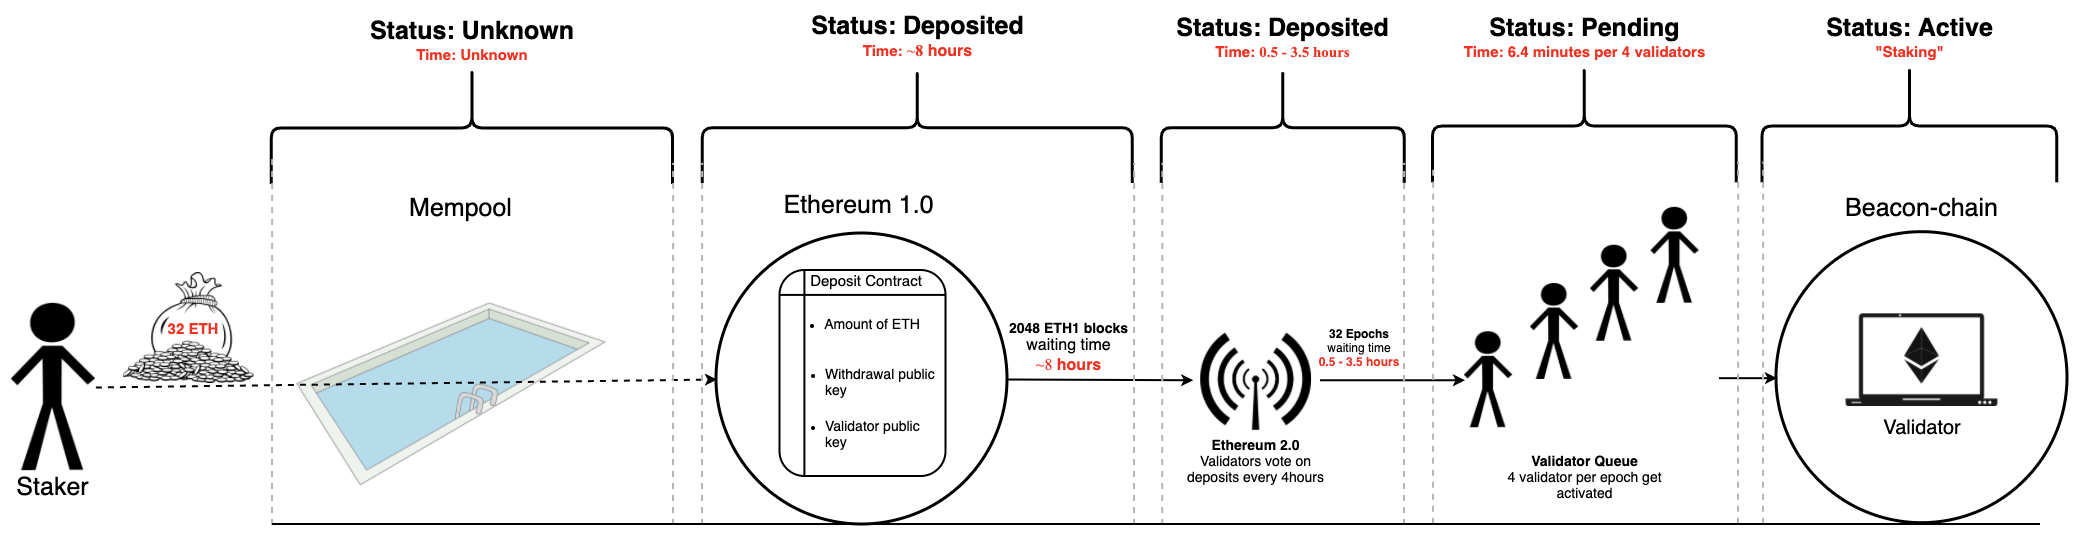 Image: Process of Validator Activation
You can verify the status of your validators following these steps:
- Navigate to the deposit tool and click on the
Validator Statustab.
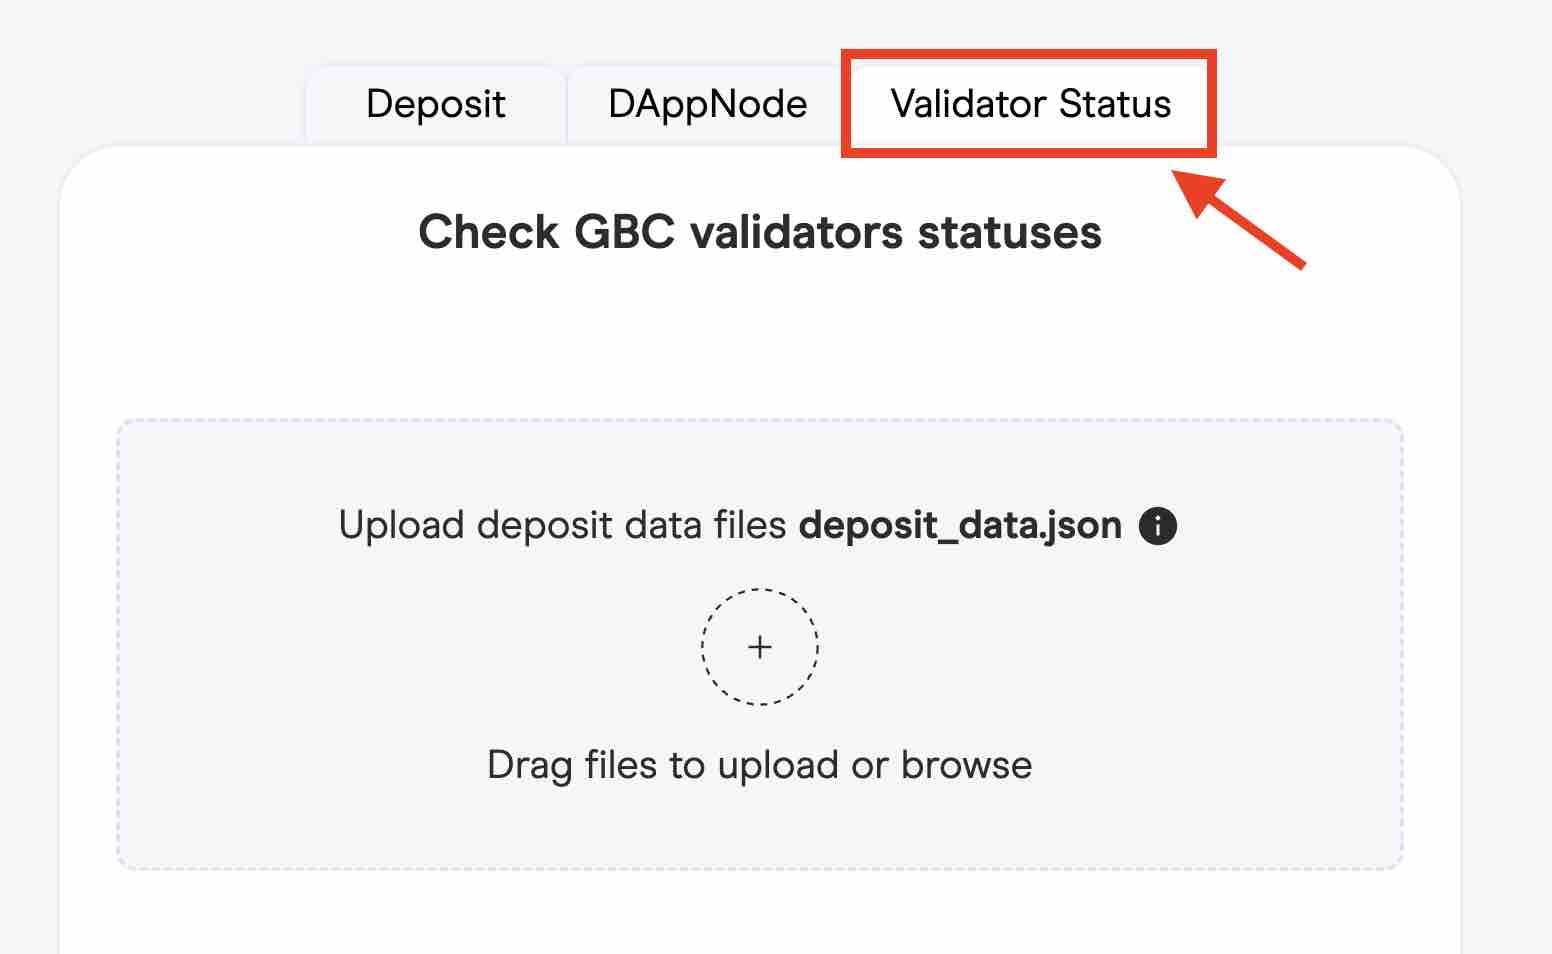
- Upload your
deposit_data.jsonfile used during the deposit step.
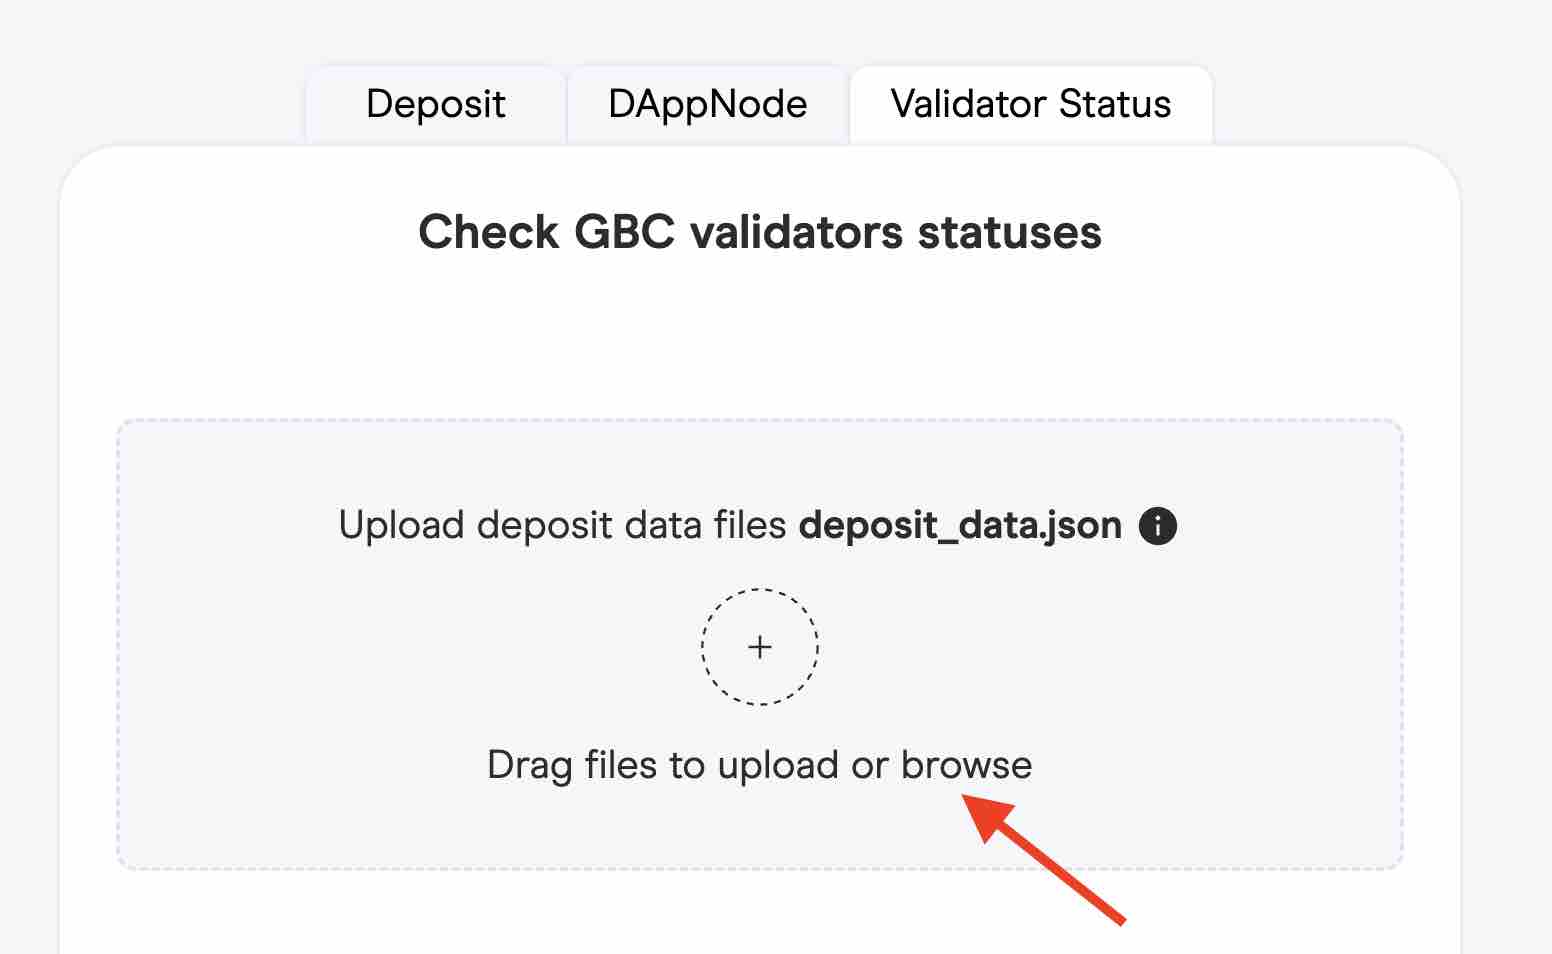
- Check the status of all your validators included in the
deposit_data.jsonfile.

- Optionally, click on the
import all validators into the Beacon Chain Explorer Dashboardto see detailed status of your validators.
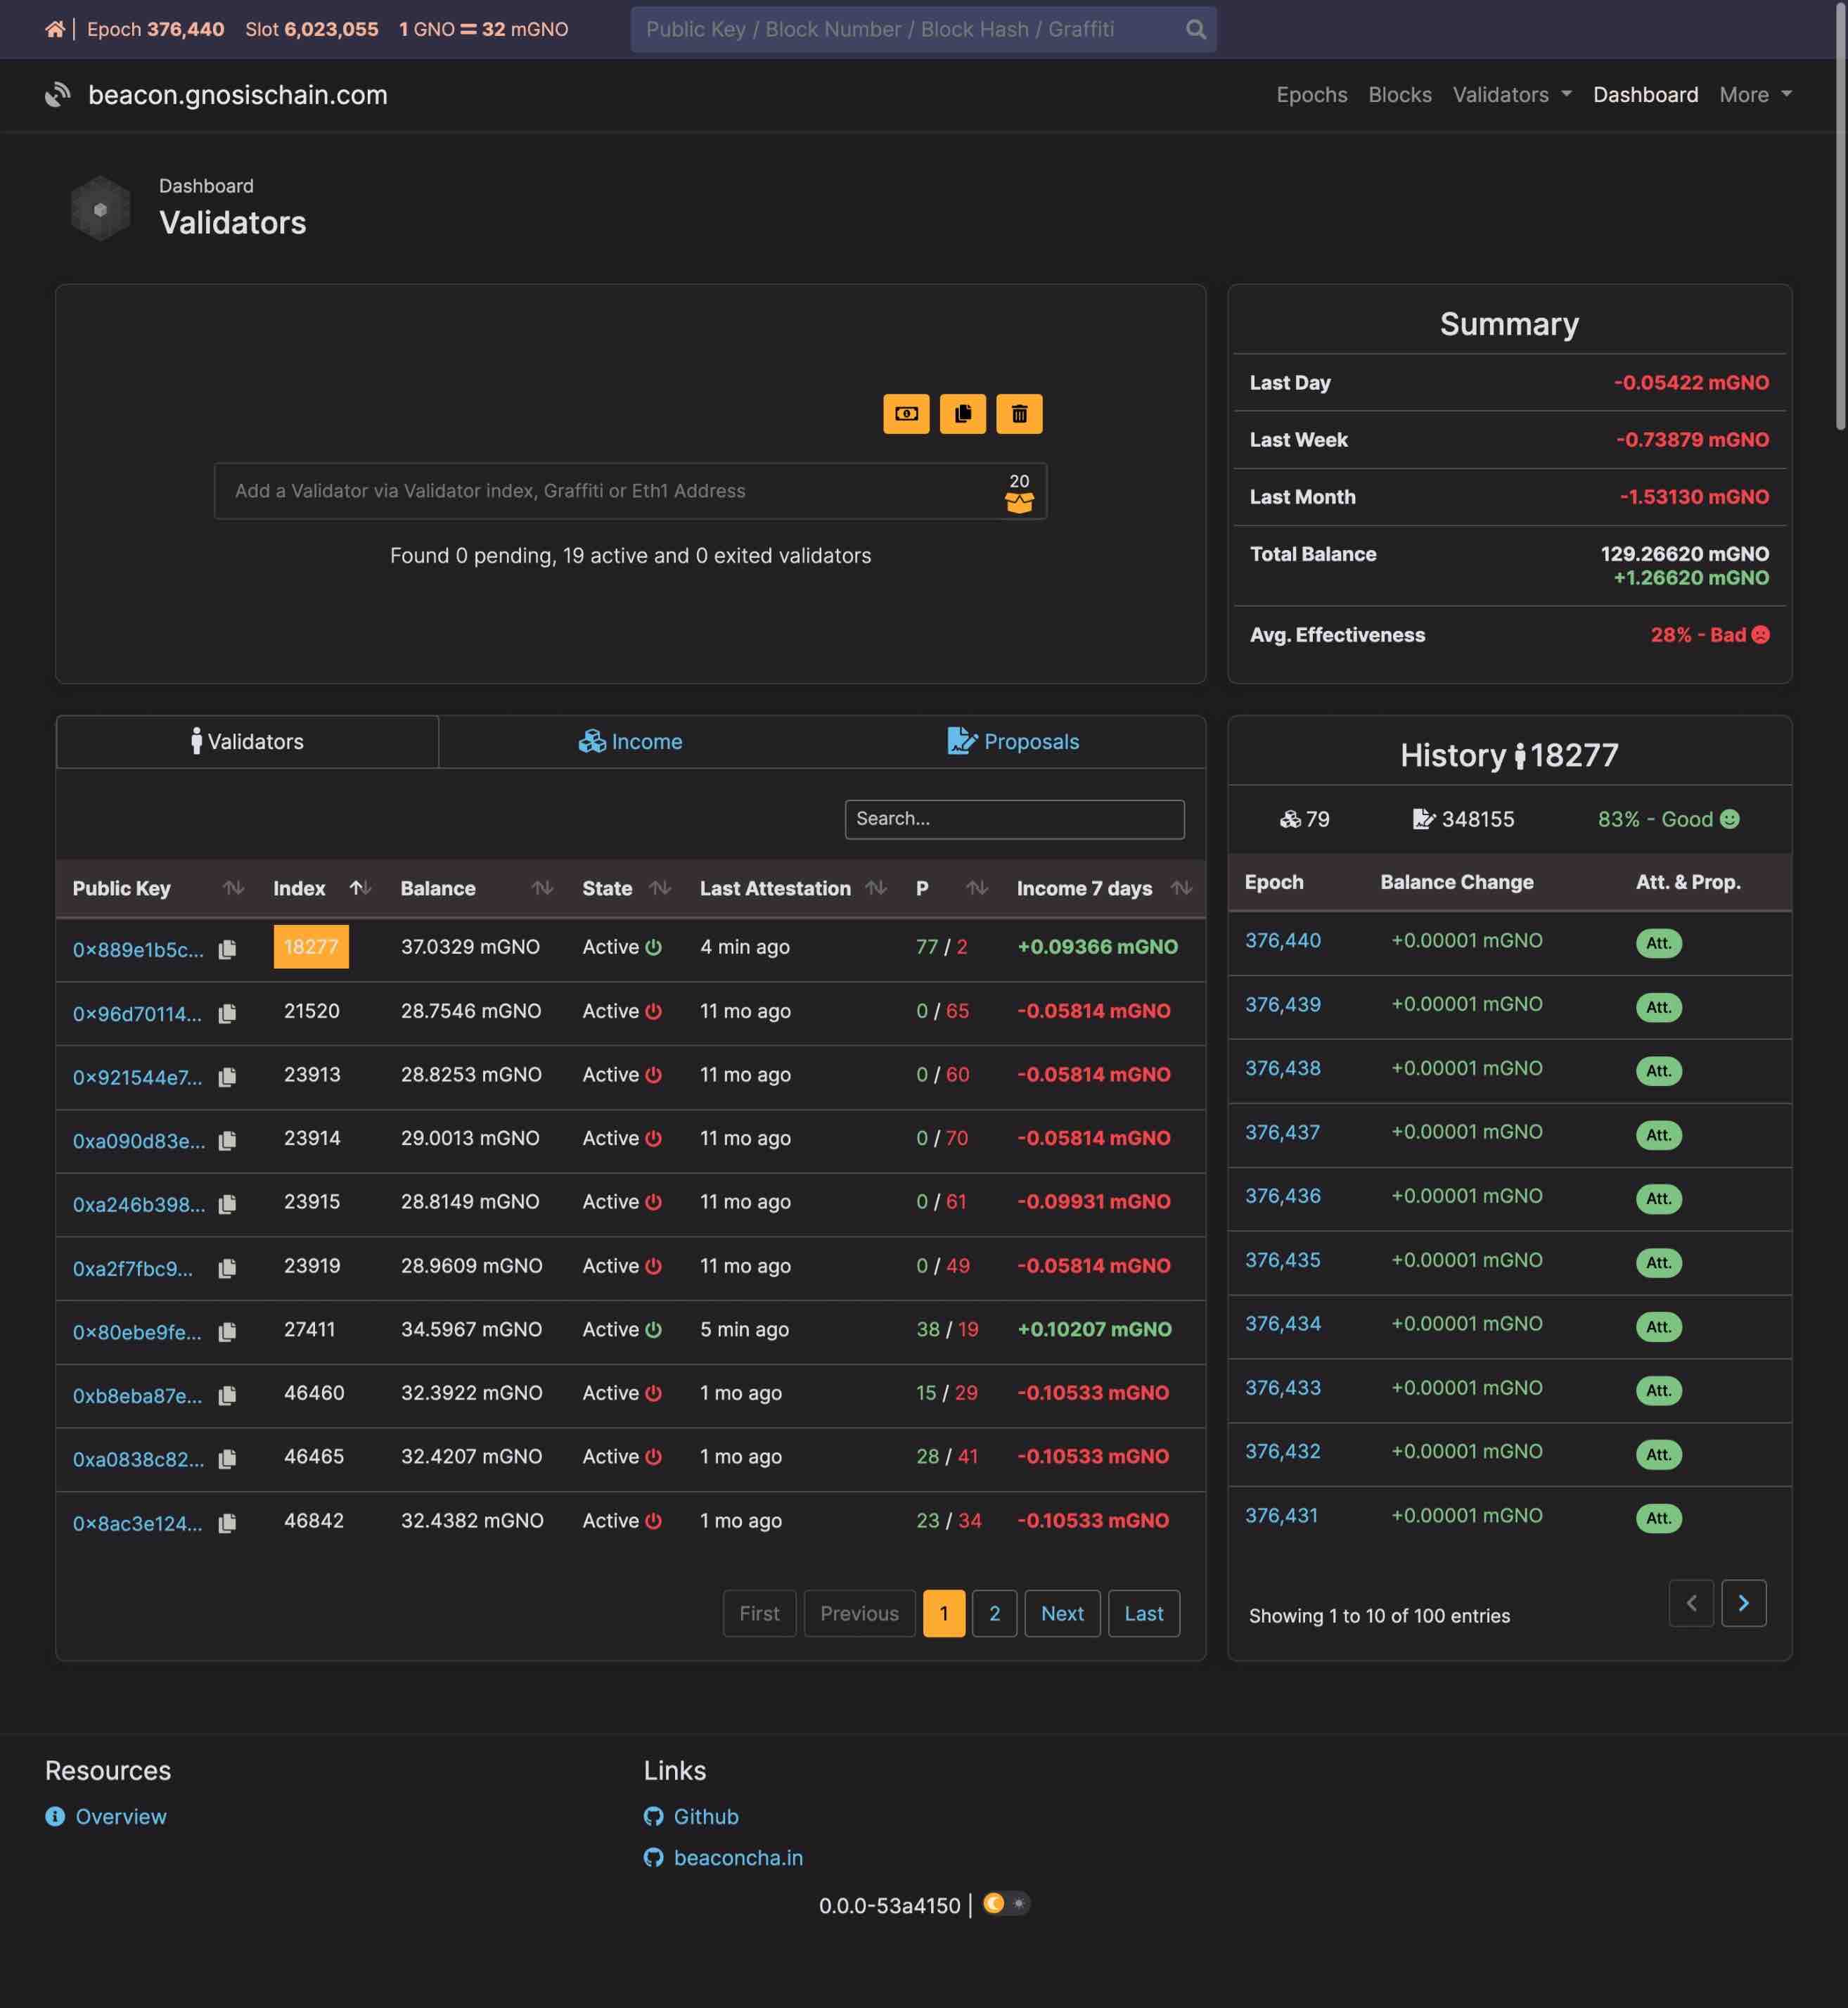
- The Gnosis Beacon chain explorer is a fork of the Ethereum Beaconcha.in explorer.
See more about the validator statuses and Deposit Process in the Beaconcha.in Knowledge Base.
Chiado testnet does not support public participation yet.
Step 4 is omitted.